

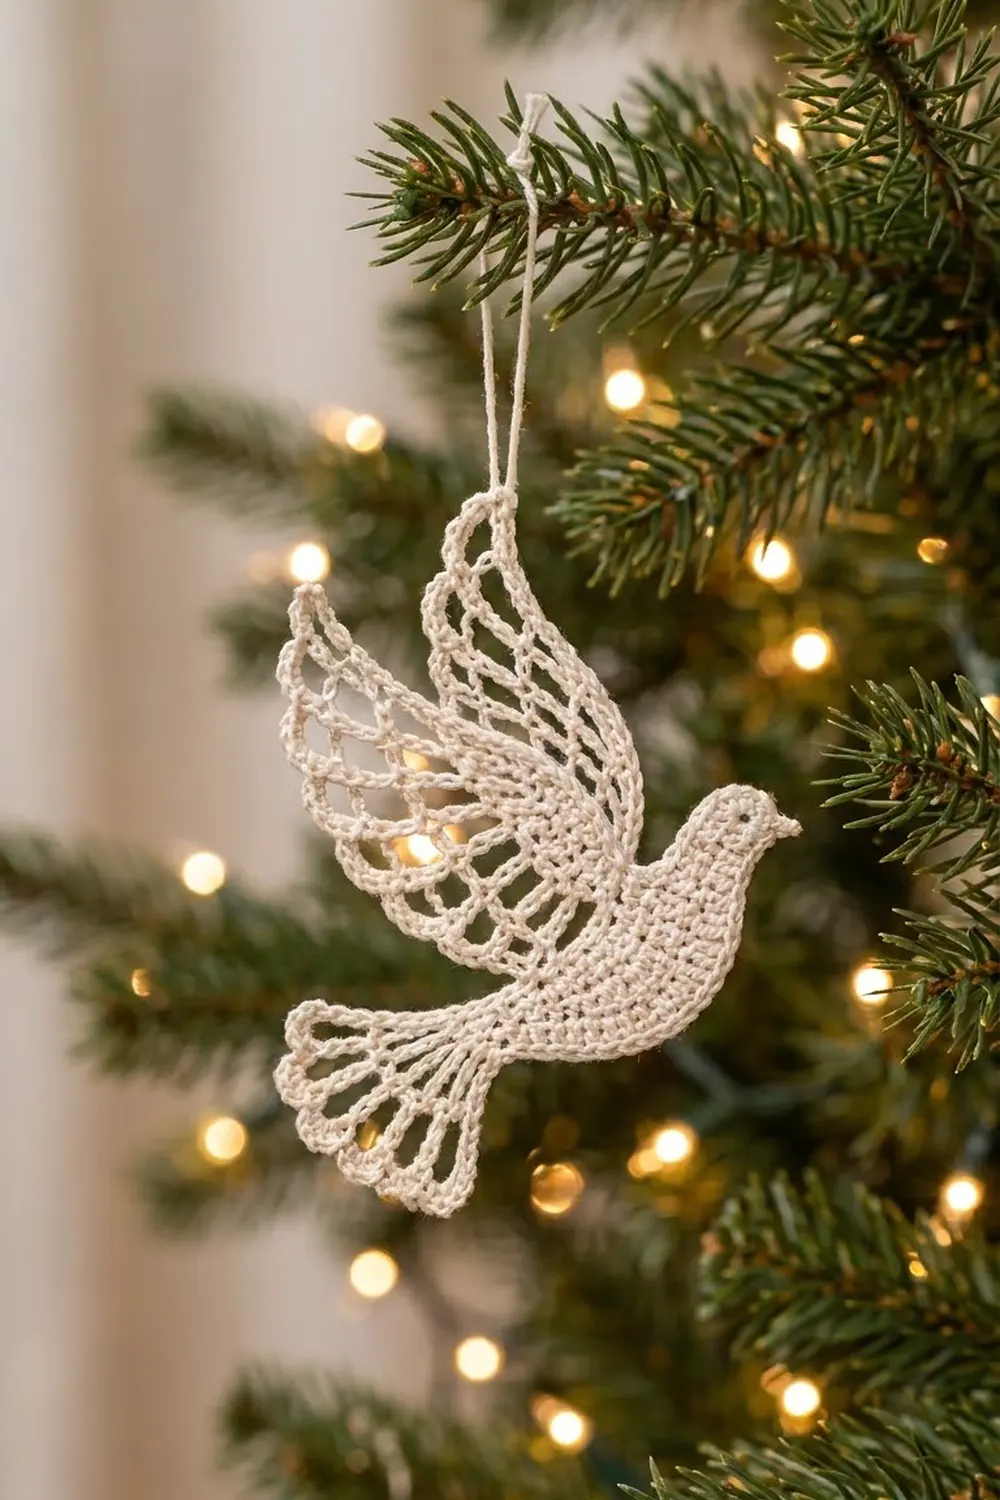
This thread-lace dove is a calm, classic ornament for the tree. The body is solid and smooth, and the wings and tail open into airy chain-loop feathers with crisp single crochet outlines. Light from the tree shows through the lace, so the dove looks light and delicate when it hangs.
The design uses one color, a soft cream or ivory cotton thread. Plain white, natural, or a pale metallic-blend thread also work. Starching it a little keeps the feathers open and sharp.
The pattern uses US crochet terms. The finished dove is about 4 in (10.2 cm) wide and 4.5 in (11.4 cm) tall, not counting the hanging loop. The loop adds about 1.25 in (3.2 cm).
You first make a solid oval body in four rounds, with the eye and beak built in. Then you work two lace wings and a fan tail in rows directly off the body’s edge. A final outline row on each wing and on the tail is the border. The dove is one piece, with no sewing.
Finished Size and Construction
- Finished size: 4 in (10.2 cm) wide x 4.5 in (11.4 cm) tall, plus the hanging loop
- Skill level: Intermediate (fine thread, chain-loop lace)
- Terminology: US crochet terms
- Yarn weight: Size 10 cotton crochet thread (lace weight, category 0)
- Hook: 1.75 mm steel hook (often labeled US steel 6)
- Number of pieces: 1
- Layout: Body horizontal with the head pointing right; wings rising up and to the left; tail sweeping down and to the left
- Piece size: Body alone is 3.25 in (8.3 cm) long x 1.25 in (3.2 cm) tall
- Size before border: About 3.75 in (9.5 cm) wide x 4 in (10.2 cm) tall
- Border depth: About 0.25 in (0.6 cm) outline on wings and tail
Materials
Thread: Use mercerized size 10 cotton. It holds starch well, and the stitches stay crisp. Avoid fuzzy or very soft threads, because the feather loops will droop and lose their shape.
- Cream/ivory: 5 g, about 15 m (16 yd), per dove
Tools:
– 1.75 mm steel crochet hook
– Fine tapestry needle
– Small sharp scissors
– Blocking mat or foam board
– Rust-proof pins
– Spray starch or fabric stiffener
– Stitch marker (optional)
The thread amount includes a margin of about 50% for your gauge swatch and weaving in ends. One standard ball of size 10 thread will make many doves.
Abbreviations (US Terms)
- ch – chain
- sl st – slip stitch
- sc – single crochet
- hdc – half double crochet
- dc – double crochet
- st(s) – stitch(es)
- sp – space
- lp(s) – loop(s)
- rep – repeat
- RS / WS – right side / wrong side
Special stitch – Beak Point: Ch 3, sc in 2nd ch from hook, hdc in next ch. This makes a small triangle that points outward. It is not counted as a stitch.
Gauge and Checkpoints
Gauge: 18 sc = 2 in (5.1 cm), and 10 rows of sc = 1 in (2.5 cm), with a 1.75 mm hook.
Make one full dove before you make a set. A lace ornament is quick to make, and the first dove is your real gauge test.
Checkpoints:
– After Body Round 1: 2.75 in (7.0 cm) long
– After Body Round 3: 3 in (7.6 cm) long x 1 in (2.5 cm) tall
– After Body Round 4: 3.25 in (8.3 cm) long x 1.25 in (3.2 cm) tall
– Back wing before outline: 1.75 in (4.4 cm) from the body edge to the loop tips
– Front wing before outline: 2.25 in (5.7 cm) from the body edge to the loop tips
– Tail before outline: 1 in (2.5 cm) from the body edge
– Whole dove after outline and blocking: 4 in (10.2 cm) x 4.5 in (11.4 cm)
A difference of up to 0.25 in (0.6 cm) is fine.
Too big? Change to a 1.5 mm hook, or chain more firmly. Loose chain loops are the usual cause.
Too small? Change to a 2.0 mm hook.
Body
The body is worked in joined rounds around a foundation chain. Do not turn between rounds.
Round 1: Ch 26. Sc in 2nd ch from hook, sc in next 23 ch, 3 sc in last ch (head end). Working along the opposite side of the chain, sc in next 23 ch, 2 sc in last ch (the same ch as the first sc). Sl st to the first sc to join. (52 sc)
Stitches 25–27 are the head end. Stitches 51, 52 and 1 are the tail end.
Round 2: Ch 1, 2 sc in first st, sc in next 23 sts. For the head: 2 sc in next st, (sc, ch 1, sc) in next st (this ch-1 is the eye), 2 sc in next st. Sc in next 23 sts, 2 sc in each of last 2 sts. Join. (58 sc; the ch-1 eye sp is not counted)
Check: 2 + 23 + 6 + 23 + 4 = 58.
Round 2 positions: tail 1–2, top 3–25, head 26–31, bottom 32–54, tail 55–58.
Round 3 (shaping): Ch 1, sc in first 17 sts (tail and back), hdc in next 8 sts (rising neck), 2 dc in each of next 6 sts (head, 12 dc), hdc in next 8 sts (breast), dc in next 8 sts (full belly), hdc in next 7 sts, sc in last 4 sts. Join. (64 sts)
Do not work into the eye sp; skip over it so it stays open as an eyelet.
Check: 17 + 8 + 12 + 8 + 8 + 7 + 4 = 64.
Round 4 (body edge and beak): Ch 1, sc in first 31 sts, work a Beak Point, sc in each of the remaining 33 sts. Join and fasten off. (64 sc, plus the beak)
The beak sits at the center front of the head, between stitches 31 and 32. Round 4 positions match Round 3: 1–17 top/back, 18–25 neck, 26–37 head, 38–60 underside, 61–64 tail end.
Lay the body with the head pointing right and the top (stitches 1–25) facing up. Both faces look the same, so use the neater one as the front.
Back Wing
Rows are worked back and forth off the body’s top edge. Turn at the end of every row.
Row 1 (RS): Join thread with a sl st in Round 4 st 6, ch 1, sc in the same st and next 4 sts. Turn. (5 sc)
Row 2: Ch 1, sc in first sc, (ch 5, sc in next sc) 4 times. Turn. (5 sc, 4 ch-5 lps)
Row 3: Ch 1, (sc, ch 6, sc) in first lp, ch 6, (sc, ch 6, sc) in next lp; rep from * 2 more times. Turn. (8 sc, 7 ch-6 lps)*
Check: 4 loops inside the old loops + 3 loops between them = 7.
Row 4: Ch 1, sc in first lp, (ch 8, sc in next lp) 6 times. Turn. (7 sc, 6 ch-8 lps)
These long loops are the feathers. Leave the thread attached for the outline in the Border section.
Front Wing
Skip Round 4 st 11 so there is a little space between the wings.
Row 1 (RS): Join thread with a sl st in Round 4 st 12, ch 1, sc in the same st and next 5 sts (sts 12–17). Turn. (6 sc)
Row 2: Ch 1, sc in first sc, (ch 5, sc in next sc) 5 times. Turn. (6 sc, 5 ch-5 lps)
Row 3: Ch 1, (sc, ch 6, sc) in first lp, ch 6, (sc, ch 6, sc) in next lp; rep from * 3 more times. Turn. (10 sc, 9 ch-6 lps)*
Check: 5 + 4 = 9 loops.
Row 4: Ch 1, sc in first lp, (ch 9, sc in next lp) 8 times. Turn. (9 sc, 8 ch-9 lps)
Leave the thread attached.
Tail
Row 1 (RS): Join thread with a sl st in Round 4 st 61, ch 1, sc in the same st and next 5 sts (sts 61, 62, 63, 64, 1, 2). Turn. (6 sc)
Row 2: Ch 1, sc in first sc, (ch 4, sc in next sc) 5 times. Turn. (6 sc, 5 ch-4 lps)
Row 3: Ch 1, sc in first sc, ch 7, (sc in next ch-4 lp, ch 7) 5 times, sc in last sc. Turn. (7 sc, 6 ch-7 lps)
Leave the thread attached.
Border (Feather Outlines)
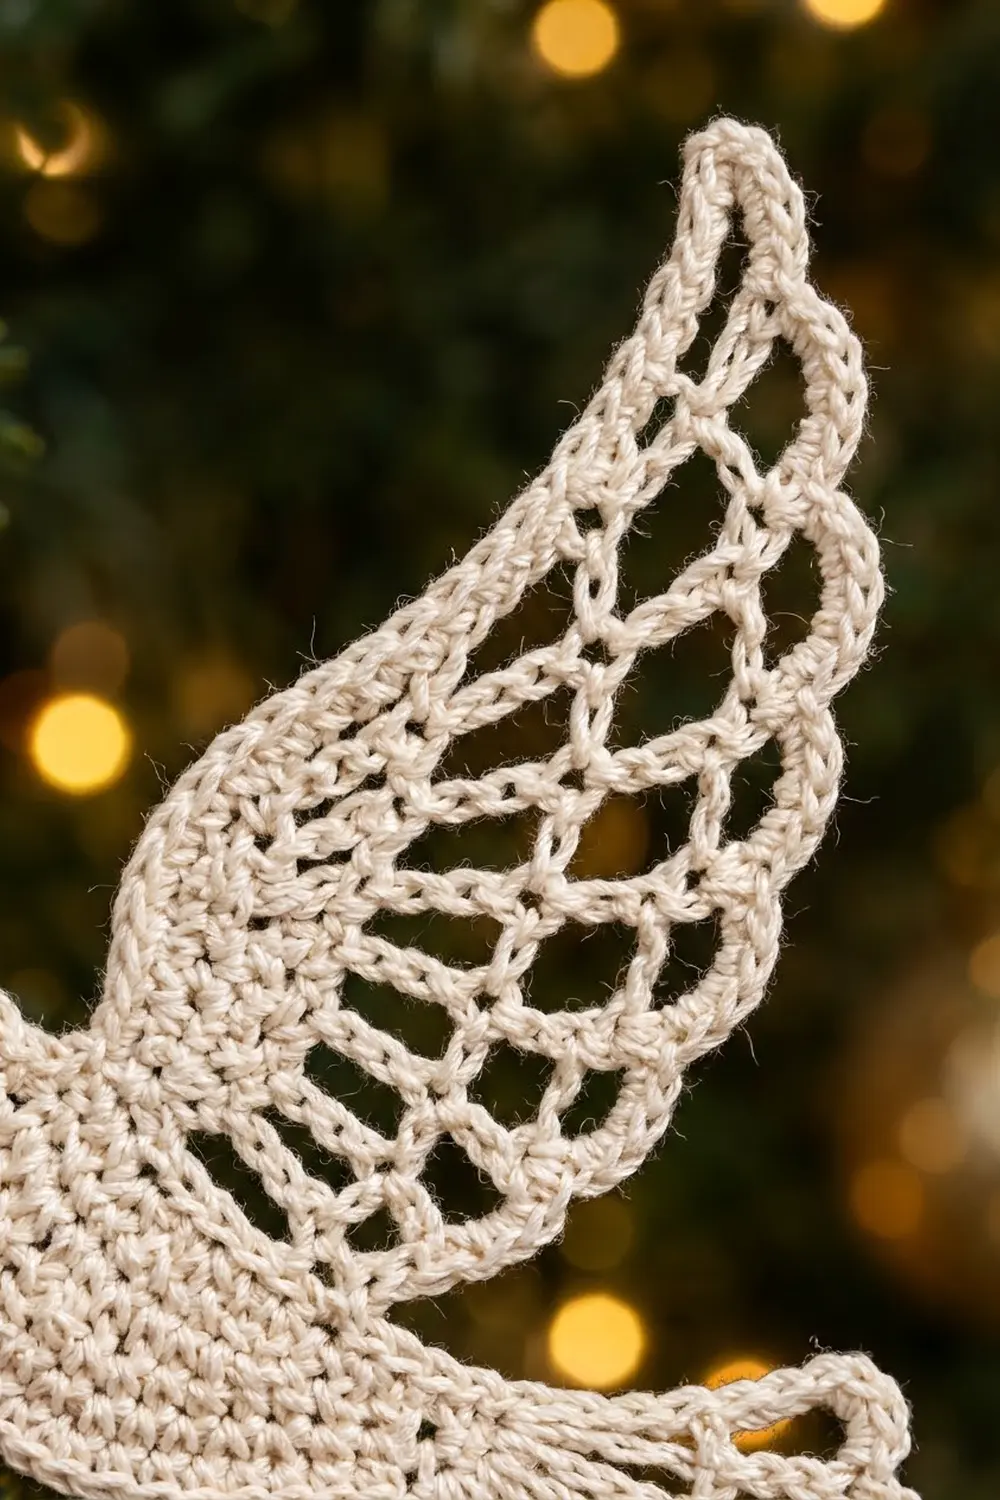
The border is a dense outline of sc packed into each long loop. It turns a plain chain into a thick, rounded feather edge, as in the photo. Work it on each lace section in turn, continuing from the thread you left attached.
Border gauge: About 1.2–1.3 sc per chain in each loop. That is enough to cover the chain completely and curve it into a smooth scallop. With fewer stitches the loop stays thin and gappy. With more, the edge ruffles.
Back Wing Row 5 (outline): Ch 1, sc in first sc, (10 sc in next ch-8 lp, sc in next sc) 6 times. Fasten off.
Count: (6 lps x 10 sc) + (7 sc worked 1 per existing sc) = 67 sc.
Front Wing Row 5 (outline and hanging loop): Ch 1, sc in first sc, (12 sc in next ch-9 lp, sc in next sc) 7 times. In the last lp: 6 sc, ch 30, sl st in the last sc made (hanging loop), 6 sc. Sc in the last sc. Fasten off.
Count: (8 lps x 12 sc) + (9 sc worked 1 per existing sc) = 105 sc. The hanging loop is not counted.
Tail Row 4 (outline): Ch 1, sc in first sc, (9 sc in next ch-7 lp, sc in next sc) 6 times. Fasten off.
Count: (6 lps x 9 sc) + (7 sc worked 1 per existing sc) = 61 sc.
Why the math works:
– Back wing: 10 sc over 8 ch = 1.25 per chain.
– Front wing: 12 over 9 = 1.33. This is a little denser, so the longer top feathers stay firm and can carry the ornament’s weight from the loop.
– Tail: 9 over 7 = 1.29.
All three are in the same 1.2–1.3 range, so every feather has the same thick, even outline. The single sc between loops keeps the feathers separate, giving the scalloped look.
The outline adds about 0.25 in (0.6 cm) to each edge. That takes the dove from 3.75 in (9.5 cm) x 4 in (10.2 cm) to 4 in (10.2 cm) x 4.5 in (11.4 cm).
The 30-chain loop folds to about 1.25 in (3.2 cm). Weave in all ends inside the solid body stitches, where they won’t show.
Final Blocking
- Wet the dove in cool water and press out the water in a towel. Do not wring it.
- Lay it on the blocking mat with the head pointing right.
- Pin the body first. Pin it into a smooth teardrop 3.25 in (8.3 cm) long, with a rounded head and the beak pointing straight forward.
- Angle the back wing up and to the left, so its loop tips are about 1.75 in (4.4 cm) from the body edge plus the outline.
- Pin the front wing upward, slightly overlapping the back wing. Put its tip, where the hanging loop is, at the highest point.
- Fan the tail down and to the left. Pin each of the 6 feathers open with one pin at its tip.
- Put a pin through every wing feather tip, spreading the loops evenly.
- Check the overall size: 4 in (10.2 cm) x 4.5 in (11.4 cm).
- Spray with starch, or brush on diluted stiffener, and let it dry completely before unpinning.
Final Quality-Control Checklist
- Body Round 4 has 64 sc, and the beak sits between stitches 31 and 32.
- The eye eyelet is open and clearly visible.
- The back wing outline has 67 sc, the front wing 105 sc, and the tail 61 sc.
- Every loop is fully covered with sc, with no bare chain showing.
- The wings do not overlap the head, and there is a 1-stitch gap between them.
- The hanging loop is secure and lets the dove hang level.
- All ends are woven into the solid body.
- The dried dove holds its shape when you lift it by the loop.
Troubleshooting
Body cups or curls: Your tension is too tight on Round 3. Loosen up, or use a 2.0 mm hook for the body only.
Head looks flat: Make sure you worked 2 dc in each of the 6 head stitches (12 dc), not single dc.
Eye hole closed up: You probably worked into the ch-1 sp in Round 3. Skip it.
Feathers ruffle: Too many sc per loop, or chains that are too tight. Count your chains, and keep the outline counts exactly as written.
Feathers look gappy: The chains are too loose. Chain more firmly, or add 1 sc per loop as long as it stays flat.
Dove hangs crooked: Move the hanging loop one stitch toward the body, or block the front wing more upright.
Care
Hand wash gently in cool water, re-block, and starch again as needed. Store flat in tissue paper so the feathers don’t crush.
Final Notes
Your gauge (18 sc = 2 in / 5.1 cm) gives a body 3.25 in (8.3 cm) long. The mesh wings and tail bring the dove to 3.75 in (9.5 cm) x 4 in (10.2 cm). The 0.25 in (0.6 cm) outline brings it to the finished 4 in (10.2 cm) x 4.5 in (11.4 cm). Check each stage, block carefully, and every dove you make will match the first.
Happy crocheting!