

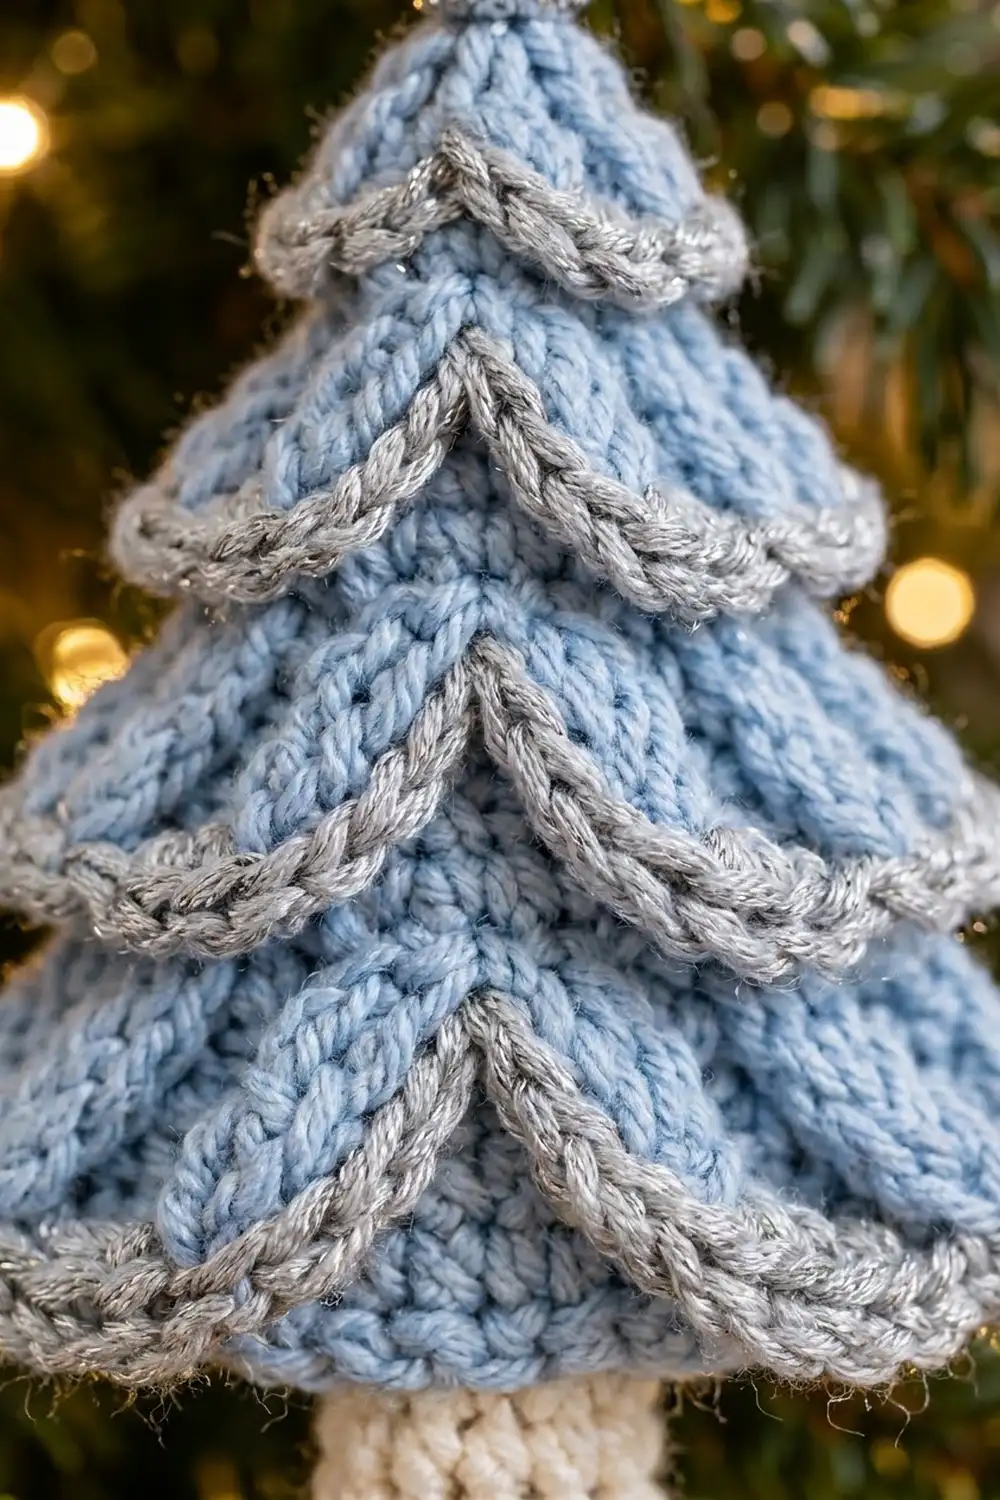
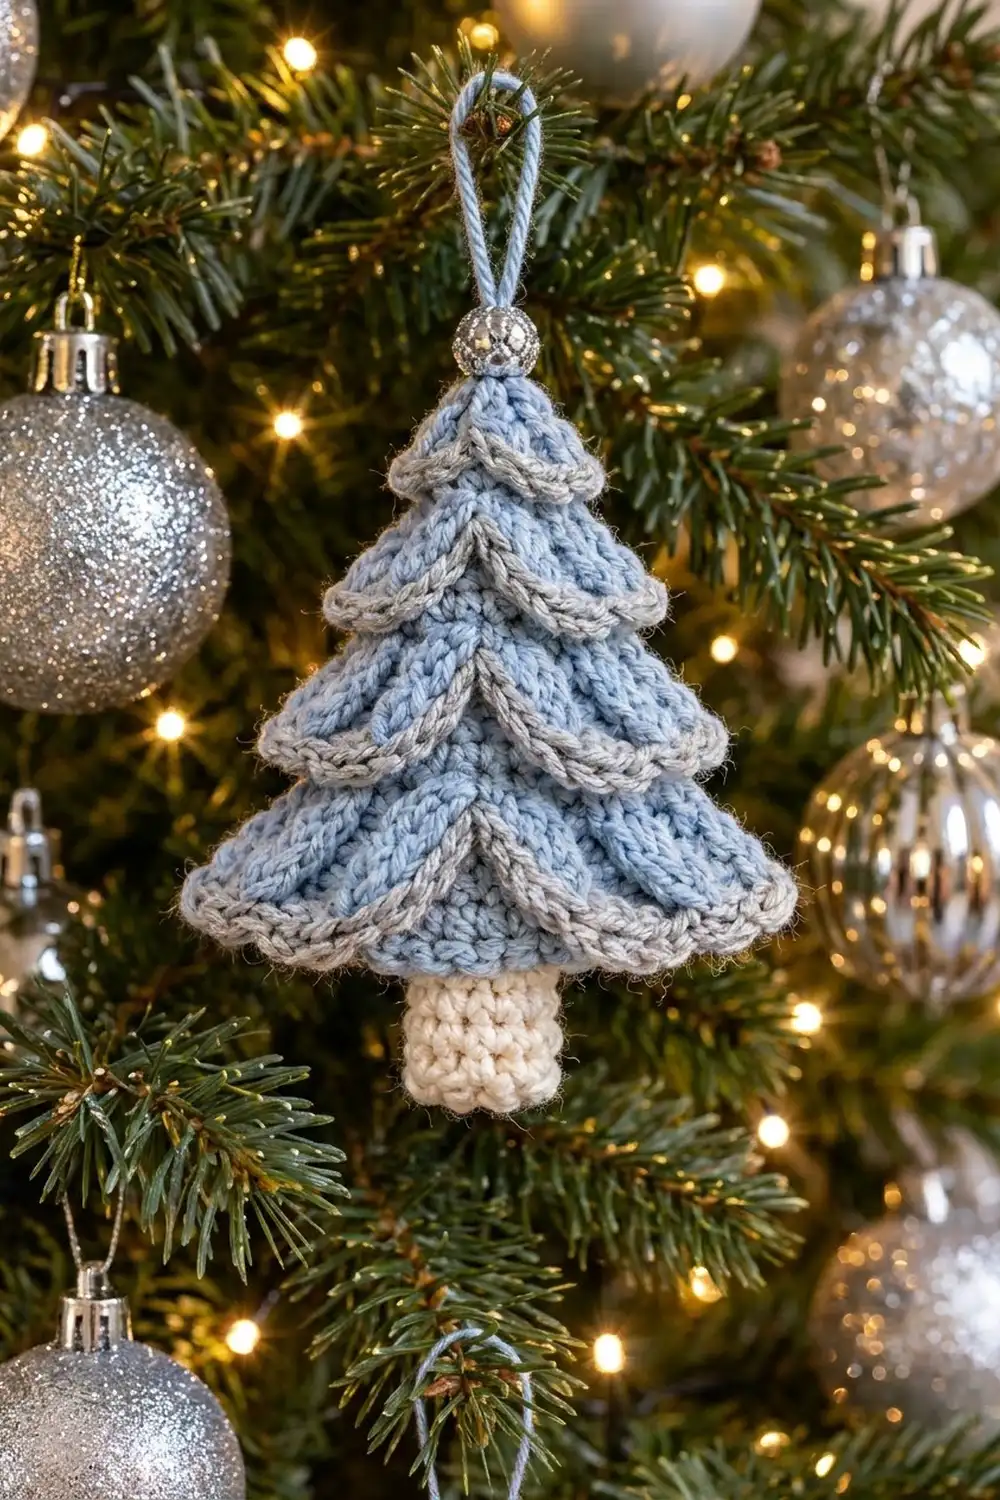
The Frosted Tiers ornament is a small, flat Christmas tree with five stacked tiers. Each tier ends in a ledge that hangs over the tier below, and every ledge is trimmed with soft gray swags. A little cream trunk peeks out underneath, and a silver bead sits at the tip where the hanging loop comes out.
The colors are wintry and calm: light powder blue for the branches, silver-gray for the scalloped edges and creamy off-white for the trunk. It looks lovely next to silver and glass baubles. It is also quick to make, so you can make a whole set for gifts or tags.
This pattern uses US crochet terms. The finished ornament is about 3 in (7.6 cm) wide and about 4.3 in (10.9 cm) tall from tip to trunk, not counting the hanging loop.
The tree is one single piece. You crochet it from the top down in turning rows, starting at the tip. The first row of each new tier goes into the back loops only, which leaves a line of free front loops behind. Later you work the gray swag edging into those free loops, so each tier gets its own overhanging ledge. The trunk is worked straight off the last row, and the bead and loop go on at the end.
Finished Size and Construction
- Finished size: about 3 in (7.6 cm) wide x 4.3 in (10.9 cm) tall
- Skill level: Easy-intermediate (front/back loop work, simple edging)
- Terminology: US crochet terms
- Yarn weight: DK (#3, light)
- Hook: 3.5 mm (E-4)
- Number of pieces: 1 (single flat tree with an attached trunk)
- Layout: five stacked tiers, worked from tip to base, plus a centered trunk
- Piece size (tree body): 3 in (7.6 cm) wide x 3.3 in (8.4 cm) tall
- Size before border (gray edging): same as the body, 3 in x 3.3 in (7.6 cm x 8.4 cm)
- Border depth: the gray swags drop about 0.25 in (0.6 cm) at their deepest point
Materials
Choose a smooth DK yarn with good stitch definition. Cotton or a cotton blend gives crisp swags and a firm, flat tree. Soft acrylic also works but may need more blocking. Avoid fuzzy yarns, because they blur the ledges.
Yarn (DK, about 230 m per 100 g):
- Light blue (tree): 8 g, about 18 m
- Silver gray (edging): 3 g, about 7 m
- Cream (trunk): 2 g, about 5 m
These amounts include a small margin for the gauge check, joining tails and the hanging loop.
Tools:
- 3.5 mm (E-4) crochet hook
- Tapestry needle
- Scissors
- Stitch marker (optional, to mark the right side)
- One 8 mm silver bead with a hole large enough for 2 strands of DK yarn
- Rust-proof pins and a blocking mat or folded towel
- Spray bottle with water
Abbreviations (US Terms)
- ch – chain
- sc – single crochet
- hdc – half double crochet
- dc – double crochet
- sc2tog – single crochet 2 together
- BLO – back loop only
- FLO – front loop only
- RS / WS – right side / wrong side
- st(s) – stitch(es)
Special stitch – standing sc: With a slip knot on your hook, insert the hook into the stitch, yarn over and pull up a loop. Yarn over again and pull through both loops. This joins new yarn without a slip stitch.
Note: The ch 1 at the start of each row does not count as a stitch.
Gauge and Checkpoints
Gauge: 20 sc and 24 rows = 4 in (10.2 cm) in rows of sc with a 3.5 mm hook. That is 5 sts and 6 rows per 1 in (2.5 cm).
This is a single piece, so use Tier 1 as your test. Work it first and measure it before you go on.
Checkpoints:
- After Row 4 (end of Tier 1): 7 sts wide = 1.4 in (3.6 cm); about 0.7 in (1.8 cm) tall.
- After Row 12 (end of Tier 3): 11 sts wide = 2.2 in (5.6 cm); 2 in (5.1 cm) tall.
- After Row 20 (end of Tier 5): 15 sts wide = 3 in (7.6 cm); 3.3 in (8.4 cm) tall.
- Trunk: 5 sts x 6 rows = 1 in x 1 in (2.5 cm x 2.5 cm).
If your tree is too big: switch to a 3.25 mm or 3 mm hook. Loose sc makes floppy ledges.
If your tree is too small: switch to a 3.75 mm hook. Very tight sc makes the free front loops hard to find.
Tree Body
Work in light blue. Each tier has 4 rows. The first row of every tier is a RS row, and the fourth row is a WS row. Mark the RS with a stitch marker after Row 1.
Each new tier starts 2 sts narrower than the ledge above it, then widens again. This step-in gives the tree its stepped outline.
Tier 1
Ch 2.
Row 1 (RS): 3 sc in 2nd ch from hook, turn. (3 sts)
Row 2 (WS): Ch 1, 2 sc in first st, sc in next st, 2 sc in last st, turn. (5 sts)
Row 3: Ch 1, sc in each st across, turn. (5 sts)
Row 4: Ch 1, 2 sc in first st, sc in next 3 sts, 2 sc in last st, turn. (7 sts)
Tier 2
Row 5 (RS): Ch 1, working in BLO only: sc2tog, sc in next 3 sts, sc2tog, turn. (5 sts)
The 7 front loops of Row 4 are now free on the RS. The first gray edging goes into them later.
Row 6: Ch 1, now working in both loops: 2 sc in first st, sc in next 3 sts, 2 sc in last st, turn. (7 sts)
Row 7: Ch 1, sc across, turn. (7 sts)
Row 8: Ch 1, 2 sc in first st, sc in next 5 sts, 2 sc in last st, turn. (9 sts)
Tier 3
Row 9 (RS): Ch 1, in BLO only: sc2tog, sc in next 5 sts, sc2tog, turn. (7 sts)
Row 10: Ch 1, 2 sc in first st, sc in next 5 sts, 2 sc in last st, turn. (9 sts)
Row 11: Ch 1, sc across, turn. (9 sts)
Row 12: Ch 1, 2 sc in first st, sc in next 7 sts, 2 sc in last st, turn. (11 sts)
Tier 4
Row 13 (RS): Ch 1, in BLO only: sc2tog, sc in next 7 sts, sc2tog, turn. (9 sts)
Row 14: Ch 1, 2 sc in first st, sc in next 7 sts, 2 sc in last st, turn. (11 sts)
Row 15: Ch 1, sc across, turn. (11 sts)
Row 16: Ch 1, 2 sc in first st, sc in next 9 sts, 2 sc in last st, turn. (13 sts)
Tier 5
Row 17 (RS): Ch 1, in BLO only: sc2tog, sc in next 9 sts, sc2tog, turn. (11 sts)
Row 18: Ch 1, 2 sc in first st, sc in next 9 sts, 2 sc in last st, turn. (13 sts)
Row 19: Ch 1, sc across, turn. (13 sts)
Row 20: Ch 1, 2 sc in first st, sc in next 11 sts, 2 sc in last st. (15 sts)
Fasten off and weave in the end on the WS.
Checkpoint: On the RS there are now lines of free front loops at the base of Tiers 1 to 4: 7, 9, 11 and 13 sts. Row 20 is the bottom edge, with 15 sts. The body measures 3 in (7.6 cm) wide and 3.3 in (8.4 cm) tall.
Border: Gray Swag Edging
In this design, the “border” is the gray swag trim on each tier. Each edging row is worked with the RS facing, one stitch into each free front loop. So each edging has the same count as its tier’s last row: 7, 9, 11, 13 and 15.
Border gauge: The edging adds no width, because it uses exactly 1 st per loop. It only adds depth. The sc points stay close to the ledge, the hdc hang a little lower and the dc hang about 0.25 in (0.6 cm) lower. These different stitch heights make the swags.
Tip: Turn the tree upside down with the tip pointing toward you and the RS facing. The free loops now line up like the top of a normal row. Work from right to left. When you turn the tree back up, the tall stitches hang down over the tier below.
For each tier, join gray with a standing sc in the first free front loop. Work the sequence below into the free front loops (the standing sc is the first sc), then fasten off and weave the ends in on the WS.
Tier 1 edging (FLO of Row 4): sc, hdc, dc, sc, dc, hdc, sc. (7 sts: 2 small swags, peak in the center)
Tier 2 edging (FLO of Row 8): sc, hdc, dc, hdc, sc, hdc, dc, hdc, sc. (9 sts: 2 full swags)
Tier 3 edging (FLO of Row 12): sc, hdc, dc, sc, hdc, dc, hdc, sc, dc, hdc, sc. (11 sts: small swag, full swag, small swag)
Tier 4 edging (FLO of Row 16): sc, [hdc, dc, hdc, sc] 3 times. (13 sts: 3 full swags)
Tier 5 edging (FLO of Row 20): With the RS facing, work into the front loops of the bottom row: sc, hdc, dc, sc, [hdc, dc, hdc, sc] 2 times, dc, hdc, sc. (15 sts: small swag, 2 full swags, small swag)
Why the math works: A full swag is “hdc, dc, hdc” between two sc points. That is 4 sts per repeat, plus 1 sc to close. It fits 9 and 13 exactly (1 + 4 x 2 and 1 + 4 x 3). The widths 7, 11 and 15 don’t fit that formula; they are 2 sts off. So each end of those tiers gets a 2-st small swag (“hdc, dc” or “dc, hdc”) instead. Every sequence is symmetrical, starts and ends with sc at the tier’s corners and uses exactly one stitch per free loop. No stitches are added or skipped, so each ledge stays as wide as its tier.
Trunk
The back loops of Row 20 are still free, because the Tier 5 edging used only the front loops. The trunk is worked into the center 5 of those back loops.
Turn the tree upside down with the RS facing. Count 5 sts in from the right edge.
Row 1 (RS): Join cream with a standing sc in BLO of the 6th st, sc in BLO of next 4 sts, turn. (5 sts, worked into sts 6-10 of 15, with 5 sts left unworked on each side)
Rows 2-6: Ch 1, sc across, turn. (5 sts)
Fasten off and weave in the ends. The trunk measures 1 in (2.5 cm) square. It hangs below the bottom swags, which cover its top 0.25 in (0.6 cm).
Hanging Loop and Bead
Cut a 14 in (35.6 cm) length of light blue. Use the tapestry needle to pull it through the tip of Row 1 until the two ends are even. Thread both ends through the 8 mm silver bead and slide it down until it sits snugly on the tip. Knot the ends together about 2.5 in (6.4 cm) above the bead, then trim the excess.
Final Blocking
- Weave in every end on the WS before blocking. Hide the gray tails under the ledges.
- Mist the ornament lightly until it is damp. Do not soak it.
- Lay it RS up on the mat. Pin the two base corners 3 in (7.6 cm) apart. Pin the tip 3.3 in (8.4 cm) above the base line.
- Lift each ledge with your fingers so it lies flat over the tier below. Gently pull each dc down to open the swags.
- Pin the trunk straight and centered, 1 in (2.5 cm) wide.
- Let it dry completely (2 to 4 hours) before adding the bead and loop.
For acrylic yarn, you can steam block instead. Hold the iron above the piece and never press it down, so the swags keep their shape.
Final Quality-Control Checklist
- The body is 3 in (7.6 cm) wide at the base and 3.3 in (8.4 cm) tall.
- Each tier steps in by 1 st on both sides at its first row.
- The gray edgings have 7, 9, 11, 13 and 15 sts, and each one is symmetrical.
- Every swag hangs down over the tier below, not up toward the tip.
- The trunk is 5 sts wide and centered, with 5 unworked sts on each side.
- The total height, tip to trunk, is about 4.3 in (10.9 cm).
- The bead sits snugly at the tip and the loop is secure.
- No ends show on the RS.
Troubleshooting
The ledges don’t overhang. You probably worked the first row of a tier in both loops. Rip back and work that row in BLO only.
The swags point upward. The edging went into the wrong edge. Work into the free front loops of the tier’s last row, with the tree upside down.
The free loops are on the WS. The first row of each tier must be a RS row. Count your rows; each tier has exactly 4.
The sides are jagged. Make the increases in the first and last stitch, not the second. Keep the ch 1 loose so the edges stay smooth.
The tree curls. Your tension is too tight, or the edging is tighter than the body. Block firmly, or work the gray edging with a hook one size larger.
The trunk is off-center. Count again. There should be 5 unworked back loops on each side of the trunk.
Care
Hand wash in cool water with mild soap, roll in a towel to press out the water and dry flat, reshaping the swags. Store it flat or hanging, away from heavy ornaments that could crush the ledges.
Final Notes
Here is how the measurements build on each other. At 5 sts and 6 rows per 1 in (2.5 cm), Tier 1 is 7 sts wide, or 1.4 in (3.6 cm). Each tier steps in by 2 sts and then grows by 4. After 20 rows, or 3.3 in (8.4 cm), the base is 15 sts, or 3 in (7.6 cm). The gray edging uses one stitch per free loop, so it adds depth but no width. The 6-row trunk adds 1 in (2.5 cm), for a total height of about 4.3 in (10.9 cm).
If Tier 1 measures right, the rest of the tree will too.
Happy crocheting!