

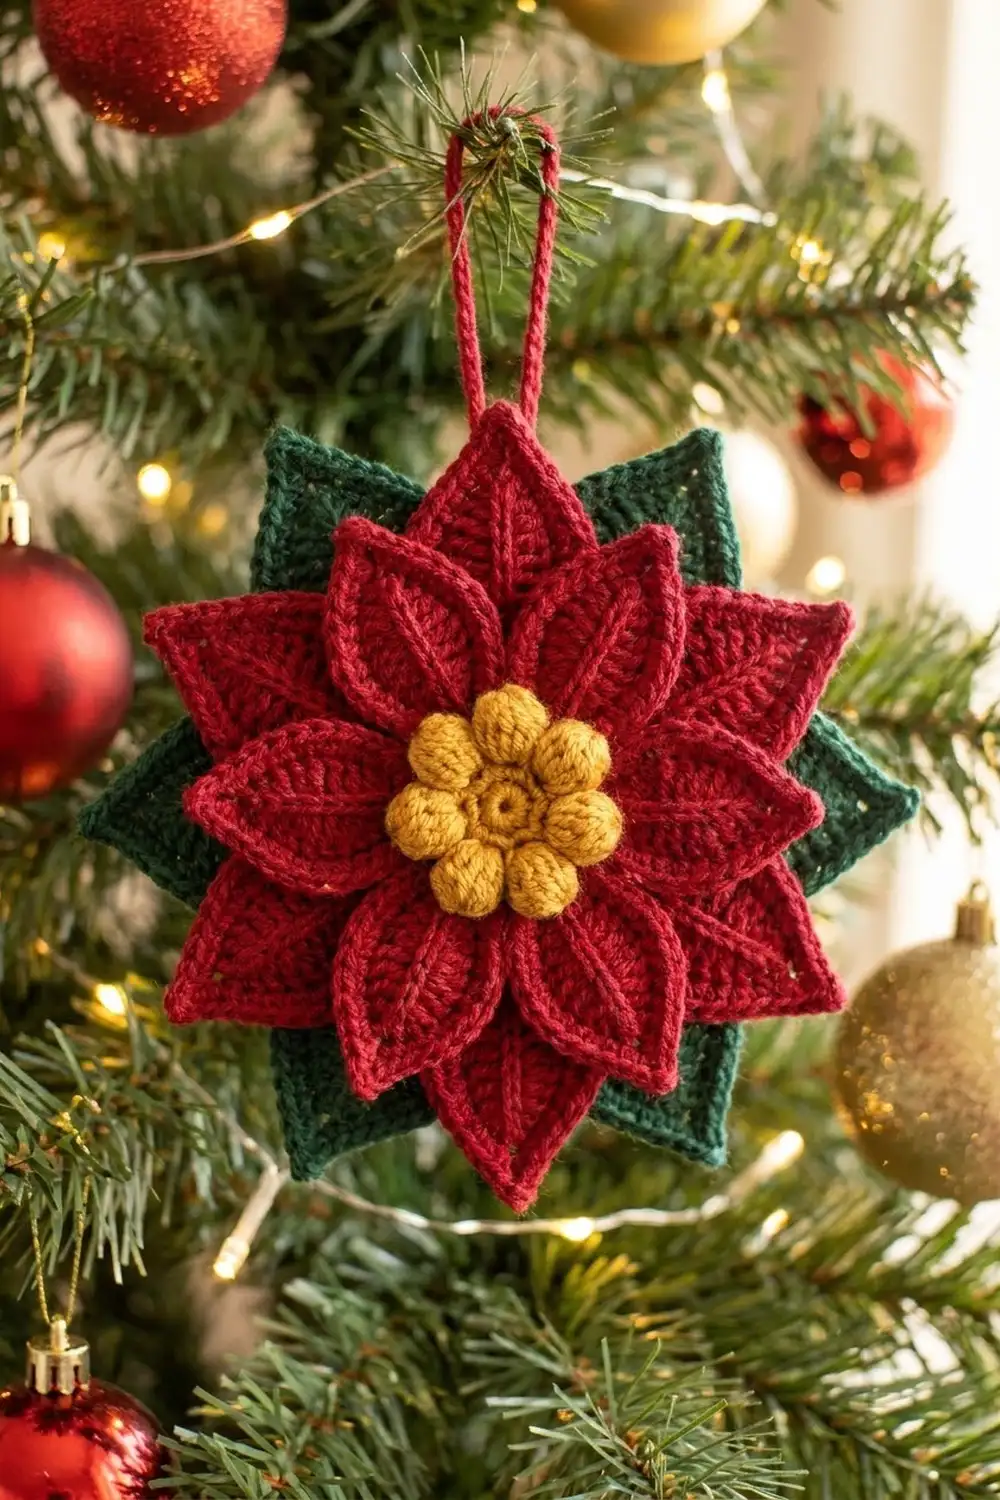
This poinsettia ornament is a small, layered Christmas flower that hangs from a red chain loop. Eight pointed red petals sit in two staggered layers over six deep green leaves, and a gold bobble center finishes it. Each petal has a raised center vein and a crisp single crochet outline, so the flower reads clearly even from across the room.
The colors are cranberry red, forest green and mustard gold. The style is cozy and traditional, and the ornament works on a tree, a gift package or a wreath.
The pattern uses US crochet terms. The finished ornament measures 5 in (12.7 cm) from petal tip to petal tip, and the hanging loop rises about 2 in (5.1 cm) above the top petal.
The construction is simple. You work every petal and leaf in one round around a short foundation chain, then outline it with single crochet. The gold center is a ring of bobbles. Then you stack and sew all the pieces and add a chain loop on the back.
Finished Size and Construction
- Finished size: 5 in (12.7 cm) tip to tip, plus a loop about 2 in (5.1 cm) tall
- Skill level: Easy to intermediate
- Terminology: US crochet terms
- Yarn weight: Worsted (#4)
- Hook: 3.75 mm (US F-5)
- Number of pieces: 15 crocheted motifs (4 large red petals, 4 small red petals, 6 green leaves, 1 gold center), plus 1 chain loop
- Layout: Radial, in four stacked layers
- Piece size (edged): large petal 2.25 x 1.25 in (5.7 x 3.2 cm); small petal 2 x 1 in (5.1 x 2.5 cm); leaf 1.75 x 1 in (4.4 x 2.5 cm); center 1 in (2.5 cm) across
- Size before border: large petal 2 x 1 in (5.1 x 2.5 cm); small petal 1.75 x 0.75 in (4.4 x 1.9 cm); leaf 1.5 x 0.75 in (3.8 x 1.9 cm)
- Border depth: about 0.125 in (0.3 cm) along each side and 0.25 in (0.6 cm) at the tip
Materials
Use a smooth worsted-weight yarn with good stitch definition. Wool, wool blend and acrylic all work. Avoid fuzzy or loosely plied yarns, because they blur the veins and the tip points.
- Red: 8 g, about 16 m (17.5 yd), for 8 petals and the hanging loop
- Green: 4 g, about 8 m (8.7 yd), for 6 leaves
- Gold: 2 g, about 4 m (4.4 yd), for the center
These amounts include a margin of about 30 percent for swatching, tails and sewing.
Tools:
- 3.75 mm (US F-5) crochet hook
- Tapestry needle
- Scissors
- Rust-proof pins
- Spray bottle and a blocking mat or folded towel
- Optional: stitch marker
Abbreviations (US Terms)
- ch = chain
- sl st = slip stitch
- sc = single crochet
- hdc = half double crochet
- dc = double crochet
- tr = treble crochet
- sp = space
- st(s) = stitch(es)
- MR = magic ring
Special stitch: bobble (4-dc bobble). [Yarn over, insert hook in st, yarn over and pull up a loop, yarn over and pull through 2 loops] 4 times in the same st (5 loops on hook). Yarn over and pull through all 5 loops.
Beginning bobble: Ch 2. Work the bobble with only 3 repeats in the same st (4 loops on hook), then yarn over and pull through all 4 loops. The ch-2 and the 3-dc cluster together count as the first bobble.
Gauge and Checkpoints
Gauge: 18 sc and 20 rows = 4 in (10.2 cm) in sc worked flat. This fabric is firm on purpose so the petals hold their shape.
Don’t make all 15 pieces at once. Make and edge one large red petal first, then measure it.
Checkpoints:
- Large petal after Round 1: 2 in (5.1 cm) long, 1 in (2.5 cm) wide
- Large petal after edging: 2.25 in (5.7 cm) long, 1.25 in (3.2 cm) wide
- Small petal after edging: 2 in (5.1 cm) long, 1 in (2.5 cm) wide
- Leaf after edging: 1.75 in (4.4 cm) long, 1 in (2.5 cm) wide
- Gold center after Round 2: 1 in (2.5 cm) across
If the petal is too big, go down to a 3.5 mm (US E-4) hook. If it is too small, go up to a 4 mm (US G-6) hook. An error of 0.25 in (0.6 cm) per petal becomes 0.5 in (1.3 cm) across the whole flower, so fix it early.
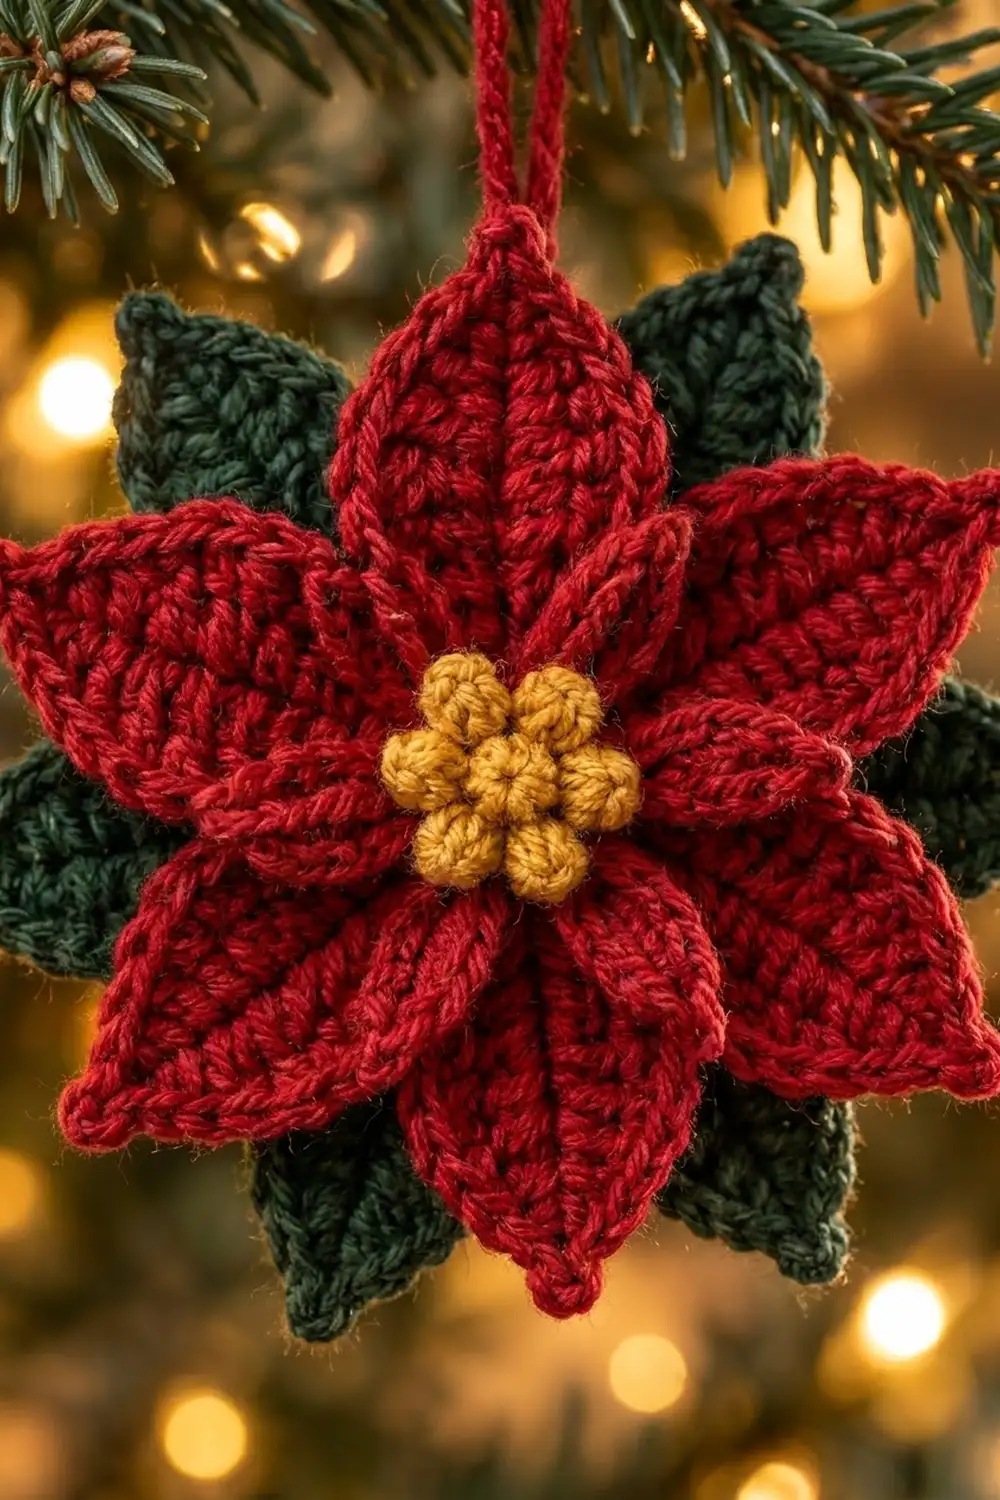
Large Red Petal (Make 4)
With red, ch 10. Count the chains from the hook. Ch 2 is the second chain from the hook, at the tip end. Ch 10 is the first chain you made, at the base end.
Round 1:
- Side A: Sc in ch 2, hdc in ch 3, dc in ch 4, tr in ch 5 and ch 6, dc in ch 7, hdc in ch 8, sc in ch 9. (8 sts)
- Base: 3 sc in ch 10. (3 sts)
- Side B: Rotate the work. Along the opposite side of the chain, sc in ch 9, hdc in ch 8, dc in ch 7, tr in ch 6 and ch 5, dc in ch 4, hdc in ch 3, sc in ch 2. (8 sts)
- Tip: Ch 2, sl st in the first sc of Side A.
Round 1 total: 19 sts (8 + 3 + 8), plus 1 ch-2 tip sp.
The two sides meet over the foundation chain and form the raised center vein. The tr make the widest point. The sc at each end taper the petal, and the ch-2 makes the sharp tip.
Don’t fasten off yet. Work the edging round from the Border section, then fasten off with an 8 in (20.3 cm) tail for sewing.
Small Red Petal (Make 4)
With red, ch 9.
Round 1:
- Side A: Sc in ch 2, hdc in ch 3, dc in ch 4, tr in ch 5, dc in ch 6, hdc in ch 7, sc in ch 8. (7 sts)
- Base: 3 sc in ch 9. (3 sts)
- Side B: Along the opposite side of the chain, sc in ch 8, hdc in ch 7, dc in ch 6, tr in ch 5, dc in ch 4, hdc in ch 3, sc in ch 2. (7 sts)
- Tip: Ch 2, sl st in the first sc of Side A.
Round 1 total: 17 sts (7 + 3 + 7), plus 1 ch-2 tip sp.
Work the edging round, then fasten off with an 8 in (20.3 cm) tail.
Green Leaf (Make 6)
With green, ch 8.
Round 1:
- Side A: Sc in ch 2, hdc in ch 3, dc in ch 4 and ch 5, hdc in ch 6, sc in ch 7. (6 sts)
- Base: 3 sc in ch 8. (3 sts)
- Side B: Along the opposite side of the chain, sc in ch 7, hdc in ch 6, dc in ch 5 and ch 4, hdc in ch 3, sc in ch 2. (6 sts)
- Tip: Ch 2, sl st in the first sc of Side A.
Round 1 total: 15 sts (6 + 3 + 6), plus 1 ch-2 tip sp.
The leaves use dc instead of tr, which keeps them slimmer than the petals. Work the edging round, then fasten off with an 8 in (20.3 cm) tail.
Gold Bobble Center (Make 1)
With gold, make a MR.
Round 1: Ch 1, work 6 sc in the ring, and pull the ring tight. Sl st in the first sc. (6 sts) The center now measures 0.5 in (1.3 cm) across.
Round 2: Work a beginning bobble in the same st as the join, then ch 1. [Bobble in next sc, ch 1] 5 times. Sl st in the top of the beginning bobble. (6 bobbles + 6 ch-1 = 12 sts)
Fasten off with a 12 in (30.5 cm) tail. Push each bobble toward the right side so it puffs out. The closed ring of sc forms the small raised middle.
Hanging Loop (Make 1)
With red, ch 40. The chain should measure about 8.9 in (22.6 cm). Fasten off and leave a 6 in (15.2 cm) tail at each end.
Make All Pieces
| Color | Piece | Quantity |
|---|---|---|
| Red | Large petal | 4 |
| Red | Small petal | 4 |
| Red | Hanging loop | 1 |
| Green | Leaf | 6 |
| Gold | Bobble center | 1 |
Layout grid (front view, clock positions):
Layer 1 (bottom)  Green leaves:      12, 2, 4, 6, 8, 10 o'clock
Layer 2           Large red petals:  12, 3, 6, 9 o'clock
Layer 3           Small red petals:  1:30, 4:30, 7:30, 10:30
Layer 4 (top)     Gold center:       middle
Back              Hanging loop:      behind center, rising past 12
Joining
Sew all pieces with the long tails and a tapestry needle. Start at the bottom layer and work up.
Step 1: Leaf ring. Lay out the 6 leaves like a wheel with the bases pointing in. Each base should sit 0.5 in (1.3 cm) from the center point. Whipstitch each base to the leaves next to it with 2 or 3 small stitches through the base sc. Checkpoint: 4.5 in (11.4 cm) from one tip to the opposite tip.
Step 2: Large petals. Place the large petals at 12, 3, 6 and 9 o’clock, with each base 0.25 in (0.6 cm) from the center. Sew through the 3 base sc and the first 2 sts on each side. Leave the rest of the petal free so the tip lifts slightly. Checkpoint: 5 in (12.7 cm) from the 12 o’clock tip to the 6 o’clock tip.
Step 3: Small petals. Place the small petals in the gaps at 1:30, 4:30, 7:30 and 10:30, also with each base 0.25 in (0.6 cm) from the center. Sew them the same way. Checkpoint: 4.5 in (11.4 cm) across on the diagonal.
Step 4: Center. Center the gold piece over the petal bases. Sew through each ch-1 sp of Round 2, catching all the layers underneath.
Step 5: Loop. Fold the chain in half. Sew both ends securely to the back of the center. Checkpoint: the fold rises about 2 in (5.1 cm) above the top petal tip.
Tension: Sew firmly enough that the pieces don’t shift, but don’t pull tight. Tight stitches pucker the center and make the petals cup. Hide all sewing under the next layer or on the back. Weave each tail through at least 1 in (2.5 cm) of stitches.
Border: Petal and Leaf Edging
The border is the single round of sc that you work around each petal and leaf right after Round 1, before you fasten off. All the counts are collected here so you can compare the three pieces.
Border gauge: 1 sc per Round 1 st. That matches the 18 sc per 4 in (10.2 cm) gauge, so the edge lies flat.
Edging round (all pieces): Ch 1, sc in the same st as the join. Sc in each st along Side A, in each of the 3 base sts, and in each st along Side B. In the tip ch-2 sp, work (sc, ch 2, sc). Sl st in the first sc.
| Piece | Side A | Base | Side B | Tip | Total |
|---|---|---|---|---|---|
| Large petal | 8 sc | 3 sc | 8 sc | 2 sc + ch-2 | 21 sc + ch-2 sp |
| Small petal | 7 sc | 3 sc | 7 sc | 2 sc + ch-2 | 19 sc + ch-2 sp |
| Leaf | 6 sc | 3 sc | 6 sc | 2 sc + ch-2 | 17 sc + ch-2 sp |
Counts as a trim round:
- Large petal: 19 (1 per existing st) + 2 (added at tip) = 21 sc
- Small petal: 17 + 2 = 19 sc
- Leaf: 15 + 2 = 17 sc
Why the math works: Each side gets exactly one sc per Round 1 st, so the sides don’t get longer, only slightly thicker. That adds about 0.125 in (0.3 cm) per side, which takes the large petal from 1 in (2.5 cm) to 1.25 in (3.2 cm) wide. The only new stitches are the 2 tip sc. With the new ch-2, they extend the point by 0.25 in (0.6 cm), from 2 in (5.1 cm) to 2.25 in (5.7 cm). The base gets no extra stitches because the center covers it.
Final Blocking
- Weave in any remaining tails on the back.
- Lay the ornament face down on a mat or folded towel.
- Mist the back until it is damp but not soaked.
- Turn it face up. Pin the 12 and 6 o’clock tips 5 in (12.7 cm) apart, then pin the 3 and 9 o’clock tips the same distance apart.
- Pin each small petal tip and each leaf tip into a sharp point.
- Press along each vein with a fingertip so it stands slightly raised.
- Let the ornament dry for at least 6 hours.
- Unpin it and fluff the bobbles.
Final Quality-Control Checklist
- 4 large petals, 4 small petals and 6 leaves, each with a clean ch-2 tip
- Edging counts: 21 sc on large petals, 19 sc on small petals, 17 sc on leaves
- 6 even bobbles, all facing forward
- Large petals form a plus sign, and small petals form an X
- Tip to tip measures 5 in (12.7 cm)
- No sewing shows on the front
- The loop is centered and rises about 2 in (5.1 cm) above the top petal
Troubleshooting
Petals curl lengthwise: The foundation chain is too tight. Make the chain with the next size up, then switch back for Round 1.
Rounded tips: Make sure you worked the ch-2 at the tip and put the edging (sc, ch 2, sc) into that space.
Ruffled edging: One side probably has an extra sc. Count it against the table.
Flat center: Pull the magic ring fully closed and push each bobble to the front.
Ornament tilts forward: Sew the loop ends higher behind the 12 o’clock petal.
Gaps between petals: Move the petal bases 0.125 in (0.3 cm) closer to the center.
Care
Hand wash in cool water with mild soap, then press the water out in a towel. Reshape the petals and dry the ornament flat. Store it flat in tissue so the tips stay crisp.
Final Notes
Here is the measurement chain. Match the gauge of 18 sc per 4 in (10.2 cm). A large petal measures 2 in (5.1 cm) after Round 1 and 2.25 in (5.7 cm) after edging. With the bases 0.25 in (0.6 cm) from the center, two opposite large petals span 5 in (12.7 cm). The small petals and leaves fill the gaps at 4.5 in (11.4 cm), and the 1 in (2.5 cm) gold center covers every seam. If each piece passes its checkpoint, the finished ornament will come out the right size.
Happy crocheting!