

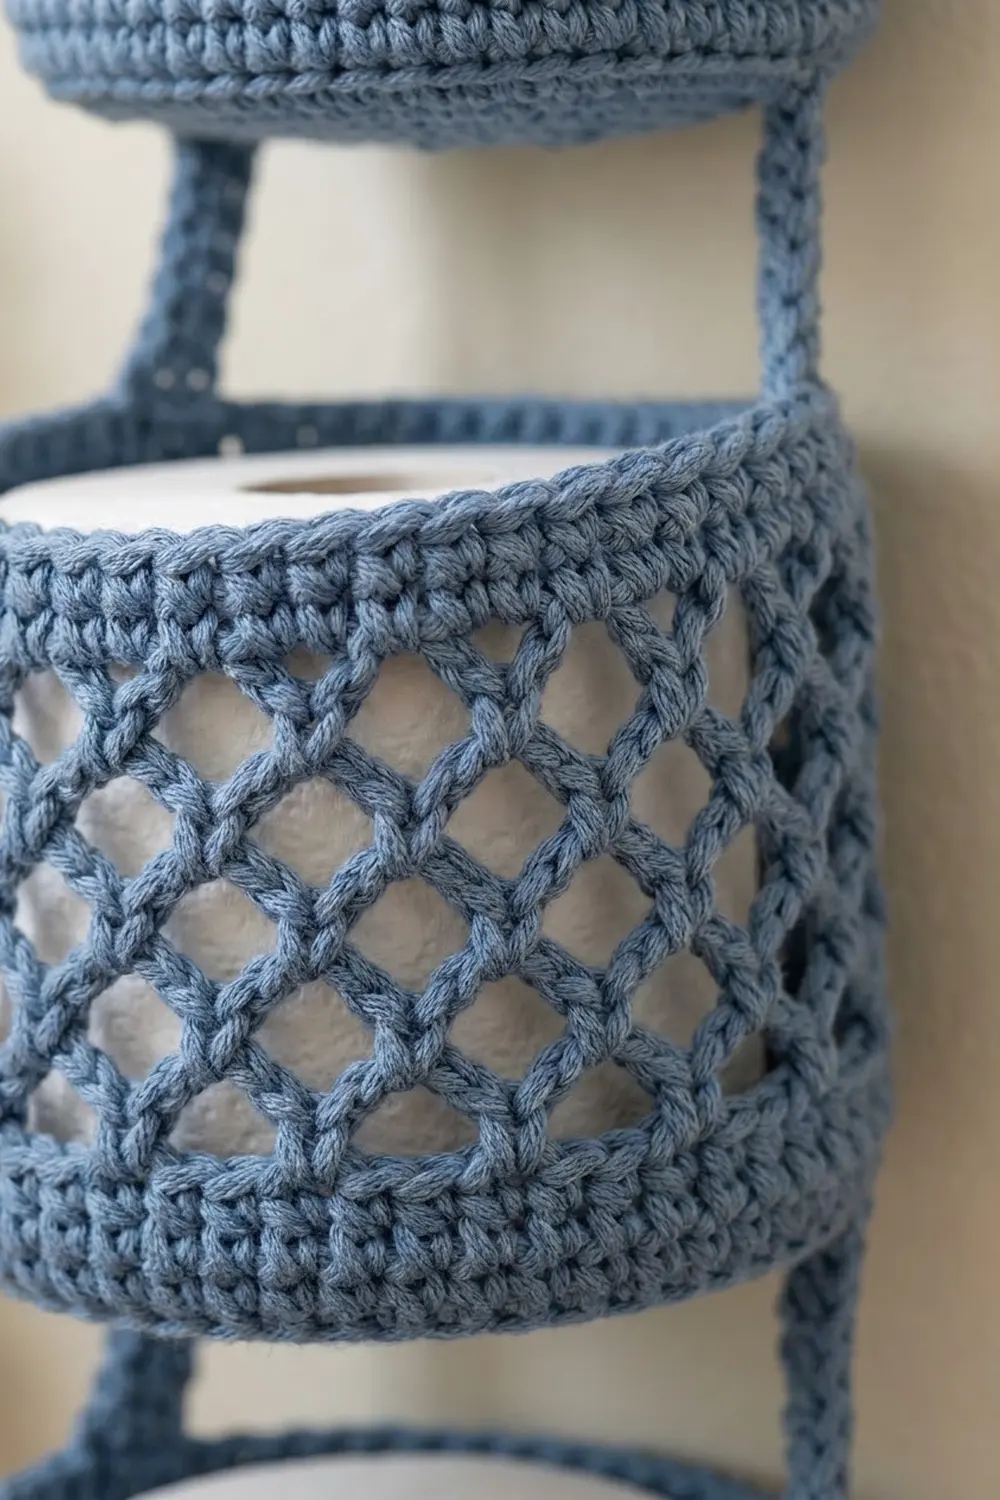
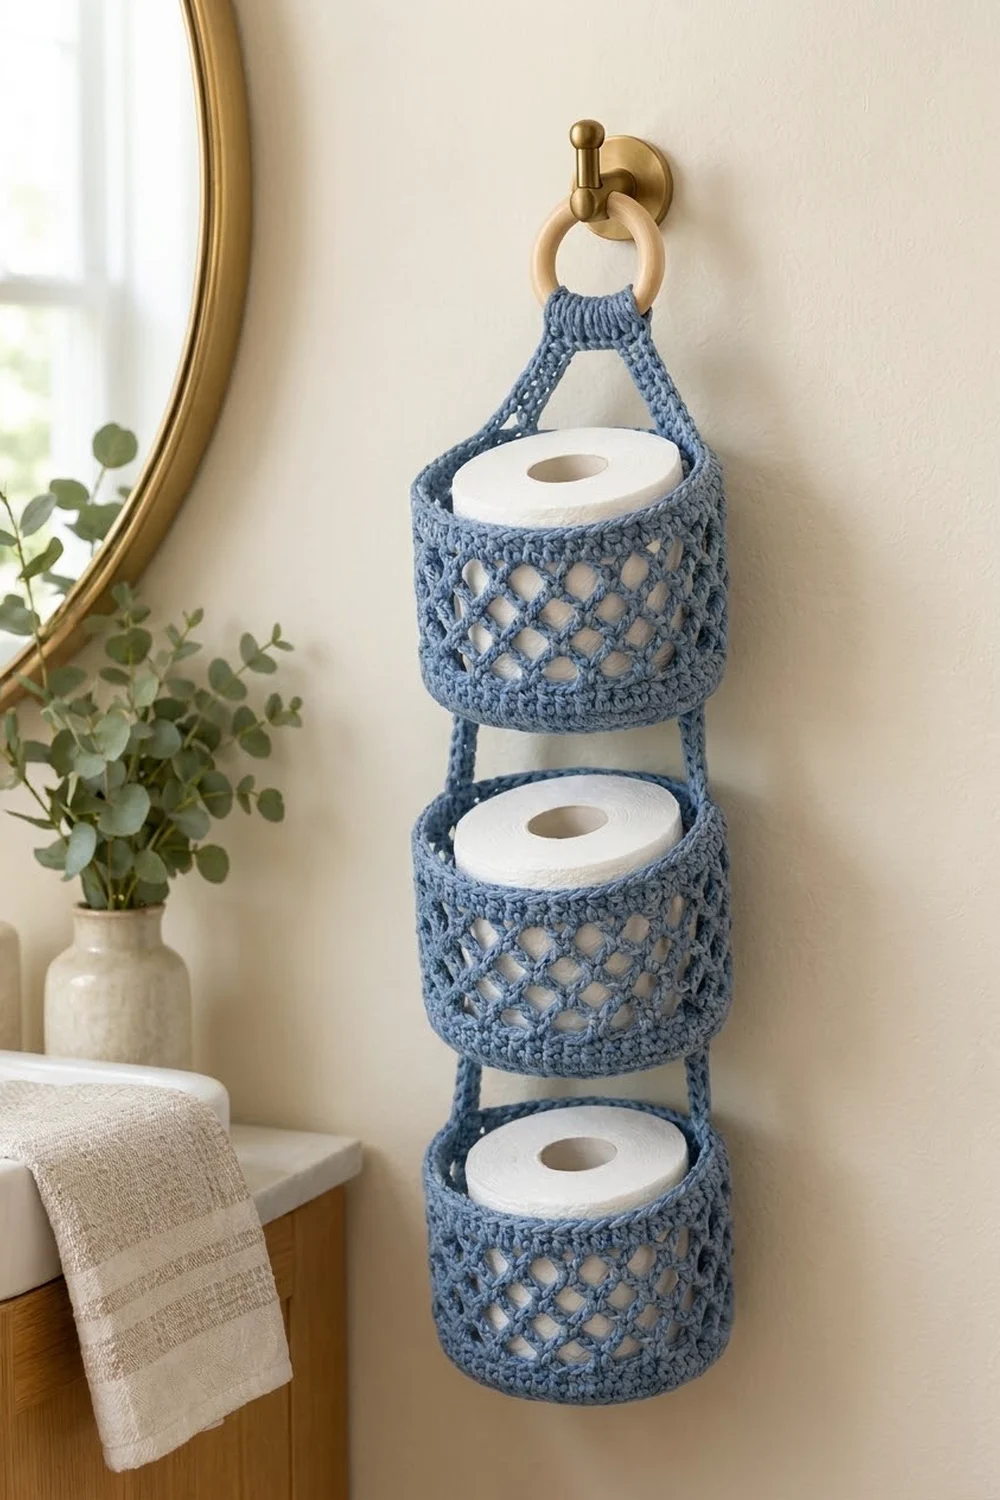
This hanging toilet paper holder stores three spare rolls in a neat vertical column. Each basket is oval. It has a solid single crochet base, a short solid band at the bottom, an open diamond lattice through the middle, and a solid band at the top finished with a rolled reverse single crochet rim.
The whole holder is worked in one soft denim-blue cotton. Two narrow side straps run up the narrow ends of all three baskets and meet at the top, where they wrap around a natural wooden ring. Hang it from a hook or towel peg and it sits flat against the wall.
The pattern uses US crochet terms. Each basket measures about 6 in (15.2 cm) wide, 4.5 in (11.4 cm) deep and 3.5 in (8.9 cm) tall. The holder hangs about 19 in (48.3 cm) from the bottom of the lowest basket to the top of the strap fold, plus the ring.
Construction is simple. You crochet three identical baskets in joined rounds and two long straps in rows. Then you sew the straps to the baskets and fold the strap tops over the ring.
Finished Size and Construction
- Basket size: 6 in x 4.5 in (15.2 x 11.4 cm) base, 3.5 in (8.9 cm) wall height
- Hanging length: about 19 in (48.3 cm), ring not included
- Skill level: Easy to Intermediate
- Terminology: US
- Yarn weight: Worsted (#4), cotton
- Hook: 5 mm (H-8)
- Number of pieces: 5 (3 baskets, 2 straps), plus 1 purchased ring
- Layout: 3 baskets stacked in a single column, 1.6 in (4.1 cm) apart
- Piece size: each strap is 0.9 in (2.3 cm) wide and 20.5 in (52.1 cm) long
- Size before border: basket wall 3.25 in (8.3 cm) tall
- Border depth: 0.25 in (0.6 cm), one round of reverse single crochet
Materials
Choose a worsted-weight 100% cotton or a cotton blend. Cotton holds the basket shape and stretches less than acrylic under the weight of the rolls. Avoid very splitty yarn, because the lattice looks best with a smooth, rounded ply.
- Denim Blue: 150 g, about 230 m (252 yd)
This quantity includes a comfortable margin for gauge differences, swatching and sewing.
Tools:
- 5 mm (H-8) crochet hook
- 1 wooden ring, 2.75 in (7.0 cm) outer diameter
- Tapestry needle
- 4 locking stitch markers
- Scissors
- Measuring tape
- Pins (for positioning the straps)
Abbreviations (US Terms)
- ch: chain
- sl st: slip stitch
- sc: single crochet
- dc: double crochet
- BLO: back loop only
- sk: skip
- sp: space
- st(s): stitch(es)
- rev sc: reverse single crochet
- rnd(s): round(s)
Reverse single crochet (rev sc): Work from left to right (if you are right-handed). Insert the hook into the next stitch to the right, yarn over, pull up a loop, yarn over and pull through both loops. This makes a twisted, corded edge.
Gauge and Checkpoints
Gauge: 14 sc and 15 rnds = 4 in (10.2 cm) in sc worked in the round.
Make one full basket before starting the others. It works as your gauge swatch, and you can test it with an actual roll.
Checkpoints:
- After Rnd 4: base measures about 3.75 in x 2.25 in (9.5 x 5.7 cm).
- After Rnd 8: base measures 6 in x 4.5 in (15.2 x 11.4 cm) and lies flat.
- After Rnd 10: the solid bottom band is 0.5 in (1.3 cm) tall.
- After Rnd 15: the lattice section is about 2.25 in (5.7 cm) tall.
- After Rnd 17: the wall is 3.25 in (8.3 cm) tall.
If your base is too big, go down to a 4.5 mm hook. If it is too small, or a roll will not drop in, go up to a 5.5 mm hook. Change the hook, not the stitch counts, because the lattice needs a multiple of 4 stitches.
Basket (Make 3)
Work the basket in joined rounds with the right side facing. Do not turn.
Oval Base
Ch 9.
Rnd 1: Sc in 2nd ch from hook, sc in next 6 ch, 3 sc in last ch. Working along the opposite side of the foundation chain, sc in next 6 ch, 2 sc in the first ch you worked into. Join with sl st to first sc. (18 sts)
The 6 sts along each straight side stay at 6 for the whole base. All increases happen at the two curved ends.
Rnd 2: Ch 1, 2 sc in first st, sc in next 6, 2 sc in each of next 3, sc in next 6, 2 sc in each of last 2. Join. (24 sts)
Rnd 3: Ch 1, 2 sc in first st, sc in next st, sc in next 6, [2 sc in next st, sc in next st] 3 times, sc in next 6, [2 sc in next st, sc in next st] 2 times. Join. (30 sts)
Rnd 4: Ch 1, 2 sc in first st, sc in next 2, sc in next 6, [2 sc in next st, sc in next 2] 3 times, sc in next 6, [2 sc in next st, sc in next 2] 2 times. Join. (36 sts)
Rnd 5: Ch 1, 2 sc in first st, sc in next 3, sc in next 6, [2 sc in next st, sc in next 3] 3 times, sc in next 6, [2 sc in next st, sc in next 3] 2 times. Join. (42 sts)
Rnd 6: Ch 1, 2 sc in first st, sc in next 4, sc in next 6, [2 sc in next st, sc in next 4] 3 times, sc in next 6, [2 sc in next st, sc in next 4] 2 times. Join. (48 sts)
Rnd 7: Ch 1, 2 sc in first st, sc in next 5, sc in next 6, [2 sc in next st, sc in next 5] 3 times, sc in next 6, [2 sc in next st, sc in next 5] 2 times. Join. (54 sts)
Rnd 8: Ch 1, 2 sc in first st, sc in next 6, sc in next 6, [2 sc in next st, sc in next 6] 3 times, sc in next 6, [2 sc in next st, sc in next 6] 2 times. Join. (60 sts)
The 60 sts divide as 6 (front straight) + 24 (end curve) + 6 (back straight) + 24 (end curve). Place a marker in the 12th st of each 24-st end curve. These markers show where the straps go.
Bottom Solid Band
Rnd 9: Ch 1, sc in BLO of each st around. Join. (60 sts) The unused front loops form a crisp ridge and turn the work upward.
Rnd 10: Ch 1, sc in each st around. Join. (60 sts)
Move the end markers up as you go.
Diamond Lattice
Rnd 11: Ch 1, sc in first st, ch 5, sk 3 sts, sc in next st; repeat from * 13 more times, ch 2, sk last 3 sts, dc in first sc. (15 ch-5 loops) The ch 2 + dc counts as the 15th loop and puts your hook at the center of that loop.
Check the math: 1 + (14 x 4) = 57 sts used, plus 3 skipped = 60.
Rnds 12–14: Ch 1, sc around the post of the dc just made, ch 5, sc in next ch-5 sp; repeat from * 13 more times, ch 2, dc in first sc. (15 loops)
Rnd 15: Ch 1, sc around the post of the dc just made, ch 5, sc in next ch-5 sp; repeat from * 13 more times, ch 5, sl st in first sc. (15 ch-5 loops) Ending with a full ch 5 gives a matching last loop for the conversion round.
Each sc lands in the center of a loop below, so the openings stack into the diamond lattice.
Top Solid Band
Rnd 16 (conversion round): Sl st into first ch-5 sp, ch 1, 4 sc in same sp, 4 sc in each remaining ch-5 sp around. Join. (0 sts worked 1-per-stitch + 15 loops x 4 sc = 60 sts)
Rnd 17: Ch 1, sc in each st around. Join. (60 sts)
The wall now measures 3.25 in (8.3 cm). Work the rim round from the Border section now, before joining. Then fasten off and weave in the ends.
Strap (Make 2)
Foundation: Ch 4.
Row 1: Sc in 2nd ch from hook and in next 2 ch. (3 sts)
Rows 2–77: Ch 1, turn, sc in each st across. (3 sts)
Fasten off, leaving a 24 in (61.0 cm) tail for sewing. The strap measures 0.9 in (2.3 cm) wide and 20.5 in (52.1 cm) long.
Place markers to map the strap:
- Rows 1–13: lowest basket (Basket 3)
- Rows 14–19: gap
- Rows 20–32: middle basket (Basket 2)
- Rows 33–38: gap
- Rows 39–51: top basket (Basket 1)
- Rows 52–71: rise to the ring
- Rows 72–77: wrap around the ring
Make All Pieces
All pieces are Denim Blue:
- Baskets: 3
- Straps: 2
Layout (front view):
           ( ring )
           /      \
      strap        strap
    [    Basket 1    ]
     |              |
    [    Basket 2    ]
     |              |
    [    Basket 3    ]
Each strap runs vertically along one narrow end of every basket.
Joining
Method: Whipstitch with the tail of each strap, on the outside of the baskets.
- Lay Basket 3 on its back. Pin strap row 1 at the end marker on Rnd 9. Center it so the 3 strap sts cover the marked st and one st on each side.
- Pin strap rows 1–13 up the wall. Thirteen rows span 3.5 in (8.9 cm), which matches the 10 wall rounds (Rnds 9–18).
- Whipstitch both long edges of the strap to the basket. On solid rounds, sew into one stitch per strap row. Across the lattice, catch the sc nearest each strap edge in every lattice round. This anchors the strap about every 0.45 in (1.1 cm).
- Leave rows 14–19 free. This 1.6 in (4.1 cm) gap separates the baskets.
- Attach rows 20–32 to Basket 2 and rows 39–51 to Basket 1 the same way.
- Repeat with the second strap on the opposite end marker of each basket. Check that all baskets face the same way.
Tension: Sew firmly, but don’t pull the wall in. The basket should keep its oval shape with no puckers under the strap.
Top: Stack the two strap tops with row 72 on row 72. Pass rows 72–77 through the ring to the back. Fold them down and sew row 77 to the strap just below the ring, going through all layers around the edges.
Size checkpoint: Hold the holder up by the ring. Each gap should measure 1.6 in (4.1 cm), and the total hanging length should be about 19 in (48.3 cm).
Border
The border is the rim of each basket. Work it right after Rnd 17, before joining.
Border gauge: One rev sc per sc, at the same 14 sts = 4 in (10.2 cm) as the body, so the rim neither flares nor pulls in.
Rnd 18: Ch 1, rev sc in each st around. Join with sl st to first rev sc. (60 sts)
Per-side counts:
- Front straight: 6 sts
- End curve: 24 sts
- Back straight: 6 sts
- End curve: 24 sts
- Total: 6 + 24 + 6 + 24 = 60
Why the math works: The base ends with 60 sts. The lattice uses 15 repeats of 4 sts (60). The conversion round puts 4 sc in each of 15 loops, giving 60 again. The rim works 1 rev sc per sc, so it stays at 60 and adds 0.25 in (0.6 cm), which brings the wall to 3.5 in (8.9 cm).
Final Blocking
- Lightly mist each basket with water until damp, not soaked.
- Slide a roll of toilet paper, or a can wrapped in a towel, inside each basket.
- Pinch the rim into an even oval and straighten the lattice so the diamonds line up vertically.
- Lay the straps flat and pat them to 0.9 in (2.3 cm) wide.
- Let everything dry completely, for at least 12 hours.
- Hang the holder empty for an hour so the straps settle, then load the rolls.
Final Quality-Control Checklist
- Each base measures 6 in x 4.5 in (15.2 x 11.4 cm) and lies flat.
- Each basket has exactly 60 sts in Rnds 8, 9, 10, 16, 17 and 18.
- Each lattice round has 15 loops.
- All three walls measure 3.5 in (8.9 cm).
- Each strap has 77 rows and measures 20.5 in (52.1 cm).
- Gaps between baskets are 1.6 in (4.1 cm).
- Straps sit centered on the end markers of every basket.
- The ring fold is sewn through all layers.
- All ends are woven in and trimmed.
Troubleshooting
Base ruffles: You may have too many increases or loose tension. Check your counts, then try a smaller hook.
Base cups before Rnd 9: Your tension is too tight. Go up a hook size for the base only.
Lattice slants or spirals: Make sure each sc goes into the center of a loop, not into a chain to one side. Always start the round around the dc post.
Roll won’t fit: Remake the basket with a hook half a size larger. Keep all stitch counts the same.
Baskets tip forward: The strap isn’t sewn high enough. Stitch it through Rnds 16–18 as well as the lower rounds.
Straps stretch: Cotton relaxes under weight. Add a row of sl st along each long strap edge, or remove 2 rows from the rise.
Uneven gaps: Recount the rows before sewing, and place the markers on the strap, not on the baskets.
Care
Hand wash in cool water with mild soap and gently press out the water. Dry flat with a roll inside each basket to keep its shape, and don’t tumble dry.
Final Notes
Every measurement in this holder builds on the one before it. A gauge of 14 sc = 4 in (10.2 cm) gives a 60-st base of 6 in x 4.5 in (15.2 x 11.4 cm). Those 60 sts become 15 lattice loops and then return to 60 sts. The wall reaches 3.25 in (8.3 cm), and the rim brings it to 3.5 in (8.9 cm). Thirteen strap rows match that wall, and 6-row gaps give 1.6 in (4.1 cm) of space. In total, 77 rows produce a 20.5 in (52.1 cm) strap and a holder that hangs about 19 in (48.3 cm). Check each measurement as you go, and the finished piece will hang straight and hold its rolls neatly.
Happy crocheting!