

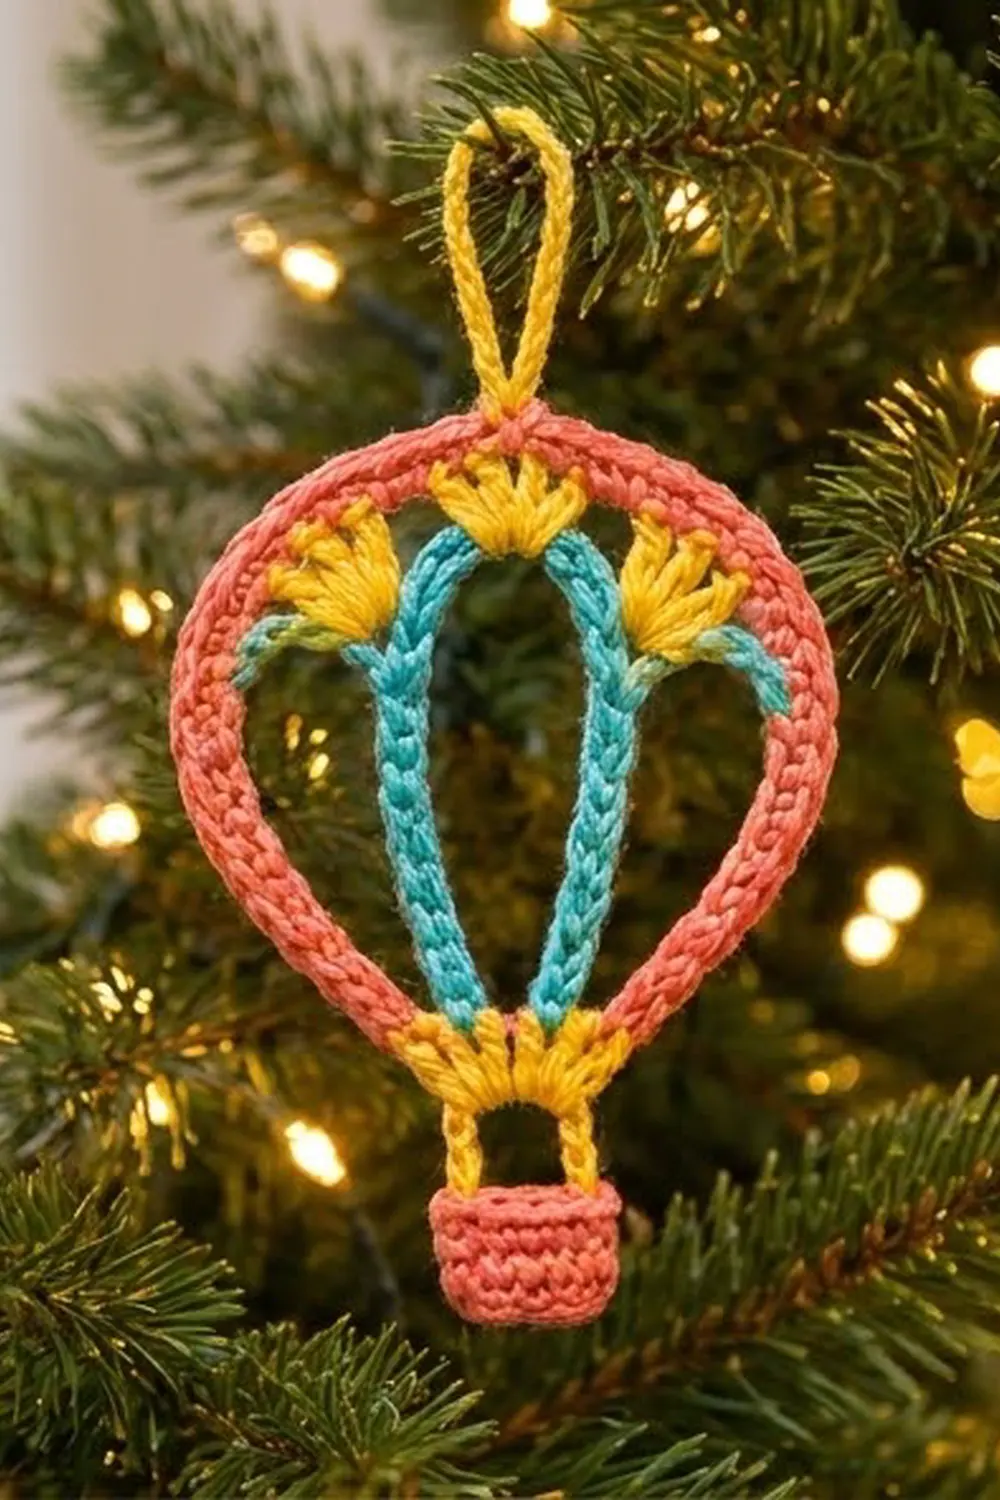
This little hot air balloon ornament has an open coral frame, three yellow fans at the top, turquoise ribs that curve down the middle, and a small coral basket below. It looks light and airy on the tree because the center of the balloon is left open.
The colors are coral, turquoise, and sunny yellow. They feel cheerful and a bit retro, and they stand out well against green branches and warm lights. The pattern uses US crochet terms throughout.
The finished balloon is 3.5 in (8.9 cm) wide and 4.25 in (10.8 cm) tall. With the lines and basket, the ornament is 6.25 in (15.9 cm) tall, not counting the 1.25 in (3.2 cm) hanging loop.
Construction overview: you crochet a coral ring of single crochet for the frame. Next you add the yellow fans and the yellow band to the inside edge of the frame, then stretch the turquoise chain ribs between them. Last you work the hanging lines, the basket, the loop, and a slip stitch border. The finished ornament is one piece.
Finished Size and Construction
- Finished size: balloon 3.5 in (8.9 cm) wide × 4.25 in (10.8 cm) tall; total height 6.25 in (15.9 cm) without the loop
- Skill level: Advanced beginner
- Terminology: US crochet terms
- Yarn weight: DK / light (#3) cotton
- Hook: 3.5 mm (E-4)
- Number of pieces: 1 (worked as one connected piece)
- Layout: one balloon with a basket hanging below
- Basket size: 1.4 in (3.6 cm) wide × 1.0 in (2.5 cm) tall
- Balloon size before border: 3.25 in (8.3 cm) × 4.0 in (10.2 cm)
- Border depth: 1/8 in (0.3 cm) on each side
Materials
Use a smooth mercerized cotton or cotton blend in DK weight, about 115 m per 50 g. Cotton keeps the frame crisp and shows off the stitch texture. Acrylic works too, but it may need firmer blocking.
- Coral: 6 g (14 m), for the frame, border, and basket
- Yellow: 4 g (9 m), for the fans, band, lines, and loop
- Turquoise: 2 g (5 m), for the ribs and branches
These amounts include a safety margin of about 20%.
Tools:
– 3.5 mm (E-4) crochet hook
– Tapestry needle
– 4 locking stitch markers
– Scissors
– Rust-proof pins and a foam blocking mat
– Spray bottle or starch (optional)
Abbreviations (US Terms)
- ch – chain
- sl st – slip stitch
- sc – single crochet
- sc2tog – single crochet 2 together
- dc – double crochet
- tr – treble crochet
- BLO / FLO – back loop only / front loop only
- st(s) – stitch(es)
- rep – repeat
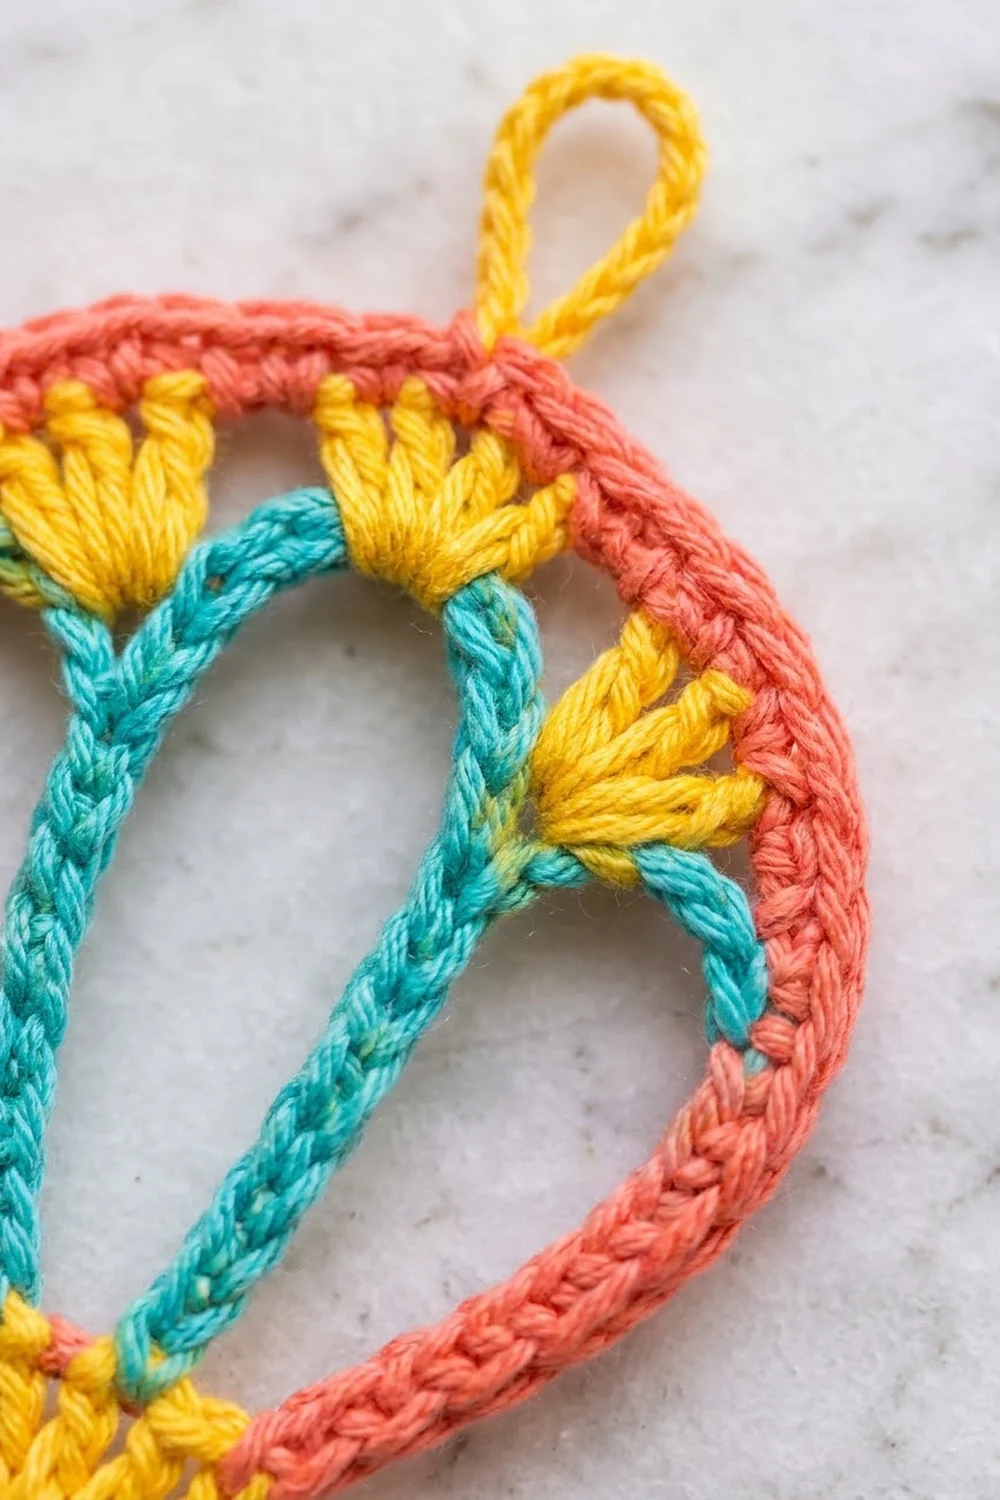
Special stitch: Fan (standing spread tr5tog). Start with a slip knot on your hook. *Yo twice, insert hook in the next indicated stitch, yo, pull up a loop, (yo, draw through 2 loops) twice. Repeat from * in each of the next 4 indicated stitches. You now have 6 loops on the hook (5 legs plus the slip knot). Yo and draw through all 6 loops, then ch 1 tightly to lock it. The 5 legs spread out across the frame, and the top of the cluster makes a point facing into the balloon.
Gauge and Checkpoints
Gauge: 5 sc and 5 rows = 1 in (2.5 cm). Chains: 11 ch = 2 in (5.1 cm).
Swatch: ch 11. Work 10 sc per row for 10 rows. The square should measure 2 × 2 in (5.1 × 5.1 cm).
Make one ornament before you plan a batch. Since this is a single piece, the first ornament is also your test.
Checkpoints:
1. After Round 1, the frame laid in a loose circle should have an inner circumference of 10 in (25.4 cm).
2. After Round 2, the outer edge should measure 12 in (30.5 cm), and the frame band should be 0.4 in (1.0 cm) wide.
3. When pinned into a balloon shape before the border, the balloon should be 3.25 × 4.0 in (8.3 × 10.2 cm).
4. After the border, the balloon should be 3.5 × 4.25 in (8.9 × 10.8 cm).
If your pieces come out too big, go down a hook size to 3.25 mm (D-3). If they come out too small, go up to 3.75 mm (F-5). Check gauge again before you start the frame. If the frame ruffles, your Round 2 is too loose. If it cups, Round 2 is too tight.
Part 1: The Coral Frame
Foundation: With coral, ch 50 and join with a sl st to the first ch to make a ring. Don’t twist it.
Round 1: Ch 1. Work 1 sc in the back bump of each ch around and join with a sl st to the first sc. (50 sc)
The front Vs of the foundation chain stay free and become the inner edge. Number those Vs 1–50, going clockwise from the join. V 1 is the top center and V 26 is the bottom center. Put a marker in V 1 and another in V 26.
Round 2: Ch 1. Sc in each of the next 4 sts, 2 sc in the next st; rep from * 9 more times. Join with a sl st. (60 sc)*
That’s 10 repeats of 5 stitches, which add up to 50 stitches worked plus 10 increases. Rounds 1 and 2 have different numbers of stitches so the frame will lie flat when you bend it into a balloon. Round 2 stitch 1 sits above V 1 (top center), and Round 2 stitch 31 sits above V 26 (bottom center). Fasten off and weave in the ends.
Part 2: The Yellow Fans
Work all three fans into the inner-edge Vs with the right side facing you.
- Center fan: Work 1 Fan across Vs 49, 50, 1, 2, 3. Fasten off.
- Fan A: Work 1 Fan across Vs 7–11. Fasten off.
- Fan B: Work 1 Fan across Vs 41–45. Fasten off.
The pattern is symmetrical: V n mirrors V (52 − n). Fan A is centered on V 9 and Fan B on V 43, which mirror each other. Each fan is about 0.6 in (1.5 cm) long, and its point faces inward. Leave a 4 in (10.2 cm) tail on Fans A and B. You’ll weave these in later.
Part 3: The Yellow Band
Row 1 (RS): Join yellow with a sl st in V 21. Ch 3 (counts as the first dc). Work 1 dc in each of Vs 22–31. (11 dc) These Vs are centered on V 26, so the band sits in the middle of the bottom of the balloon.
Row 2: Ch 1 and turn. Sc in the first dc, sc2tog, sc in each of the next 5 dc, sc2tog, sc in the top of the turning ch. (9 sc) That’s 7 stitches worked one into one plus 2 decreases.
The band is 0.6 in (1.5 cm) tall. Its top is slightly narrower than its base, which gives it the fan shape of a balloon skirt. Fasten off.
Mark the 4th sc from each end of Row 2. That’s sc 4 and sc 6, with sc 5 between them. The ribs attach here.
Part 4: The Turquoise Ribs and Branches
Each rib is a chain that you slip stitch back along, which makes a firm cord.
Rib on the Fan A side:
1. Join turquoise with a sl st in V 13 on the inner edge.
2. Ch 4, then sl st into the ch-1 point of Fan A. This is the branch.
3. Ch 12, then sl st into the marked Row 2 sc on the same side as Fan A. This is the rib.
4. Sl st in the back bump of each of the 12 rib ch, back up to the Fan A point. (12 sl st)
5. Sl st in each of the 4 branch ch, back to V 13. (4 sl st) Fasten off.
Rib on the Fan B side: Work the same steps, starting at V 39 and using Fan B and the other marked sc.
Stitch count per rib: 16 ch + 16 sl st.
The rib chain is 2.2 in (5.6 cm) long, which is a bit longer than the straight distance from the fan to the band. That extra length makes each rib bow outward slightly, like in the photo. The branch is 0.75 in (1.9 cm) long and runs out to the widest part of the frame.
Part 5: Lines and Basket
Lines: Join yellow with a sl st in the BLO of Round 2 stitch 28. Ch 6 and fasten off, leaving a 4 in (10.2 cm) tail. Do the same at Round 2 stitch 34. These two stitches sit evenly on either side of stitch 31 (bottom center), 1.2 in (3.0 cm) apart. Each line hangs about 1 in (2.5 cm) below the balloon.
Basket foundation: Make a slip knot with coral. Sl st into the 6th ch of the first line, ch 5, then sl st into the 6th ch of the second line. (7 sts: sl st, 5 ch, sl st)
Row 1: Ch 1 and turn. Work 1 sc in each st across. (7 sc)
Rows 2–5: Ch 1 and turn. Work 1 sc in each st across. (7 sc)
The basket is 7 stitches wide, which is 1.4 in (3.6 cm), and 5 rows tall, which is 1.0 in (2.5 cm). Fasten off.
Part 6: Hanging Loop
Join yellow with a sl st in the BLO of Round 2 stitch 1 (top center). Ch 14 and sl st in the same stitch to make a loop. Work 16 sc into the loop, over the chain, then sl st into the starting stitch. Fasten off. The loop stands 1.25 in (3.2 cm) tall.
Border
Border gauge: 5 sl st = 1 in (2.5 cm), one into each Round 2 stitch.
The balloon’s outer edge doesn’t have straight sides, so count it in four arcs of Round 2 stitches:
– Upper right: sts 1–15
– Lower right: sts 16–30
– Lower left: sts 31–45
– Upper left: sts 46–60
Border Round: Join coral in the FLO of Round 2 stitch 1. Sl st in the FLO of each stitch around: 15 sl st per arc, 60 sl st total. Join to the first sl st and fasten off.
Why the math works:
– Round 1 has 50 stitches. Round 2 works all 50 of them and adds 10 increases, for 60.
– The border adds no stitches: it’s one sl st per existing stitch, 60 + 0 = 60.
– 4 arcs × 15 = 60.
The loop and lines were joined in the back loops, so the front loops are still free. The border crosses them without catching any yellow. It adds a rounded edge 1/8 in (0.3 cm) deep, which brings the balloon from 3.25 × 4.0 in (8.3 × 10.2 cm) to 3.5 × 4.25 in (8.9 × 10.8 cm).
Final Blocking
- Weave in all ends along stitches of the same color.
- Wet the ornament, or spray it until it’s damp all the way through.
- Lay it right side up on the blocking mat.
- Pin the frame into a balloon shape 3.5 in (8.9 cm) wide and 4.25 in (10.8 cm) tall, with the widest point about 1.5 in (3.8 cm) below the top.
- Taper the bottom down to the band.
- Pin each fan point, then ease the ribs into matching, gentle curves.
- Pin the basket square, centered 1 in (2.5 cm) below the balloon.
- For a firmer ornament, spray lightly with starch.
- Let it dry completely before you unpin it.
Final Quality-Control Checklist
- The frame has 50 sc in Round 1 and 60 sc in Round 2, and lies flat.
- All three fans have exactly 5 legs and their points face inward.
- The band has 11 dc in Row 1 and 9 sc in Row 2.
- Each rib has 12 ch plus 12 sl st, and each branch has 4 ch plus 4 sl st.
- Both ribs curve the same amount.
- The lines are joined at Round 2 stitches 28 and 34, the same distance from the center.
- The basket is 7 sc wide and 5 rows tall.
- The border has 60 sl st, 15 per arc.
- The finished size is 3.5 × 4.25 in (8.9 × 10.8 cm) for the balloon and 6.25 in (15.9 cm) overall.
Troubleshooting
- Frame twists: The foundation chain was twisted when you joined it. Start over, and keep all the chain Vs facing the same way.
- Frame cups: Round 2 is too tight. Loosen your tension or use a hook half a size larger.
- Frame ruffles: Round 2 is too loose. Check that you made exactly 10 increases.
- Fans look flat: Make sure all 5 legs go into 5 separate Vs, and pull the closing ch 1 snug.
- Ribs sag: Your chains are too loose. Work the rib with 11 ch instead of 12.
- Ribs pull the frame inward: Your chains are too tight. Work 13 ch instead.
- Basket tilts: One line has more chains than the other. Recount both, then re-block.
Care
Hand wash in cool water, press out the water in a towel, and re-block flat to dry. Store it flat or hang it so the ribs keep their shape.
Final Notes
Here’s the full measurement chain:
– At a gauge of 5 sc = 1 in (2.5 cm), Round 1 is 50 stitches, or 10 in (25.4 cm).
– Round 2 is 60 stitches, or 12 in (30.5 cm), which pins into a 3.25 × 4.0 in (8.3 × 10.2 cm) balloon.
– The border adds 1/8 in (0.3 cm) on each side, for a 3.5 × 4.25 in (8.9 × 10.8 cm) balloon.
– The lines add 1 in (2.5 cm) and the basket adds 1.0 in (2.5 cm), for a total of 6.25 in (15.9 cm).
If your gauge is right at each checkpoint, the finished size will be too. Make one in each color combination and give the tree a whole sky of balloons.
Happy crocheting!