

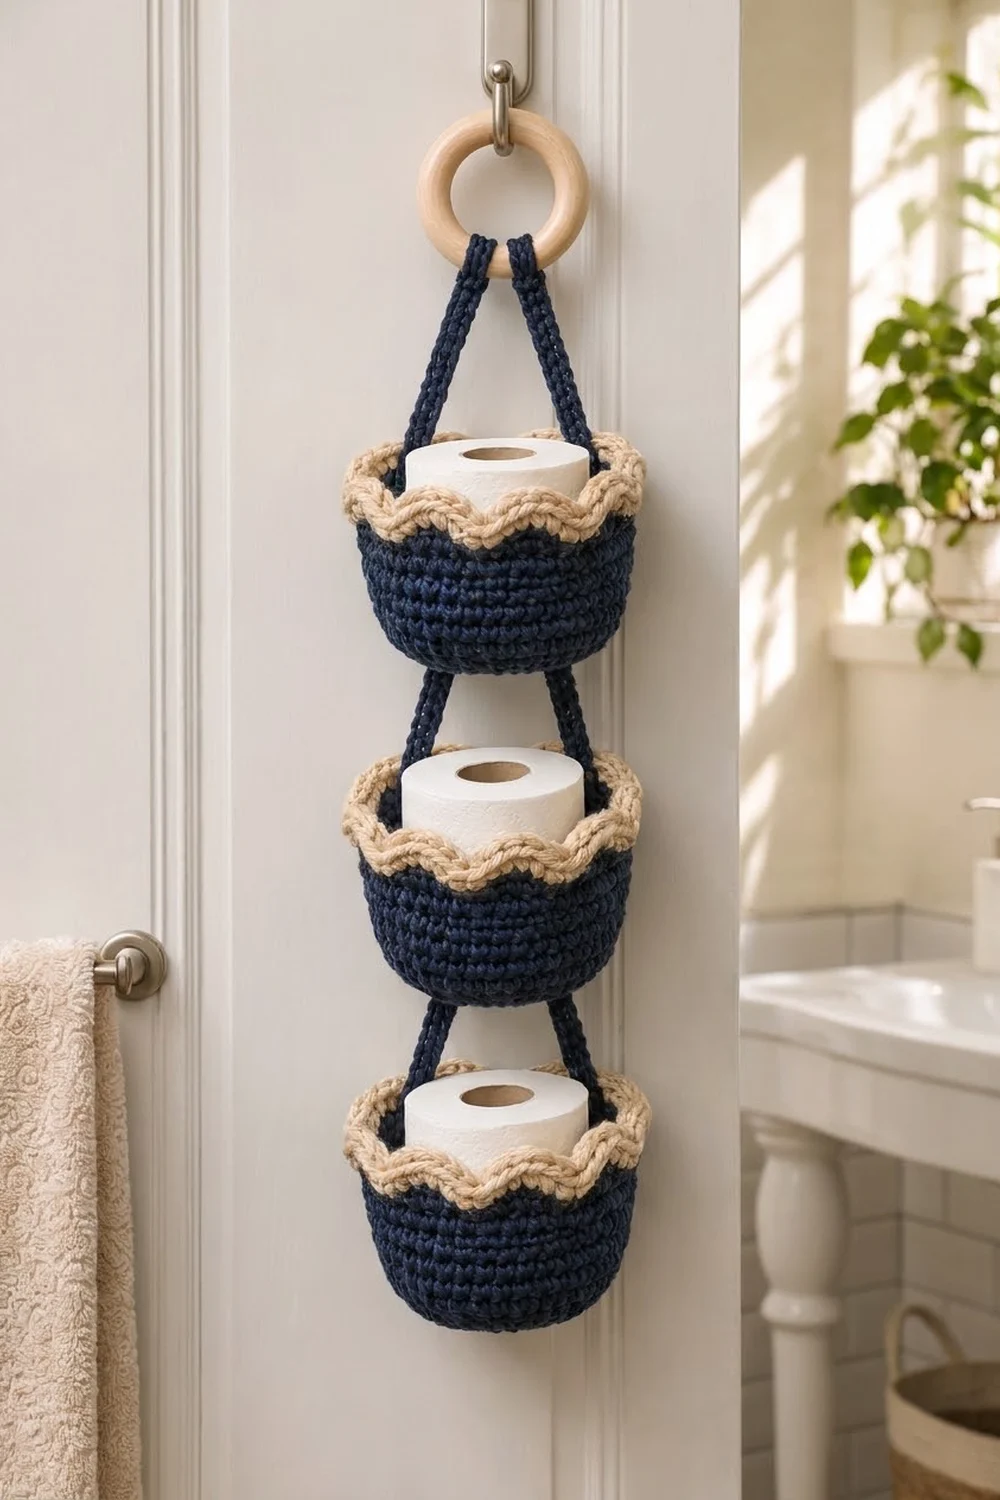
This hanging holder stacks three toilet rolls in a tidy column. It hangs from a single wooden ring on a door hook, towel hook or wall peg. Each basket is worked in dense navy single crochet and finished with a cream scalloped rim with a corded edge.
The navy and cream colors give it a calm, nautical look that suits white bathroom doors and wood accents. The baskets are firm enough to keep their shape when empty, and the rolls sit with their tops showing so you can easily grab one.
The pattern uses US crochet terms. The finished holder is about 23 in (58.4 cm) long from the top of the ring to the base of the lowest basket. Each basket is about 7 in (17.8 cm) wide at the rim and 3.67 in (9.3 cm) tall.
You will make three identical baskets from the base up in joined rounds and add the scalloped rim in cream. Then you make two slip-stitch cords, wrap them around a wooden ring and sew them down the sides of the baskets.
Finished Size and Construction
- Finished length: about 23 in (58.4 cm), ring included
- Skill level: Easy+
- Terminology: US
- Yarn weight: Bulky (#5) cotton or cotton blend
- Hook: 6 mm (J-10)
- Number of pieces: 3 baskets + 2 cords + 1 wooden ring
- Layout: 1 column of 3 baskets
- Piece size (one basket): base 5.5 in (14.0 cm) across; rim about 7 in (17.8 cm) across; 3.67 in (9.3 cm) tall
- Size before border (navy body only): wall height 2.67 in (6.8 cm), opening about 7 in (17.8 cm)
- Border (rim) depth: about 1 in (2.5 cm)
Materials
Use a smooth, firm cotton or cotton-blend bulky yarn of about 110 m per 100 g. Cotton keeps its shape, handles bathroom humidity well and gives the clear stitch definition shown here. Avoid fuzzy or very stretchy acrylics, because the baskets will sag.
- Color A – Navy: 150 g / 165 m (baskets and cords)
- Color B – Cream/Beige: 50 g / 55 m (scalloped rims)
These amounts include a margin of roughly 15–25% over the yarn actually used.
Tools:
– 6 mm (J-10) crochet hook
– 1 natural wooden ring, 3 in (7.6 cm) outer diameter
– Tapestry needle
– 4 locking stitch markers
– Scissors
– Measuring tape
– Spray bottle and a toilet roll or small jar for blocking
Abbreviations (US Terms)
- ch – chain
- sl st – slip stitch
- sc – single crochet
- dc – double crochet
- BLO – back loop only
- rsc – reverse single crochet (crab stitch)
- st(s) – stitch(es)
- rnd(s) – round(s)
- MR – magic ring
Special stitch – reverse single crochet (rsc): Work from left to right (right-handed). Insert the hook into the next stitch to the right, yarn over, pull up a loop, then yarn over and pull through both loops on the hook. This gives the twisted, rope-like edge on the rim.
Shell: 5 dc worked in the same stitch.
Gauge and Checkpoints
Gauge: 11 sc and 12 rnds = 4 in (10.2 cm) in sc worked in joined rounds.
Cord gauge: 3 sl st along the chain = 1 in (2.5 cm), so 9 sts = 3 in (7.6 cm).
Make one complete basket before starting the others. It works as your gauge swatch, and you can check it against a real toilet roll.
Checkpoints:
– After Rnd 4 (24 sts): base is 2.75 in (7.0 cm) across.
– After Rnd 8 (48 sts): base is 5.5 in (14.0 cm) across.
– After Rnd 16: navy wall is 2.67 in (6.8 cm) tall, and the opening is about 7 in (17.8 cm) across.
– After Rnd 19: total basket height is 3.67 in (9.3 cm).
If your base is too big: go down to a 5.5 mm hook. A standard roll is about 4.5 in (11.4 cm) across, so a slightly smaller base still works, but a loose base will sag.
If your base is too small: go up to a 6.5 mm hook. Make sure a roll drops into the finished basket without forcing it.
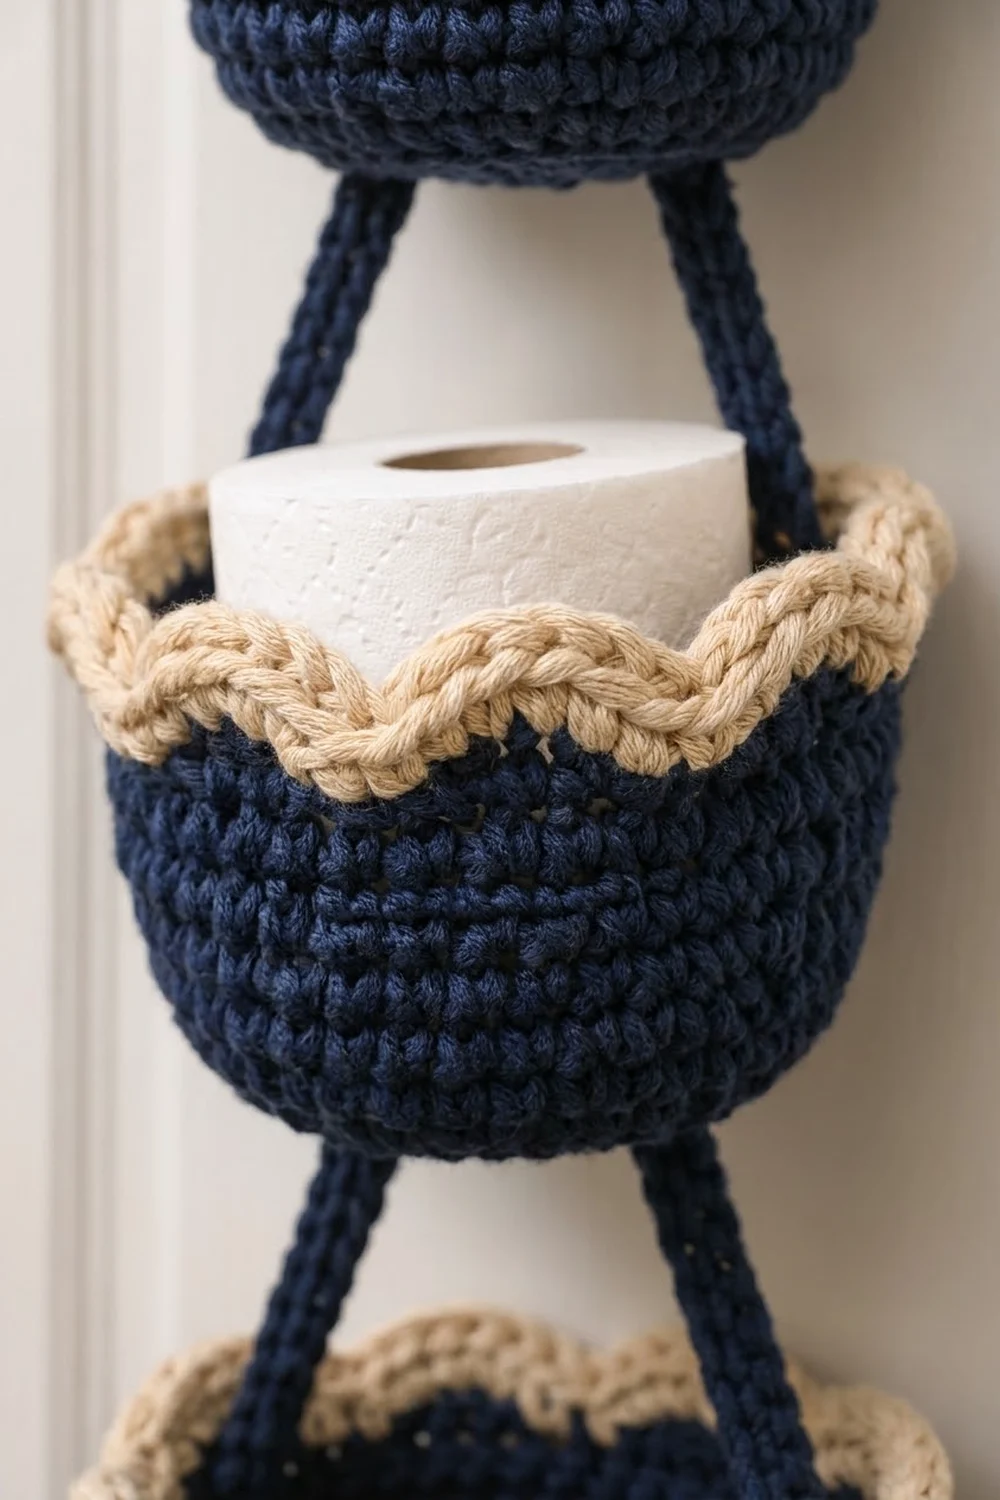
Basket (Make 3)
Work in joined rounds. Join each round with a sl st to the first sc. The ch 1 at the start of a round never counts as a stitch. Keep the joins in one straight line, because a cord will later cover this seam.
Base
With Color A, make a MR.
Rnd 1: Ch 1, 6 sc in MR, join. (6 sts)
Rnd 2: Ch 1, 2 sc in each st around, join. (12 sts)
Rnd 3: Ch 1, sc 1, 2 sc in next 6 times, join. (18 sts)
Rnd 4: Ch 1, sc 2, 2 sc in next 6 times, join. (24 sts)
Rnd 5: Ch 1, sc 3, 2 sc in next 6 times, join. (30 sts)
Rnd 6: Ch 1, sc 4, 2 sc in next 6 times, join. (36 sts)
Rnd 7: Ch 1, sc 5, 2 sc in next 6 times, join. (42 sts)
Rnd 8: Ch 1, sc 6, 2 sc in next 6 times, join. (48 sts)
The base should lie flat and measure 5.5 in (14.0 cm) across.
Wall
Rnd 9 (turning round): Ch 1, sc in BLO of each st around, join. (48 BLO sc + 0 added = 48 sts)
The unused front loops make a crisp ridge, and the wall starts rising from here.
Rnds 10–11: Ch 1, sc in each st around, join. (48 sts)
Rnd 12: Ch 1, sc 7, 2 sc in next 6 times, join. (54 sts)
Rnd 13: Ch 1, sc in each st around, join. (54 sts)
Rnd 14: Ch 1, sc 8, 2 sc in next 6 times, join. (60 sts)
Rnds 15–16: Ch 1, sc in each st around, join. (60 sts)
Fasten off Color A and weave in the tail. The wall is 8 rnds tall, about 2.67 in (6.8 cm). The two increase rounds give it a gentle outward flare.
Scalloped Rim (Border)
Rim gauge: each scallop uses 6 sts of Rnd 17 and is about 2.2 in (5.6 cm) wide at the rim edge. The three rim rounds add about 1 in (2.5 cm) of height.
Rnd 17: Join Color B with a sl st in the st directly above the seam line. Ch 1, sc in the same st and in each st around, join. (60 sc + 0 added = 60 sts)
Call the first sc of this round st 1. Place a marker in st 1 and another in st 31. These two stitches face each other across the basket and mark where the cords will go.
Rnd 18 (shells): Do not ch. Skip 2 sts, 5 dc in next st, skip 2 sts, sl st in next st 10 times. The last sl st lands in st 1. (10 shells = 50 dc + 10 sl st = 60 sts)
The sl sts sit in sts 1, 7, 13, 19, 25, 31, 37, 43, 49 and 55. Both marked stitches (1 and 31) are valleys between scallops.
Rnd 19 (corded edge): Ch 1. Working from left to right, rsc in each st of Rnd 18 around, including each sl st valley. Join with a sl st to the first rsc. (60 rsc + 0 added = 60 sts)
Fasten off and weave in the ends.
Why the math works: Each scallop repeat uses exactly 6 sts (1 sl st + 2 skipped + 1 shell base + 2 skipped). Since 60 ÷ 6 = 10, the round closes with no partial repeat. Because the number of scallops is even, the two cord points split the rim into two halves of 30 sts each, with exactly 5 scallops per half. The rsc round works 1 st into each of the 60 stitches of Rnd 18, so it keeps the same count and does not ruffle.
Make All Pieces
Baskets – make 3:
– Color A per basket: about 40 g / 44 m (Rnds 1–16)
– Color B per basket: about 13 g / 14 m (Rnds 17–19)
Cords – make 2 (Color A):
Ch 70. Sl st in the back bump of the 2nd ch from the hook and in each ch across. (69 sl sts)
Each cord should measure 23 in (58.4 cm), give or take 0.5 in (1.3 cm). Use about 5 g / 5.5 m per cord.
Place markers to divide each cord into sections, counting from the starting end:
- Sts 1–6: ring wrap, 2 in (5.1 cm)
- Sts 7–24: hanger, 6 in (15.2 cm)
- Sts 25–35: top basket, 11 sts
- Sts 36–41: gap, 2 in (5.1 cm)
- Sts 42–52: middle basket, 11 sts
- Sts 53–58: gap, 2 in (5.1 cm)
- Sts 59–69: bottom basket, 11 sts
Layout grid:
          ( O )      <- wooden ring
          /   \      <- hanger, sts 7–24
        [Basket 1]   <- sts 25–35
         |     |     <- gap, sts 36–41
        [Basket 2]   <- sts 42–52
         |     |     <- gap, sts 53–58
        [Basket 3]   <- sts 59–69
Joining
Method: Whipstitch with Color A and a tapestry needle. Sew one cord stitch to one basket round.
Stitch-to-stitch logic: Each basket is 11 rounds tall from the turning round to the rim edge (Rnds 9–19). Each basket section of the cord is also 11 sts. The cord gauge (3 sts per inch) matches the round gauge (3 rnds per inch), so the cord lies flat without bunching or stretching.
- Ring: Wrap sts 1–6 of Cord 1 around the bar of the wooden ring. Sew the end of st 1 to st 7. Repeat with Cord 2, placing it about 0.5 in (1.3 cm) beside Cord 1 on the ring.
- Top basket: Line up Cord 1 with marker st 1 on the outside of the basket. Sew cord st 35 at the Rnd 19 valley, st 34 at Rnd 18, st 33 at Rnd 17, and so on down to st 25 at Rnd 9. Follow a straight vertical line that covers the seam. Sew Cord 2 the same way at marker st 31.
- Middle basket: Leave sts 36–41 free as the gap. Sew sts 42–52 to the middle basket the same way, with st 52 at Rnd 19 and st 42 at Rnd 9.
- Bottom basket: Leave sts 53–58 free. Sew sts 59–69 to the bottom basket, with st 69 at Rnd 19 and st 59 at Rnd 9.
Tension: Catch one leg of the cord and one leg of the basket stitch with each pass. Snug each stitch until the pieces touch, but stop before the fabric puckers. Sew the top 2 and bottom 2 cord stitches of each basket section twice, because these points carry the weight.
Size checkpoint: Hang the holder on a hook. It should measure about 23 in (58.4 cm) from the top of the ring to the lowest base. The two gaps should each be 2 in (5.1 cm), and all three baskets should hang level.
Final Blocking
- Put a toilet roll, or a jar wrapped in a hand towel, inside each basket so the wall stands straight.
- Mist the baskets and rims evenly until damp, not soaked.
- Pinch each scallop into an even rounded arch. Pin the valleys so all 10 sit at the same height.
- Roll the corded edge gently between your fingers so it sits upright.
- Hang the holder while it dries so the cords straighten under light weight.
- Let it dry completely, about 12–24 hours, before loading it with rolls.
Final Quality-Control Checklist
- Each base has 48 sts and measures 5.5 in (14.0 cm) across.
- Each basket has 60 sts at the top of the wall and 10 even scallops.
- Each basket is 3.67 in (9.3 cm) tall.
- Each cord has 69 sts and measures 23 in (58.4 cm).
- Both cords are sewn over the st 1 and st 31 valleys, and the seam lines are hidden.
- Gaps are 2 in (5.1 cm), and the baskets hang level.
- The ring wraps are sewn securely.
- All ends are woven in at least 2 in (5.1 cm).
Troubleshooting
Base cups instead of lying flat: Your tension is too tight. Go up a hook size for Rnds 1–8 only.
Base ripples: Your tension is too loose, or you have extra stitches. Recount each round against the totals.
Wall leans outward too much: Work Rnd 14 as a plain round instead, and adjust the rim to 54 sts with 9 scallops. Note that the cords will then sit off-center.
Scallops lean or twist: Check that every repeat skips exactly 2 sts on each side of the shell.
Rim flares or ruffles: Your rsc is too loose. Work it with a 5.5 mm hook.
Baskets tilt: One cord section is sewn higher than the other. Unpick it and re-align by round number.
Cords stretch: Remake them with a tighter chain or a 5.5 mm hook. Sew the stress points twice.
Care
Hand wash in cool water with mild soap. Press out the water in a towel, reshape over a roll and air dry. Do not tumble dry.
Final Notes
Everything in this pattern follows one measurement chain. The 48-st base measures 5.5 in (14.0 cm). The wall grows to 60 sts and about 7 in (17.8 cm) across. The rim divides into 10 scallops of 6 sts each. Each basket stands 11 rounds tall, 3.67 in (9.3 cm), which matches an 11-st cord section. The cord sections add up to 23 in (58.4 cm). If you check your gauge on the first basket, the other two baskets and the cords will line up.
Happy crocheting!