

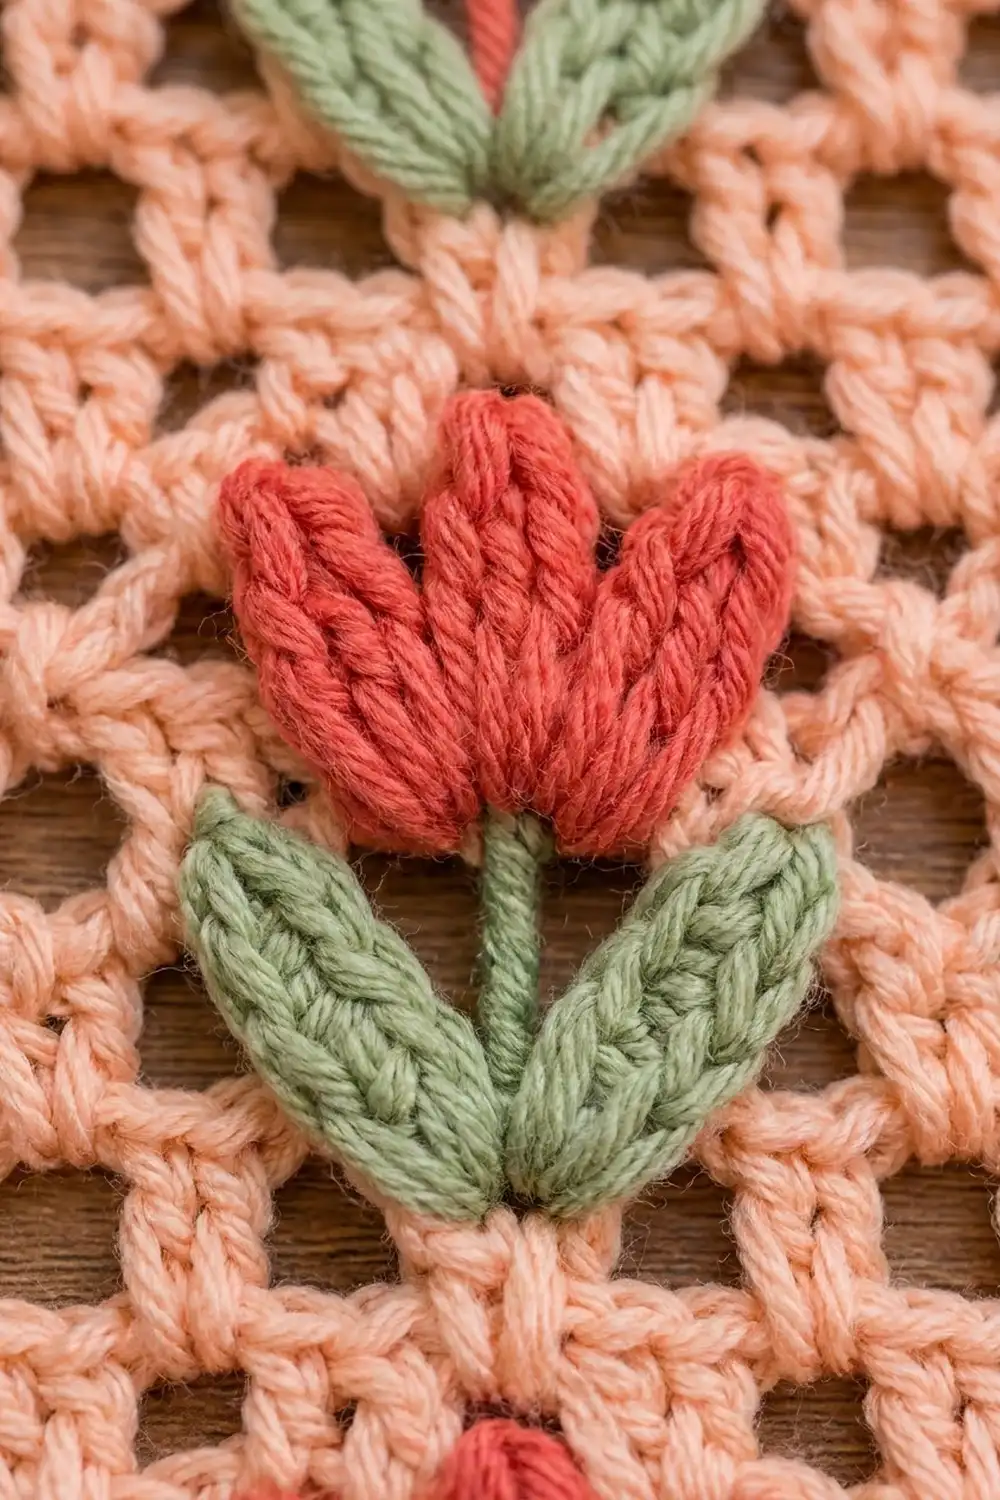
This panel sets rows of coral tulips into a light peach mesh. Each tulip has a three-petal puff fan for its head and two green leaves that angle outward from a short stem. The tulips sit in four neat tiers of three, with open mesh all around them, so the panel looks airy but still feels solid.
The colors are soft: peach for the background, coral red for the petals and sage green for the leaves. A small chain-loop border gives the edge a gently scalloped outline and rounds the corners.
This pattern uses US crochet terms. The finished panel measures 11 in x 15.25 in (27.9 cm x 38.7 cm) after blocking.
The panel is worked flat in rows from the bottom up. It starts with a simple filet-style mesh. In the motif rows, you drop the peach yarn and work each leaf group and petal fan straight into the center stitch of a two-square window. Then you add a two-round border and block the panel.
Finished Size and Construction
- Finished size: 11 in x 15.25 in (27.9 cm x 38.7 cm)
- Skill level: Intermediate
- Terminology: US
- Yarn weight: Aran / heavy worsted (#4)
- Hook: 6.0 mm (J-10)
- Number of pieces: 1 single panel
- Layout: 3 tulips across x 4 tiers = 12 tulips
- Panel size before border: 10 in x 14.25 in (25.4 cm x 36.2 cm)
- Border depth: 0.5 in (1.3 cm) on each side
- Single tulip size: about 2 in wide x 2.25 in tall (5.1 cm x 5.7 cm)
Materials
Use a smooth, plied aran-weight cotton or cotton blend so the puffs stand out clearly. Fuzzy or very splitty yarns hide the mesh and blur the petal shapes.
- Peach (background and border): 95 g (about 170 m)
- Coral red (tulip heads): 15 g (about 27 m)
- Sage green (leaves and stems): 12 g (about 22 m)
These amounts include roughly a 15% margin for the gauge swatch, tails and small differences in tension.
Tools:
– 6.0 mm (J-10) crochet hook
– Tapestry needle
– Scissors
– Locking stitch markers
– Rust-proof pins and a blocking mat
– Measuring tape
– Spray bottle or steamer
Abbreviations (US Terms)
- ch – chain
- sk – skip
- sl st – slip stitch
- sc – single crochet
- dc – double crochet
- sp – space
- st(s) – stitch(es)
- RS / WS – right side / wrong side
- rep – repeat
Special stitches:
- 3-dc cluster (cl): *Yarn over, insert hook in the st, yarn over and pull up a loop, yarn over and pull through 2 loops; rep from * 2 more times in the same st, then yarn over and pull through all 4 loops on the hook.
- Puff: *Yarn over, insert hook in the st, yarn over and pull up a loop to about 0.75 in (1.9 cm); rep from * 2 more times in the same st (7 loops on the hook), yarn over and pull through all 7 loops, then ch 1 to lock. The locking ch does not count as a stitch.
- Leaf Group: (Cl, ch 1, dc, ch 1, cl) all in the same st. This counts as 5 sts. The center dc is the stem, and the two clusters lean outward as the leaves.
- Tulip Fan: (Puff, ch 1, puff, ch 1, puff) all in the same st. This counts as 5 sts.
Gauge and Checkpoints
Mesh gauge: 4 mesh squares (12 sts) and 4 rows = 4 in wide x 3 in tall (10.2 cm x 7.6 cm).
One mesh square is 1 dc plus 2 ch, so each square is 1 in (2.5 cm) wide. Each row is 0.75 in (1.9 cm) tall.
Test first. Ch 17 and work Row 1 below over 4 squares. Then work 7 more mesh rows. The swatch should measure 4 in x 6 in (10.2 cm x 15.2 cm).
Checkpoints while working the panel:
– After Row 2: 10 in wide x 1.5 in tall (25.4 cm x 3.8 cm)
– After Row 6 (first tier): 4.5 in (11.4 cm) tall
– After Row 10: 7.5 in (19.1 cm) tall
– After Row 14: 10.5 in (26.7 cm) tall
– After Row 18: 13.5 in (34.3 cm) tall
– After Row 19: 14.25 in (36.2 cm) tall
If your work is too big, go down a half hook size (5.5 mm). If it is too small, go up to 6.5 mm. If only the height is off, adjust how tall you pull up your dc rather than changing hooks.
Stitch Layout
Every mesh row has 31 sts: 11 dc posts and 10 ch-2 spaces, which makes 10 squares.
Across each row, the squares are used like this:
margin 1 | tulip 2 | gap 1 | tulip 2 | gap 1 | tulip 2 | margin 1 = 10 squares
A tulip window is 2 squares wide. It runs from one dc post to another and has a center dc in the middle: ch-2 sp, dc, ch-2 sp, which is 5 sts. Both the Leaf Group and the Tulip Fan are worked into that center dc, and each one makes exactly 5 sts. That means each one replaces the 5 sts it covers, and the count stays at 31 in every row.
Color handling: Change color on the last yarn over of the stitch before the change. On leaf rows, lay the peach strand along the top of the row below and work the Leaf Group over it so it is enclosed. On tulip rows, let the peach float loosely behind the fan; the puffs hide it. Cut the green or coral after each group, leaving a 6 in (15.2 cm) tail.
Panel Pattern
Foundation: With peach, ch 35.
Row 1 (RS): Dc in the 8th ch from the hook. *Ch 2, sk 2 ch, dc in the next ch; rep from * 8 more times. Turn. (11 dc, 10 ch-2 sps = 31 sts; 10 squares)
Row 2 (WS): Ch 5 (counts as dc and ch 2). Sk the first ch-2 sp, dc in the next dc. *Ch 2, dc in the next dc; rep from * across, working the last dc in the 3rd ch of the turning chain. Turn. (31 sts)
Row 2 is the Mesh Row. Every row marked “Mesh Row” below is worked exactly like Row 2.
Row 3 (RS, Leaf Row): Ch 5, dc in the next dc. Do the following 3 times: sk the ch-2 sp; with green, work a Leaf Group in the next dc; sk the ch-2 sp; with peach, dc in the next dc. Between tulips, and after the third tulip, work ch 2 and dc in the next dc. Work the last dc in the 3rd ch of the turning chain. Turn.
Count check: 3 (turning ch) + 2 + 1 = 6. Each of the three tulip windows adds 5 + 1 = 6 sts, for 18. Each of the three “ch 2, dc” steps after a tulip adds 3 sts, for 9. The last “ch 2, dc” in the turning chain is the third of those steps. Total: 6 + 18 + 9 = 33, minus the 2 sts counted twice at the start. Checked by posts instead: 11 dc posts + 10 spans = 31 sts.
(Simple check: there are still 10 posts plus the turning chain, and each tulip window spans exactly 2 squares.)
Row 4 (WS, Mesh Row over leaves): Ch 5, dc in the next dc. Over each Leaf Group, work ch 2, sk (cl, ch-1 sp), dc in the stem dc, ch 2, sk (ch-1 sp, cl), then dc in the next dc. In all other squares, work ch 2 and dc in the next dc. Turn. (31 sts)
Row 5 (RS, Tulip Row): Work as for Row 3, but with coral, and work a Tulip Fan into each center dc (the dc that sits above each stem). Turn. (31 sts)
Row 6 (WS, Mesh Row over tulips): Ch 5, dc in the next dc. Over each Tulip Fan, work ch 2, sk (puff, ch-1 sp), dc in the center puff, ch 2, sk (ch-1 sp, puff), then dc in the next dc. Work all other squares as normal mesh. Turn. (31 sts)
Rows 7–10: Rep Rows 3–6. (Tier 2)
Rows 11–14: Rep Rows 3–6. (Tier 3)
Rows 15–18: Rep Rows 3–6. (Tier 4)
Row 19 (RS): Mesh Row. Fasten off.
The 3 tulip columns are centered on dc posts 7, 16 and 25. Post 16 is the exact middle of the 31 sts, so the layout is symmetrical. There are 2 plain mesh rows below the first leaves (Rows 1–2) and 2 above the last petals (Rows 18–19).
Weave in all the green and coral tails now, along the backs of their own groups.
Border
Border gauge: 12 sc = 4 in (10.2 cm), which is 3 sc per inch.
Round 1: With RS facing, join peach with a sc in the 3rd ch of the turning ch-5 at the top-right corner of Row 19.
- Top: *2 sc in the next ch-2 sp, sc in the next dc; rep from * 9 more times. (31 sc)
- Corner: Ch 2.
- Left side: Work 2 sc in each row end, but 3 sc in the row ends of Rows 2, 6, 10, 14 and 18. (19 x 2 + 5 = 43 sc)
- Corner: Ch 2.
- Bottom: Working into the foundation chain, sc at the base of each dc and 2 sc in each ch-2 sp. (11 + 20 = 31 sc)
- Corner: Ch 2.
- Right side: Work as for the left side. (43 sc)
- Corner: Ch 2, then sl st to the first sc.
Total: 148 sc and 4 corner ch-2 sps.
Each side count already includes the first and last sc on that side. The ch-2 corners sit between the sides and are not counted in any side.
Round 2: Ch 1, sc in the same st.
- Top: *Ch 3, sk 1, sc in the next sc; rep from * 14 more times. (15 loops)
- Corner: Ch 3, sc in the corner ch-2 sp, ch 3, sc in the first sc of the next side.
- Side: *Ch 3, sk 1, sc in the next sc; rep from * 20 more times. (21 loops)
Work the bottom like the top and the second side like the first side, with the same corner between each pair. After the last corner sc, ch 3 and sl st to the first sc. Fasten off.
Total: 80 loops (15 + 21 + 15 + 21 + 8 corner loops).
Why the math works: Each loop uses 2 sc, and an odd side count leaves one sc at each end of the side. On the top and bottom, 1 + (15 x 2) = 31. On the sides, 1 + (21 x 2) = 43. Each corner gets 2 loops, which is what makes it round.
The top and bottom work out to 3.1 sc per inch (31 sc over 10 in), and the sides to 3.0 sc per inch (43 sc over 14.25 in). Both match the border gauge, so the edge stays flat and does not ruffle.
Final Blocking
- Soak the panel in cool water for 10 minutes. Press the water out gently, without wringing.
- Roll it in a towel to take out the extra moisture.
- Lay it RS up on a blocking mat.
- Pin the corners to 11 in x 15.25 in (27.9 cm x 38.7 cm).
- Pin every 2nd border loop along each side so the scallops stay open.
- Use your fingertips to straighten the tulip columns so each stem sits upright.
- Fluff each puff petal from the back so the fans stand up.
- Leave it to dry completely before unpinning.
Final Quality-Control Checklist
- All rows have 31 sts (11 posts, 10 squares)
- There are 12 tulips in 4 tiers of 3, lined up in columns
- Every Leaf Group has a green center stem
- Every Tulip Fan has 3 distinct petals
- No peach floats show from the RS
- Border Round 1: 31 / 43 / 31 / 43 sc
- Border Round 2: 80 loops
- Panel measures 11 in x 15.25 in (27.9 cm x 38.7 cm)
- All tails are woven in and trimmed
Troubleshooting
The panel is getting narrower. You are probably missing the last dc in the turning chain. Count your posts every row.
The tulips lean sideways. The fan went into the wrong post. Count squares from the edge: tulips sit on posts 7, 16 and 25.
The puffs look flat. Pull up longer loops and always ch 1 to lock each puff.
The peach float shows through the mesh. Keep it relaxed, and on leaf rows work it inside the stitches.
The border ripples. Your sc are too loose. Go down a half hook size for the border only.
The edges cup inward. Check that you added the 5 extra sc on each side in Round 1.
Care
Hand wash in cool water with mild soap and dry flat. Reshape the petals while the panel is damp.

Final Notes
The measurements build on each other step by step. Each mesh square is 1 in (2.5 cm) wide and each row is 0.75 in (1.9 cm) tall. Ten squares make the 10 in (25.4 cm) width, and 19 rows make the 14.25 in (36.2 cm) height. The two border rounds add 0.5 in (1.3 cm) on each side, which brings the panel to 11 in x 15.25 in (27.9 cm x 38.7 cm).
If your swatch matches the gauge, every later checkpoint will fall into place.
Happy crocheting!