

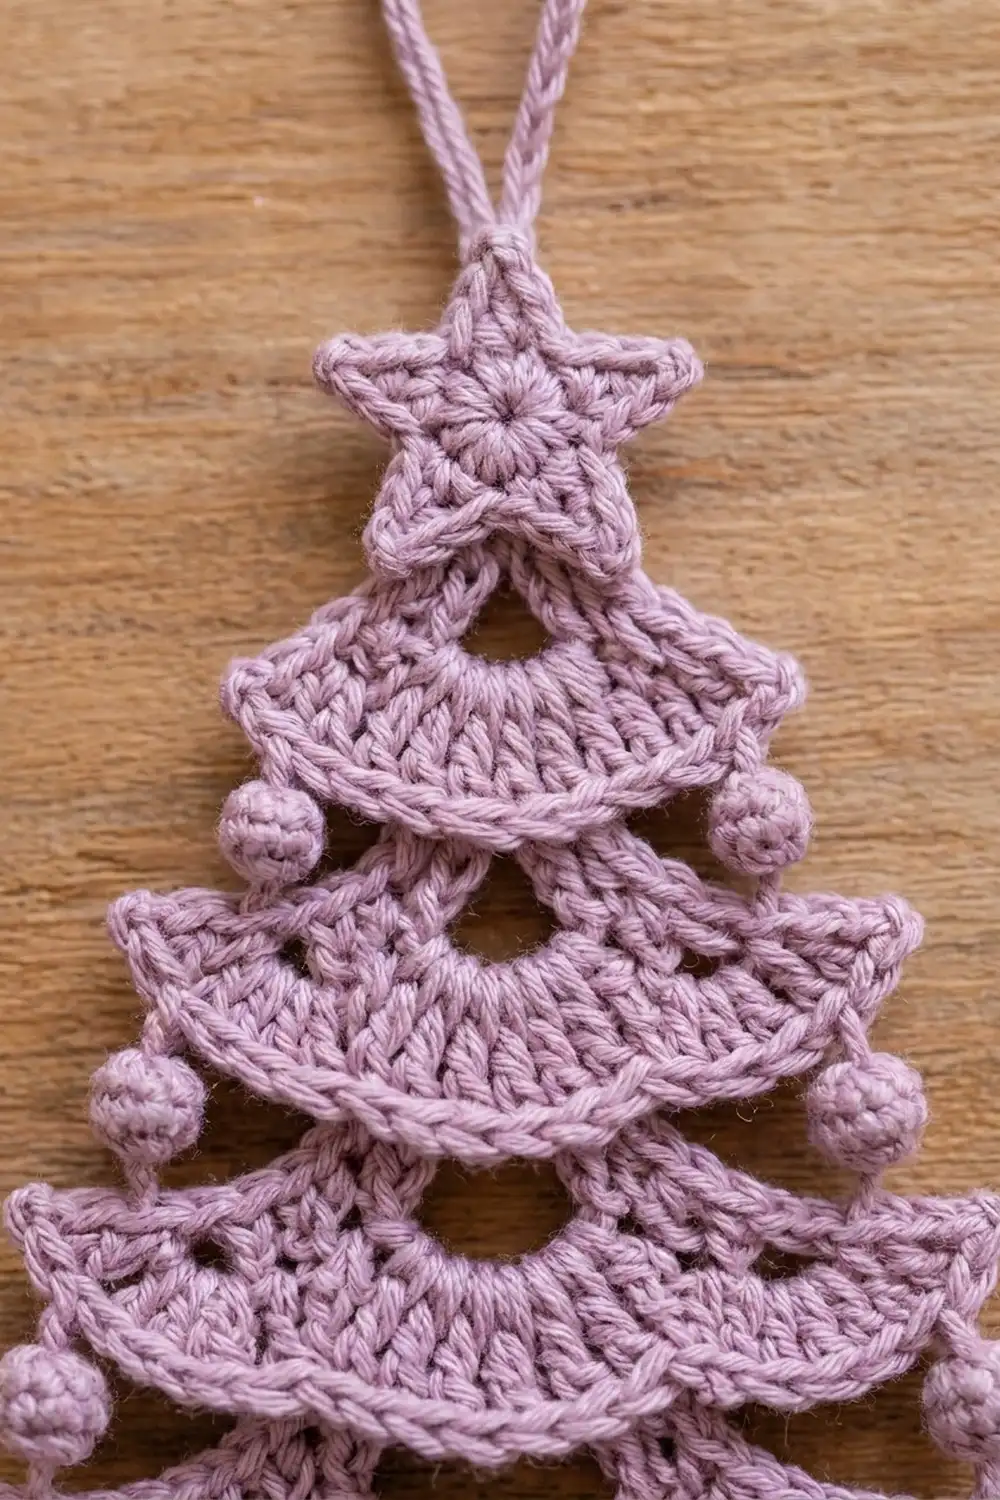
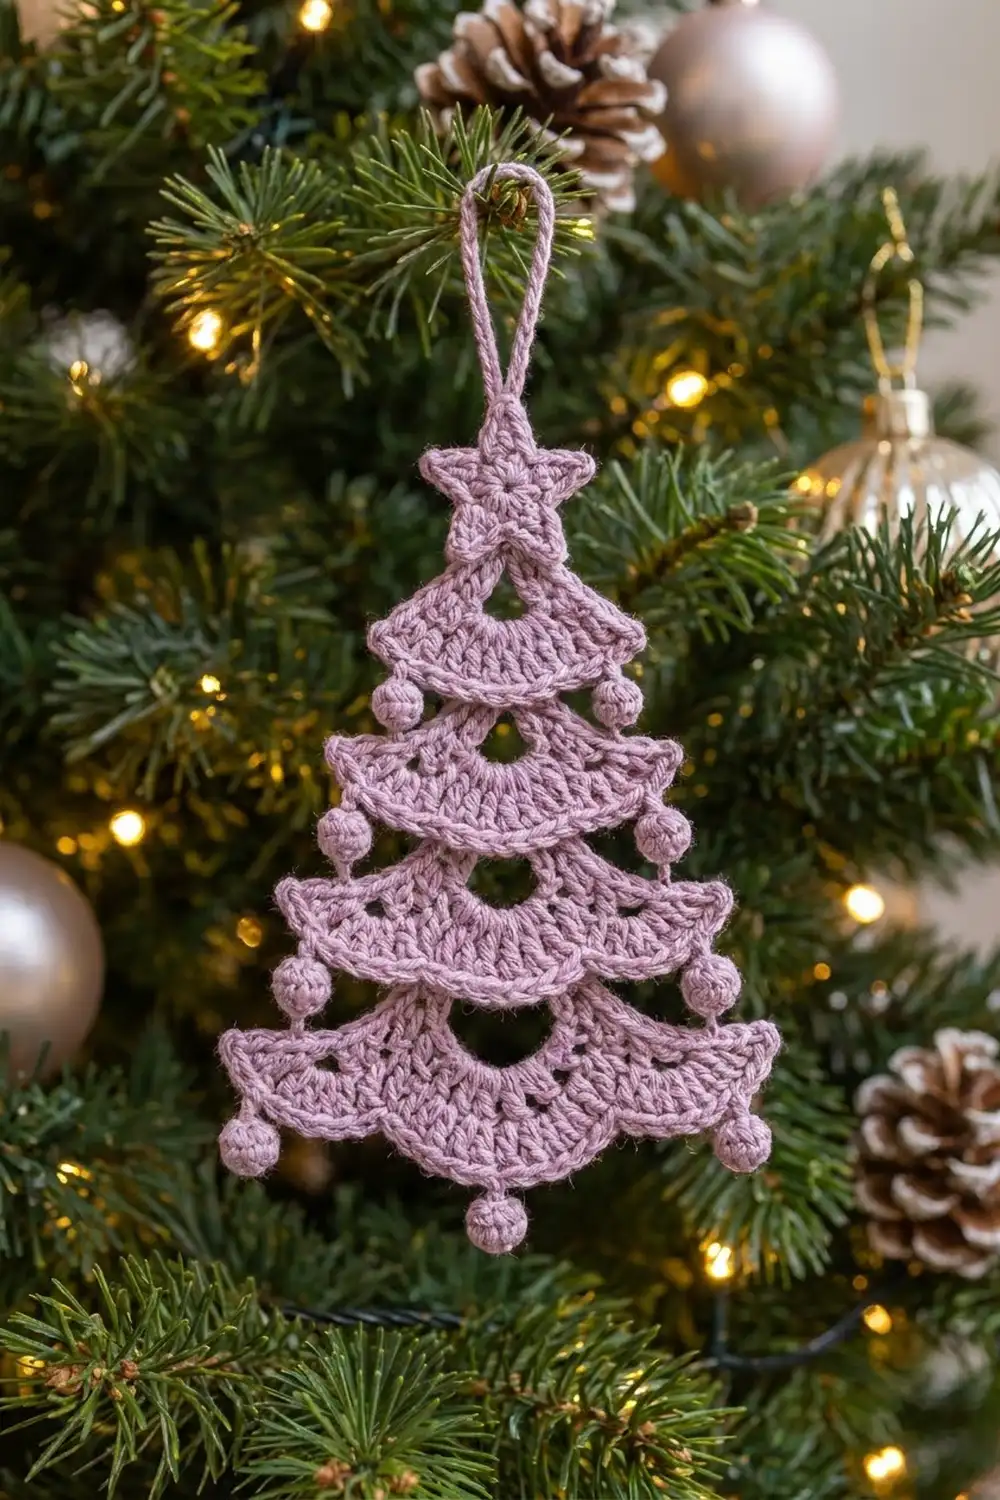
The Lilac Frost Christmas Tree is a flat, lacy ornament with four scalloped tiers, a little star on top and tiny bobble baubles at every tier tip. In one soft lilac yarn it looks calm and vintage, and it photographs beautifully against dark green branches.
This pattern uses US crochet terms throughout. The finished ornament is about 5.25 in (13.3 cm) tall without the loop and 4.5 in (11.4 cm) wide at the bottom tier. With the hanging loop it is about 7.25 in (18.4 cm) tall.
Construction is modular. You crochet four tiers in short rows, from the top edge down. Each tier has a sc band, chain arches that leave open windows, and 11-dc fans that flare into scallops. A sc rim finishes the lower edge. Then you make a five-point star, 9 small balls and a slip-stitch cord, and sew everything into one flat ornament.
Every component is small, so this is a good pattern to make in an evening and repeat for a whole tree.
Finished Size and Construction
- Finished size: 5.25 in (13.3 cm) tall x 4.5 in (11.4 cm) wide, without the loop
- Height with loop: 7.25 in (18.4 cm)
- Skill level: Easy-intermediate
- Terminology: US crochet terms
- Yarn weight: #3 light (DK) cotton or cotton blend
- Hook: 3.0 mm
- Number of pieces: 1 ornament, made from 15 components (4 tiers, 1 star, 9 balls, 1 cord)
- Layout: Tiers stacked vertically, smallest at top, each overlapping the one below by 0.25 in (0.6 cm)
- Piece size (bottom tier): 4.5 in (11.4 cm) wide x 1.1 in (2.8 cm) tall
- Size before border (bottom tier): 4.25 in (10.8 cm) wide x 0.9 in (2.3 cm) tall
- Border depth: one sc row, about 0.2 in (0.5 cm)
Materials
Yarn: Use a smooth mercerized or matte DK cotton. Cotton holds the scallops crisply and blocks flat. Acrylic works too, but the fans will curl more and need firmer blocking.
- Lilac (only color): 12 g, about 28 m (31 yd), assuming about 2.3 m per gram
These quantities include a margin of roughly 40% for swatching, long sewing tails and stuffing the balls with scraps. One ornament actually uses about 7–8 g.
Tools:
– 3.0 mm crochet hook
– Tapestry needle
– Scissors
– 4 stitch markers
– Rust-proof pins and a foam blocking mat
– Spray bottle, plus optional light spray starch
Abbreviations (US Terms)
- ch – chain
- sl st – slip stitch
- sc – single crochet
- hdc – half double crochet
- dc – double crochet
- sc2tog – single crochet 2 together
- sk – skip
- sp – space
- MR – magic ring
- RS / WS – right side / wrong side
Special stitch – Fan: Work 11 dc into the same ch-5 space. The fan should spread into a half-circle with its two end dc lying flat.
Gauge and Checkpoints
Gauge: 22 sc = 4 in (10.2 cm), which is 5.5 sc per inch. Gauge is not critical for an ornament, but the tiers only stack neatly if they keep their relative sizes.
Test one piece first. Make Tier 1 as your gauge piece and check it before you make the larger tiers.
Checkpoints:
– Tier 1, Row 1 (5 sc): 0.9 in (2.3 cm) wide
– Tier 2, Row 1 (9 sc): 1.6 in (4.1 cm) wide
– Tier 3, Row 1 (13 sc): 2.4 in (6.1 cm) wide
– Tier 4, Row 1 (17 sc): 3.1 in (7.9 cm) wide
– Tier 4 before edging: 4.25 in (10.8 cm) at the fan tips
– Tier 4 after edging: 4.5 in (11.4 cm)
– Star: 1.25 in (3.2 cm) point to point
– Ball: 0.5 in (1.3 cm) across
If your pieces are too big: switch to a 2.75 mm hook, or check that your dc are not loose on the yarn-over.
If your pieces are too small or the fans cup: switch to a 3.25 mm hook. Cupping usually means the fan dc are too tight.
Tiers (Make 4)
All four tiers follow the same formula, where S is the number of scallops in that tier:
- Foundation: ch (4S + 2)
- Row 1: 4S + 1 sc
- Row 2: S + 1 sc and S ch-5 arches
- Row 3: 11S dc + (S + 1) sc = 12S + 1 stitches
- Row 4 (edging): 12S + 1 sc
Row 1 is the top of the tier. The fans in Row 3 flare outward, which makes the tier’s fan shape.
Tier Pattern
Foundation: Ch (4S + 2).
Row 1 (RS): Sc in the 2nd ch from the hook and in each ch across. Turn. (4S + 1 sc)
Row 2 (arch row): Ch 1 (does not count as a stitch here or in later rows), sc in the first sc, ch 5, sk the next 3 sc, sc in the next sc. Repeat from * to * S times. Turn. (S + 1 sc, S ch-5 arches)
Each ch-5 arch bridges 3 skipped sc. That gap becomes the open window under the arch.
Row 3 (fan row): Ch 1, sc in the first sc, Fan (11 dc) in the next ch-5 sp, sc in the next sc. Repeat from * to * S times. Do not fasten off. (11S dc + (S + 1) sc = 12S + 1 stitches)
Continue straight into the Border section below, which is Row 4.
Stitch Counts per Tier
Tier 1 (S = 1):
– Ch 6
– Row 1: 5 sc
– Row 2: 2 sc + 1 arch
– Row 3: 11 dc + 2 sc = 13 sts
Tier 2 (S = 2):
– Ch 10
– Row 1: 9 sc
– Row 2: 3 sc + 2 arches
– Row 3: 22 dc + 3 sc = 25 sts
Tier 3 (S = 3):
– Ch 14
– Row 1: 13 sc
– Row 2: 4 sc + 3 arches
– Row 3: 33 dc + 4 sc = 37 sts
Tier 4 (S = 4):
– Ch 18
– Row 1: 17 sc
– Row 2: 5 sc + 4 arches
– Row 3: 44 dc + 5 sc = 49 sts
Check the arithmetic in Row 2: you use 1 sc, then S repeats of (3 skipped + 1 worked) = 1 + 4S sc. That matches Row 1 exactly. For Tier 4: 1 + 16 = 17 sc.
Star (Make 1)
Round 1: MR, ch 1, 10 sc in the ring. Pull the ring closed and sl st to the first sc. (10 sc)
Round 2 (points): Ch 4, sc in the 2nd ch from the hook, hdc in the next ch, dc in the next ch, sk the next sc, sl st in the next sc. Repeat from * to * 5 times. The final sl st lands in the first sc of Round 1. (5 points, each with 3 sts; 5 sl st)
The points are anchored on sc 3, 5, 7, 9 and 1. The skipped sc are 2, 4, 6, 8 and 10, so the points sit evenly. Fasten off, leaving a 6 in (15.2 cm) tail. The star should measure 1.25 in (3.2 cm) point to point.
Bobble Balls (Make 9)
Round 1: MR, 6 sc in the ring. Pull it closed. (6 sc)
Round 2: 2 sc in each sc. (12 sc)
Round 3: Sc in each sc. (12 sc)
Round 4: Sc2tog 6 times. (6 sts)
Push a small bit of yarn scrap or the starting tail inside. Fasten off, leaving an 8 in (20.3 cm) tail. Weave the tail through the front loops of the last 6 sts and pull tight. Keep the tail for sewing. Each ball should be 0.5 in (1.3 cm) across.
Hanging Cord (Make 1)
Ch 26. Sl st in the 2nd ch from the hook and in each ch across. (25 sl st)
Fasten off, leaving a 6 in (15.2 cm) tail. The cord is about 4 in (10.2 cm) long and folds into a 2 in (5.1 cm) loop.
Border: Scalloped Edging (Row 4 of Each Tier)
The border is a single sc row worked straight off Row 3 on each tier’s lower edge. It firms up the scallops and gives the raised rim seen on each tier.
Border gauge: the same 5.5 sc per inch as the body. On the curved fans the sc sit slightly spread, so the tier gains about 0.125 in (0.3 cm) at each outer tip. The total width gain is 0.25 in (0.6 cm).
Row 4: Ch 1, sc in the first sc, sc in each of the 11 dc of the fan, then sc in the valley sc. Repeat across the row. Fasten off, leaving a 10 in (25.4 cm) tail for sewing.
Counts for the bottom edge (the only edge bordered):
– Tier 1: 13 sc
– Tier 2: 25 sc
– Tier 3: 37 sc
– Tier 4: 49 sc
Why the math works: each scallop gives 12 stitches (11 dc + the sc that follows it), and the very first sc adds 1. That is 12S + 1, so Row 4 equals Row 3 one-for-one. No stitches are added, so the scallops keep their shape and do not ruffle.
The valley sc fall at positions 1, 13, 25, 37 and 49 in Tier 4. Sc 1 and sc 49 are the outer tips. Sc 25 is the center valley, where the bottom ball hangs.
Size after border:
– Tier 1: 1.5 in (3.8 cm) wide
– Tier 2: 2.5 in (6.4 cm) wide
– Tier 3: 3.5 in (8.9 cm) wide
– Tier 4: 4.5 in (11.4 cm) wide
– Each tier: about 1.1 in (2.8 cm) tall at the center
Assembly
- Pre-block the tiers. Pin each tier flat, opening every fan into an even half-circle. Mist the tiers and let them dry before sewing (see Final Blocking).
- Stack the tiers. Lay Tier 4 RS up. Place Tier 3 above it, centered, so Tier 3’s scallops overlap the top of Tier 4 by 0.25 in (0.6 cm). The overlap should just cover Tier 4’s Row 1 band and leave its arch windows visible. Pin.
- Sew the tiers. From the back, whipstitch Tier 4’s Row 1 band to the back loops of Tier 3’s Row 3 stitches. Work across the width without letting the stitches show on the front.
- Repeat to add Tier 2 above Tier 3, then Tier 1 above Tier 2, with the same 0.25 in (0.6 cm) overlap each time.
- Add the star. Center the star over the top of Tier 1, overlapping by 0.25 in (0.6 cm), so one point aims straight up. Sew it on from the back.
- Add the loop. Fold the cord in half and sew both ends to the back of the star, behind the top point.
- Add the balls. Sew one ball to each outer tip (sc 1 and the last sc of Row 4) on all four tiers, for 8 balls. Sew the ninth ball to Tier 4’s center valley sc (sc 25), letting it hang so its lowest point sits 0.6 in (1.5 cm) below the tier edge.
- Weave in all ends on the back.
Height checkpoint:
– Star (1.25 in) + 4 tiers (4 x 1.1 in = 4.4 in) − 4 overlaps (4 x 0.25 in = 1 in) = 4.65 in (11.8 cm)
– Add the hanging ball (0.6 in): 5.25 in (13.3 cm) total
Final Blocking
- Mist the assembled ornament until it is damp but not dripping.
- Lay it RS up on the blocking mat.
- Pin each outer tier tip so the tiers line up symmetrically on both sides of the center line.
- Pin each scallop point between fans so all valleys sit at the same depth.
- Check the measurements: 4.5 in (11.4 cm) across Tier 4 and 4.65 in (11.8 cm) from the star tip to Tier 4’s lower edge.
- Pin each star point out to its full length.
- If you want a stiffer ornament, spray lightly with starch.
- Let it dry completely, at least 6–8 hours, before unpinning.
Final Quality-Control Checklist
- Row 3 counts are correct for each tier: 13, 25, 37 and 49 sts.
- Row 4 counts match Row 3 exactly.
- Every arch window is open and visible above the tier below.
- Tiers are centered and overlap evenly by 0.25 in (0.6 cm).
- The star sits straight with one point up.
- All 9 balls are firmly attached: 8 at tier tips and 1 at the bottom center.
- The loop is secure and the ornament hangs straight.
- No ends or sewing stitches show on the front.
- Finished size is 5.25 in (13.3 cm) tall x 4.5 in (11.4 cm) wide.
Troubleshooting
The fans cup or ripple: Your dc are too tight or too loose for 11 stitches. Pull up taller loops, or change hook size by 0.25 mm.
The arch windows disappear: The ch-5 arches are too tight. Chain more loosely, or make sure you skipped exactly 3 sc.
The tier is crooked: Usually Row 2 is miscounted. Count the Row 1 stitches before you start the arches.
The ornament leans to one side: Re-center the tiers on a vertical line before sewing, and re-block with even pinning.
A ball wobbles loose: Sew through two separate stitches at the tier tip and knot on the back.
The star curls: Block it with every point pinned. A light starch helps it stay flat.
Care
Hand wash in cool water, press out the water in a towel and reshape flat to dry. Store the ornament flat between tissue so the scallops and star points stay crisp.
Final Notes
The measurement chain is simple:
– Gauge: 5.5 sc per inch.
– Tier 1 is your test piece.
– Each tier follows 12S + 1 stitches, and the border matches it one-for-one.
– The bottom tier is 4.5 in (11.4 cm) wide.
– Four 1.1 in (2.8 cm) tiers and a 1.25 in (3.2 cm) star, with 0.25 in (0.6 cm) overlaps, stack to 4.65 in (11.8 cm).
– The hanging center ball brings the ornament to 5.25 in (13.3 cm).
Check the numbers at each stage and every tree in your set will match.
Happy crocheting!