

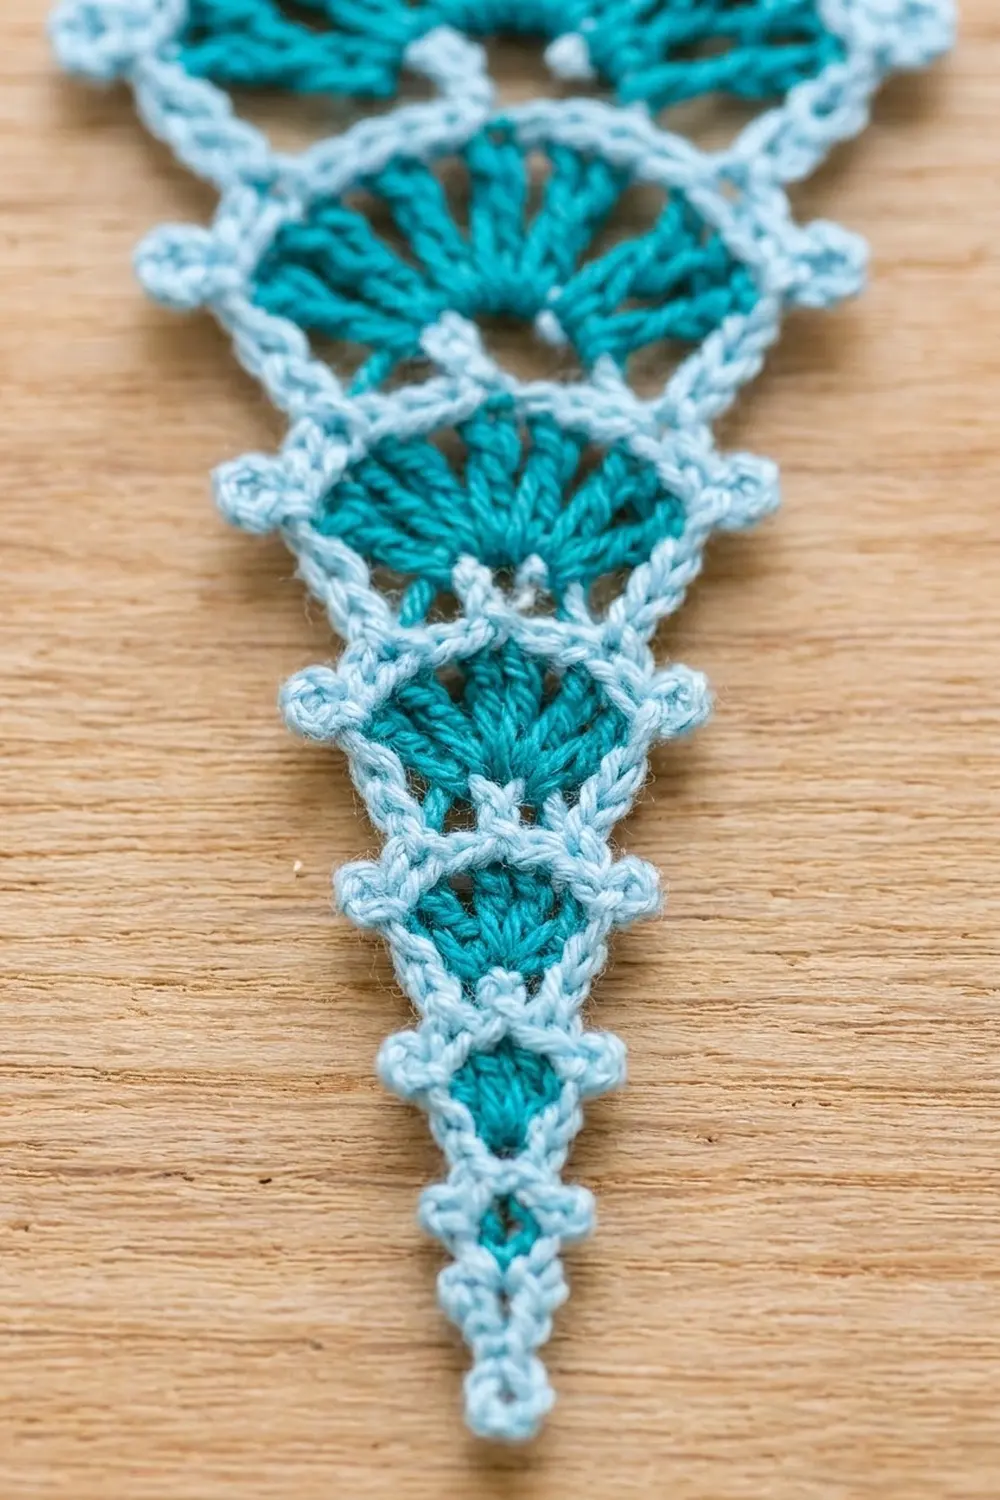
This Frosted Fan Icicle is a slim, lacy Christmas ornament built from six stacked fan tiers. Each tier is a small teal fan of open spokes, framed by a pale light blue outline with tiny picots at the corners. The tiers get smaller toward the bottom, so the finished piece tapers to a single picot point like a frozen drip.
It uses just two colors: a saturated teal for the fans and a soft, icy light blue for the outlines, picots, and hanging loop. The look is crisp and airy, somewhere between a snowflake and a classic thread icicle, and it hangs flat against the branches.
This pattern uses US crochet terms. The finished ornament measures about 2 in (5.1 cm) wide at the top tier and 4.5 in (11.4 cm) long from the top arch to the tip picot. The hanging loop adds 1.5 in (3.8 cm), for a total hanging length of about 6 in (15.2 cm).
Construction is simple. You crochet six separate teal fans, each worked as one row of spokes into a magic ring. Then you outline each fan in light blue, starting with the top fan. As you outline each new fan, you join it to the fan above with three joining stitches. There is no separate seaming.
Finished Size and Construction
- Finished size: about 2 in (5.1 cm) wide x 4.5 in (11.4 cm) long, plus a 1.5 in (3.8 cm) loop
- Skill level: Intermediate (magic ring, working sc along the side of a stitch, join-as-you-go)
- Terminology: US crochet terms
- Yarn weight: Super fine / fingering (#1) cotton
- Hook: 2.25 mm (US B-1)
- Number of pieces: 6 fans, joined into 1 ornament
- Layout: 1 vertical column, with the largest fan at the top and the smallest at the bottom
- Piece size (Fan 1, outlined): 1.75 in (4.4 cm) wide, not counting picots
- Size before border (Fan 1, teal only): 1.5 in (3.8 cm) wide x 0.75 in (1.9 cm) tall
- Border depth: about 1/8 in (0.3 cm) of light blue sc, plus picots
Materials
Choose a smooth, tightly plied mercerized cotton. It shows the stitches clearly, holds a crisp shape after starching, and does not get fuzzy on the tree. Any fingering-weight cotton of about 170 m per 50 g will work with the amounts below.
- Teal (fans): 4 g, about 14 m
- Light blue (outlines, picots, loop): 4 g, about 14 m
These amounts are for one ornament and include extra for your gauge piece and for weaving in ends. One 50 g ball of each color makes about ten ornaments.
Tools:
- 2.25 mm (US B-1) crochet hook
- Tapestry needle
- Small sharp scissors
- 2 removable stitch markers
- Blocking board or foam, plus rust-proof pins
- Spray starch or fabric stiffener (optional, recommended)
Abbreviations (US Terms)
- ch: chain
- sl st: slip stitch
- sc: single crochet
- hdc: half double crochet
- dc: double crochet
- tr: treble crochet
- sp: space
- beg: beginning
- RS: right side
- st(s): stitch(es)
Picot: ch 3, sl st in the first ch made. Picots are never counted as stitches.
Joining sc (jsc): sc in the next st as usual. Then take the hook out of the loop, insert it from front to back through the named stitch on the fan above, pick up the dropped loop, and pull it through. A jsc counts as one sc.
Gauge and Checkpoints
Make Fan 1 in teal first and measure it before you go on. It is your gauge piece.
- Basic gauge: 28 sc = 4 in (10.2 cm) in light blue.
- Checkpoint 1 (Fan 1, teal): 1.5 in (3.8 cm) wide across the spoke tops and 0.75 in (1.9 cm) from the ring to the spoke tops.
- Checkpoint 2 (Fan 1, outlined): 1.75 in (4.4 cm) wide without picots, about 2 in (5.1 cm) with picots.
- Checkpoint 3 (finished ornament): about 4.5 in (11.4 cm) from the top arch to the tip picot.
If Fan 1 is too big, use a hook 0.25 mm smaller. If it is too small, use a hook 0.25 mm larger. If the width is right but the fan cups, your ch-1 spaces are too tight. Make the chains a little looser instead of changing hooks.
Teal Fans
Work every fan in teal with RS facing, as a single row into a magic ring. You make the spokes from right to left, so the first spoke is on the right and the last spoke is on the left. The ring sits at the bottom and becomes the point of the fan.
After each fan, fasten off and pull the ring tail firmly so the spokes spread out from a tight point. Weave in the ring tail securely, because it carries the weight of the fans below.
Fan 1 (tr fan)
Make a magic ring. Ch 5 (counts as tr and ch 1), [tr, ch 1] 7 times, tr in ring.
Count: 9 tr, 8 ch-1 sp. Fasten off. Width 1.5 in (3.8 cm), height 0.75 in (1.9 cm).
Fan 2 (tr fan)
Make a magic ring. Ch 5 (counts as tr and ch 1), [tr, ch 1] 5 times, tr in ring.
Count: 7 tr, 6 ch-1 sp. Width 1.3 in (3.3 cm), height 0.75 in (1.9 cm).
Fan 3 (dc fan)
Make a magic ring. Ch 4 (counts as dc and ch 1), [dc, ch 1] 5 times, dc in ring.
Count: 7 dc, 6 ch-1 sp. Width 1.1 in (2.8 cm), height 0.55 in (1.4 cm).
Fan 4 (dc fan)
Make a magic ring. Ch 4 (counts as dc and ch 1), [dc, ch 1] 4 times, dc in ring.
Count: 6 dc, 5 ch-1 sp. Width 1 in (2.5 cm), height 0.55 in (1.4 cm).
Fan 5 (hdc fan)
Make a magic ring. Ch 3 (counts as hdc and ch 1), [hdc, ch 1] 3 times, hdc in ring.
Count: 5 hdc, 4 ch-1 sp. Width 0.75 in (1.9 cm), height 0.4 in (1 cm).
Fan 6 (hdc fan)
Make a magic ring. Ch 3 (counts as hdc and ch 1), [hdc, ch 1] 2 times, hdc in ring.
Count: 4 hdc, 3 ch-1 sp. Width 0.6 in (1.5 cm), height 0.4 in (1 cm).
The beg chain is the first spoke. When you outline, the top of that spoke is the 4th ch of a ch-5, the 3rd ch of a ch-4, or the 2nd ch of a ch-3.
Make All Pieces
For one ornament you need six teal fans, one of each size:
- Teal: Fans 1, 2, 3, 4, 5, and 6 (6 pieces)
- Light blue: no separate pieces; it is used for the outline round on every fan
Lay the fans out before outlining to check the taper:
      [ hanging loop ]
   [------ Fan 1 ------]   9 tr
    [----- Fan 2 -----]    7 tr
     [---- Fan 3 ----]     7 dc
      [--- Fan 4 ---]      6 dc
       [-- Fan 5 --]       5 hdc
        [- Fan 6 -]        4 hdc
             o             tip picot
Each fan’s point sits at the center of the arch of the fan below.
Joining
You join the fans while you outline them, so joining and the border happen in one round per fan. Outline Fan 1 first, with no joins. Then outline Fans 2 through 6 in order, joining each one to the fan directly above it.
Which stitches join: every fan’s arch has an odd number of sc, so there is always one center sc. On the fan above, the tip sc sits in the ring, with one side sc on each side of it. Three stitches on the new fan join to three stitches on the fan above:
- Arch sc just before the center: jsc to the first sc of the right side of the fan above (the sc right after its tip sc)
- Arch center sc: jsc to the tip sc of the fan above
- Arch sc just after the center: jsc to the last sc of the left side of the fan above (the sc right before its tip sc)
Before each join, place a marker in the tip sc of the fan above so you can find it in the lace.
Tension: pull each dropped loop through snugly but not tightly. A tight join pinches the arch into a V, and a loose one lets the tier swing. The fan above should sit flat against the arch with no visible gap.
Size checkpoint: after joining Fan 3, the top three tiers should measure about 2.6 in (6.6 cm) from the top arch to the tip of Fan 3.
Border (Light Blue Outline)
Border gauge: along the arch, work 1 sc in the top of each spoke and 1 sc in each ch-1 sp. Along the sides, work 5 sc down the side of a tr, 4 sc down a dc, and 3 sc down an hdc. That is about 7 sc per inch (2.5 cm), which matches the basic gauge.
Outline round, general method: with RS facing and the ring at the bottom, join light blue with sc in the top of the first spoke (right corner), then picot. Work [sc in next ch-1 sp, sc in next spoke] across the arch, then picot. Work the side sc down the side of the last spoke (left side), sc in the ring (tip sc), then work the side sc up the side of the first spoke (right side). Sl st to the first sc and fasten off.
Exact counts per fan:
| Fan | Arch sc (center) | Left side | Tip | Right side | Total sc |
|---|---|---|---|---|---|
| 1 | 17 (9th) | 5 | 1 | 5 | 28 |
| 2 | 13 (7th) | 5 | 1 | 5 | 24 |
| 3 | 13 (7th) | 4 | 1 | 4 | 22 |
| 4 | 11 (6th) | 4 | 1 | 4 | 20 |
| 5 | 9 (5th) | 3 | 1 | 3 | 16 |
| 6 | 7 (4th) | 3 | 1 | 3 | 14 |
Fan 1: work the general method. After the 9th arch sc, ch 30 and sl st in the 9th sc you just made to form the hanging loop, then continue across. Count: 28 sc, 2 picots, 1 loop.
Fans 2 to 6: work the general method, using jsc for the three center arch stitches as described in Joining. Fan 2 joins with its 6th, 7th, and 8th arch sc. Fan 3 uses its 6th, 7th, and 8th. Fan 4 uses its 5th, 6th, and 7th. Fan 5 uses its 4th, 5th, and 6th. Fan 6 uses its 3rd, 4th, and 5th.
Fan 6 tip: work the tip sc and a picot, then continue up the right side. Count: 14 sc, 3 picots.
Why the math works: a fan with n spokes has n – 1 spaces, so the arch is 1 + 2(n – 1) = 2n – 1 sc. That number is always odd, so there is always a true center sc for the join or the loop. The corner sc are the first and last arch stitches, so they are not counted again on the sides. Each side count is the spoke height times 7 sc per inch, so the edges lie flat. Joins are ordinary sc, so no stitches are added or lost at any seam. Every total in the table stays the same whether or not a fan is joined.
Final Blocking
- Weave in all ends along the outline sc, never across the open spokes.
- Lightly mist the ornament with water, or soak it and roll it in a towel.
- Pin it RS up on the board. Pin the top arch first, then the tip picot, stretching gently to 4.5 in (11.4 cm).
- Pin each pair of corner picots so they point outward and sit level.
- Ease every arch into a smooth dome and spread each fan’s spokes into even rays.
- Spray with starch or brush on stiffener, then let it dry completely, at least 6 hours.
- Unpin and check the measurements again.
Final Quality-Control Checklist
- Fan 1 is 1.75 in (4.4 cm) wide without picots.
- The ornament is about 4.5 in (11.4 cm) long, plus a 1.5 in (3.8 cm) loop.
- Every fan has its correct sc total from the table.
- There are 13 picots: 2 per fan plus 1 at the tip.
- Each fan’s tip sits exactly on the center of the arch below.
- All 15 joins are snug and invisible from the front.
- The ornament hangs straight from the loop.
- No ends show through the lacy spokes.
Troubleshooting
Fan curls into a cup: the ch-1 spaces are too tight. Remake the fan with looser chains, or block it flat with extra starch.
Arch ruffles: your sc are too loose for the number of spokes. Use a smaller hook for the light blue only.
Gap between tiers: the jsc went into the wrong stitches. Check that the center arch sc meets the tip sc.
Ornament leans to one side: the left and right sides have different sc counts. Count both sides and redo the outline if needed.
Ring loosens and the point opens: the tail was not woven in firmly. Pull it tight again and weave it in two directions.
Picots lie flat or twist: pin them outward while blocking and starch them again.
Care
Hand wash in cool water with mild soap, roll in a towel, and block flat again. Starch again after washing, and store flat between sheets of tissue.

Final Notes
Here is the measurement chain from start to finish. Fan 1 measures 1.5 in (3.8 cm) wide in teal. Its 1/8 in (0.3 cm) light blue outline brings it to 1.75 in (4.4 cm), and the picots bring it to about 2 in (5.1 cm). The six graded tiers stack to about 4.5 in (11.4 cm), and the loop brings the hanging length to about 6 in (15.2 cm). Check Fan 1 first, keep your joins snug, and starch well, and every icicle will match.
Happy crocheting!