

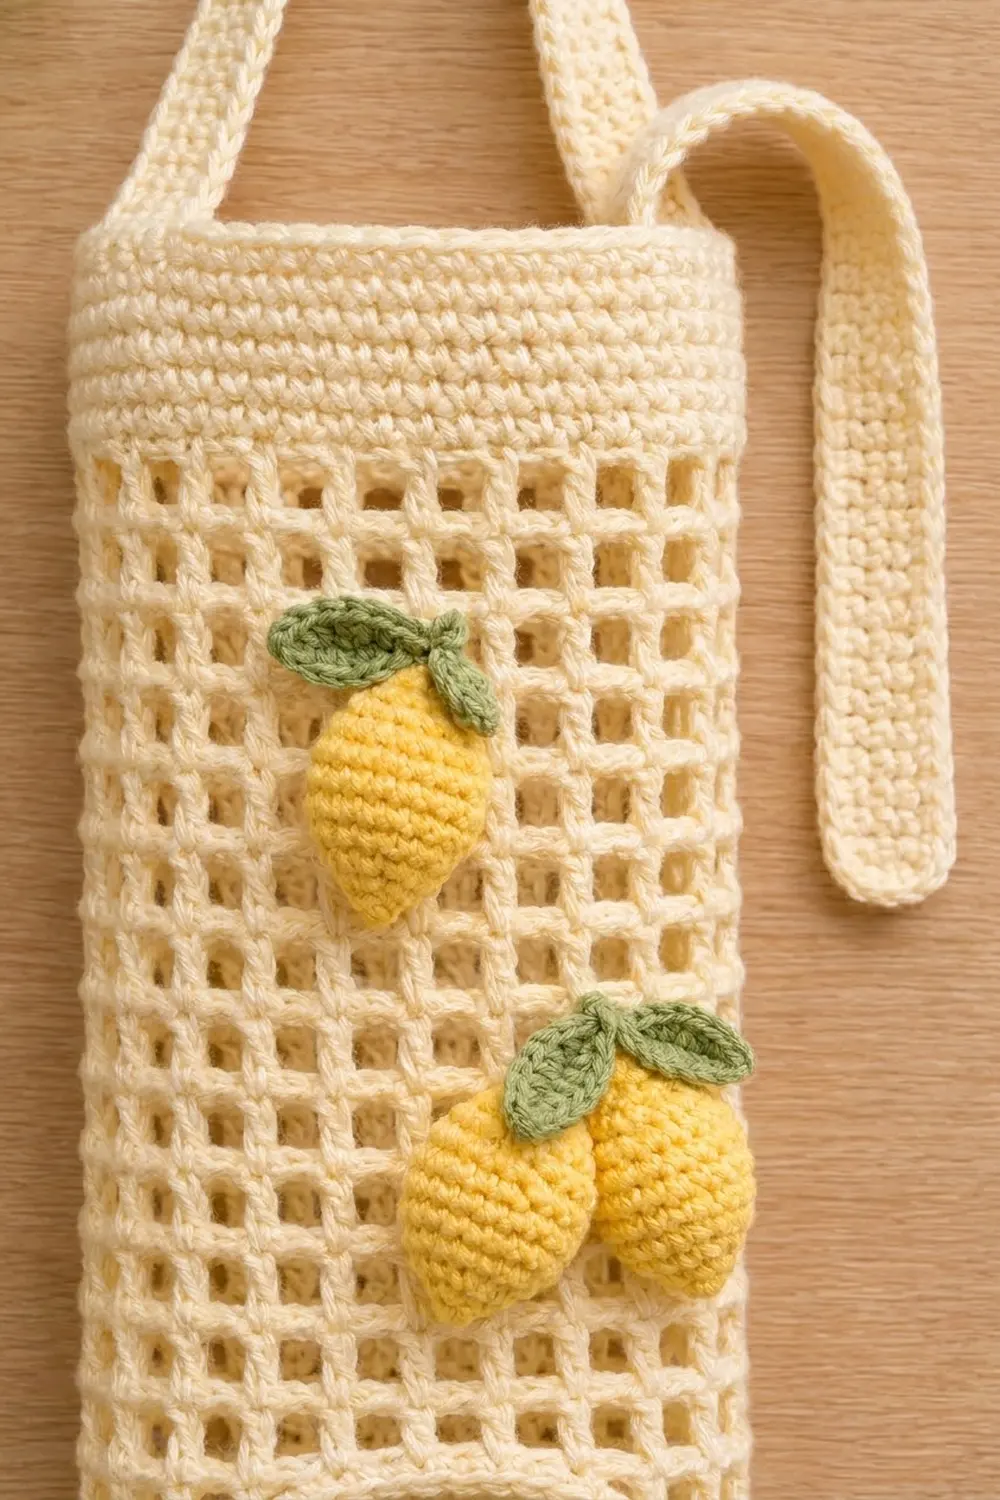
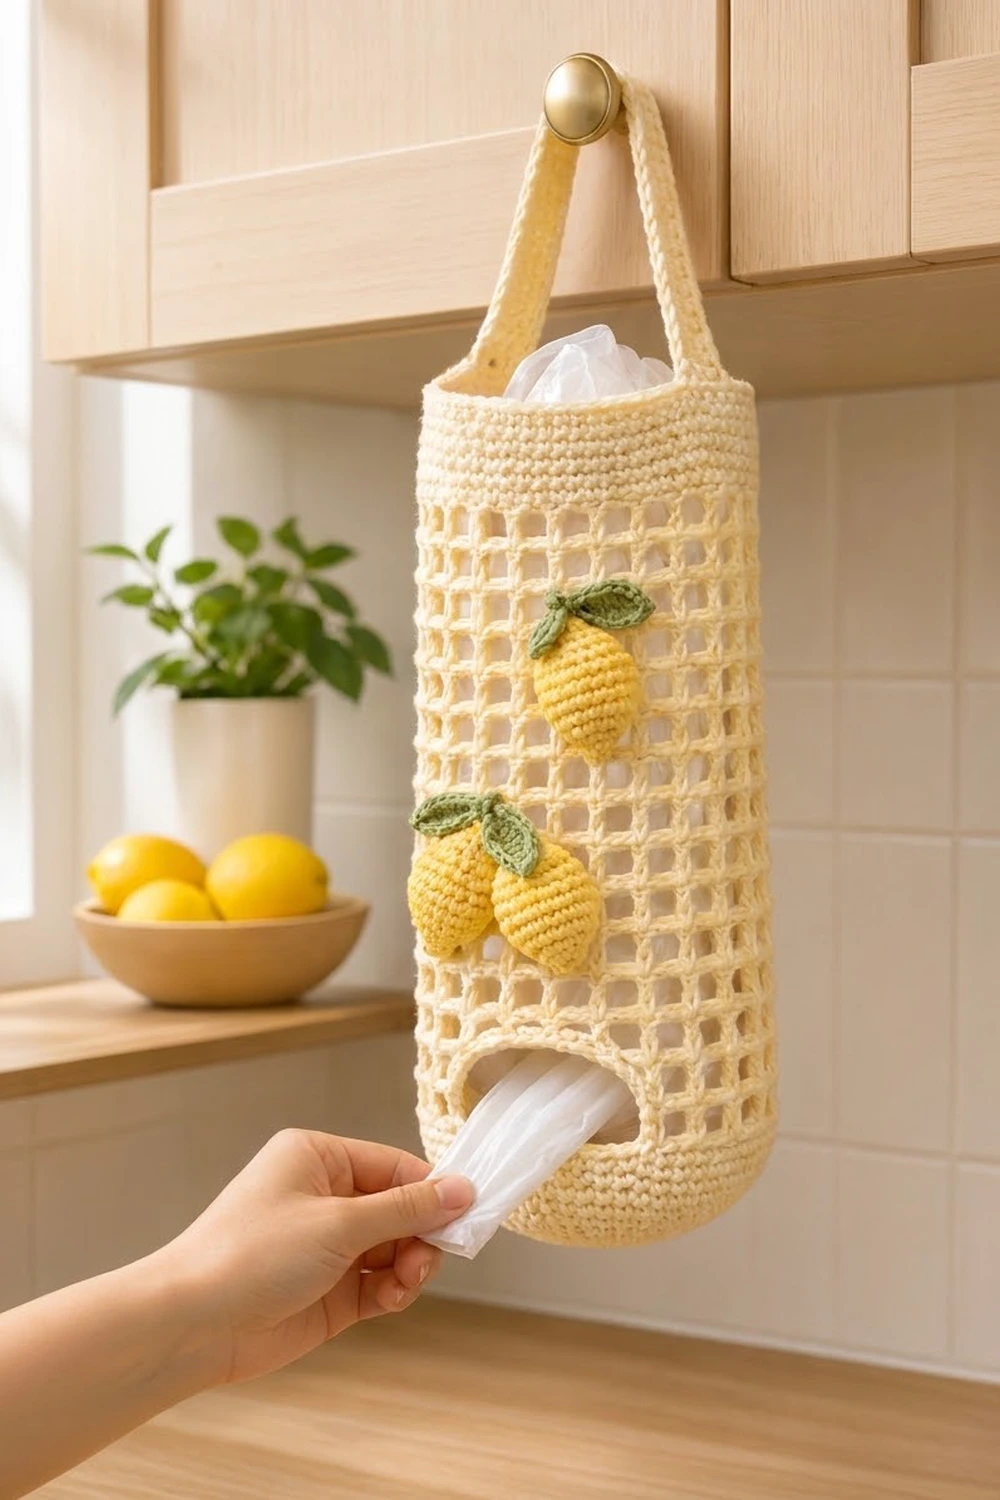
This grocery bag holder is a tall, open-mesh tube in soft cream cotton. It has a solid base, a solid top band, a hanging strap, and a little cluster of padded yellow lemons with sage-green leaves. Bags go in at the top and come out one at a time through the oval opening near the bottom.
The palette is cream, buttery yellow, and sage green, in a clean, kitchen-friendly style.
This pattern uses US crochet terms. The finished holder is 16 in (40.6 cm) tall and 15 in (38.1 cm) around. It’s about 7.5 in (19.1 cm) wide when it hangs flat. The strap adds a hanging loop of about 8.5 in (21.6 cm).
You crochet the body as one seamless piece from the bottom up: a flat circular base, a solid lower wall with a dispenser slot, 27 rounds of filet mesh, and a solid top band. The strap is made separately and sewn inside the top band. Last, you sew three small stuffed lemons and four leaves onto the mesh.
Finished Size and Construction
- Finished size: 16 in (40.6 cm) tall x 15 in (38.1 cm) around; about 7.5 in (19.1 cm) wide hanging flat
- Skill level: Easy-intermediate
- Terminology: US
- Yarn weight: Worsted (#4) cotton
- Hook: 4.5 mm for the body and strap, 3.5 mm for the lemons and leaves
- Number of pieces: 1 body, 1 strap, 3 lemons, 4 leaves (assembled into one holder)
- Layout: One single lemon upper left, a pair of lemons lower right, two leaves on each
- Base: about 4.75 in (12.1 cm) across, 60 sts
- Body before border: 16 in (40.6 cm) tall, 60 sts around
- Border depth: one slip-stitch round at the top and one sc round around the slot; neither adds measurable height
Materials
Choose a smooth worsted-weight cotton or cotton blend. These quantities assume about 1.6 m per gram, which is typical for worsted cotton.
- Cream: 100 g, about 160 m (body and strap)
- Yellow: 10 g, about 16 m (lemons)
- Sage green: 5 g, about 8 m (leaves)
All quantities include a margin of roughly 25 percent for swatching and differences in tension.
Tools:
- 4.5 mm and 3.5 mm crochet hooks
- Stitch marker
- Tapestry needle
- Small amount of fiberfill
- Rustproof pins and a blocking mat
- Measuring tape and scissors
Abbreviations (US Terms)
- ch – chain
- sl st – slip stitch
- sc – single crochet
- hdc – half double crochet
- dc – double crochet
- inc – 2 sc in the same stitch
- dec – sc2tog (single crochet 2 together)
- BLO – back loop only
- sk – skip
- sp – space
- st(s) – stitch(es)
Special stitch – mesh square: dc in the next stitch, ch 2, sk the next 2 stitches. In later rounds, a mesh square is “dc in the next dc, ch 2.” Each mesh square is 3 stitches wide.
Gauge and Checkpoints
Sc gauge (4.5 mm hook): 16 sc and 18 rounds = 4 in (10.2 cm).
Mesh gauge (4.5 mm hook): 4 mesh squares = 3 in (7.6 cm); 9 mesh rounds = 4 in (10.2 cm).
The base is your test piece. Measure it before you start the wall.
Checkpoints:
- After Rnd 5 (30 sts), the circle measures about 2.4 in (6.1 cm) across.
- After Rnd 10 (60 sts), the base measures about 4.75 in (12.1 cm) across and lies flat.
- After Rnd 22, the solid wall is about 2.7 in (6.9 cm) tall.
- After 9 mesh rounds, the mesh section is 4 in (10.2 cm) tall.
- After Rnd 55, the body is 16 in (40.6 cm) tall.
If the base is too big, go down half a hook size. If it’s too small, go up half a hook size. Settle your hook size here, because the body stays at 60 stitches all the way up.
Body: Base
Use cream and the 4.5 mm hook. Join every round with a sl st to the first sc, then ch 1 to start the next round. The ch 1 doesn’t count as a stitch.
Rnd 1: Make a magic ring, 6 sc in ring. (6)
Rnd 2: Inc in each st around. (12)
Rnd 3: [Sc 1, inc] 6 times. (18)
Rnd 4: [Sc 2, inc] 6 times. (24)
Rnd 5: [Sc 3, inc] 6 times. (30)
Rnd 6: [Sc 4, inc] 6 times. (36)
Rnd 7: [Sc 5, inc] 6 times. (42)
Rnd 8: [Sc 6, inc] 6 times. (48)
Rnd 9: [Sc 7, inc] 6 times. (54)
Rnd 10: [Sc 8, inc] 6 times. (60)
Check checkpoint 2. If the circle looks hexagonal, move the increases a few stitches over on every other round. The counts stay the same.
Body: Lower Wall
Rnd 11: Sc in BLO of each st around. (60)
The unworked front loops form a crisp ridge where the base turns up into the wall.
Rnds 12–14: Sc in each st around. (60)
Body: Dispenser Slot
To make the slot, work 6 turned rows across 44 stitches and leave 16 stitches unworked. Then close the top of the gap with a chain.
Row 15: Ch 1, sc in the first 44 sts, turn. Leave the last 16 sts unworked. (44)
Rows 16–20: Ch 1, sc in each st across, turn. (44)
Row 20 ends beside the gap.
Bridge: Ch 16, then sl st to the first sc of Row 20, which sits at the other side of the gap.
Rnd 21: Ch 1, sc in the same st and in each of the next 43 sts, then sc in each of the 16 ch, sl st to the first sc. (44 sc + 16 sc = 60)
Rnd 22: Sc in each st around. (60)
The opening is 16 sts wide, about 4 in (10.2 cm), and 6 rows tall, about 1.3 in (3.3 cm). Check checkpoint 3: the wall from Rnd 11 through Rnd 22 is 12 rounds, about 2.7 in (6.9 cm).
Body: Mesh Section
Rnd 23: Ch 5 (counts as dc + ch 2), sk the next 2 sts, dc in the next st, ch 2, sk the next 2 sts; repeat from * 18 more times, sl st to the 3rd ch of the beginning ch-5. (20 dc, 20 ch-2 sps)
Rnds 24–49: Ch 5 (counts as dc + ch 2), dc in the next dc, ch 2; repeat from * 18 more times, sl st to the 3rd ch of the beginning ch-5. (20 dc, 20 ch-2 sps)
That makes 27 mesh rounds (Rnds 23–49), 12 in (30.5 cm) tall. Each dc sits directly on top of the dc below it, so the windows line up in straight columns. Check checkpoint 4 after Rnd 31.
Body: Top Band
Rnd 50 (conversion round): Ch 1, sc in the same st, 2 sc in the next ch-2 sp, sc in the next dc, 2 sc in the next ch-2 sp; repeat from * 18 more times, sl st to the first sc. (20 sc in dc + 40 sc in sps = 60)
Rnds 51–55: Sc in each st around. (60)
The band is 6 rounds, about 1.3 in (3.3 cm). Don’t fasten off; go straight on to the top border below. Check checkpoint 5: 2.7 in + 12 in + 1.3 in = 16 in (40.6 cm).
Strap
Use cream and the 4.5 mm hook.
Row 1: Ch 5, sc in the 2nd ch from the hook and in each ch across, turn. (4)
Rows 2–45: Ch 1, sc in each st across, turn. (4)
The strap is 1 in (2.5 cm) wide and 10 in (25.4 cm) long.
Edging round: Ch 1, turn. Working across Row 45, 2 sc in the first st, sc in the next 2 sts, 2 sc in the last st (6). Sc in each row end down the long side (45). Working across the foundation chain, 2 sc in the first ch, sc in the next 2, 2 sc in the last (6). Sc in each row end up the second long side (45). Sl st to the first sc. (102)
The extra stitch at each corner rounds off the ends. The finished strap is about 1.5 in (3.8 cm) wide and 10.5 in (26.7 cm) long. Fasten off, leaving a 16 in (40.6 cm) tail.
Lemons (Make 3)
Use yellow and the 3.5 mm hook, and work in a continuous spiral. Mark the first stitch of each round.
Rnd 1: Magic ring, 4 sc in ring. (4)
Rnd 2: [Sc 1, inc] 2 times. (6)
Rnd 3: Inc in each st around. (12)
Rnd 4: [Sc 1, inc] 6 times. (18)
Rnds 5–8: Sc in each st around. (18)
Rnd 9: [Sc 1, dec] 6 times. (12)
Stuff lightly and flatten the lemon slightly.
Rnd 10: Dec 6 times. (6)
Rnd 11: [Sc 1, dec] 2 times. (4)
Fasten off, leaving a 12 in (30.5 cm) tail. Weave the tail through the front loops of the 4 sts, pull tight, and keep the rest for sewing. The small 4-stitch rounds at each end make the pointed lemon tips. Each lemon is about 2 in (5.1 cm) long and 1.25 in (3.2 cm) wide.
Leaves (Make 4)
Use sage green and the 3.5 mm hook.
Ch 7. Working in the back bumps, sl st in the 2nd ch from the hook, sc in the next ch, hdc in the next ch, dc in the next ch, hdc in the next ch, sc in the last ch (6). Ch 1, then rotate to work along the other side of the chain: sc in the first ch, hdc in the next, dc in the next, hdc in the next, sc in the next, sl st in the last (6). Sl st to the tip. (12 sts)
The chain forms the center vein, and the taller stitches in the middle give the leaf its pointed oval shape. Each leaf is about 1.25 in (3.2 cm) long. Fasten off, leaving a 10 in (25.4 cm) tail.
Border: Top Edge and Dispenser Opening
Border gauge: Same as the body, 16 sc = 4 in (10.2 cm). Both border rounds work one stitch into each existing stitch or row end, so they add no width.
Top edge, Rnd 56: Continuing from Rnd 55, sl st loosely in each st around. (60 sl st)
Join and fasten off. The slip stitches firm up the rim without adding height, so the top stays 15 in (38.1 cm) around.
Slot edging: Join cream in the first unworked st of Rnd 14, at a lower corner of the opening. Ch 1.
- Bottom edge: Sc in each of the 16 unworked sts. (16)
- First side: Sc in each of the 6 row ends. (6)
- Top edge: Sc in the free loop of each of the 16 bridge chains. (16)
- Second side: Sc in each of the 6 row ends. (6)
Sl st to the first sc. (16 + 6 + 16 + 6 = 44)
Why the math works: The top and bottom edges each take exactly 16 stitches, matching the 16 skipped stitches and the 16 bridge chains. A sc row is almost as tall as a sc is wide (18 rows vs. 16 sts per 4 in), so one sc per row end keeps the sides flat. You don’t add extra stitches at the corners, so they draw in to a soft oval about 3.5 in (8.9 cm) wide and 1 in (2.5 cm) tall.
Assembly
- Strap: Flatten the body with the slot centered on the front. Lay 1 in (2.5 cm) of each strap end inside the top band at the two side folds, and whipstitch all the way around each overlap. The free loop is about 8.5 in (21.6 cm).
- Single lemon: Pin it left of center over mesh Rnds 41–44 and sew it through the dc posts behind it.
- Lemon pair: Pin two lemons side by side, angled slightly toward each other, right of center over mesh Rnds 30–34. Sew them in place.
- Leaves: Sew two leaves in a V at the top of the single lemon, and two at the top of the pair.
- Weave in all ends on the inside.
Final Blocking
- Mist the holder lightly with water. Keep the stuffed lemons dry.
- Fill the holder with a rolled towel so it holds its tube shape.
- Smooth each mesh column so the windows are square and the dc posts are straight.
- Pat the body to 16 in (40.6 cm) tall and 7.5 in (19.1 cm) wide when flat.
- Shape the slot into an even oval and pin the strap flat at 1.5 in (3.8 cm) wide.
- Let it dry completely before hanging.
Final Quality-Control Checklist
- Base has 60 sts, lies flat, and has a clean ridge at Rnd 11.
- Every mesh round has 20 dc and 20 ch-2 spaces, in straight columns.
- Rnd 50 and the top band have 60 sts.
- Slot edging has 44 sc and forms a smooth oval.
- Strap is secure at both side folds.
- Lemons and leaves are firmly sewn.
- Body measures 16 in (40.6 cm) tall and 15 in (38.1 cm) around.
Troubleshooting
- Mesh columns lean: Work each dc into the top of the dc below, not into the ch-2 space.
- Slot is lopsided: Recount Rows 15–20 (44 sts each) and the bridge chain (16).
- Bags pull out in clumps: Add a second slot edging round with sc2tog at each corner.
- Top band flares: Work Rnds 50–56 with a hook half a size smaller.
- Lemons look round: Use less stuffing and pinch the tips.
Care
Hand wash in cool water with mild soap, roll it in a towel to remove the water, and dry it flat over a rolled towel. Don’t put it in the dryer.
Final Notes
The whole holder follows one measurement chain. A 60-stitch base at 16 sc per 4 in (10.2 cm) gives 15 in (38.1 cm) around. Twelve solid rounds make the 2.7 in (6.9 cm) lower wall with its 16-stitch slot. Twenty mesh squares per round over 27 rounds make the 12 in (30.5 cm) mesh section. A 60-stitch conversion round then leads into the 1.3 in (3.3 cm) band. Measure at each checkpoint, and the holder will finish at 16 in (40.6 cm) tall.
Happy crocheting!