

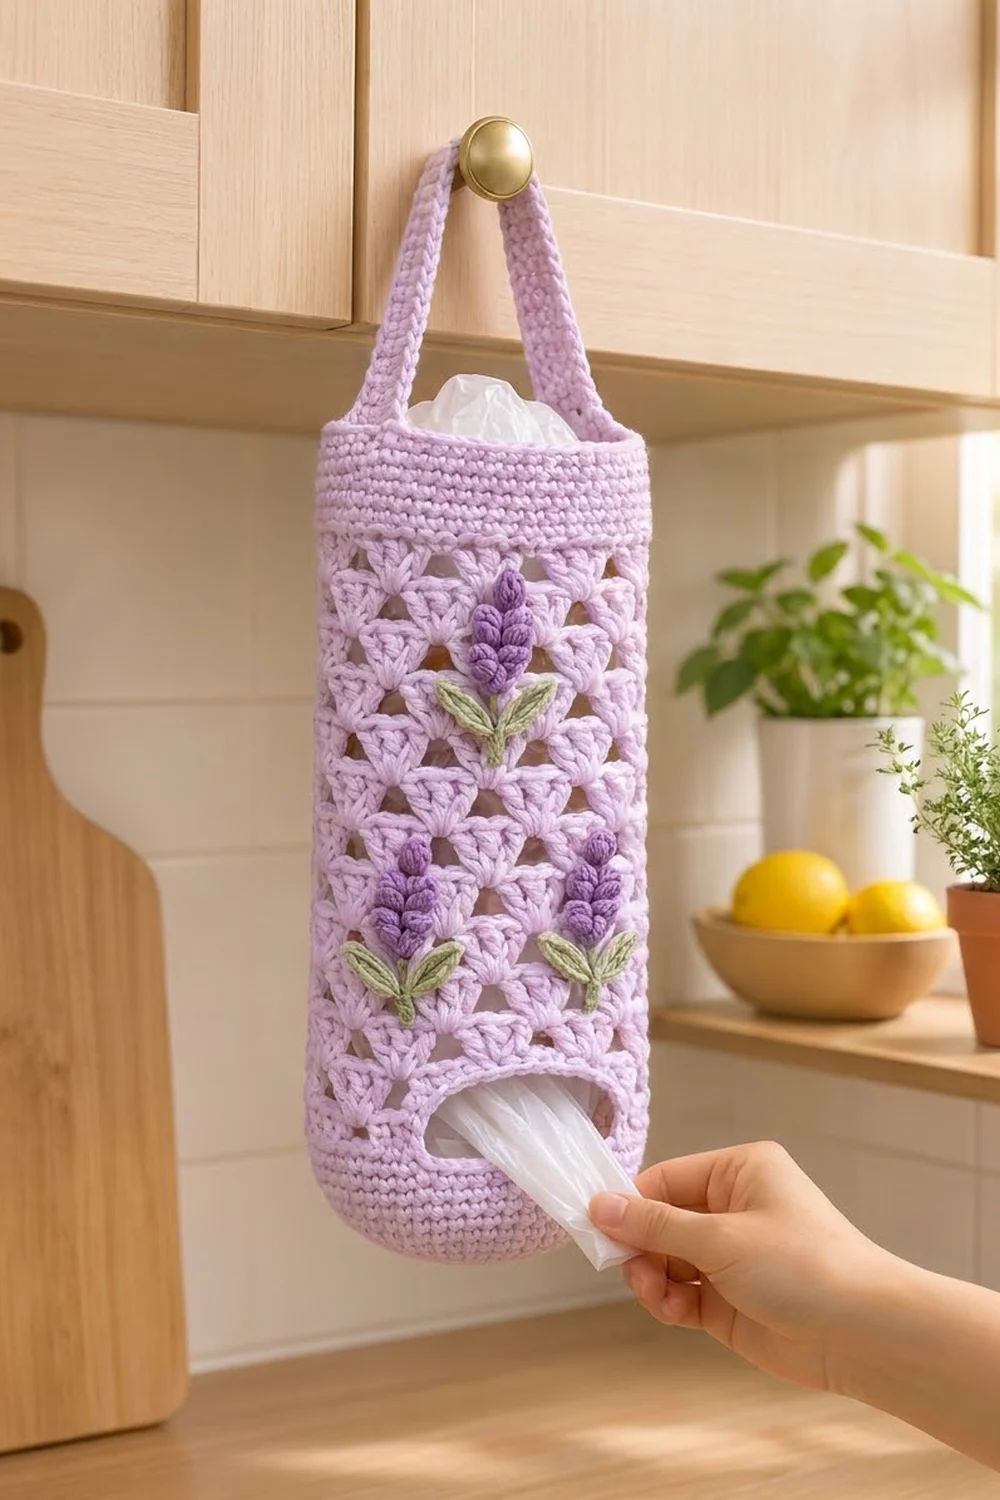
The Lavender Fields Bag Holder is a tall, lacy tube that hangs from a cabinet knob and keeps plastic bags tidy. You stuff bags in at the top and pull them out one at a time through an oval slot near the bottom.
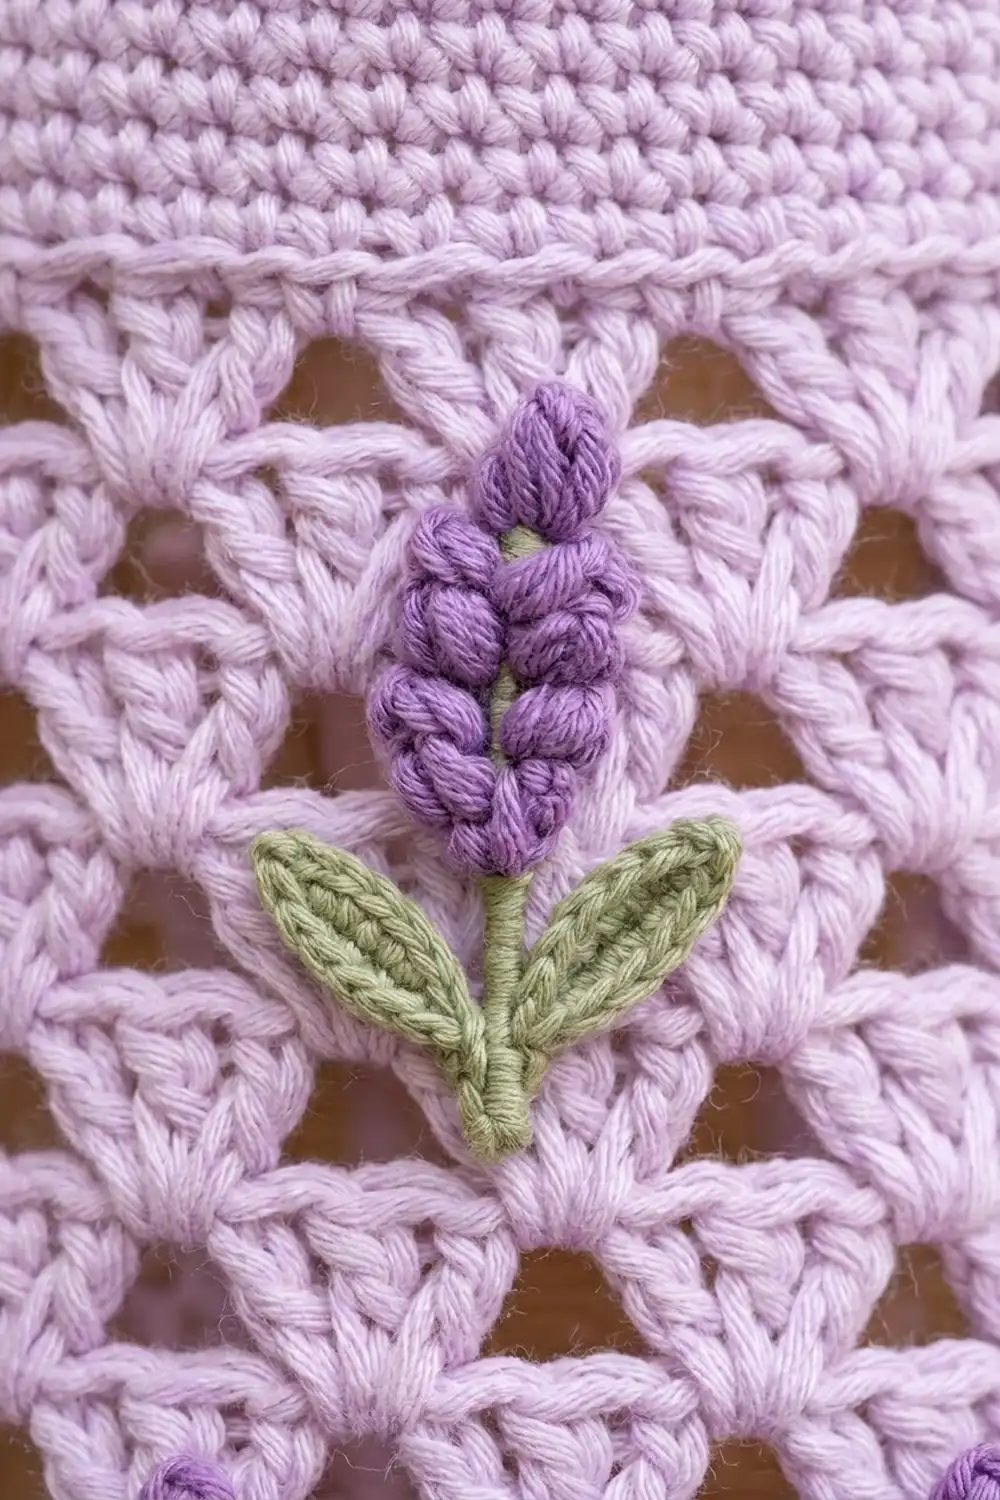
The body is soft lilac with a solid round base, a staggered shell mesh and a firm single-crochet rim. Three lavender sprigs with medium-purple bud spikes and sage-green leaves decorate the front.
This pattern uses US crochet terms. Laid flat, the holder measures about 6.9 in (17.5 cm) wide by 15.2 in (38.6 cm) tall. With the strap included, it hangs about 20.5 in (52.1 cm) tall.
You crochet the body in one piece from the base up, working back and forth for a few rows to form the dispenser slot. Then you make the strap and the three appliqués separately and sew them on.
Finished Size and Construction
- Finished size (flat): 6.9 in (17.5 cm) wide × 15.2 in (38.6 cm) tall
- Hanging height with strap: about 20.5 in (52.1 cm)
- Skill level: Intermediate
- Terminology: US
- Yarn weight: Worsted (#4) cotton or cotton blend
- Hook: 5.0 mm (H-8)
- Number of pieces: 5 (1 body, 1 strap, 3 lavender sprigs)
- Layout: Strap sewn inside the rim at both side folds; sprigs in a triangle on the front
- Body circumference: 48 sts = 13.7 in (34.8 cm)
- Height before the top band: 11.2 in (28.4 cm) flat
- Top band (border) depth: 2 in (5.1 cm), 8 rounds
Materials
Use a smooth, mercerized or matte cotton. Cotton holds its shape when the holder is full of bags and doesn’t stretch out over time the way acrylic can.
- Color A, pale lilac: 120 g, about 205 m (body and strap)
- Color B, medium purple: 10 g, about 17 m (bud spikes)
- Color C, sage green: 8 g, about 14 m (stems and leaves)
These quantities include about a 15% margin for your gauge swatch and seaming.
Tools:
– 5.0 mm (H-8) crochet hook
– Tapestry needle
– 4 locking stitch markers
– Rustproof pins
– Measuring tape
– Scissors
Abbreviations (US Terms)
- ch: chain
- sl st: slip stitch
- sc: single crochet
- hdc: half double crochet
- dc: double crochet
- st(s): stitch(es)
- sk: skip
- sp: space
- rep: repeat
- RS / WS: right side / wrong side
Special stitches
- Shell: 5 dc in the same stitch.
- Puff: (yarn over, insert hook in st, pull up a loop to ¾ in [1.9 cm]) 3 times, for 7 loops on the hook. Yarn over and pull through all 7 loops, then ch 1 to close.
- Bud: ch 2, puff in the same ch, sl st in the same ch.
Gauge and Checkpoints
- Single crochet gauge: 14 sc × 16 rounds = 4 in (10.2 cm)
- Shell mesh gauge: 4 shell rounds = 2.5 in (6.4 cm), and 1 shell repeat = about 1.7 in (4.3 cm) wide
Before starting the body, make one test piece: a sprig appliqué or a 4 in (10.2 cm) sc swatch. Check your gauge before going further.
Checkpoints:
1. After Rnd 8, the base measures 4.4 in (11.2 cm) across and lies flat.
2. After Rnd 22, the solid section measures 3.5 in (8.9 cm) tall from the edge of the base. The body laid flat measures 6.9 in (17.5 cm) wide.
3. After Rnd 34, the mesh section measures 7.5 in (19.1 cm) tall.
4. After Rnd 42, the side wall measures 13 in (33.0 cm) tall.
If your piece comes out too big, go down one hook size. If it’s too small, go up one size. If only the base ruffles, you’re crocheting it too loosely. Re-crochet those rounds a little tighter rather than changing the stitch count.
Body
Work with Color A in continuous joined rounds. Don’t turn unless told to.
Base
- Rnd 1: Make a magic ring. Ch 1, then 6 sc in the ring. Join with a sl st to the first sc. (6)
- Rnd 2: Ch 1, 2 sc in each st, join. (12)
- Rnd 3: Ch 1, sc 1, 2 sc in next st 6 times, join. (18)
- Rnd 4: Ch 1, sc 2, 2 sc in next st 6 times, join. (24)
- Rnd 5: Ch 1, sc 3, 2 sc in next st 6 times, join. (30)
- Rnd 6: Ch 1, sc 4, 2 sc in next st 6 times, join. (36)
- Rnd 7: Ch 1, sc 5, 2 sc in next st 6 times, join. (42)
- Rnd 8: Ch 1, sc 6, 2 sc in next st 6 times, join. (48)
Lower wall
- Rnd 9: Ch 1, sc in the back loop only of each st, join. (48) This ridge turns the work so the wall goes straight up.
- Rnds 10–16: Ch 1, sc in each st, join. (48)
Number the stitches of Rnd 16 from 1 to 48 in your head. Sts 1–24 are the front, and sts 6–19 sit centered on the front.
Dispenser slot
- Row 17 (RS): Sl st in each of the first 19 sts. Sts 6–19 now form the bottom edge of the slot. Ch 1, then sc in sts 20 through 48 and sts 1 through 5. (34) Turn.
- Rows 18–20: Ch 1, sc in each st, turn. (34)
- Rnd 21 (RS): Ch 1, sc in each st (34), then ch 14 and join with a sl st to the first sc of the row. The ch-14 spans the 14 skipped sts.
- Rnd 22: Ch 1, sc in each of the 34 sc and in each of the 14 chs, join. (48)
The slot is 14 sts wide, which is 4 in (10.2 cm), and about 1 in (2.5 cm) tall.
Shell mesh
- Rnd 23: Ch 1, sc in the first st, sk 2, shell in the next st, sk 2. Sc in the next st, sk 2, shell in the next st, sk 2, rep 7 more times. Join to the first sc. (8 shells and 8 sc = 48 sts)
- Rnd 24: Sl st in each of the next 3 dc, so you’re in the center dc of the shell. Ch 1, sc in the same dc, ch 2, shell in the next sc, ch 2. Sc in the center dc of the next shell, ch 2, shell in the next sc, ch 2, rep 7 more times. Join to the first sc. (8 shells, 8 sc, 16 ch-2 sps)
- Rnd 25: Sl st in the next ch-2 sp and in each of the next 3 dc. Then work as for Rnd 24 from “ch 1.” (8 shells, 8 sc, 16 ch-2 sps)
- Rnds 26–34: Rep Rnd 25. (8 shells, 8 sc, 16 ch-2 sps in every round)
Each shell sits on the sc below it, and each sc sits on a shell center. The ch-2 spaces between them open into the staggered triangular holes.
Border: Top Band and Slot Edging
Border gauge: 14 sc = 4 in (10.2 cm). The band keeps all 48 sts, so it measures 13.7 in (34.8 cm) around. That’s 24 sts on each side of the flattened tube: 24 ÷ 3.5 sts per inch = 6.9 in (17.5 cm).
- Rnd 35 (conversion): Ch 3 (counts as dc) in the same sc as the join. Sc in the next ch-2 sp, sk the next dc, sc in each of the next 3 dc, sk the next dc, sc in the next ch-2 sp. Dc in the next sc, sc in the ch-2 sp, sk 1 dc, sc 3, sk 1 dc, sc in the ch-2 sp, rep 7 more times. Join to the top of the ch-3.
- Count: 32 sts worked 1-per-existing-st (8 dc + 24 sc) + 16 sts added into ch-2 sps = 48.
- Rnds 36–42: Ch 1, sc in each st, join. (48)
Fasten off and weave in the ends.
Why the math works: the base, lower wall, mesh and band all use a 48-stitch circumference: 6 sts per shell repeat × 8 repeats = 48. Because none of the sections changes the width, the wall stays straight from base to rim.
Slot edging: With the RS facing, join Color A at the bottom-right corner of the slot and sc around it:
– 14 sc along the bottom edge, one in each sl st
– 4 sc up the left side, one per row end
– 14 sc along the top edge, one in each free loop of the ch-14
– 4 sc down the right side
That’s 36 sc total. Join, fasten off and weave in the ends.
Strap
With Color A, ch 5.
- Row 1: Sc in the 2nd ch from the hook and in each ch across. (4) Turn.
- Rows 2–56: Ch 1, sc in each st, turn. (4)
Edging (rounds the ends): Ch 1, then work around the strap:
– Along Row 56: 3 sc in the first st, sc 2, 3 sc in the last st (8)
– Down the long side: 56 sc, one per row end
– Along the foundation chain’s free loops: 3 sc in the first ch, sc 2, 3 sc in the last ch (8)
– Up the other long side: 56 sc
That’s 128 sc. Join and fasten off, leaving a 24 in (61.0 cm) tail for sewing.
The finished strap measures 14.5 in (36.8 cm) long and 1.7 in (4.3 cm) wide.
Lavender Sprigs
Make 3 complete sprigs. Each one has a green stem-and-leaves piece with a purple bud spike stacked on top.
Stem and leaves (Color C)
- Ch 12. Sl st in the 2nd ch from the hook and in each of the next 3 ch. This is the lower stem (4 sl sts).
- Right leaf: Ch 7. Working back along this chain from the 2nd ch from the hook, work sl st, sc, hdc, hdc, sc, sl st. (6)
- Left leaf: Ch 7 and work as for the right leaf. (6)
- Sl st in each of the remaining 7 ch of the stem.
Fasten off, leaving a 10 in (25.4 cm) tail.
The two leaves come out of the same point. Spread them into a V when you sew them down. The piece measures about 2.5 in (6.4 cm) tall.
Bud spike (Color B)
Ch 8. Number the 7 working chains from 1 (the tip, nearest the hook) to 7 (the base).
- Tip: Bud in ch 1.
- Side A, working down the chain: sl st in ch 2? No — work a bud in ch 2, sl st in ch 3, bud in ch 4, sl st in ch 5, bud in ch 6, sl st in ch 7.
- Rotate and work into the bottom loops of the chain.
- Side B, working up: bud in ch 7, sl st in ch 6, bud in ch 5, sl st in ch 4, bud in ch 3, sl st in ch 2, then sl st into the tip.
That’s 7 buds in a staggered cone. Fasten off, leaving a 10 in (25.4 cm) tail. The spike measures about 1.75 in (4.4 cm) long and 1 in (2.5 cm) wide.
Stack the sprig: Lay the spike over the top of the stem so it covers 0.25 in (0.6 cm) of the stem. Tack the two pieces together from the back.
Make All Pieces
| Piece | Qty | Color |
|---|---|---|
| Body | 1 | A |
| Strap | 1 | A |
| Stem and leaves | 3 | C |
| Bud spike | 3 | B |
The finished sprigs measure 3.5 in (8.9 cm) tall. Here’s how they’re arranged on the front of the holder:
[      Top band 2 in       ]
[   ·    Sprig 1     ·     ]
[ Sprig 2    ·    Sprig 3  ]
[        ( slot )          ]
[          base            ]
Joining
Find the side folds: Lay the body flat with the slot centered on the front. Place a marker at each side fold in Rnd 41.
Strap: Overlap each end of the strap 1.5 in (3.8 cm) down the inside of the band, centered on a fold marker. Pin both ends and check that the strap isn’t twisted.
Whipstitch all the way around each overlap. Go through one outer edging stitch of the strap and one sc of the band for each stitch. Stitch the top of the overlap twice more for strength, because this point carries the full load.
That leaves 11.5 in (29.2 cm) of strap to form the loop, which rises about 5.5 in (14.0 cm) above the rim.
Sprigs:
– Pin Sprigs 2 and 3 so their stems start 0.5 in (1.3 cm) above Rnd 22. Center each one 1.75 in (4.4 cm) to the left or right of the center front.
– Pin Sprig 1 on the center front with its stem base 3.5 in (8.9 cm) above Rnd 22. Its tip should stop 0.5 in (1.3 cm) below the band.
Sew each sprig down with its own color tail, catching the shells and sc of the mesh, not the open holes. Keep your stitches snug but not tight. Pulling too hard draws the mesh in and makes it pucker.
Size checkpoint: The body should still measure 6.9 in (17.5 cm) wide flat behind the appliqués.
Final Blocking
- Soak the holder in cool water for 10 minutes, then gently press the water out. Don’t wring it.
- Roll it in a towel to remove more water.
- Slide a 4.4 in (11.2 cm) wide bottle or rolled towel inside to shape the tube.
- Pat the base round and straighten the shell columns.
- Open the slot into a smooth oval, 4 in (10.2 cm) wide.
- Lay the strap out straight and pin it to 14.5 in (36.8 cm).
- Let everything dry completely before you hang it.
Final Quality-Control Checklist
- Base: flat, 4.4 in (11.2 cm) across
- Body: 6.9 in (17.5 cm) wide flat; side wall 13 in (33.0 cm) tall
- Slot: centered on the front, with all 36 edging sc
- Every mesh round: 8 shells, staggered neatly
- Top band: 48 sts, 2 in (5.1 cm) deep
- Strap: untwisted, overlaps 1.5 in (3.8 cm) at each end
- Sprigs: in a triangle, with each spike overlapping its stem
- All ends woven in securely
Troubleshooting
- Base cups or ruffles: It cups if you crochet too tightly and ruffles if you crochet too loosely. Redo the base rounds with even tension.
- Slot sits off-center: Re-count the 19 sl sts in Row 17.
- Shells lean or spiral: Make sure each round starts by sl stitching to the center dc.
- Band flares: Recheck that Rnd 35 has 48 sts. Rework it with tighter sc if needed.
- Strap stretches: Use a firmer cotton or go down a hook size for the strap.
- Mesh puckers behind the sprigs: Loosen the sewing stitches.
Care
Hand wash cool and dry flat over a bottle-shaped form. Shake out crumbs from the base now and then.
Final Notes
Here’s the full measurement chain:
– 48-st base, 4.4 in (11.2 cm) across
– 3.5 in (8.9 cm) solid lower wall with a 4 in (10.2 cm) slot
– 7.5 in (19.1 cm) shell mesh
– 2 in (5.1 cm) band, for a 13 in (33.0 cm) wall
– Body: 6.9 in × 15.2 in (17.5 cm × 38.6 cm) flat
– 14.5 in (36.8 cm) strap
– Three 3.5 in (8.9 cm) lavender sprigs
If each checkpoint matches, the finished holder will too.
Happy crocheting!