

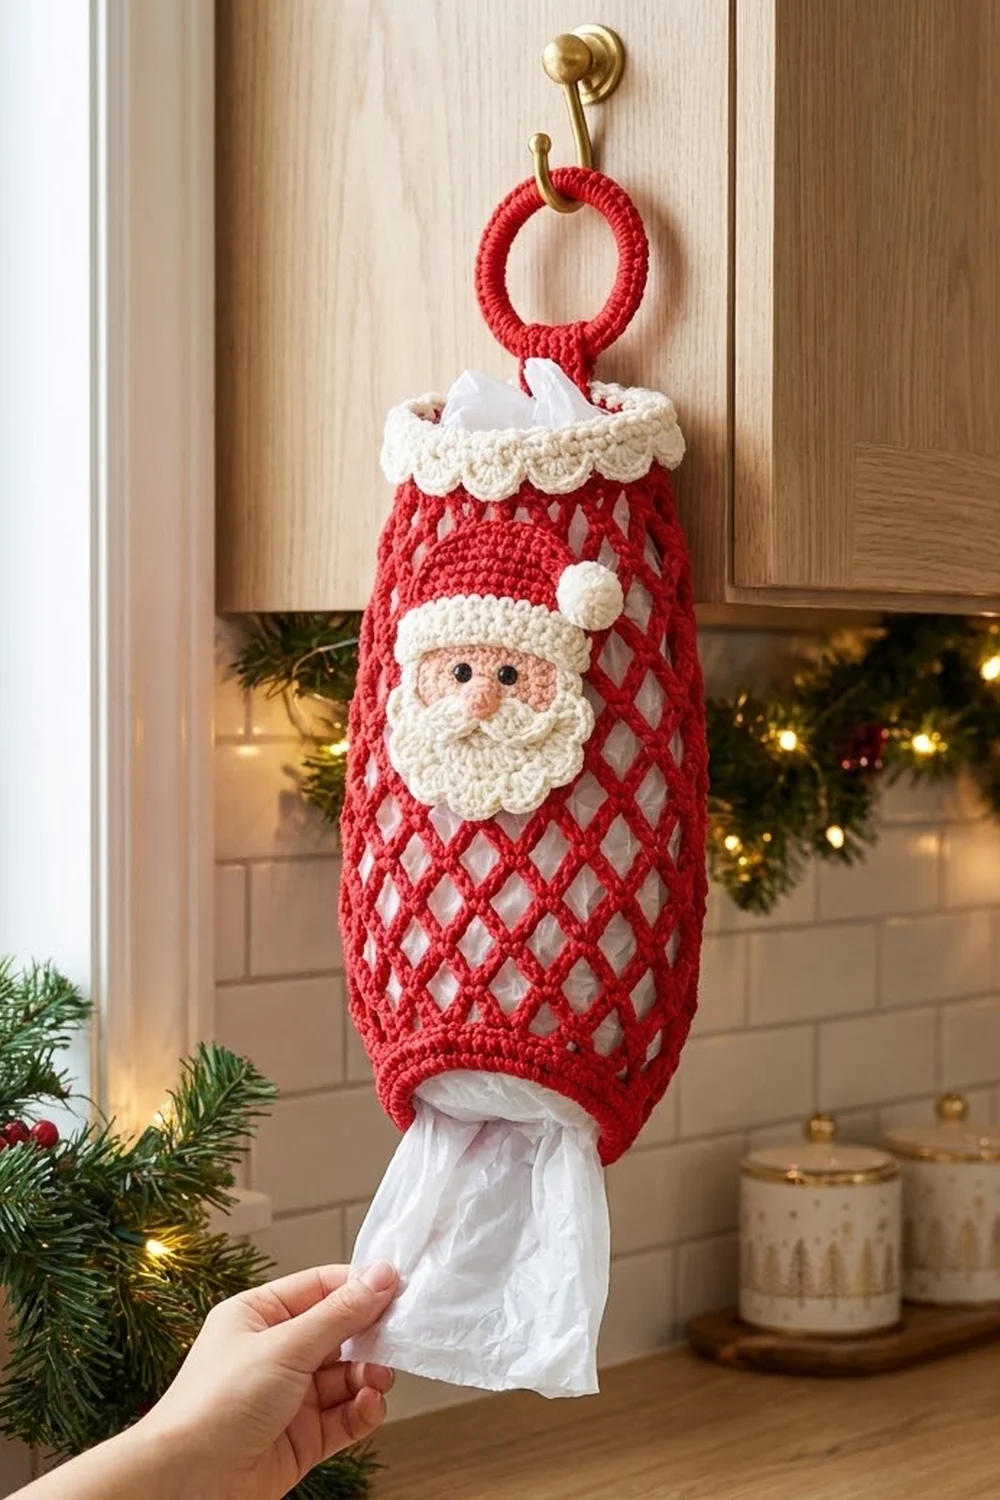
This Santa bag holder keeps plastic grocery bags tidy in the kitchen. Its red diamond mesh body holds a big stash of bags. You push them in at the top and pull them out one at a time through the solid bottom opening.
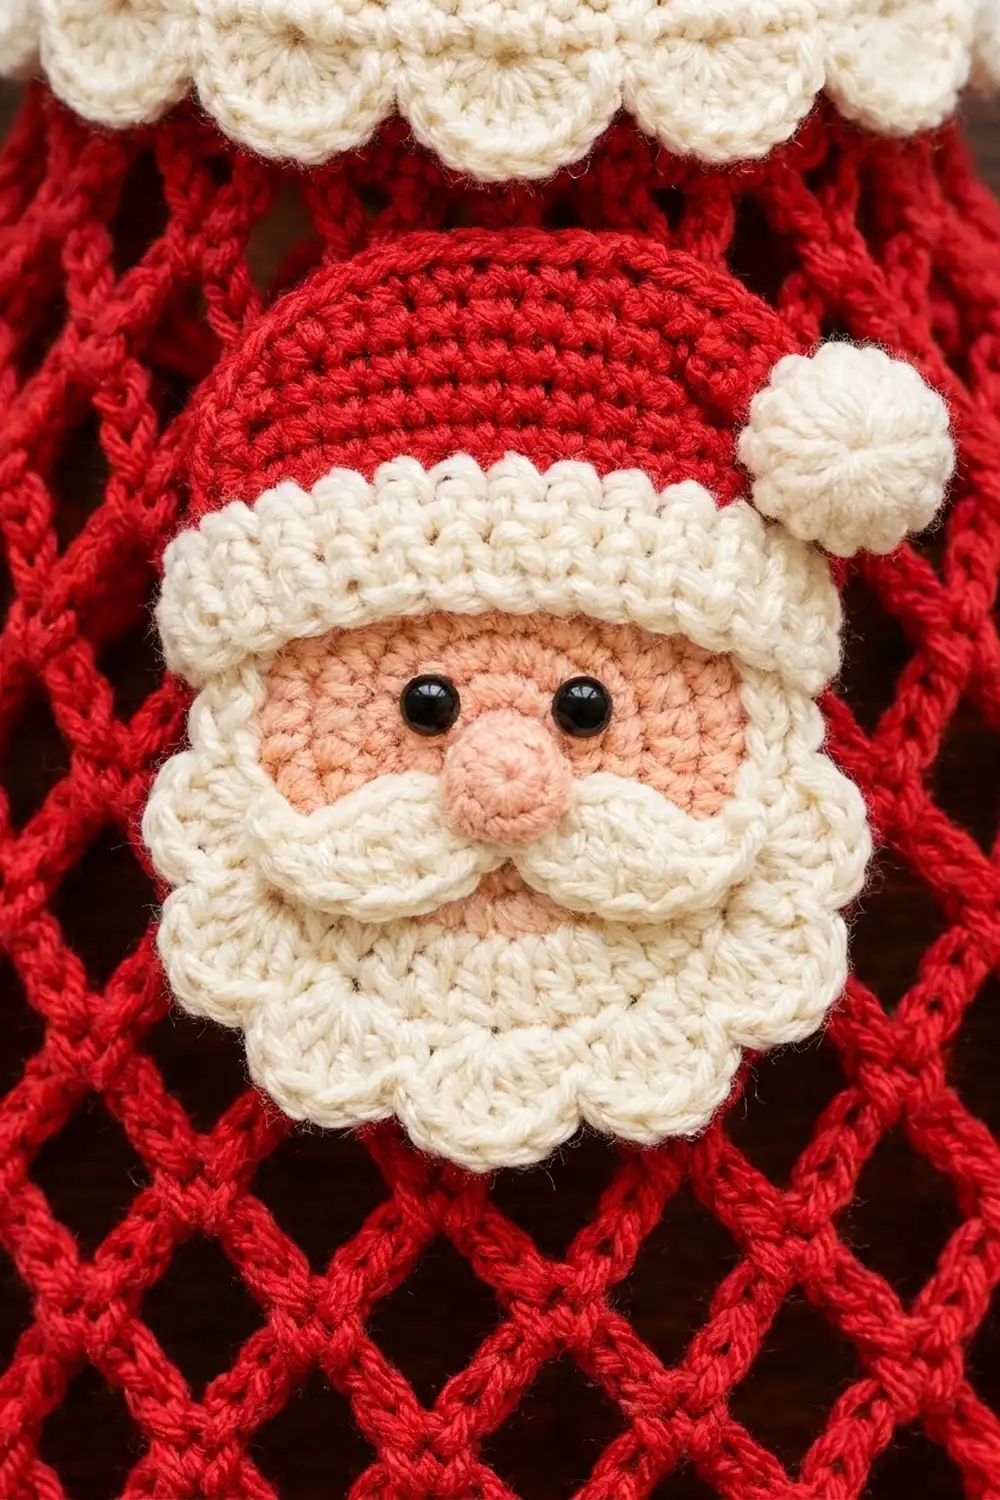
The body is a classic Christmas red. Cream is used for the scalloped cuff, beard, mustache, hat brim and pompom. Peach is used for the face and rose pink for the nose. If you make the body in green, you get a second colorway to hang beside the first.
The pattern uses US crochet terms. The finished body is 7 in (17.8 cm) wide when laid flat at its widest point and 15 in (38.1 cm) tall. With the ring attached, the holder hangs about 19 in (48.3 cm) long.
You crochet the body in the round from the bottom up. It starts with a solid band, continues with 15 rounds of chain-loop mesh that widen and then narrow, and ends with a solid top band. The cuff, ring, tab and Santa are made separately and sewn on at the end.
Finished Size and Construction
- Finished size: 7 in (17.8 cm) x 15 in (38.1 cm), or about 19 in (48.3 cm) tall with the ring
- Skill level: Easy+
- Terminology: US
- Yarn weight: Worsted (#4)
- Hooks: 5.0 mm (H-8) for the body, cuff, ring and tab; 4.0 mm (G-6) for the appliqué
- Number of pieces: 1 body, 1 cuff, 1 covered ring, 1 tab and 1 Santa appliqué, plus a mustache, nose and pompom
- Layout: The ring and tab sit on top, the cuff wraps the top band and Santa is centered on the front.
- Openings: 6 in (15.2 cm) wide when laid flat, which is 12 in (30.5 cm) around
- Size before cuff: 7 in x 15 in (17.8 cm x 38.1 cm)
- Cuff depth: 1.25 in (3.2 cm)
Materials
Use a smooth worsted cotton or cotton blend. Cotton holds the mesh shape and stretches less under the weight of the bags. Acrylic also works, but the mesh will stretch more in length.
- Red: 55 g, about 100 m
- Cream: 20 g, about 35 m
- Peach: 5 g, about 8 m
- Rose pink: 2 g, about 2 m
These amounts include a margin of about 15%.
Tools:
- 5.0 mm (H-8) and 4.0 mm (G-6) hooks
- One 3 in (7.6 cm) plastic or metal ring
- Two 6 mm black safety eyes
- Stitch marker
- Tapestry needle
- Scissors
- A pinch of fiberfill
- Pins and a blocking mat
Abbreviations (US Terms)
- ch: chain
- sl st: slip stitch
- sc: single crochet
- hdc: half double crochet
- dc: double crochet
- sk: skip
- sc2tog: single crochet 2 together
- sc3tog: single crochet 3 together
- MR: magic ring
- st(s): stitch(es)
Shell (special stitch): Work 5 dc in the same stitch.
Gauge and Checkpoints
Gauge: 14 sc and 16 rounds = 4 in (10.2 cm) with the 5.0 mm hook. One mesh round is about 0.85 in (2.2 cm) tall.
Test one piece first. Work Rounds 1–5 (the bottom band) and measure them before you go on.
- After Round 5: The band should be 12 in (30.5 cm) around, 6 in (15.2 cm) laid flat and 1.25 in (3.2 cm) tall.
- After Round 10: The piece should be about 5.5 in (14.0 cm) long.
- After Round 16: The piece should be about 10.6 in (26.9 cm) long and 7 in (17.8 cm) wide laid flat.
- After Round 20: The piece should be about 14 in (35.6 cm) long.
- After Round 24: The piece should be 15 in (38.1 cm) long.
If your band is too big, switch to a 4.5 mm hook. If it is too small, switch to a 5.5 mm hook. Don’t change the stitch count, because the cuff has to match the body stitch for stitch.
Body
Use red and the 5.0 mm hook.
Bottom Band
Foundation: Ch 42 and sl st to the first ch to form a ring, making sure the chain isn’t twisted.
Round 1: Ch 1, sc in each ch around, sl st to first sc. (42 sc)
Rounds 2–5: Ch 1, sc in each st around, sl st to first sc. (42 sc)
This solid band is the opening you pull bags from. It is firm enough to keep its shape.
Mesh Section
Each mesh round places one sc in the center of each chain loop from the round before, which builds the diamond net. Every round has 14 loops. Only the chain length changes, and that is what shapes the body.
Moving to the next round: Sl st across to the center of the first loop of the round you just finished. Use 3 sl st for a ch-5 or ch-6 loop and 4 sl st for a ch-7 loop.
Round 6 (set-up): Ch 1, sc in first st, *ch 5, sk 2, sc in next st; repeat from * 12 more times, ch 5, sk 2, sl st to first sc. (14 ch-5 loops)
Check: 14 repeats x 3 sts = 42 sts. ✓
Round 7: Sl st to the center of the first loop, ch 1, sc in the same loop, *ch 5, sc in next loop; repeat from * 12 more times, ch 5, sl st to first sc. (14 ch-5 loops)
Round 8: Repeat Round 7. (14 ch-5 loops)
Rounds 9–10: Work as Round 7, but ch 6 between sc. (14 ch-6 loops)
Rounds 11–16: Work as Round 7, but ch 7 between sc. (14 ch-7 loops) This is the widest part of the body, about 7 in (17.8 cm) laid flat.
Rounds 17–18: Work as Round 7, but ch 6 between sc. (14 ch-6 loops)
Rounds 19–20: Work as Round 7. (14 ch-5 loops)
That makes 15 mesh rounds in total (Rounds 6–20).
Top Band
Round 21 (conversion): Ch 1, work 3 sc in each ch-5 loop around, sl st to first sc. (14 loops x 3 sc = 42 sc)
Rounds 22–24: Ch 1, sc in each st around, sl st to first sc. (42 sc)
Fasten off. The top band is 1 in (2.5 cm) tall and has 42 sts, the same as the bottom band.
Cuff, Ring and Tab
Scalloped Cuff
Use cream and the 5.0 mm hook.
Foundation: Ch 42 and sl st to the first ch to form a ring.
Round 1: Ch 1, sc in each ch around, sl st to first sc. (42 sc)
Round 2 (increase): Ch 1, *sc in next 6 sts, 2 sc in next st; repeat from * 5 more times, sl st to first sc. (42 sts worked + 6 extra = 48 sc)
Round 3 (scallops): Ch 1, *sc in next st, sk 1, shell in next st, sk 1; repeat from * 11 more times, sl st to first sc. (12 shells)
Fasten off and leave a 24 in (61.0 cm) tail for sewing.
Covered Ring
Use red and the 5.0 mm hook.
Round 1: Join the yarn to the ring with a sl st. Work about 60 sc tightly around the ring until no gaps show, then sl st to first sc.
Round 2: Ch 1, sl st in the back loop of each st around. Fasten off.
The covered ring is about 3.5 in (8.9 cm) across.
Tab
Row 1: With red, ch 5, then sc in the 2nd ch from the hook and in each ch across. (4 sc)
Rows 2–12: Ch 1, turn, sc in each st across. (4 sc)
The finished tab is about 1.1 in (2.8 cm) wide and 3 in (7.6 cm) long. Fasten off and leave a long tail.
Santa Appliqué
Use the 4.0 mm hook.
Face
Use peach.
Round 1: MR, 6 sc in ring, sl st to first sc. (6 sc)
Round 2: Ch 1, 2 sc in each st around. (12 sc)
Round 3: Ch 1, *sc in next st, 2 sc in next st; repeat from * around. (18 sc)
Round 4: Ch 1, *sc in next 2 sts, 2 sc in next st; repeat from * around. (24 sc)
Fasten off. The face is about 2 in (5.1 cm) across. Insert the safety eyes between Rounds 2 and 3, 4 sts apart.
Mark the 13 sts along the lower half of Round 4 for the beard. The remaining 11 sts at the top are for the brim.
Beard
Use cream and join in the first marked st.
Row 1 (conversion): Ch 1, 2 sc in each of the next 12 sts, sc in the 13th st. (13 sts worked + 12 extra = 25 sc)
Row 2: Ch 1, turn, sc in first st, *sk 1, shell in next st, sk 1, sc in next st; repeat from * 5 more times. (6 shells)
Check: 1 + (6 x 4) = 25 sts. ✓ Fasten off.
Hat Brim
Use cream and join in the first of the 11 top sts.
Row 1: Ch 1, sc in each st across. (11 sc)
Row 2: Ch 1, turn, 2 sc in first st, sc in next 9 sts, 2 sc in last st. (13 sc)
Fasten off.
Hat
Use red and join in the first st of brim Row 2.
Row 1: Ch 1, sc in each st across. (13 sc)
Row 2: Ch 1, turn, sc2tog, sc in next 9 sts, sc2tog. (11 sc)
Row 3: Ch 1, turn, sc in each st across. (11 sc)
Row 4: Ch 1, turn, sc2tog, sc in next 7 sts, sc2tog. (9 sc)
Row 5: Ch 1, turn, sc in each st across. (9 sc)
Row 6: Ch 1, turn, sc2tog, sc in next 5 sts, sc2tog. (7 sc)
Row 7: Ch 1, turn, sc in each st across. (7 sc)
Row 8: Ch 1, turn, sc2tog, sc in next 3 sts, sc2tog. (5 sc)
Row 9: Ch 1, turn, sc2tog, sc in next st, sc2tog. (3 sc)
Row 10: Ch 1, turn, sc3tog. (1 st)
Fasten off. Fold the tip of the hat to the right and tack it down.
Mustache, Nose and Pompom
Mustache (cream): Ch 8. Starting in the 2nd ch from the hook, work sc, hdc, 2 dc in next ch, sl st in next ch, 2 dc in next ch, hdc, sc. (7 chs used)
Nose (rose pink): MR, 6 sc, pull the ring tight and sl st to first sc.
Pompom (cream):
- Round 1: MR, 6 sc. (6 sc)
- Round 2: 2 sc in each st around. (12 sc)
- Round 3: Sc2tog 6 times. (6 sc)
Stuff the pompom lightly and close it. It is about 0.75 in (1.9 cm) across.
Sew the mustache below the eyes and the nose above the center of the mustache. Sew the pompom to the folded hat tip. The finished Santa is about 3.5 in (8.9 cm) wide and 4 in (10.2 cm) tall.
Make All Pieces
- Red: 1 body, 1 covered ring, 1 tab, 1 hat
- Cream: 1 cuff, 1 beard, 1 brim, 1 mustache, 1 pompom
- Peach: 1 face
- Rose pink: 1 nose
Layout (front view):
        [ RING ]
        [ TAB  ]
[ CUFF over TOP BAND ]
[ MESH | SANTA | MESH ]
[      MESH BODY      ]
[     BOTTOM BAND     ]
Joining
Cuff: Flatten the body so the round joins sit at the center back. Slide the cuff over the top band with the scallops pointing down. Line up cuff Round 1 with body Round 24. Both have 42 sts, so whipstitch them together one stitch to one stitch, with 21 sts across the front and 21 across the back. Six scallops hang over the mesh on each side.
Tab and ring: Thread the tab through the ring and fold it in half. Sew both ends to the inside of the top band at the center back, overlapping the band by 0.5 in (1.3 cm).
Santa: Center the appliqué on the front, 0.5 in (1.3 cm) below the scallops. Sew around the edge of the face, beard and hat, catching the mesh bars behind it.
Tension: Keep your stitches even and gentle. Pulling too tight puckers the cuff or squeezes the mesh behind the Santa.
Size checkpoint: The body should still measure 7 in x 15 in (17.8 cm x 38.1 cm).
Border
For this design, the top band and cuff work as the border.
Border gauge: 14 sc = 4 in (10.2 cm)
| Round | Total stitches | Per side when flattened |
|---|---|---|
| Body Round 21 | 42 sc (14 x 3) | 21 |
| Body Rounds 22–24 | 42 sc | 21 |
| Cuff Round 1 | 42 sc | 21 |
| Cuff Round 2 | 48 sc (42 + 6) | 24 |
| Cuff Round 3 | 12 shells | 6 |
Why the math works: At 3 sc per loop, the 14 loops give back the same 42 sts you started with. The cuff also starts at 42 sts, so it joins without easing. The 6 increases bring the count to 48, which divides evenly by the 4-stitch scallop repeat. They also add a little flare so the scallops sit outward.
Final Blocking
- Soak the body in cool water and gently squeeze it out without wringing.
- Roll it in a towel to remove the extra water.
- Pin it flat to 7 in (17.8 cm) wide at the widest point and 15 in (38.1 cm) tall.
- Open each diamond evenly so the mesh lines run straight.
- Pin the bottom and top bands at 6 in (15.2 cm) wide.
- Shape each cuff scallop and beard scallop into a curve.
- Let it dry completely before you unpin it.
Final Quality-Control Checklist
- Both bands have 42 sc.
- Every mesh round has 14 loops.
- The body measures 7 in x 15 in (17.8 cm x 38.1 cm).
- The cuff has 12 even scallops.
- The ring is fully covered and stands upright.
- The Santa is centered and firmly sewn on.
- All ends are woven in.
Troubleshooting
- Mesh spirals: You probably skipped the sl st move into the loop center. Count your loops every round.
- Body too long: Use a smaller hook for the mesh, or work only Rounds 11–15 with ch-7 loops.
- Cuff ruffles: Leave out the Round 2 increases and work 7 scallops of 6 sts each over the 42 sts.
- Loose bottom opening: Work Round 5 in back loops only.
- Appliqué curls: Steam it flat before sewing it on.
Care
Hand wash in cool water and lay flat to dry. Don’t machine dry, because the mesh can stretch.
Final Notes
Here is how the measurements build on each other. The 42-stitch bottom band is 12 in (30.5 cm) around. The 15 mesh rounds, each with 14 loops, widen the body to 7 in (17.8 cm) and bring it to 14 in (35.6 cm) long. The 42-stitch top band finishes the body at 15 in (38.1 cm) and matches the cuff stitch for stitch. If you check your measurements at each checkpoint, your Santa will hang straight and hold plenty of bags.
Happy crocheting!