

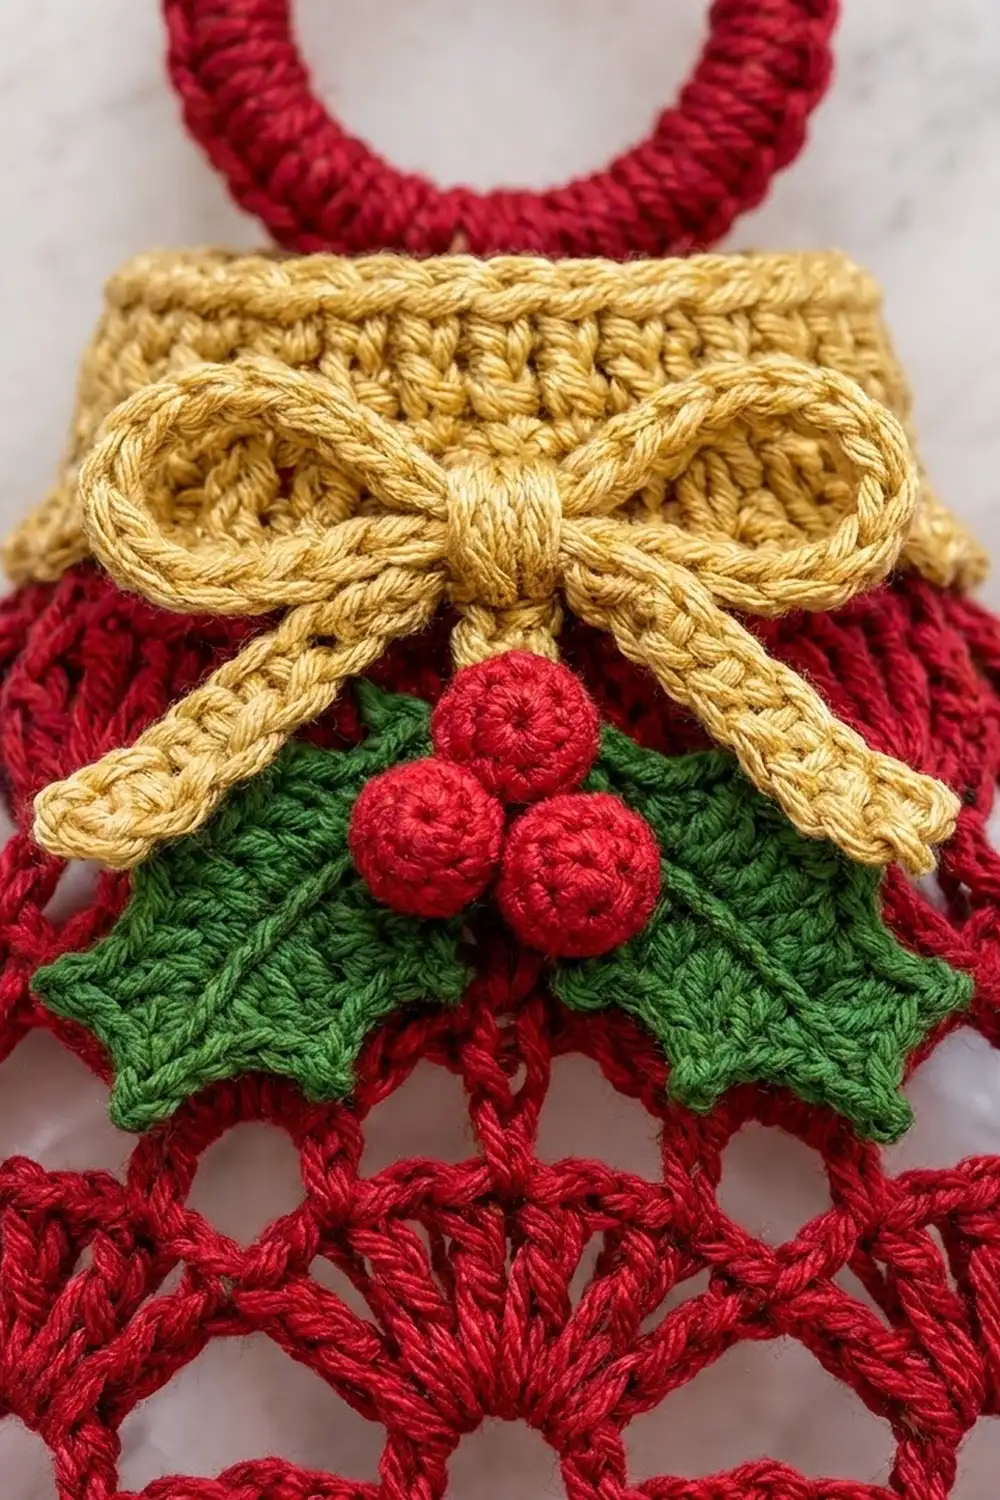
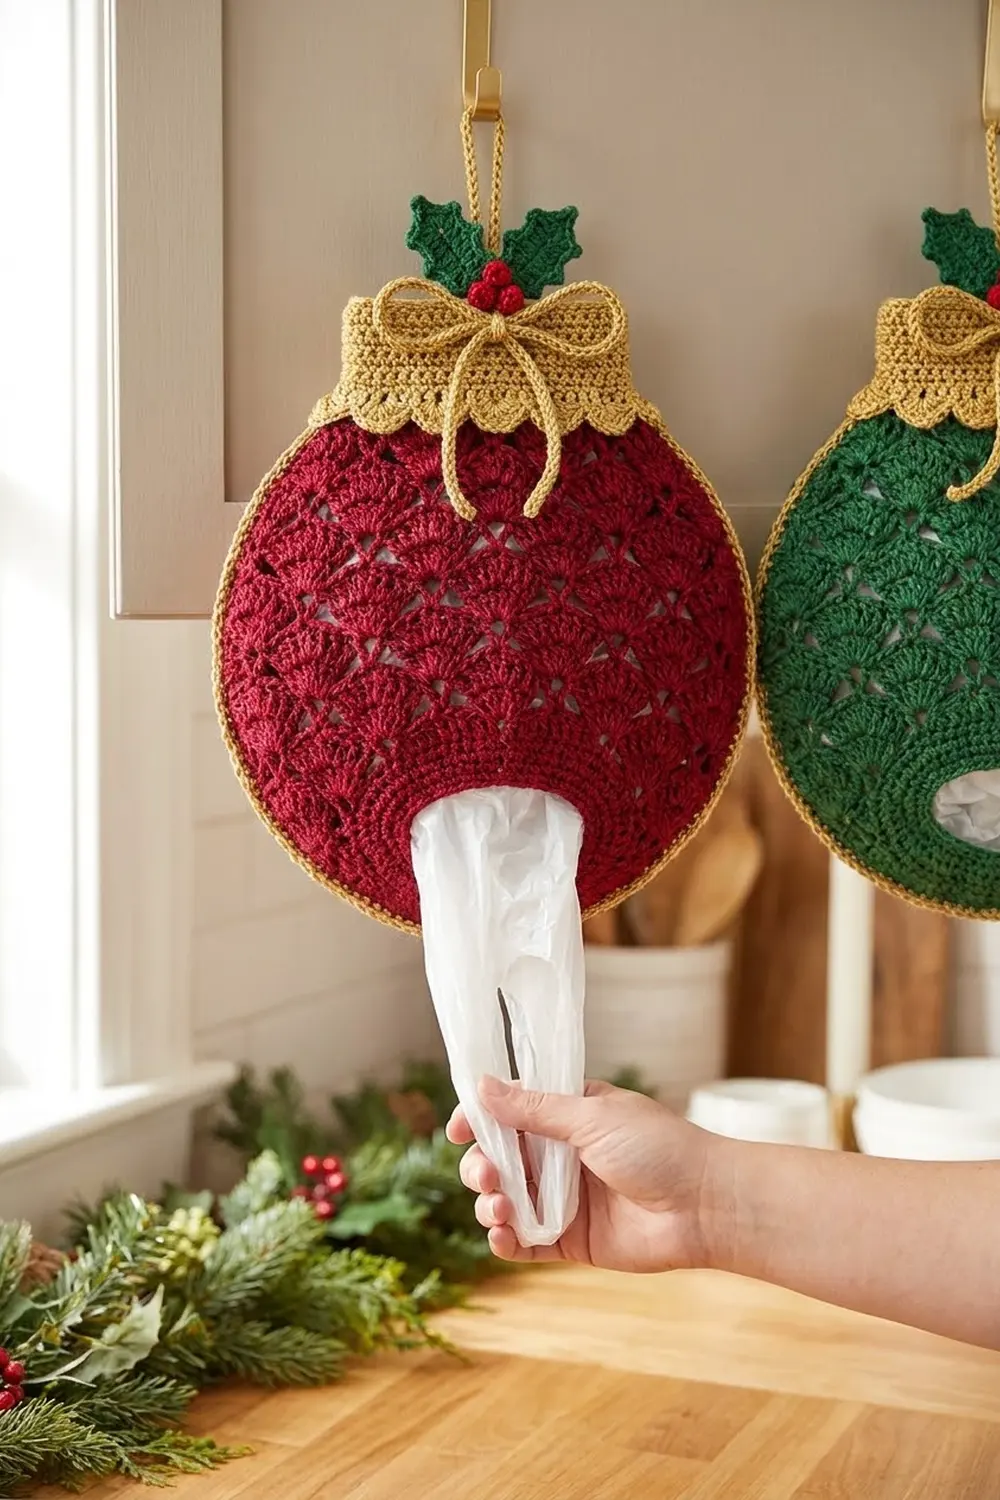
This plastic bag holder looks like a Christmas tree bauble. The body is a red fan-lace ornament with a gold collar, a red hanging ring, a gold bow, two holly leaves and three berries. Hang it from a cabinet knob, push bags in at the top and pull them out through the bottom opening one at a time.
The palette is deep cranberry red, warm gold and holly green. The lace is open enough to show the bags inside, and the solid bands at the top and bottom keep the shape firm.
The pattern uses US crochet terms. The finished body is 10 in (25.4 cm) tall and 9 in (22.9 cm) wide when flattened. With the ring, the holder is about 12.5 in (31.8 cm) tall.
You start the body at the bottom opening and work it in joined rounds up to the neck. Next, you add a gold rim around the bottom opening. Then you make the collar, ring, bow, leaves and berries separately and sew them on.
Finished Size and Construction
- Finished size: 9 in (22.9 cm) wide × 10 in (25.4 cm) tall (body); 12.5 in (31.8 cm) tall with the ring
- Skill level: Intermediate
- Terminology: US
- Yarn weight: Worsted (#4), cotton or cotton blend
- Hook: 5.0 mm (H-8)
- Number of pieces: 1 holder: 1 body plus 7 small parts (collar, ring, bow, 2 leaves, 3 berries)
- Layout: A single holder, worked in the round and flattened
- Bottom opening: 6 in (15.2 cm) across when flat, 12 in (30.5 cm) around
- Size before border: 9 in (22.9 cm) × 9.5 in (24.1 cm)
- Border depth: 0.5 in (1.3 cm), gold, around the bottom opening only
Materials
Choose a smooth, firm worsted cotton. It shows the fan lace clearly and does not stretch much under the weight of the bags. Acrylic also works, but the holder will be softer and may sag a little.
- Red (main): 100 g, about 180 m (197 yd)
- Gold: 25 g, about 45 m (49 yd)
- Green: 10 g, about 18 m (20 yd)
The quantities include a margin of about 15% for your gauge swatch and weaving in ends.
Tools:
– 5.0 mm (H-8) crochet hook
– One 3 in (7.6 cm) plastic or metal ring
– Tapestry needle
– Stitch marker
– Scissors
– A small amount of fiberfill for the berries, or use yarn scraps
– Pins and a tape measure
Abbreviations (US Terms)
- ch: chain
- sl st: slip stitch
- sc: single crochet
- hdc: half double crochet
- dc: double crochet
- sc2tog: single crochet 2 together
- rev sc: reverse single crochet (crab stitch)
- BLO: back loop only
- MR: magic ring
- sp(s): space(s)
- st(s): stitch(es)
Special stitches
– V-st: (dc, ch 2, dc) in the same stitch. Some rounds use ch 3 in the middle; the pattern tells you when.
– Fan: the stated number of dc, all worked into the same space.
– Picot: ch 3, then sl st in the 3rd ch from the hook.
Gauge and Checkpoints
Gauge: 16 sc × 18 rounds = 4 in (10.2 cm), worked in the round with a 5.0 mm hook.
Treat Rounds 1–3 as your test piece. Flatten the tube: it should measure 6 in (15.2 cm) across. If it is wider, go down to a 4.5 mm hook. If it is narrower, go up to a 5.5 mm hook. Start again if you change hooks.
Checkpoints (body flattened):
– After Rnd 3: 6 in (15.2 cm) wide, 0.75 in (1.9 cm) tall
– After Rnd 8: about 8.5 in (21.6 cm) wide, 4 in (10.2 cm) tall
– After Rnd 12: 9 in (22.9 cm) wide, 6.5 in (16.5 cm) tall
– After Rnd 16: 8.5 in (21.6 cm) tall, with the top edge about 7 in (17.8 cm) wide
– After Rnd 20: 9.5 in (24.1 cm) tall, with the neck 5 in (12.7 cm) wide
If the lace is more than 0.5 in (1.3 cm) taller than the checkpoint, your dc stitches are loose. Shorten them by pulling each loop snug as you finish it. If the lace is shorter than the checkpoint, loosen your chain spaces a little.
Body (Red)
Join every round with a sl st to the first stitch. Do not turn.
Foundation: Ch 48. Join with a sl st to the first ch to make a ring, and check that the chain is not twisted.
Rnd 1: Ch 1, sc in each ch around. (48 sc)
Rnds 2–3: Ch 1, sc in each st around. (48 sc)
Rnd 4 (first fans): Ch 1, sc in the first st. Skip 2 sts, 5 dc in the next st, skip 2 sts, sc in the next st. Repeat from * 7 more times, but leave out the last sc on the final repeat. (8 fans of 5 dc + 8 sc = 48 sts)
Each repeat uses 6 stitches, and 8 × 6 = 48, so the fans fit the band exactly.
Rnd 5 (V round): Ch 5 (counts as dc + ch 2), dc in the same sc. Ch 2, sc in the center (3rd) dc of the next fan, ch 2. V-st in the next sc, ch 2, sc in the center dc of the next fan, ch 2. Repeat from * 6 more times (8 repeats in total). Join to the 3rd ch of the starting ch-5. (8 V-sts, 8 sc, 16 ch-2 sps)
Rnd 6 (7-dc fans): Sl st into the first V-st sp. Ch 3 (counts as dc), 6 dc in the same sp. Ch 2, sc in the next sc, ch 2. 7 dc in the next V-st sp, ch 2, sc in the next sc, ch 2. Repeat from * 6 more times (8 fans in total). (8 fans of 7 dc = 56 dc, 8 sc, 16 ch-2 sps)
The new fans sit above the gaps between the fans below. This alternating layout creates the scale pattern.
Rnd 7: Sl st across to the next sc. Ch 5 (counts as dc + ch 2), dc in the same sc. Ch 3, sc in the center (4th) dc of the next fan, ch 3. V-st in the next sc, ch 3, sc in the 4th dc of the next fan, ch 3. Repeat from * 6 more times. (8 V-sts, 8 sc, 16 ch-3 sps)
Rnd 8 (9-dc fans): Sl st into the first V-st sp. Ch 3, 8 dc in the same sp. Ch 3, sc in the next sc, ch 3. 9 dc in the next V-st sp, ch 3, sc in the next sc, ch 3. Repeat from * 6 more times. (8 fans of 9 dc = 72 dc, 8 sc, 16 ch-3 sps)
Rnd 9: Sl st across to the next sc. Ch 6 (counts as dc + ch 3), dc in the same sc. Ch 3, sc in the center (5th) dc of the next fan, ch 3. (Dc, ch 3, dc) in the next sc, ch 3, sc in the 5th dc of the next fan, ch 3. Repeat from * 6 more times. (8 V-sts with ch-3 centers, 8 sc, 16 ch-3 sps)
Rnd 10: Repeat Rnd 8. (72 dc, 8 sc, 16 ch-3 sps)
Rnd 11: Repeat Rnd 9.
Rnd 12: Repeat Rnd 8. This is the widest round. (72 dc, 8 sc, 16 ch-3 sps)
Rnd 13 (begin shaping in): Sl st across to the next sc. Ch 5, dc in the same sc. Ch 2, sc in the 5th dc of the next fan, ch 2. V-st in the next sc, ch 2, sc in the 5th dc of the next fan, ch 2. Repeat from * 6 more times. (8 V-sts, 8 sc, 16 ch-2 sps)
Rnd 14: Repeat Rnd 6. (56 dc, 8 sc, 16 ch-2 sps)
Rnd 15: Sl st across to the next sc. Ch 5, dc in the same sc. Ch 1, sc in the 4th dc of the next fan, ch 1. V-st in the next sc, ch 1, sc in the 4th dc of the next fan, ch 1. Repeat from * 6 more times. (8 V-sts, 8 sc, 16 ch-1 sps)
Rnd 16 (5-dc fans): Sl st into the first V-st sp. Ch 3, 4 dc in the same sp. Ch 1, sc in the next sc, ch 1. 5 dc in the next V-st sp, ch 1, sc in the next sc, ch 1. Repeat from * 6 more times. (40 dc, 8 sc, 16 ch-1 sps)
Rnd 17 (conversion to neck): Ch 1. Sc in each dc and each sc, and skip all ch-1 sps. (40 + 8 = 48 sc worked one into each stitch, + 0 added = 48 sc)
Rnd 18: Ch 1. Sc in the next 4 sts, sc2tog. Repeat from * around. (40 sc)
Rnds 19–20: Ch 1, sc in each st around. (40 sc) Fasten off and weave in the ends.
Collar (Gold)
Ch 44. Join with a sl st to the first ch, checking that the chain is not twisted.
Rnd 1: Ch 1, sc in each ch around. (44 sc)
Rnds 2–4: Ch 2 (does not count as a stitch), hdc in the BLO of each st around. (44 hdc) Working in the back loop creates the horizontal ridges.
Rnd 5 (scallops): Ch 1, sc in the first st. Skip 1 st, 5 dc in the next st, skip 1 st, sc in the next st. Repeat from * around, but leave out the last sc on the final repeat. (11 scallops of 5 dc + 11 sc)
Each scallop uses 4 stitches, and 11 × 4 = 44. The collar measures 11 in (27.9 cm) around and 1.75 in (4.4 cm) deep. It slides easily over the 10 in (25.4 cm) neck.
Hanging Ring (Red)
Join red to the 3 in (7.6 cm) ring. Work sc stitches over the ring until it is fully covered, about 60 sc, pushing the stitches close together as you go. Join and fasten off, leaving a 12 in (30.5 cm) tail.
Bow (Gold)
Ch 72, which is about 16 in (40.6 cm) long. Sl st in the back bump of each ch, starting in the 2nd ch from the hook. (71 sl st)
Tie the cord into a bow with two 1.5 in (3.8 cm) loops and two 2 in (5.1 cm) tails. The bow should be about 3.5 in (8.9 cm) wide. Put a few stitches through the knot so it stays tied.
Holly Leaves (Make 2, Green)
Ch 11.
Side 1: Sl st in the 2nd ch from the hook. Then work into the next chains as follows: sc, hdc, dc, picot, dc, dc, picot, dc, hdc, sc. (9 chs used)
Tip: Work (sc, picot, sc) in the last ch.
Side 2: Work along the other side of the foundation chain: sc, hdc, dc, picot, dc, dc, picot, dc, hdc, sc, sl st. Fasten off.
Each leaf has 5 points (2 picots per side plus the tip) and measures about 2.5 in (6.4 cm) long.
Berries (Make 3, Red)
Rnd 1: 6 sc in MR. (6 sc)
Rnd 2: 2 sc in each st. (12 sc)
Rnd 3: Sc2tog 6 times. (6 sc)
Stuff the berry with its own tail or a bit of fiberfill. Close the hole and keep a tail for sewing. Each berry is about 0.75 in (1.9 cm) across.
Assembly
- Slide the collar over the neck so that the foundation edge lines up with Rnd 20. The scallops will hang down over Rnd 16. Whipstitch the top edge of the collar to Rnd 20 all the way around.
- Flatten the body so the round joins are at the back. Sew the bottom of the ring to the top edge at the front center and the back center. This leaves two openings, one on each side of the ring, for loading bags.
- Sew the bow to the center front of the collar.
- Sew the leaves under the bow at angles, with their bases touching.
- Sew the three berries where the leaf bases meet.
Border (Gold Bottom Rim)
Border gauge: Work 1 sc per foundation chain at 16 sc = 4 in (10.2 cm). That gives 4 sc per inch, or about 1.6 sc per cm.
Rnd 1: Hold the body upside down. Join gold in the free loop of any foundation ch. Ch 1, sc in each free loop around. (48 sc: 24 per flattened side)
Rnd 2: Ch 1, rev sc in each st around. (48 rev sc: 24 per side) Fasten off.
Why the math works: The foundation has 48 chains, and the border places 1 stitch in each one. As a result, the opening stays at 12 in (30.5 cm) around, which is 6 in (15.2 cm) per flattened side, and it does not flare. The bottom has no corners, so there are no corner stitches to add. The rev sc round rolls into a firm cord that adds 0.5 in (1.3 cm), bringing the body from 9.5 in (24.1 cm) to 10 in (25.4 cm) tall.
Final Blocking
- Lightly spray the body with water or dampen it.
- Stuff the body with plastic bags or a towel until it takes on its round bauble shape.
- Ease each fan open and straighten the arches.
- Pin the collar scallops flat against the body.
- Lay the leaves flat and pin out the picot points.
- Let everything dry completely, then remove the stuffing.
Final Quality-Control Checklist
- The body is 9 in (22.9 cm) wide and 10 in (25.4 cm) tall when flat.
- There are 8 fans in every fan round.
- The fans alternate from round to round.
- The bottom opening measures 6 in (15.2 cm) across.
- The collar sits level all the way around.
- The ring is sewn on securely at both points.
- The bow, leaves and berries are centered on the front.
- All ends are woven in on the inside.
Troubleshooting
- The fans lean in a spiral: Join every round exactly at the beginning chain, and start each round with the sl st shown.
- The bottom ruffles: The border is too loose. Work Rnd 1 with a 4.5 mm hook.
- The collar won’t slide on: Make it again with ch 48 and 12 scallops.
- Bags fall out on their own: Tighten the gold border, or skip the rev sc and work a second sc round instead.
- The leaves curl: Steam them flat and let them dry under a book.
Care
Hand wash in cool water, press out the excess and dry flat in shape. Do not tumble dry, because the lace may stretch.
Final Notes
Check every measurement as you go. The 48-stitch band should measure 6 in (15.2 cm) flat. The lace widens to 9 in (22.9 cm) at Rnd 12 and comes back in to a 5 in (12.7 cm) neck at 9.5 in (24.1 cm) tall. The 0.5 in (1.3 cm) border brings the body to 10 in (25.4 cm), and the ring brings the total to about 12.5 in (31.8 cm).
If you would like a second holder, work the body in green and keep the gold, red and green trims the same.
Happy crocheting!