

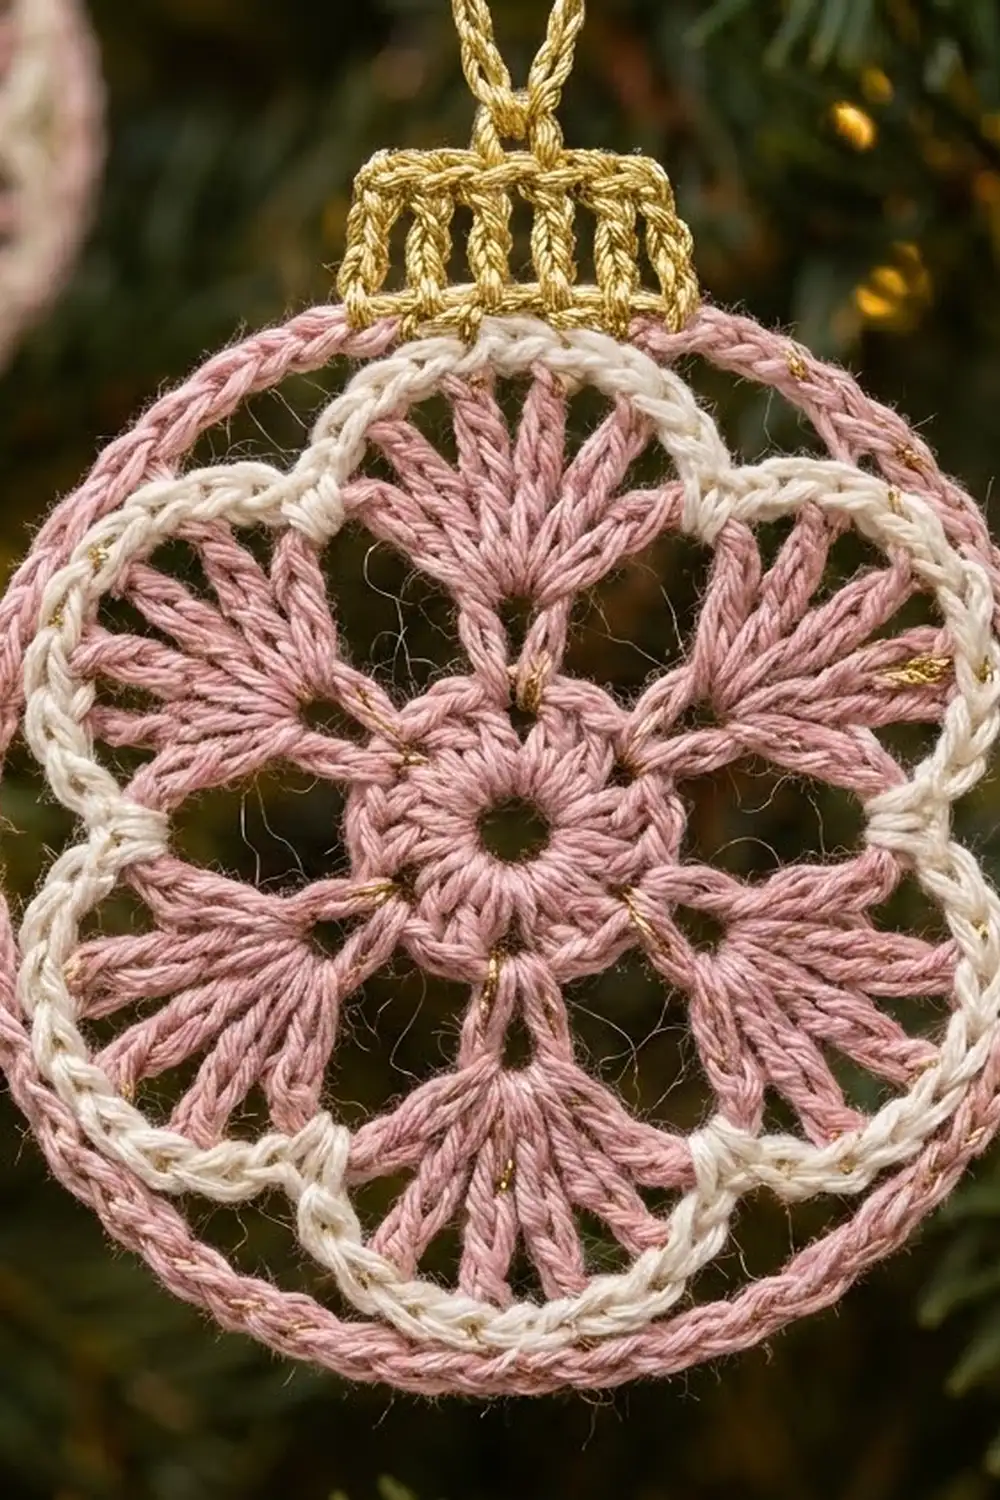
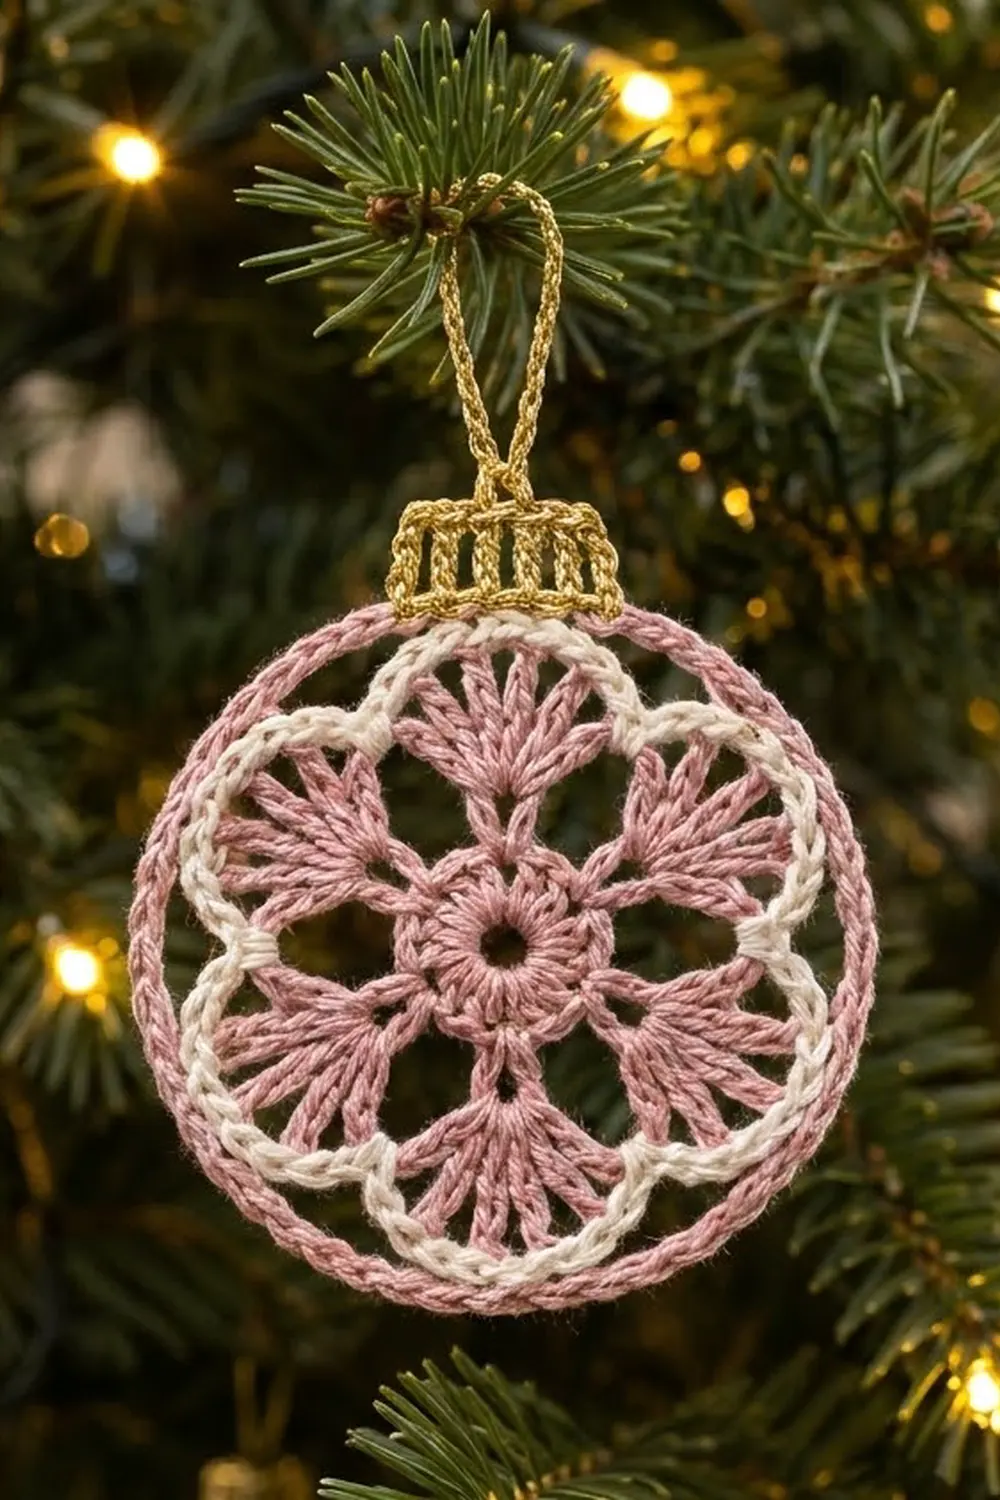
The Rosy Lace Bauble is a flat, lacy Christmas ornament shaped like a classic glass ball. Six dusty-pink fans radiate from a solid center ring, an ivory scalloped round outlines them like frosting, and a slim pink ring closes the shape into a neat circle. A small gold cap and hanging loop finish it so it reads as a bauble from across the room.
The palette is soft and vintage: rose pink, warm cream and a touch of metallic gold. It looks lovely on a real tree, tied to a gift or hung in a window where light shows through the open spaces.
This pattern uses US crochet terms. The finished bauble body measures 4.1 in (10.4 cm) in diameter. The total height, including the cap and loop, is about 6 in (15.2 cm).
The ornament is one single piece. You work the pink center and fans in the round, add one cream scallop round, and then work a two-round pink outer ring. The gold cap is worked in short rows straight off the top of the ring, and the hanging loop is chained from the cap’s center. There is nothing to sew together.
Finished Size and Construction
- Finished size: 4.1 in (10.4 cm) diameter body; about 6 in (15.2 cm) tall including cap and loop
- Skill level: Easy-intermediate
- Terminology: US crochet terms
- Yarn weight: Super Fine (#1) fingering-weight mercerized cotton
- Hook: 2.5 mm (US B/1 or C/2)
- Number of pieces: 1
- Layout: Single circular motif with a cap at the top
- Piece size (body): 4.1 in (10.4 cm) diameter
- Size before border: 3.5 in (8.9 cm) across the cream scallop tips
- Border depth: 0.3 in (0.8 cm) pink outer ring, plus a gold cap 1.3 in (3.3 cm) wide and 0.6 in (1.5 cm) tall
Materials
Use a smooth, mercerized cotton in fingering weight. It gives crisp stitch definition, holds its shape well after blocking and doesn’t fuzz on the tree. A metallic thread of similar thickness works well for the gold. If yours is much thinner, hold it double.
- Color A, Rose Pink: 8 g, about 27 m (center, fans and outer ring)
- Color B, Cream: 3 g, about 10 m (scallop round)
- Color C, Metallic Gold: 2 g, about 7 m (cap and loop)
The quantities include a margin of about 20% for gauge swatching and weaving in.
Tools:
– 2.5 mm crochet hook
– Tapestry needle
– Scissors
– Stitch marker
– Blocking mat and rustproof pins
– Spray bottle with water (optional: light spray starch)
Abbreviations (US Terms)
- ch: chain
- sl st: slip stitch
- sc: single crochet
- dc: double crochet
- tr: treble crochet
- sp(s): space(s)
- sk: skip
- st(s): stitch(es)
- RS: right side
Special stitch: Standard sc join. Place a slipknot of the new color on your hook, insert the hook into the stitch, yarn over and pull up a loop, then yarn over and pull through both loops. This joins the new color and counts as the first sc of the round.
Gauge and Checkpoints
Gauge: 7 sc = 1 in (2.5 cm), measured along the outer ring after blocking.
Because this is a single small piece, the ornament itself is your test piece. Measure at each checkpoint below, after lightly flattening the work with your hand:
- After Round 1: the center ring is 1 in (2.5 cm) across.
- After Round 3: 2 in (5.1 cm) across.
- After Round 4: 3.2 in (8.1 cm) from fan tip to opposite fan tip.
- After Round 5: 3.5 in (8.9 cm) across the cream scallop tips.
- After Round 7: 4.1 in (10.4 cm) diameter.
Too big? Go down to a 2.25 mm hook, or tighten the long chain loops in Round 6. Too small, or cupping? Go up to a 2.75 mm hook. A small difference of about 0.1 in (0.3 cm) will block out.
Pattern
Round 1: Center Ring (Color A)
Make a magic ring.
Round 1: Ch 3 (counts as dc), 17 dc in ring. Pull the ring closed and join with a sl st to the top of the beginning ch-3. (18 dc)
Checkpoint: 1 in (2.5 cm) across, with a small open hole in the middle.
Round 2: Fan Bases
Round 2: Ch 1, sc in the same st as the join, ch 3, sk 2 sts, sc in next st, ch 3, sk 2 sts; repeat from * 4 more times. Join with a sl st to the first sc. (6 sc, 6 ch-3 sps)
The six sc are the anchor points for the six fans.
Round 3: V-Shells
Round 3: Ch 3 (counts as dc), (dc, ch 1, 2 dc) in the same sc, ch 3, sk the ch-3 sp, (2 dc, ch 1, 2 dc) in next sc, ch 3, sk the ch-3 sp; repeat from * 4 more times. Join with a sl st to the top of the beginning ch-3. (24 dc, 6 ch-1 sps, 6 ch-3 sps)
Checkpoint: 2 in (5.1 cm) across. You should see six small V-shells, each with a narrow ch-1 sp at its tip.
Round 4: Fans
Round 4: Sl st in the next dc and into the ch-1 sp. Ch 4 (counts as tr), 8 tr in the same ch-1 sp, ch 3, sc in the next ch-3 sp, ch 3, 9 tr in the next ch-1 sp, ch 3, sc in the next ch-3 sp, ch 3; repeat from * 4 more times. Join with a sl st to the top of the beginning ch-4. Fasten off Color A. (54 tr in 6 fans of 9, 6 sc, 12 ch-3 sps)
The two ch-3 sps on each side of each sc form the open triangles between the fans.
Checkpoint: 3.2 in (8.1 cm) from tip to opposite tip. Spread each fan with your fingers so the 9 tr fan out evenly.
Round 5: Cream Scallops (Color B)
Round 5: With RS facing, use a standard sc join to join Color B in the first tr of any fan. Sc in the next 3 tr (4 sc made). Work 3 sc in the next (5th, center) tr, then sc in the next 4 tr. Work 2 sc in the next ch-3 sp, sk the sc, and work 2 sc in the next ch-3 sp.
Sc in the next 4 tr, 3 sc in the next tr, sc in the next 4 tr, 2 sc in the next ch-3 sp, sk the sc, 2 sc in the next ch-3 sp; repeat from * 4 more times. Join with a sl st to the first sc and fasten off.
(15 sc per scallop: 4 + 3 + 4 + 2 + 2; 90 sc total)
The 3-sc group at each fan’s center makes a rounded peak. The 4 sc packed into the ch-3 sps between fans pull the round inward, which creates the scalloped dips. The middle sc of each 3-sc group is the tip sc. Place a marker in one tip sc if it helps.
Checkpoint: 3.5 in (8.9 cm) across the tips.
Border: Outer Ring and Gold Cap
Border gauge: 7 sc = 1 in (2.5 cm). The ring is divided into 6 equal segments, one per scallop.
Round 6: Ring Chains (Color A)
Round 6: Use a standard sc join to join Color A in any tip sc. Ch 12, sc in the next tip sc, ch 12; repeat from * 4 more times. Join with a sl st to the first sc. (6 sc, 6 ch-12 sps)
Each ch-12 spans the dip between two scallops and leaves an open crescent behind it.
Round 7: Corded Ring
This is a conversion round: you work 1 sc into each existing sc, and add 14 sc into each chain space.
Round 7: Ch 1, sc in the same sc, 14 sc in the ch-12 sp, sc in the next sc, 14 sc in the next ch-12 sp; repeat from * 4 more times. Join with a sl st to the first sc and fasten off.
Count per segment: 1 (sc worked into the existing sc) + 14 (sc added in the space) = 15 sc.
Total: 6 segments × 15 = 90 sc.
Why the math works: At 7 sc per inch, 90 sc give an outer edge of 12.9 in (32.8 cm). Dividing by π gives a diameter of 4.1 in (10.4 cm). You pack 14 sc onto 12 chains so the ring curves outward into a true circle instead of pulling into a hexagon. With 14 or fewer chains, the 14 sc would buckle; with fewer sc, the ring would straighten between the tips.
Gold Cap (Color C)
You work the cap in rows over 9 sts at the top of the ring, centered on one of the sc that sits over a tip.
Choose the tip at the top of the ornament. On Round 7, find the sc worked into a Round 6 sc (the top sc). With RS facing, count 4 sts to the right of the top sc.
Row 1: Use a standard sc join to join Color C in that 4th st. Sc in the next 3 sts, sc in the top sc, and sc in the next 4 sts. Turn. (9 sc)
Row 2: Ch 3 (counts as dc), dc in each of the next 8 sts. Turn. (9 dc)
Row 3: Ch 1, sc in each st across. Turn. (9 sc)
The tall dc row makes the vertical columns of the cap. The cap measures 1.3 in (3.3 cm) wide (9 sc ÷ 7 per inch) and 0.6 in (1.5 cm) tall.
Hanging Loop
Without chaining, sl st in each of the first 5 sts of Row 3, ending in the center st. Ch 20, then sl st in the same center st. Fasten off.
The loop hangs about 1.25 in (3.2 cm) tall. The total height is 4.1 in (10.4 cm) + 0.6 in (1.5 cm) + 1.25 in (3.2 cm), or about 6 in (15.2 cm).
Final Blocking
- Weave in all ends along stitches of the same color, so pink tails don’t show through the cream.
- Spray the ornament with water until damp, or soak it briefly and press it in a towel.
- Pin it to the mat as a 4.1 in (10.4 cm) circle. Pin the outer ring first at 6 evenly spaced points opposite the scallop tips.
- Pin each scallop tip so it touches the ring, and pin the 6 cream dips inward evenly.
- Spread each fan so its 9 tr fan out symmetrically. Open the triangles between fans with pins.
- Pin the cap square and lay the loop straight up.
- Mist with light starch if you’d like a stiffer ornament. Let it dry completely before unpinning.
Final Quality-Control Checklist
- [ ] Round 1 has 18 dc and the center hole is closed tight.
- [ ] There are 6 fans, each with exactly 9 tr.
- [ ] Round 5 has 90 sc, with 6 rounded peaks and 6 dips.
- [ ] Round 6 has 6 ch-12 sps, each anchored in a tip sc.
- [ ] Round 7 has 90 sc, 15 per segment.
- [ ] The body measures 4.1 in (10.4 cm) diameter.
- [ ] The cap is 9 sts wide and centered over a tip.
- [ ] The loop is anchored in the cap’s center st.
- [ ] All ends are hidden in matching colors.
Troubleshooting
Center ring won’t close: Pull the magic ring tail firmly before joining, then weave the tail around the ring once more.
Fans look cramped: Make sure all 9 tr go into the ch-1 sp, not into the dc beside it.
Cream round ruffles: Your tension is loose. Work the sc a little tighter or go down a hook size for this round only.
Outer ring looks hexagonal: The chains are too long, or the sc are too few or too tight. Check that you have 14 sc per space.
Outer ring ripples: Your chains are too tight. Rework Round 6 with a looser chain tension.
Cap tilts to one side: Count again from the top sc. There must be 4 sts on each side.
Gold thread splits: Use a slightly larger hook for the cap, or hold the metallic thread double.
Care
Hand wash in cool water with mild soap, press out the water in a towel and pin flat to dry. Store flat between tissue paper so the ring and loop keep their shape.
Final Notes
Here is the measurement chain:
- 1 in (2.5 cm) center ring
- 2 in (5.1 cm) after the V-shells
- 3.2 in (8.1 cm) at the fan tips
- 3.5 in (8.9 cm) after the cream scallops
- 4.1 in (10.4 cm) finished ring
- About 6 in (15.2 cm) total with the cap and loop
If your piece matches each checkpoint, the stitch counts will do the rest: 18 dc, 6 fans of 9 tr, 90 cream sc, and a 90-sc outer ring.
Happy crocheting!