
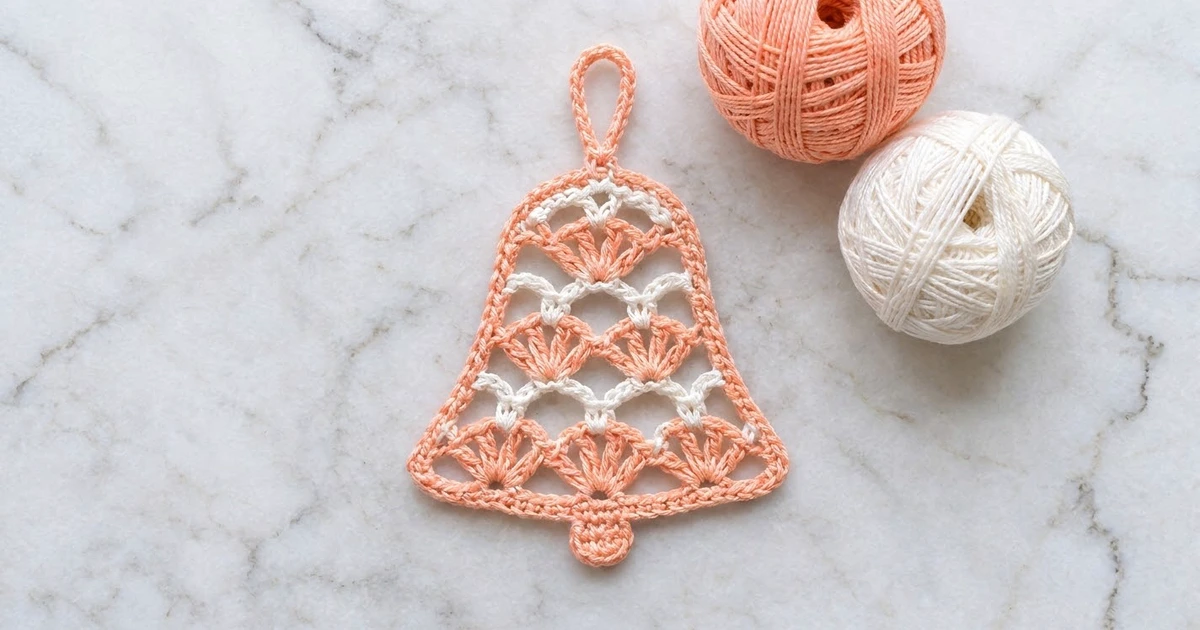
This little lace bell is a flat, openwork Christmas ornament in soft peach with creamy white accents. Rows of peach shell fans alternate with cream chain arches, so the bell looks like layered scallops. A solid peach border frames the whole shape. A round peach clapper sits at the bottom, and a sturdy covered loop at the top lets it hang from a branch.
The style is classic thread lace with a modern color twist. Hang it on the tree, tie it to a gift, or fill a bowl with a few of them. All instructions use US crochet terms.
The finished bell body measures about 4.65 in (11.8 cm) wide at the base and 3.5 in (8.9 cm) tall. With the clapper and hanging loop, the whole ornament is about 5.75 in (14.6 cm) tall.
You work the bell flat in 7 rows, from the wide bottom edge up to the narrow top. The peach fan rows go from 3 full fans, to 2 fans with half fans, to 1 fan with half fans. Cream arch rows sit between them. After that, you add a peach border and the hanging loop, then sew a small separate clapper to the bottom center.
Finished Size and Construction
- Finished size: 4.65 in (11.8 cm) wide x 3.5 in (8.9 cm) tall (bell body); 5.75 in (14.6 cm) tall with clapper and loop
- Skill level: Easy-intermediate
- Terminology: US crochet terms
- Yarn weight: Fingering (#1) mercerized cotton
- Hook: 2.5 mm
- Number of pieces: 2 parts for 1 ornament (bell body + clapper)
- Layout: Single ornament; no motifs to join
- Bell body before border: 4.4 in (11.2 cm) wide x 3.25 in (8.3 cm) tall
- Clapper: 0.8 in (2.0 cm) across
- Border depth: 0.125 in (0.3 cm) on each edge
- Hanging loop: about 1.5 in (3.8 cm) tall
Materials
Choose a smooth, mercerized cotton in fingering weight, about 170 m (186 yd) per 50 g. Cotton keeps the lace shape well after blocking and doesn’t fuzz. Acrylic also works, but the fans will be softer and less crisp.
- Peach (Color A): 8 g, about 27 m (30 yd)
- Cream (Color B): 3 g, about 10 m (11 yd)
These amounts include extra yarn for a test bell and for weaving in ends. For a set, multiply them by the number of bells.
Tools:
- 2.5 mm crochet hook
- Tapestry needle
- Scissors
- Stitch markers (2)
- Blocking mat and rust-proof pins
- Spray bottle with water
- Optional: liquid fabric stiffener or starch
Abbreviations (US Terms)
- ch – chain
- sl st – slip stitch
- sc – single crochet
- dc – double crochet
- sk – skip
- st(s) – stitch(es)
- RS – right side
- WS – wrong side
- MR – magic ring
Special stitches:
- Full fan (Row 2): 9 dc in the same st.
- Full fan (Rows 4 and 6): 7 dc in the same st.
- Half fan: ch 3 (counts as dc) and 2 dc in the same st at the start of a row, or 3 dc in the same st at the end of a row. A half fan always has 3 sts.
Gauge and Checkpoints
Gauge: 7 sc = 1 in (2.5 cm) with a 2.5 mm hook.
Make one test bell before you start a full set. Small changes in tension show up quickly in lace, and a test bell tells you more than a flat swatch does.
Checkpoints:
- After Row 1: 31 sc measure 4.4 in (11.2 cm).
- After Row 2: about 0.75 in (1.9 cm) tall, still 4.4 in (11.2 cm) wide.
- After Row 7: about 3.25 in (8.3 cm) tall.
- After the border: 4.65 in (11.8 cm) wide x 3.5 in (8.9 cm) tall.
- Clapper: 0.8 in (2.0 cm) across.
If your bell is too big: switch to a 2.25 mm hook, or keep the chain arches snug. If it is too small: switch to a 2.75 mm hook, or relax your chains. A small size difference is fine for an ornament, but keep every bell in a set the same size.
Bell Body
From Row 2 on, work every row with the RS facing, starting at the right edge. Fasten off at the end of each row unless told otherwise. To save time later, work over the short tails as you go.
Row 1 (WS): With Color A, ch 32. Sc in 2nd ch from hook and in each ch across. Turn. (31 sc)
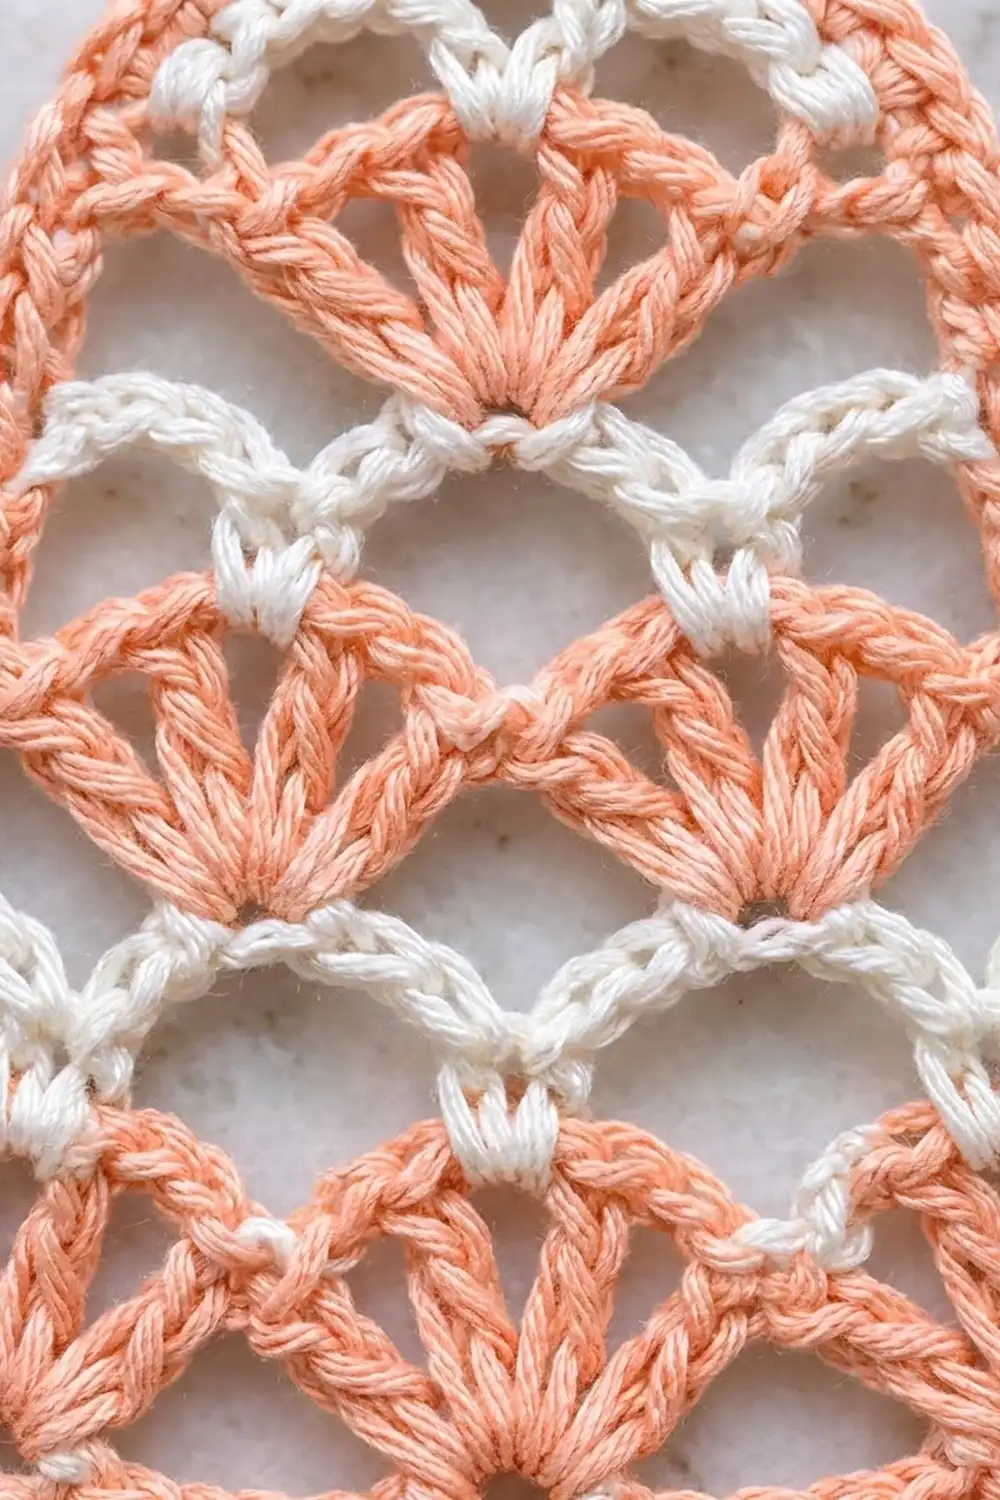
Row 2 (RS): Ch 3 (counts as dc), sk 4 sc, 9 dc in next sc (full fan), sk 4 sc, sc in next sc, sk 4 sc, 9 dc in next sc, sk 4 sc, sc in next sc, sk 4 sc, 9 dc in next sc, sk 4 sc, dc in last sc. Fasten off. (3 full fans, 2 sc, 2 edge dc = 31 sts)
Check: the 3 fans sit on sc 6, 16 and 26. The 2 sc sit on sc 11 and 21. The edge dc sit on sc 1 and 31.
Row 3 (RS): Join Color B in top of the ch-3 at the right edge. Ch 1, sc in same st, ch 5, sc in 5th (center) dc of next fan, ch 5, sc in next sc; repeat from * once more, ch 5, sc in center dc of last fan, ch 5, sc in last dc. Fasten off. (7 sc, 6 ch-5 arches)
From right to left, the 7 sc sit on: the right edge, a fan center, a valley, a fan center, a valley, a fan center and the left edge.
Row 4 (RS): Join Color A in the right edge sc of Row 3. Ch 3, 2 dc in same sc (half fan), sc in next sc (fan center), 7 dc in next sc (valley; full fan), sc in next sc (fan center), 7 dc in next sc (valley), sc in next sc (fan center), 3 dc in last sc (half fan). Skip all ch-5 arches. Fasten off. (2 full fans, 2 half fans, 3 sc = 23 sts)
The new fans sit above the old valleys, so the scallops are staggered. The smaller 7-dc fans start to narrow the bell.
Row 5 (RS): Join Color B in the 1st sc of Row 4 (the sc just after the right half fan). Ch 1, sc in same sc, ch 4, sc in 4th (center) dc of next fan, ch 4, sc in next sc; repeat from * once more. Fasten off. (5 sc, 4 ch-4 arches)
Row 5 doesn’t cover the half fans of Row 4. They form the curved shoulders on the lower sides of the bell.
Row 6 (RS): Join Color A in the 1st sc of Row 5. Ch 3, 2 dc in same sc (half fan), sc in next sc (fan center), 7 dc in next sc (full fan), sc in next sc (fan center), 3 dc in last sc (half fan). Skip all ch-4 arches. Fasten off. (1 full fan, 2 half fans, 2 sc = 15 sts)
Row 7 (RS): Join Color B in top of the ch-3 at the right edge of Row 6. Ch 1, sc in same st, ch 4, sc in next sc, ch 4, sc in 4th (center) dc of fan, ch 4, sc in next sc, ch 4, sc in last dc. Fasten off. (5 sc, 4 ch-4 arches)
Checkpoint: the bell body is now 4.4 in (11.2 cm) wide at Row 1 and about 3.25 in (8.3 cm) tall. Weave in all ends on the WS before you start the border.
Clapper
Rnd 1: With Color A, make a MR. Ch 1, 6 sc in ring. Join with sl st to 1st sc and pull the ring closed. (6 sc)
Rnd 2: Ch 1, 2 sc in each st around. Join. (12 sc)
Rnd 3: Ch 1, sc in next st, 2 sc in next st; repeat from * around. Join. (18 sc)
Stem Row 1: Don’t fasten off. Ch 1, sc in same st and next 2 sts. Turn. (3 sc)
Stem Row 2: Ch 1, sc in each st across. Fasten off, leaving a 6 in (15.2 cm) tail for sewing. (3 sc)
Checkpoint: the circle measures 0.8 in (2.0 cm) across, and the stem adds about 0.25 in (0.6 cm).
Border
Border gauge: the border uses the same gauge, 7 sc = 1 in (2.5 cm). One round of sc adds 0.125 in (0.3 cm) to each edge. The width grows from 4.4 in (11.2 cm) to 4.65 in (11.8 cm), and the height grows from 3.25 in (8.3 cm) to 3.5 in (8.9 cm).
Border Rnd (RS): Join Color A in the center (3rd) sc of Row 7. Ch 1, sc in same sc, then work the rest of the round as follows.
Top edge, left half: 4 sc in next ch-4 arch, sc in next sc, 4 sc in next arch, 2 sc in last sc (top left corner).
Left side: Work down the row ends:
- Row 6 edge (ch-3 or dc): 3 sc
- Row 5 edge sc: 1 sc
- Row 4 half fan tops: 1 sc in each of the 3 sts
- Row 4 edge: 3 sc
- Row 3 edge sc: 1 sc
- Row 2 edge: 3 sc
- Row 1 edge: 1 sc
Left side total: 15 sc.
Bottom edge: Work in the free loops of the foundation chain: 3 sc in 1st loop (corner), sc in each of the next 29 loops, 3 sc in last loop (corner). (35 sc)
Right side: Work up the row ends in reverse order: Row 1: 1 sc; Row 2: 3 sc; Row 3: 1 sc; Row 4 edge: 3 sc; Row 4 half fan tops: 3 sc; Row 5: 1 sc; Row 6: 3 sc. (15 sc)
Top edge, right half: 2 sc in 1st sc of Row 7 (top right corner), 4 sc in next arch, sc in next sc, 4 sc in next arch, 2 sc in the center sc where you started. Join with sl st to 1st sc. (90 sc)
Top edge total: 25 sc. The center sc holds 3 sc: 1 from the start of the round and 2 from the end.
Why the math works:
- Bottom: 31 foundation loops x 1 sc = 31, plus 2 extra sc at each corner = 4. Total 31 + 4 = 35.
- Top: 5 sc worked 1 each, plus 4 arches x 4 sc, gives 21. Then add 1 extra at each top corner and 2 extra at the center = 4. Total 21 + 4 = 25.
- Sides: 15 each, using the row-end map above. The 3 sts on each half fan follow its curve, so the shoulder lies flat.
- Round total: 25 + 15 + 35 + 15 = 90 sc. The corner sc are counted once, inside the top and bottom totals.
Hanging Loop: Don’t fasten off. Sl st into the middle sc of the 3 center sc. Ch 26, then sl st in the same sc. Turn so the WS faces you. Work 34 sc into the ch-26 loop, then sl st in the same center sc. Fasten off and weave in. The covered loop stands about 1.5 in (3.8 cm) tall.
Attach the Clapper: Find the 18th (center) sc of the bottom edge. Place the stem behind sc 17 to 19 so the circle hangs below the bell. Whipstitch the stem to the back of those 3 sts. The clapper hangs about 0.75 in (1.9 cm) below the bell.
Final Blocking
- Weave any remaining ends into the WS of the solid border.
- Mist the ornament with water until it is damp but not dripping. For a stiffer bell, dip it in diluted fabric stiffener and squeeze out the excess.
- Lay it RS up on the blocking mat.
- Pin the bottom corners first, 4.65 in (11.8 cm) apart.
- Pin the top edge straight and centered. Then pin the side curves so both shoulders match.
- Use a pin tip to open each fan so the dc spread evenly. Ease each cream arch into a smooth curve.
- Pin the clapper flat and round, and straighten the loop.
- Let it dry fully, at least 6 hours, before you remove the pins.
Final Quality-Control Checklist
- Bell body is 4.65 in (11.8 cm) wide x 3.5 in (8.9 cm) tall.
- Row 2 has 3 fans of 9 dc. Row 4 has 2 fans of 7 dc plus 2 half fans. Row 6 has 1 fan of 7 dc plus 2 half fans.
- Every cream sc sits on a fan center, a valley sc or an edge stitch.
- Border has 90 sc: 25 top, 35 bottom, 15 per side.
- Left and right shoulders are mirror images.
- Hanging loop is centered and fully covered.
- Clapper is centered under sc 18 and doesn’t twist.
- No ends show on the RS.
Troubleshooting
Fans ruffle or cup. Your dc are too loose for the space. Go down a hook size or work the fans more firmly.
Cream arches are tight and pull the fans inward. Loosen your chains, or use a hook one size larger for the chains only.
Bell is crooked. Check that every RS row started at the right edge and that you joined in the correct st.
Border waves on the sides. You probably added extra sc on the row ends. Recount against the 15-sc side map.
Border pulls and puckers. Your border tension is too tight. Work the side sts a little looser, or block more firmly.
Clapper curls. Rnd 3 needs all 6 increases. Recount to 18 sc and block it flat.
Care
Hand wash in cool water with mild soap, press out the water in a towel, and reshape flat to dry. Store flat in tissue paper so the loop and fans stay crisp.

Final Notes
The measurements build on each other. At 7 sc = 1 in (2.5 cm), 31 sc make a 4.4 in (11.2 cm) base. Seven rows of fans and arches build a bell 3.25 in (8.3 cm) tall. One border round of 90 sc adds 0.125 in (0.3 cm) to every edge, so the bell body ends up 4.65 in (11.8 cm) x 3.5 in (8.9 cm). The 0.75 in (1.9 cm) clapper and the 1.5 in (3.8 cm) loop bring the whole ornament to 5.75 in (14.6 cm) tall.
When your first bell matches these numbers, the rest of the set will match too. Make a few in peach and cream, or use red and white for a classic look.
Happy crocheting!