

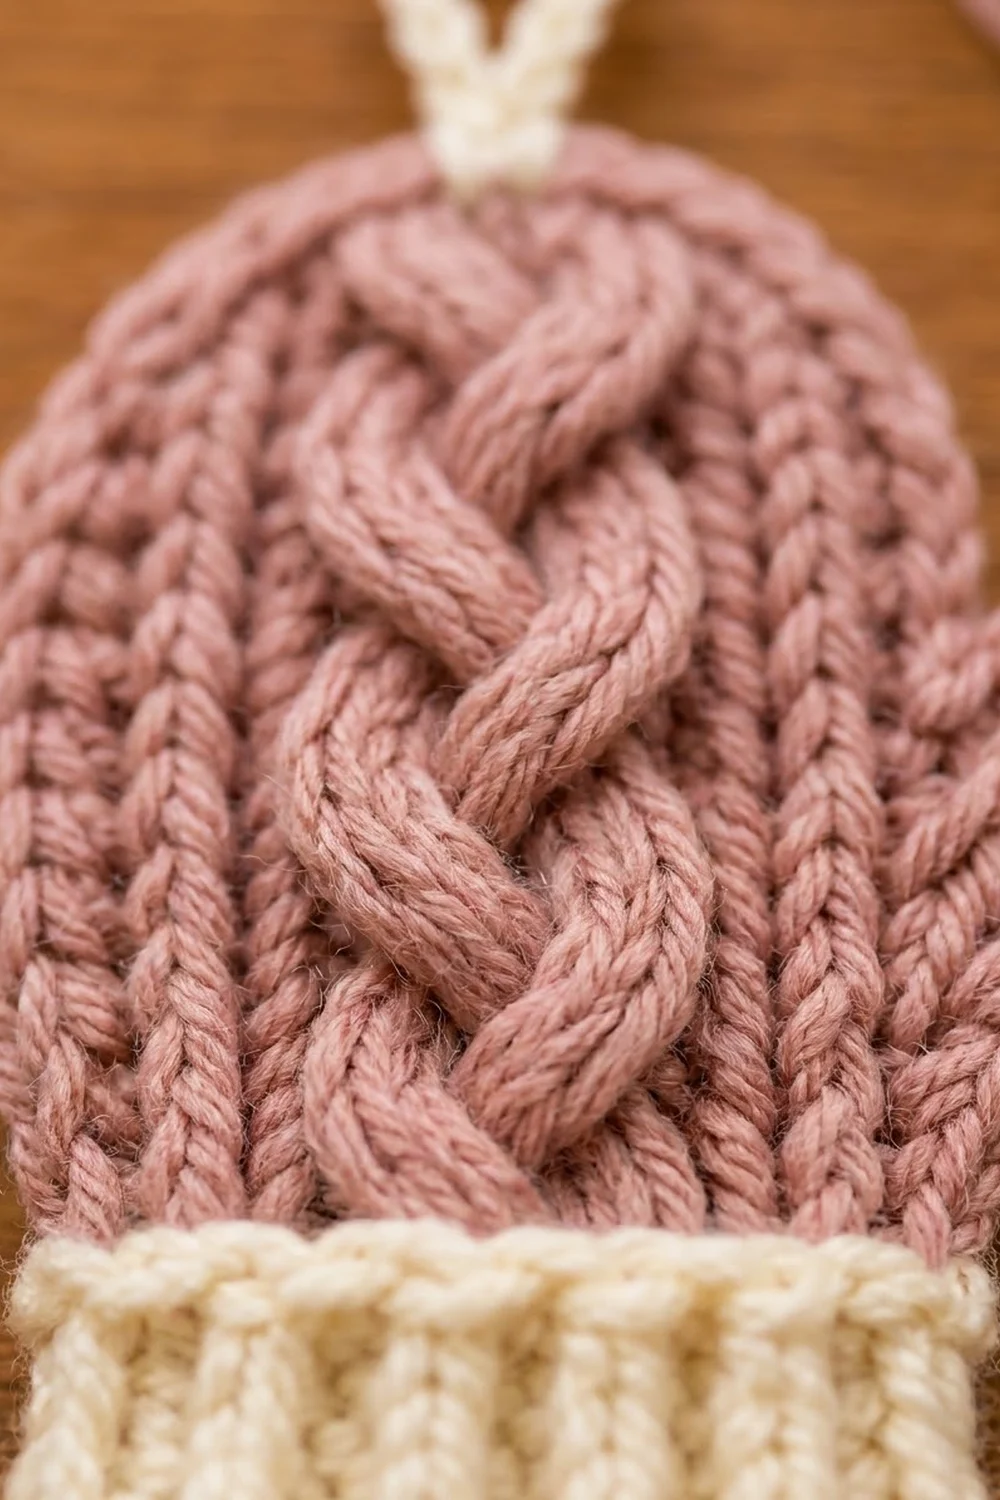
This little mitten looks like a miniature hand-knit cable mitten. A thick braided cable runs up the center of a dusty rose hand. It has raised ribbed columns on both sides, a cozy cream ribbed cuff and a cream hanging loop, so it’s ready for the tree.
The design uses two colors: dusty rose for the hand and thumb, and cream for the cuff, the ridge at the top of the cuff and the loop. The knitted look comes from front post stitches worked into a single-crochet base. They give you raised columns and a braid that holds its shape when the piece lies flat.
The pattern uses US crochet terms. The finished ornament measures about 4 in (10.2 cm) wide by 4.75 in (12.1 cm) tall, not counting the loop, which adds about 1.5 in (3.8 cm).
The mitten is a single flat piece. You crochet the cuff sideways in ribbing, then work one cream ridge row along its long edge. Next you work the hand in rows from the bottom up, splitting off a small thumb partway. A rose single-crochet edging smooths the outline, and you finish with the cream loop.
Finished Size and Construction
- Finished size: 4 in wide × 4.75 in tall (10.2 × 12.1 cm), plus a 1.5 in (3.8 cm) loop
- Skill level: Intermediate (front post cables)
- Terminology: US
- Yarn weight: Worsted (#4)
- Hook: 4.5 mm (US 7)
- Number of pieces: 1
- Layout: Single flat mitten, cuff at the bottom, thumb on the right (right side facing)
- Cuff size: 3 in wide × 1.25 in tall (7.6 × 3.2 cm)
- Size before edging: 3.75 in wide × 4.6 in tall (9.5 × 11.7 cm)
- Edging depth: about 1/8 in (0.3 cm) on each edged side
Materials
Choose a smooth, plied worsted yarn in wool, a wool blend or soft acrylic. The plies make the cable crosses look crisp. Avoid fuzzy or very splitty yarn, because post stitches are hard to see in it.
- Color A, Dusty Rose: 12 g / about 24 m (26 yd)
- Color B, Cream: 6 g / about 12 m (13 yd)
Both amounts include a safety margin for your gauge swatch and weaving in ends.
Tools:
– 4.5 mm (US 7) crochet hook
– Tapestry needle
– Scissors
– Stitch markers (2–3)
– Blocking mat and rust-proof pins
– Spray bottle
– Ruler or tape measure
Abbreviations (US Terms)
- ch – chain
- sl st – slip stitch
- sc – single crochet
- sc2tog – single crochet 2 together
- BLO – back loop only
- FPdc – front post double crochet
- FPtr – front post treble crochet
- st(s) – stitch(es)
- RS / WS – right side / wrong side
Post stitch rule: On RS rows, every FPdc or FPtr is worked around the post of the stitch two rows below (the matching post stitch on the previous RS row). Always skip the stitch in the current row that sits behind each post stitch, so your stitch count stays the same.
Special stitches: the braid panel (6 sts)
- Cross A: Skip the next 2 posts. FPtr around each of the next 2 posts. Then, working in front of the sts just made, FPtr around each of the 2 skipped posts. FPdc around each of the next 2 posts. (6 sts)
- Cross B: FPdc around each of the next 2 posts. Skip the next 2 posts. FPtr around each of the next 2 posts. Then, working behind the sts just made, FPtr around each of the 2 skipped posts. (6 sts)
Working Cross A and Cross B on alternate RS rows produces the three-strand braid.
Gauge and Checkpoints
Gauge: 16 sc and 18 rows = 4 in (10.2 cm) in plain sc rows.
Before you start, crochet a small swatch of 10 sc by 10 rows. It should measure 2.5 in (6.4 cm) square. Post stitches pull the fabric in very slightly, but sc gauge is the number that controls the size.
Measurement checkpoints:
- Cuff (after the cuff’s Row 14): 3 in (7.6 cm) long × 1.25 in (3.2 cm) tall.
- After the cream ridge row: The cuff should still measure 3 in (7.6 cm) wide and lie flat, without flaring or cupping.
- After hand Row 5: 3.75 in (9.5 cm) across, including the thumb sts.
- After hand Row 10: About 3.75 in (9.5 cm) tall measured from the bottom of the cuff.
- Before edging: 3.75 in × 4.6 in (9.5 × 11.7 cm).
If your piece is too big, go down a hook size (to 4.0 mm). If it’s too small, go up one size (to 5.0 mm). Ribbing that flares at the cream ridge row usually means the ridge stitches are too loose, so work that row with a slightly tighter tension.
Cuff (Color B, Cream)
The cuff is worked sideways in ribbing, so its row count sets the mitten’s width.
With Color B, ch 6.
Row 1: Sc in the 2nd ch from the hook and in each ch across. Turn. (5 sc)
Rows 2–14: Ch 1, sc BLO in each st across. Turn. (5 sc)
You now have 14 rows, which form 7 visible ribs. Check against Checkpoint 1: 3 in × 1.25 in (7.6 × 3.2 cm).
Cream Ridge Row (RS)
Don’t fasten off. Ch 1 and rotate the piece so you can work along the long edge, across the row-ends.
Ridge Row (RS): Work 1 sc in each row-end, skipping row-ends 5 and 10. (12 sc)
The math: 14 row-ends minus 2 skipped = 12 sc, which matches the 12-st hand. This row makes the raised cream band at the top of the cuff.
In the last sc, change to Color A (dusty rose). Fasten off Color B, leaving a 4 in (10.2 cm) tail.
Hand (Color A, Dusty Rose)
Odd-numbered rows are WS rows. Even-numbered rows are RS rows. The thumb grows at the end of WS rows and the beginning of RS rows, so it ends up on the right when the RS faces you.
Palm layout (12 sts, RS): sc, FPdc, sc, [braid panel 6], sc, FPdc, sc.
Row 1 (WS): Ch 1, sc in each st across. Turn. (12 sc)
Row 2 (RS, set-up): Ch 1, sc in the 1st st. FPdc around the next cream ridge st (two rows below), then sc. FPdc around each of the next 6 ridge sts. Sc in the next st, FPdc around the next ridge st, sc in the last st. Turn. (12 sts: 6 sc and 6 FPdc, with 2 of the FPdc being the side columns)
On Row 2 only, the post stitches wrap the cream ridge stitches. From Row 4 on, they wrap the rose post stitches of the RS row below.
Row 3 (WS, thumb increase): Ch 1, sc in each of the first 11 sts, then 2 sc in the last st. Turn. (13 sts)
Row 4 (RS, thumb increase): Ch 1, 2 sc in the 1st st. Then work the palm: sc, FPdc, sc, Cross A, sc, FPdc, sc. Turn. (14 sts: 2 thumb + 12 palm)
Row 5 (WS, thumb increase): Ch 1, sc in each of the first 13 sts, then 2 sc in the last st. Turn. (15 sts: 3 thumb + 12 palm)
Check against Checkpoint 3: 3.75 in (9.5 cm) across.
Row 6 (RS): Ch 1, sc in each of the 3 thumb sts. Then work the palm: sc, FPdc, sc, Cross B, sc, FPdc, sc. Turn. (15 sts)
Place a marker in the 3rd st from the end of this row (the last thumb st, counting from the right edge). It shows where to rejoin for the thumb later.
Palm
Row 7 (WS): Ch 1, sc in each of the next 12 sts. Turn, leaving the 3 thumb sts unworked. (12 sts)
Row 8 (RS): Ch 1, sc, FPdc, sc, Cross A, sc, FPdc, sc. Turn. (12 sts)
Row 9 (WS): Ch 1, sc in each st across. Turn. (12 sts)
Row 10 (RS): Ch 1, sc, FPdc, sc, Cross B, sc, FPdc, sc. Turn. (12 sts)
Check against Checkpoint 4: about 3.75 in (9.5 cm) tall from the bottom of the cuff.
Top Shaping
Row 11 (WS): Ch 1, sc2tog, sc in each of the next 8 sts, sc2tog. Turn. (10 sts)
Each sc2tog merges the outer sc with the side FPdc column, so each side group drops from 3 sts to 2.
Row 12 (RS): Ch 1, sc2tog, Cross A over the 6 braid posts, sc2tog. Turn. (8 sts)
Row 13 (WS): Ch 1, sc2tog, sc in each of the next 4 sts, sc2tog. Turn. (6 sts)
Row 14 (RS): Ch 1, sc2tog. FPdc around each of the 2 center braid posts from Row 12, skipping the 2 sts behind them. Sc2tog. (4 sts)
Fasten off. The braid now runs all the way into the top curve.
Thumb
With the WS facing, join Color A in the marked st of Row 6. This is the thumb st next to the palm.
Row 7 (WS): Ch 1, sc in the same st and in the next 2 sts. Turn. (3 sc)
Row 8 (RS): Ch 1, sc in each st across. Turn. (3 sc)
Row 9 (WS): Ch 1, sc in each st across. Turn. (3 sc)
Row 10 (WS→RS): Ch 1, sc2tog, sc in the last st. (2 sts)
Fasten off. Because the thumb grew over Rows 3–6 and then worked Rows 7–10, it covers 8 rows. That makes it about 1.8 in (4.6 cm) tall, with its tip level with palm Row 10. The notch between thumb and palm is where Row 7 split.
Check against Checkpoint 5: 3.75 in × 4.6 in (9.5 × 11.7 cm).
Edging (Color A, Dusty Rose)
Edging gauge: 1 sc per row-end (4.5 sc per 1 in / 2.5 cm along the sides) and 1 sc per stitch across the top. The edging adds about 1/8 in (0.3 cm) on each edged side.
The edging outlines the rose hand and thumb only. The cuff stays plain so the ribbing reads cleanly.
With the RS facing, join Color A in the row-end of hand Row 1 on the left side (the side without the thumb), just above the cream ridge. Work this single round:
- Left side: 1 sc in each row-end of Rows 1–14. (14 sc)
- Top: 2 sc in the 1st st of Row 14, sc in each of the next 2 sts, 2 sc in the last st. (6 sc)
- Right side of palm: 1 sc in each row-end of Rows 14 down to 7. (8 sc)
- Notch: Sl st into the notch between the palm and the thumb. (1 sl st)
- Inner side of thumb: 1 sc in each row-end of thumb Rows 7–10. (4 sc)
- Thumb tip: 2 sc in each of the 2 sts. (4 sc)
- Outer side of thumb: 1 sc in each row-end of Rows 10 down to 1. (10 sc)
Sl st into the first st of the cream ridge row. Fasten off.
Total: 14 + 6 + 8 + 4 + 4 + 10 = 46 sc, plus 1 sl st.
Why the math works: Each side gets exactly 1 sc per row, which matches the 4.5 rows per inch of the fabric, so the edges neither ruffle nor tighten. The 2 sc in each top corner and thumb-tip corner add just enough to turn the stepped decreases into a smooth curve. The sl st holds the notch tight, so the thumb stays clearly separate from the palm.
Hanging Loop (Color B, Cream)
Join Color B in the center of the top edging, between the 3rd and 4th of the 6 top sc. Ch 16, then sl st into the same space. Turn and work 1 sl st into the back bump of each of the 16 ch. Sl st into the joining space again and fasten off. The loop stands about 1.5 in (3.8 cm) tall and has a firm, rounded, cord-like look.
Final Blocking
- Weave in all ends along same-color stitches. Hide the cream tails inside the cuff ribbing and the rose tails along the edging.
- Lay the mitten face up on the blocking mat.
- Pin the cuff to 3 in × 1.25 in (7.6 × 3.2 cm) with straight sides.
- Pin the whole mitten to 4 in wide × 4.75 in tall (10.2 × 12.1 cm), measured without the loop.
- Use extra pins to round the top curve and the thumb tip, and set a clean V at the notch.
- Mist lightly with water. Don’t press the cables flat, because they should stay raised.
- Leave it to dry completely, at least 6 hours.
- Unpin it. Pinch the loop into shape and let it dry standing upright.
Final Quality-Control Checklist
- The cuff has 7 even ribs and measures 3 in (7.6 cm) wide.
- The cream ridge row has 12 sts and lies flat.
- The braid shows alternating crosses on Rows 4, 6, 8, 10 and 12, plus the center posts on Row 14.
- The side FPdc columns run straight from Row 2 to Row 10.
- The thumb is on the right with the RS facing, and the notch is clearly visible.
- The edging has 46 sc and lies flat with no ruffling.
- The loop is centered at the top.
- Finished size is 4 in × 4.75 in (10.2 × 12.1 cm).
- All ends are hidden and secure.
Troubleshooting
The braid looks like a plain rope twist. You worked both crosses the same way. Cross A goes in front and Cross B goes behind, so alternate them strictly.
The post stitches pull the fabric tight. Draw each FPtr up to the height of the current row before you finish it, and loosen your yarn-overs around the post.
The stitch count grows on RS rows. You worked into the st behind a post stitch. Skip it every time.
The thumb is on the left. You treated Row 1 as an RS row. Row 1 must be a WS row so that the increases land on the right.
The edging ruffles. You worked 2 sc in some row-ends. Use exactly 1 per row-end.
There are holes around the cable crosses. Pull the first FPtr of each cross firmly, or go down 0.5 mm in hook size for the cable rows only.
The cuff flares. The ridge row is too loose. Rework it with a tighter tension, still skipping row-ends 5 and 10.
Care
Hand wash in cool water with a gentle wool wash, press out the water in a towel, and dry flat. Reshape the cables and the thumb while the piece is still damp.

Final Notes
Here is the measurement chain:
- 14 cuff rows give 3 in (7.6 cm) of width.
- The cream ridge row turns those 14 row-ends into 12 sts.
- The 12 palm sts hold the 6-st braid with 3 sts on either side.
- Three increases add a 3-st thumb, which brings the width to 3.75 in (9.5 cm).
- 14 hand rows plus the cuff and ridge row reach 4.6 in (11.7 cm) tall.
- The 46-sc edging finishes the piece at 4 in × 4.75 in (10.2 × 12.1 cm).
If each checkpoint matches, the finished size will too. Make one in rose and cream as shown, or work a batch in different colors to fill your tree.
Happy crocheting!