

This hanging holder stacks three small crown-shaped baskets on two straps and hangs from a wooden ring. Each basket has a firm oval base, a solid lower wall, an openwork band of crossed stitches, and a rim of eight pointed fans. Each tier holds one standard roll.
The sample uses one color, a soft lavender cotton. With only one color, you notice the texture more: the lattice holes, the fans and the crisp, outlined points.
This pattern uses US crochet terms. Each basket measures about 7.5 x 4.5 in (19.1 x 11.4 cm) at the base and 3.5 in (8.9 cm) tall at the points. The finished hanger is about 8 in (20.3 cm) wide and 22 in (55.9 cm) long from the top of the ring.
Construction is simple. You work each basket in joined rounds from the base up. You work two straps in short rows and sew them to the baskets. Then you finish each crown with a single crochet border and fold the straps over the ring.
Finished Size and Construction
- Finished size: about 8 in (20.3 cm) wide x 22 in (55.9 cm) long, hanging
- Skill level: Intermediate
- Terminology: US crochet terms
- Yarn weight: Worsted (#4) cotton
- Hook: 4.0 mm (G-6)
- Number of pieces: 3 baskets, 2 straps, 1 wooden ring
- Layout: 3 baskets stacked vertically, with one strap on each short end
- Basket size: 7.5 x 4.5 in (19.1 x 11.4 cm) base, 3.5 in (8.9 cm) tall at the peaks
- Basket height before border: about 3.25 in (8.3 cm) at the peaks
- Border depth: about 0.25 in (0.6 cm)
- Strap size: about 1 in (2.5 cm) wide x 21 in (53.3 cm) long
Materials
Choose a smooth worsted-weight cotton or cotton blend. Cotton holds the basket shape well and copes with bathroom humidity. Avoid fuzzy or very stretchy acrylic, because the walls will slump.
- Lavender: 130 g (about 250 m) of worsted cotton
That covers about 30 g (60 m) per basket, 6 g (12 m) per strap, plus yarn for sewing. These quantities include a margin of about 20%.
Tools:
- 4.0 mm (G-6) crochet hook
- 1 wooden ring, about 3 in (7.6 cm) outer diameter
- Tapestry needle
- 8 stitch markers
- Locking pins or clips
- Tape measure
- Spray bottle and blocking pins
Abbreviations (US Terms)
- ch – chain
- sl st – slip stitch
- sc – single crochet
- hdc – half double crochet
- dc – double crochet
- tr – treble crochet
- inc – 2 sc in the same stitch
- BLO – back loop only
- sk – skip
- sp – space
- st(s) – stitch(es)
- rep – repeat
Special stitch – X-st (crossed double crochet): Skip the next st and dc in the following st. Then dc in the skipped st, working in front of the dc you just made. One X-st uses 2 sts and makes 2 dc.
Gauge and Checkpoints
Gauge: 16 sc x 18 rounds = 4 in (10.2 cm) in sc worked in the round.
Make one complete basket first. It works as your gauge swatch and shows whether a roll fits.
Checkpoints:
- After base Rnd 5: about 5.25 x 2.25 in (13.3 x 5.7 cm)
- After base Rnd 10: 7.5 x 4.5 in (19.1 x 11.4 cm)
- After Rnd 18: wall about 2 in (5.1 cm) tall
- Before border: 3.25 in (8.3 cm) at the peaks
- After border: 3.5 in (8.9 cm) at the peaks
- Strap after 16 rows: about 3.5 in (8.9 cm) long
If your base is too big, go down 0.5 mm, because a loose base sags under a roll. If it is too small, go up 0.5 mm. A standard roll is about 4.5 in (11.4 cm) across, so base width matters most.
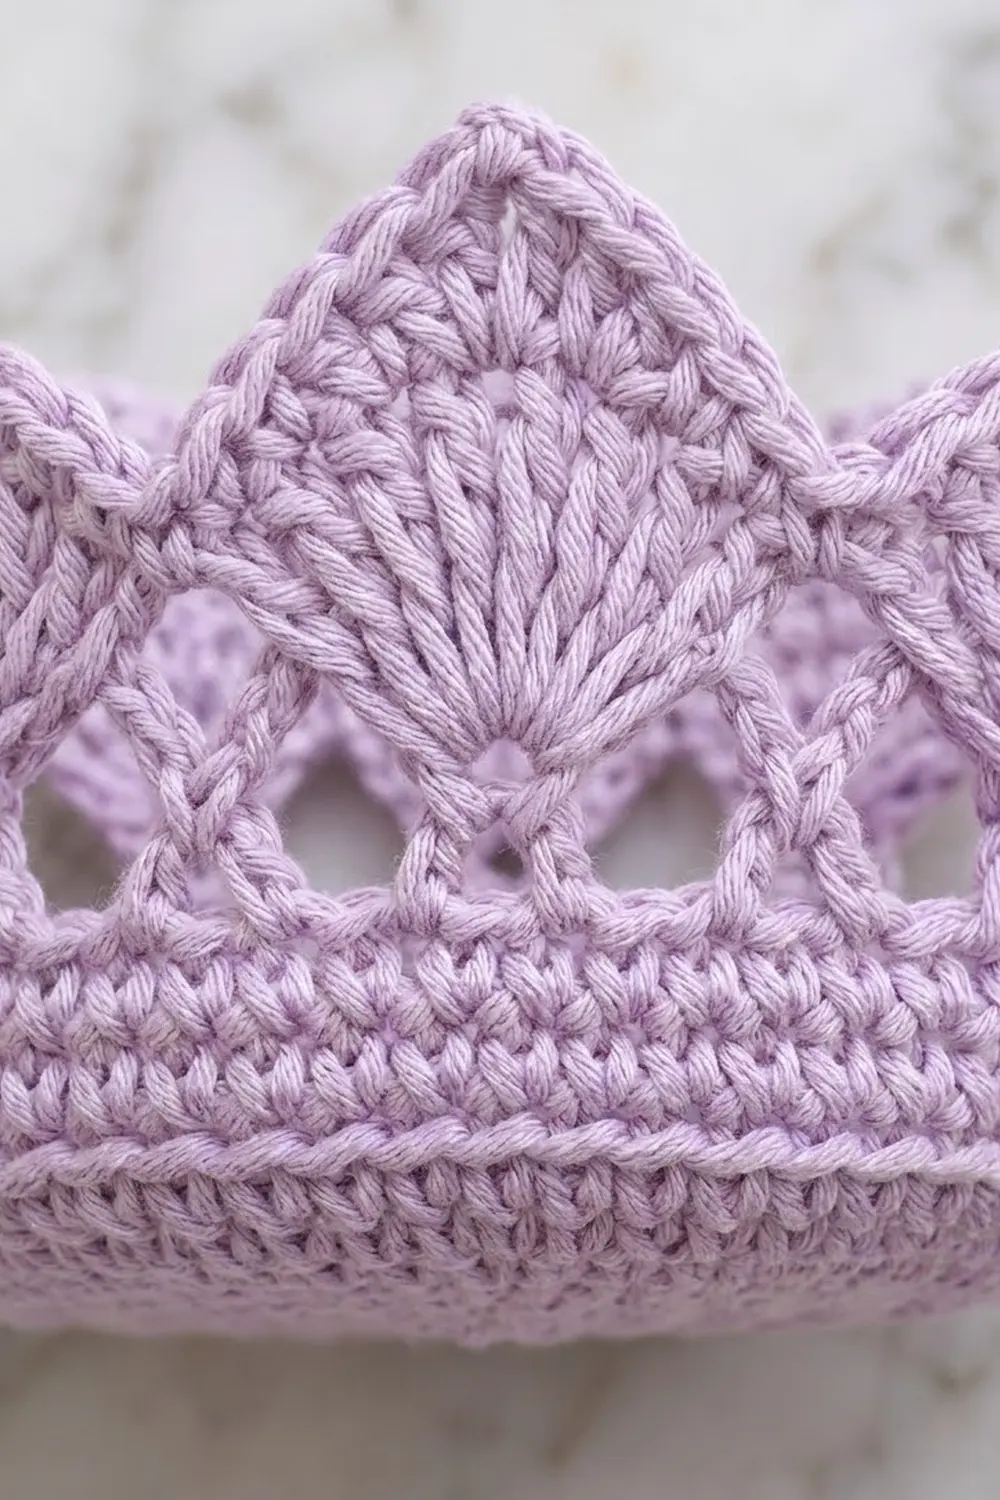
Basket (Make 3)
Work in joined rounds and do not turn. The ch 1 at the start of each round does not count as a stitch. Join each round with a sl st to the first st.
Oval Base
Ch 13.
Rnd 1: Work 3 sc in 2nd ch from hook, sc in next 10 ch, then 3 sc in last ch. Working along the opposite side of the foundation ch, sc in next 10 ch. Join. (26 sts)
Rnd 2: Ch 1, [inc in each of next 3 sts, sc in next 10 sts] twice. Join. (32 sts)
Rnd 3: Ch 1, [(sc in next st, inc) 3 times, sc in next 10 sts] twice. Join. (38 sts)
Rnd 4: Ch 1, [(sc in next 2 sts, inc) 3 times, sc in next 10 sts] twice. Join. (44 sts)
Rnds 5–10: Continue the same way, working 1 more sc before each inc in every round. Each round adds 6 sts, 3 at each end.
- Rnd 5: (50 sts)
- Rnd 6: (56 sts)
- Rnd 7: (62 sts)
- Rnd 8: (68 sts)
- Rnd 9: (74 sts)
- Rnd 10: [(sc in next 8 sts, inc) 3 times, sc in next 10 sts] twice. (80 sts)
Check: each long side has 10 sts and each end has 30 sts, so 2 x (10 + 30) = 80.
Walls
Rnd 11: Ch 1, sc in BLO of each st around. Join. (80 sts) This makes the turning ridge where the wall stands up.
Rnds 12–16: Ch 1, sc in each st around. Join. (80 sts)
Lattice Band
Rnd 17: Ch 2 (does not count), [X-st over next 2 sts, ch 2, sk next 2 sts] 20 times. Join to first dc. (20 X-sts: 40 dc + 20 ch-2 sps)
Each repeat uses 4 sts, and 20 x 4 = 80, so the lattice fits exactly.
Rnd 18 (conversion round): Ch 1, [sc in each of next 2 dc, 2 sc in next ch-2 sp] 20 times. Join. (40 sc worked 1-per-dc + 40 sc worked into the spaces = 80 sts)
Crown Fans
Rnd 19: Ch 1, [sc in next st, sk next 4 sts, 9 dc in next st, sk next 4 sts] 8 times. Join. (8 sc + 72 dc = 80 sts; 8 fans)
Each fan repeat uses exactly 10 sts, and 8 x 10 = 80.
Rnd 20 (trim round, shapes the points): [Sl st in next sc, sc in next dc, hdc in next dc, dc in each of next 2 dc, (tr, ch 3, tr) in next dc, dc in each of next 2 dc, hdc in next dc, sc in next dc] 8 times. Join to first sl st. (80 sts worked 1-per-stitch + 8 extra tr = 88 sts, plus 8 ch-3 peak sps)
That gives 11 sts and 1 ch-3 sp per point. The sl st sits low between the fans and makes a sharp valley. The stitch heights step up to the tr peak.
Measure now: the basket should be about 3.25 in (8.3 cm) tall at the peaks. Fasten off and weave in the base tail only. You will work the border after joining.
Strap (Make 2)
Work in rows.
Ch 5.
Row 1: Sc in 2nd ch from hook and in each ch across. Turn. (4 sts)
Rows 2–94: Ch 1, sc in each st across. Turn. (4 sts)
Fasten off, leaving a 12 in (30.5 cm) tail.
At 18 rows per 4 in (10.2 cm), 94 rows give 20.9 in (53.1 cm), so the strap measures about 1 in (2.5 cm) wide and 21 in (53.3 cm) long.
Make All Pieces
- Lavender: 3 baskets, 2 straps
- Wooden ring: 1
Layout (front view):
        ( RING )
       /        \
   [S]            [S]
   [S] BASKET 1   [S]   strap rows 47–62
   [S]    gap     [S]   rows 40–46
   [S] BASKET 2   [S]   rows 24–39
   [S]    gap     [S]   rows 17–23
   [S] BASKET 3   [S]   rows 1–16
Strap rows 63–94 run up to the ring, and rows 88–94 fold over it.
Joining
Method: Whipstitch with the yarn tail and a tapestry needle, through both strap edges into the basket wall.
Placement: Flatten each basket so the long sides meet. The two folds mark the center of each short end. On Rnd 11, place markers on the 2 sts on either side of each fold. That gives 4 marked sts per end, matching the strap’s 4 sts across.
Stitch-to-stitch logic:
- Line up strap Row 1 with the turning ridge of Rnd 11 on Basket 3, centered over the 4 marked sts.
- Run the strap straight up the outside of the wall. Each sc round matches one strap row. The dc lattice round (Rnd 17) is about as tall as 2 strap rows.
- Sew strap rows 1–9 to Rnds 11–18, whipstitching along both long edges of the strap. Stop at the top of Rnd 18.
- Leave rows 10–16 free over the crown for now. You will tack them down after the border.
- Skip rows 17–23. This 7-row gap is about 1.5 in (3.8 cm).
- Sew rows 24–32 to Rnds 11–18 of Basket 2. Sew rows 47–55 to Rnds 11–18 of Basket 1.
- Repeat on the opposite end with the second strap.
Tension: Pull each whipstitch snug, but not so tight that the wall puckers. Lay the hanger flat as you work and check that the baskets sit level.
Size checkpoint: Measure from the base of Basket 3 to the rim of Basket 1. It should be about 13.5 in (34.3 cm): three baskets at 3.5 in (8.9 cm) each plus two gaps at 1.5 in (3.8 cm) each.
Ring: Slip rows 88–94 of each strap through the ring and fold them back. Sew them to rows 81–87 on the back of the strap. Check that both straps hang at the same length.
Border
Work the border around the crown of each basket. The straps are sewn only up to Rnd 18, so the crown is free to work.
Border gauge: The border is 1 round of sc, about 0.25 in (0.6 cm) deep.
Join yarn in any valley sl st.
Rnd 21: [Sl st in valley sl st, sc in each of next 4 sts, sc in next tr, (sc, ch 2, sc) in ch-3 sp, sc in next tr, sc in each of next 4 sts] 8 times. Join and fasten off. (88 sts worked 1-per-stitch + 16 sc worked into the peak sps = 104 sts, plus 8 ch-2 peaks)
Count per point: 1 sl st + 4 sc + 1 sc + 2 sc + 1 sc + 4 sc = 13 sts, plus 1 ch-2 peak.
Why the math works: Rnd 20 has 11 sts per point. Rnd 21 works 1 st into each of those 11 sts and adds 2 sc in each peak sp, for 13 sts per point and 8 x 13 = 104 in total. Adding stitches only at the peak keeps the sides straight and the tips sharp. Keeping the valley at 1 sl st stops the points from blurring together.
Tack the crown: Tack the free strap rows over each crown (rows 10–16, 33–39 and 56–62) to the border sts directly beneath them, using 2–3 small stitches.
Final Blocking
- Weave in all ends along matching stitch lines.
- Mist each basket lightly until it is damp but not wet.
- Fill each basket with a roll wrapped in a plastic bag, or a folded towel, so the walls stand straight.
- Pinch each peak into a point and pin through the ch-2 into the filling.
- Open the lattice holes with your fingertip.
- Lay the hanger flat and pin the straps straight, keeping the gaps at 1.5 in (3.8 cm).
- Let it dry completely, about 24 hours, before you remove the pins.
Final Quality-Control Checklist
- Each base measures 7.5 x 4.5 in (19.1 x 11.4 cm).
- Each basket has 80 sts on Rnd 19, 88 on Rnd 20 and 104 on Rnd 21.
- Each basket has 8 even points, 3.5 in (8.9 cm) tall from the base.
- Each lattice round has 20 X-sts.
- Both straps measure 1 x 21 in (2.5 x 53.3 cm).
- The straps are centered on both short ends of every basket.
- The gaps between tiers are 1.5 in (3.8 cm).
- The ring loop is sewn securely and both straps hang level.
- A roll drops in easily without tipping the basket.
Troubleshooting
Base cups or ruffles: If it cups, your increases are too tight. If it ruffles, they are too loose. Re-check the counts for Rnds 2–10.
Walls lean outward: You may have missed the BLO on Rnd 11. Without the ridge, the wall flares, so rework Rnd 11.
Lattice looks closed: Check that you skip 2 sts after each ch-2, and work the crossing dc in front.
Fans ruffle: Your dc are too loose. Go down 0.5 mm for Rnds 19–21 only.
Points look rounded: Make sure you work (sc, ch 2, sc) into the peak sp, then pinch each peak into a point when blocking.
Basket tilts when hung: One strap is sewn higher than the other. Unpick it and line up Row 1 of both straps with Rnd 11 again.
Roll won’t fit: The base is too narrow. Use a larger hook, or add 1 more increase round.
Care
Hand wash in cool water with mild soap, then press out the water in a towel. Dry flat and reshape the points while damp. Do not tumble dry.

Final Notes
Everything comes from one chain of measurements. A gauge of 16 sc x 18 rounds = 4 in (10.2 cm) gives an 80-st base of 7.5 x 4.5 in (19.1 x 11.4 cm). The 80 sts divide into 20 lattice X-sts and 8 crown fans of 10 sts each. Each fan grows to 11 sts in Rnd 20 and 13 sts in the border, for 104 sts in total. The 94-row straps line up with the basket rounds, and three 3.5 in (8.9 cm) baskets plus two 1.5 in (3.8 cm) gaps make 13.5 in (34.3 cm). The rest of each strap rises to the ring.
Check your first basket against the checkpoints, and the other two will match it.
Happy crocheting!