
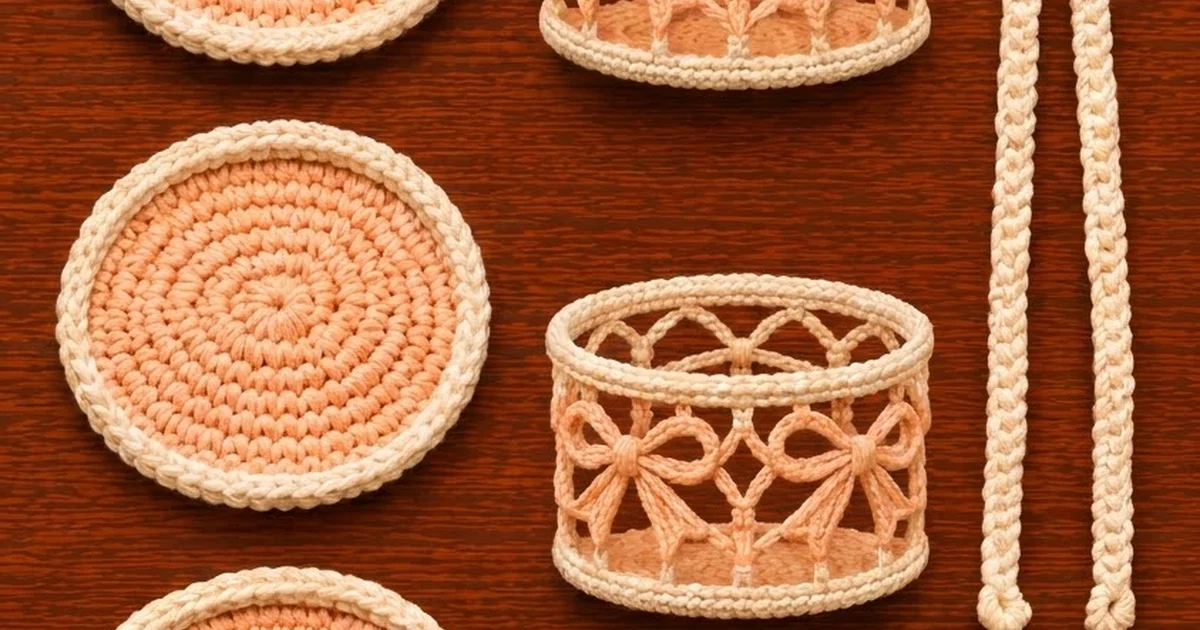
This two-tier hanging holder keeps two spare rolls in sight and off the counter. Each basket has a solid peach base, an open cream lattice wall and four peach bows sewn around the middle. A cream hanger with a ring at the top holds the upper basket, and two short straps hold the lower basket below it.
The colors are warm peach and soft cream. The look is cottage-style and a little romantic, but you only need single crochet and chain loops. All terms are US crochet terms.
Each basket is 6.1 in (15.5 cm) across and 5 in (12.7 cm) tall. When hung, the holder is about 25 in (63.5 cm) long from the top of the ring to the bottom of the lower basket.
You crochet two flat round bases, two lattice walls worked in the round, eight bows (three small parts each), one ring hanger with two cords and two short connector straps. You join each wall to its base with a single crochet seam and add a two-round border to the top rim. The bows and straps are sewn on last.
Finished Size and Construction
- Finished size: each basket 6.1 in (15.5 cm) diameter x 5 in (12.7 cm) tall; full holder about 25 in (63.5 cm) long
- Skill level: Intermediate
- Terminology: US
- Yarn weight: worsted (#4) cotton
- Hook: 5.0 mm (H-8)
- Number of pieces: 15 main pieces: 2 bases, 2 walls, 8 bows, 1 hanger, 2 connectors
- Layout: two baskets stacked one above the other, hung from one ring
- Piece size: base 6.1 in (15.5 cm) diameter; wall 19.2 in (48.8 cm) around
- Wall height before border: 4.25 in (10.8 cm)
- Border depth: 0.5 in (1.3 cm), 2 rounds
Materials
Choose a smooth, firm worsted-weight cotton or cotton blend with about 170 m per 100 g (186 yd per 3.5 oz). Cotton holds the basket shape and stretches very little under the weight of a roll. Don’t use acrylic, because the mesh will sag.
- Peach (bases and bows): 60 g, about 100 m (109 yd)
- Cream (base edges, walls, border, hanger, straps): 90 g, about 150 m (164 yd)
These amounts include about 25% extra for swatching and tails.
Tools
- 5.0 mm (H-8) crochet hook
- 6 stitch markers
- Tapestry needle
- Scissors
- Measuring tape
- Optional: a 5.5 in (14.0 cm) plastic canvas circle to stiffen each base
Abbreviations (US Terms)
- ch – chain
- sc – single crochet
- sl st – slip stitch
- st(s) – stitch(es)
- sp – space
- fsc – foundation single crochet
- rev sc – reverse single crochet (crab stitch)
- rep – repeat
- rnd(s) – round(s)
Foundation single crochet (fsc): Ch 2. Insert hook in 2nd ch from hook, yarn over and pull up a loop. Yarn over and pull through 1 loop (this is the “chain”), then yarn over and pull through 2 loops (this is the “sc”). For each next fsc, insert the hook under the 2 loops of the previous “chain” and repeat. This makes the chain and the first round of sc at the same time, and the edge stays stretchy.
Reverse single crochet (rev sc): Work from left to right (if you are right-handed). Insert hook in the next st to the right, pull up a loop, then yarn over and pull through both loops. This makes a rolled, rope-like edge.
Gauge and Checkpoints
Gauge: 15 sc and 16 rnds = 4 in (10.2 cm) in sc worked in the round.
Make one full base first and use it as your test piece. The wall has to match the base edge stitch for stitch, so the base will show whether your gauge is right.
Checkpoints:
- Base after Rnd 6 (36 sts): 3.1 in (7.9 cm) diameter
- Base after Rnd 11 (66 sts): 5.6 in (14.2 cm) diameter
- Base after Rnd 12 (72 sts): 6.1 in (15.5 cm) diameter
- Wall after Rnd 3: 19.2 in (48.8 cm) around, 0.75 in (1.9 cm) tall
- Wall after Rnd 9: 4.25 in (10.8 cm) tall
Too big? Go down to a 4.5 mm (US 7) hook. Too small? Go up to a 5.5 mm (I-9) hook. Never change the stitch counts. The base and the wall both have 72 sts, and the join only works if they match.

Pattern
Base (make 2)
Use peach. Work in continuous spiral rounds and move a marker up to the first st of each round.
Rnd 1: 6 sc in a magic ring. (6 sts)
Rnd 2: 2 sc in each st around. (12 sts)
Rnd 3: Sc in next st, 2 sc in next st 6 times. (18 sts)
Rnd 4: Sc in next 2 sts, 2 sc in next st 6 times. (24 sts)
Rnd 5: Sc in next 3 sts, 2 sc in next st 6 times. (30 sts)
Rnd 6: Sc in next 4 sts, 2 sc in next st 6 times. (36 sts)
Checkpoint: 3.1 in (7.9 cm).
Rnds 7–11: Keep going the same way, with 1 more sc before each increase every round. Rnd 7 has 42 sts, Rnd 8 has 48, Rnd 9 has 54, Rnd 10 has 60 and Rnd 11 has 66.
Checkpoint: 5.6 in (14.2 cm). Sl st in the next st and fasten off peach.
Rnd 12 (cream edge): Join cream in any st. Ch 1, sc in next 10 sts, 2 sc in next st 6 times, sl st to first sc. (72 sts)
Checkpoint: 6.1 in (15.5 cm). The cream round frames the peach spiral. Fasten off, leaving an 8 in (20.3 cm) tail.
Wall (make 2)
Use cream. Work in joined rounds with the right side facing.
Rnd 1: Fsc 72. Sl st to the first fsc to form a ring, making sure it isn’t twisted. (72 sts)
Rnds 2–3: Ch 1, sc in each st around, sl st to first sc. (72 sts)
Checkpoint: 19.2 in (48.8 cm) around and 0.75 in (1.9 cm) tall. Place markers in sts 1, 19, 37 and 55. These split the wall into four 18-st sections, one for each bow.
Rnd 4 (lattice set-up): Ch 1, sc in first st, ch 7, skip 5 sts, sc in next st 11 times, ch 7, skip last 5 sts, sl st to first sc. (12 sc, 12 ch-7 loops)
Each 18-st section now has 3 loops.
Rnd 5: Sl st in next 3 ch, ch 1, sc in same ch-7 sp, ch 7, sc in next ch-7 sp 11 times, ch 7, sl st to first sc. (12 ch-7 loops)
Rnd 6: Rep Rnd 5. (12 ch-7 loops)
Because each round of loops sits halfway between the loops below, they form the cream lattice of arches and diamond-shaped openings. Checkpoint: the lattice should be about 2.75 in (7.0 cm) tall when gently stretched.
Rnd 7 (conversion round): Ch 1, sc in first sc, 5 sc in next ch-7 sp, sc in next sc, 5 sc in next ch-7 sp 11 times, sl st to first sc. (12 sc worked into the 12 existing sc + 60 sc worked into the loops = 72 sts)
Rnds 8–9: Ch 1, sc in each st around, sl st to first sc. (72 sts)
Checkpoint: 4.25 in (10.8 cm) tall. Don’t fasten off. Go straight on to the Border.
Bow (make 8, 4 per basket)
Use peach. Each bow has three parts.
Loops: Ch 26 and sl st to the first ch to form a ring, making sure it isn’t twisted. Rnd 1: Ch 1, sc in each ch around, sl st to first sc. (26 sts) Fasten off. Flatten the ring and pinch it at the center to make two open loops, about 3.5 in (8.9 cm) wide in total.
Tails: Ch 21. Row 1: Sc in 2nd ch from hook and each ch across. (20 sts) Fasten off. Fold the strip in half into a V. Each leg is about 2.7 in (6.9 cm) long.
Knot: Ch 6. Row 1: Sc in 2nd ch from hook and each ch across. (5 sts) Fasten off, leaving a 10 in (25.4 cm) tail.
Assembly: Place the fold of the V behind the pinched center of the loops, with the legs angled down and out. Wrap the knot strip around the center twice to cover the pinch, then sew it closed at the back. The finished bow is about 3.5 in (8.9 cm) wide and 3.5 in (8.9 cm) tall.
Hanger (make 1)
Use cream.
Ring: Ch 10, sl st to first ch. Rnd 1: Ch 1, 18 sc in ring, sl st to first sc. (18 sts) The ring is about 1.5 in (3.8 cm) across.
Cord 1: Ch 46. Row 1: Sc in 2nd ch from hook and each ch across. (45 sts) Ch 3 and sl st in the last sc made to form an end loop. Row 2: Work back toward the ring with a sl st in each sc. (45 sts) Sl st in the ring.
Cord 2: Sl st in the next 2 ring sts, then work as for Cord 1. Fasten off.
Each cord is 12 in (30.5 cm) long. The slip stitches in Row 2 make the cords firm, so they don’t stretch.
Connector Strap (make 2)
Use cream. Ch 19. Row 1: Sc in 2nd ch from hook and each ch across. (18 sts) Ch 3, sl st in last sc. Row 2: Sl st in each sc across. (18 sts) Ch 3, sl st in last sl st. Fasten off.
Each strap is 4.8 in (12.2 cm) long and has a small loop at each end.
Make All Pieces
- Peach: 2 base centers (Rnds 1–11) and 8 bows
- Cream: 2 base edges (Rnd 12), 2 walls, 1 hanger and 2 connector straps
Layout (front view):
            [ RING ]
           /        \
     Cord 1          Cord 2
         |            |
   [ TOP BASKET:  bow | bow ]
         |            |
   Strap 1          Strap 2
         |            |
   [ LOWER BASKET: bow | bow ]
On each wall, the cords and straps attach at sts 1 and 37. These points are directly opposite each other and fall between two bows.
Joining
Base to wall: Put the base inside the bottom of the wall with wrong sides together, so the fsc edge lines up with base Rnd 12. With cream, sc through 1 base st and 1 fsc st together all the way around. (72 sts) Both edges have 72 sts, so you join them 1 to 1 and add no extra stitches. The seam makes a raised cream ridge around the bottom.
Keep your tension even and a little relaxed, because a tight seam pulls the base up into a bowl. Checkpoint: the basket stands flat and measures 6.1 in (15.5 cm) across. If you are using a plastic canvas circle, put it in before you close the last 15 sts.
Bows: Center one bow on each 18-st section, with the knot over the middle loop of Rnd 5. Sew the loops and tails to the lattice and to the solid band from Rnds 2–3.
Hanger: Lay the end of Cord 1 on the outside of the top basket at st 1, overlapping 1 in (2.5 cm) down from the rim. Sew it firmly through all layers. Attach Cord 2 at st 37 the same way.
Connectors: Sew one end of each strap to the outside of the top basket, 1 in (2.5 cm) up from its bottom edge and directly below a cord. Sew the other end to the lower basket, 1 in (2.5 cm) down from its rim, at the same st. This leaves a 2.8 in (7.1 cm) gap between the baskets.
Border
Work the border on each wall, continuing from Rnd 9 (before joining). The gauge is the same: 15 sts = 4 in (10.2 cm).
Border Rnd 1: Ch 1, sc in each st around, sl st to first sc. That’s 18 sts in each of the 4 bow sections. (72 sts)
Border Rnd 2: Ch 1, rev sc in each st around, sl st to first st. That’s again 18 sts per section. (72 sts) Fasten off.
Why the math works: 4 sections x 18 sts = 72, the same count as the wall, the base edge and the joining seam. The border has no increases, so the rim stays 6.1 in (15.5 cm) across, the same as the base. The rolled edge adds 0.5 in (1.3 cm), which makes the wall 4.75 in (12.1 cm) tall. The base seam ridge brings the basket to 5 in (12.7 cm).
Final Blocking
- Weave in all remaining ends.
- Mist each basket with water until it is damp but not soaked.
- Slide each basket over a jar, can or rolled towel about 6 in (15.2 cm) across.
- Gently stretch the lattice upward so the arches open evenly, and smooth the bows flat.
- Press the bases flat on a towel.
- Let everything dry completely, for at least 12 hours.
- Hang the holder and let the cords settle under the weight of a roll.
Final Quality-Control Checklist
- Both bases measure 6.1 in (15.5 cm) and lie flat.
- Each solid wall round has 72 sts, and Rnds 4–6 each have 12 loops.
- Each bow is centered in its 18-st section.
- Both cords are 12 in (30.5 cm) and both straps are 4.8 in (12.2 cm).
- On both baskets, the cords and straps line up at sts 1 and 37.
- The holder hangs level, and a roll fits with room to spare.
- All ends are woven in securely.
Troubleshooting
Base cups like a bowl: Your tension is too tight. Use a hook one size larger for the base only.
Base ruffles: You may have miscounted the increases, or you’re crocheting too loosely. Recount each round, or use a hook one size smaller.
Wall and base don’t match: Count both edges. Each one must have exactly 72 sts.
Lattice sags: Use a firmer cotton.
Basket tilts: The cords or straps are off-center. Sew them again at sts 1 and 37.
Rev sc edge flares: Use a hook one size smaller for Border Rnd 2.
Care
Hand wash in cool water and lay flat to dry, reshaping each basket over a jar. Do not tumble dry.

Final Notes
At a gauge of 15 sts = 4 in (10.2 cm), the 72-st base measures 6.1 in (15.5 cm) across. Each wall also has 72 sts and measures 19.2 in (48.8 cm) around. The wall is 4.25 in (10.8 cm) tall before the border, and the basket is 5 in (12.7 cm) tall once the border and base seam are added. The 12 in (30.5 cm) hanger cords and the 4.8 in (12.2 cm) straps bring the finished holder to about 25 in (63.5 cm).
Happy crocheting!