

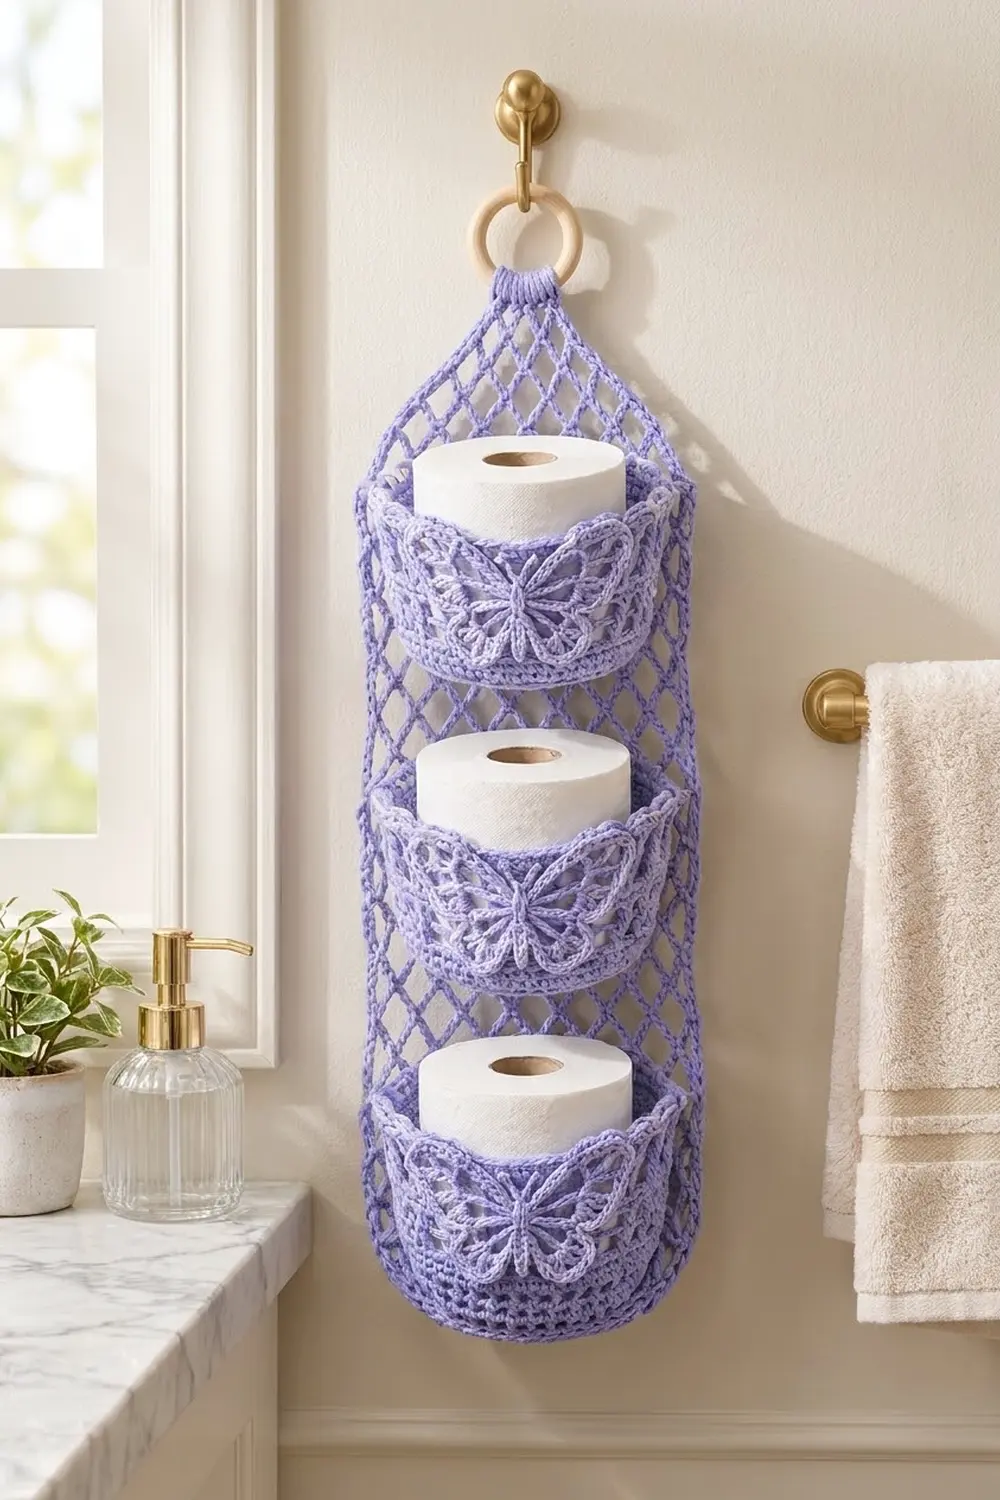
The Lavender Flutter holder is a tall, airy wall organizer that keeps three toilet paper rolls in a neat vertical stack. A diamond-mesh back panel narrows to a wooden ring at the top. Three D-shaped pockets with flat backs are sewn along the length of the panel, and each pocket has a lacy butterfly appliqué on the front.
The main color is a soft periwinkle lavender. The butterflies are worked in a paler lilac so the lace stands out against the solid pocket walls. A cream version works just as well if you prefer a neutral bathroom, and the soft, textured style fits cottage, boho or classic decor.
This pattern uses US crochet terms. The finished holder is about 6.9 in (17.5 cm) wide and about 24 in (61.0 cm) tall, including the ring. Each pocket is 6.5 in (16.5 cm) wide across the back, sticks out about 3.3 in (8.4 cm) from the panel and has walls 3 in (7.6 cm) tall.
The holder is built in simple stages:
– Crochet three half-circle bases and build the pocket walls up from them.
– Make three butterflies.
– Crochet one mesh panel with a tapered top and a hanging strap.
– Add a two-row border to the panel.
– Sew everything together.
Finished Size and Construction
- Finished size: about 6.9 in (17.5 cm) wide x 24 in (61.0 cm) tall, including the ring
- Skill level: Intermediate
- Terminology: US crochet terms
- Yarn weight: worsted (#4) cotton
- Hook: 4.5 mm (US 7)
- Number of pieces: 7 crocheted pieces (1 panel, 3 pockets, 3 butterflies), plus 3 small butterfly bodies and 1 wooden ring
- Layout: 3 pockets stacked in 1 vertical column
- Pocket size: 6.5 in (16.5 cm) wide x 3.3 in (8.4 cm) deep x 3 in (7.6 cm) tall
- Panel size before border: 6 in (15.2 cm) wide x 21 in (53.3 cm) tall (an 18 in / 45.7 cm straight section plus a 3 in / 7.6 cm taper)
- Border depth: 2 rows of sc, about 0.45 in (1.1 cm)
Materials
Choose a smooth, firm worsted-weight cotton or cotton blend. Cotton holds the pocket shape, doesn’t stretch much under the weight of a roll and copes well with a damp bathroom. Avoid splitty or very soft yarns, because they make the mesh sag.
- Main color (lavender): 200 g, about 340 m
- Contrast color (pale lilac): 30 g, about 51 m
- 4.5 mm (US 7) crochet hook
- 1 wooden ring, 2 in (5.1 cm) across
- Tapestry needle
- Stitch markers
- Locking pins or sewing clips
- Measuring tape
- Blocking mat and rust-proof pins
The quantities include a margin of about 20 percent for your test pocket and sewing tails.
Abbreviations (US Terms)
- ch – chain
- sl st – slip stitch
- sc – single crochet
- hdc – half double crochet
- dc – double crochet
- tr – treble crochet
- BLO – back loop only
- sk – skip
- sp – space
- st(s) – stitch(es)
Special stitch – Scallop: 5 dc worked into the same stitch.
Gauge and Checkpoints
Solid gauge: 16 sc x 18 rounds = 4 in (10.2 cm). One dc row is about 0.5 in (1.3 cm) tall.
Mesh gauge: 6 ch-5 loops = 6 in (15.2 cm) wide, and 8 mesh rows = 6 in (15.2 cm) tall. That makes each mesh row 0.75 in (1.9 cm) tall.
Make one complete pocket first and use it as your gauge test. Check these measurements as you go:
- Base after Row 6: the straight edge measures 6 in (15.2 cm).
- Base after Row 7: the straight edge measures about 6.5 in (16.5 cm), and the radius is about 3.25 in (8.3 cm).
- Wall after Round W7: about 1.8 in (4.6 cm) tall.
- Finished pocket: 3 in (7.6 cm) tall, with a back 6.5 in (16.5 cm) wide.
- Panel after Row 24: 6 in (15.2 cm) wide and 18 in (45.7 cm) tall.
If your piece is too big, go down 0.5 mm in hook size. If it is too small, go up 0.5 mm. A loose pocket will sag, so it’s better to crochet on the firm side.

Pockets (Make 3)
Use the main color.
Base (worked in turned rows)
Row 1: Make a magic ring, ch 3 (counts as a dc), then work 5 dc into the ring. Pull the ring closed. (6 dc)
Row 2: Ch 3, turn, dc in the same st, then 2 dc in each st across. (12 dc)
Row 3: Ch 3, turn, dc in the same st, dc in the next st, 2 dc in the next st, dc in the next st; repeat from * 5 times. (18 dc)
Row 4: Ch 3, turn, dc in the same st, dc in the next 2 sts, 2 dc in the next st, dc in the next 2 sts; repeat from * 5 times. (24 dc)
Row 5: Ch 3, turn, dc in the same st, dc in the next 3 sts, 2 dc in the next st, dc in the next 3 sts; repeat from * 5 times. (30 dc)
Row 6: Ch 3, turn, dc in the same st, dc in the next 4 sts, 2 dc in the next st, dc in the next 4 sts; repeat from * 5 times. (36 dc)
Row 7: Ch 1, turn, sc in the next 8 sts, 2 sc in the next st; repeat from * 4 times. (40 sc)
Round 8 (closing the D): Ch 1 and do not turn. Work along the straight edge as follows:
– 1 sc in the end of Row 7.
– 2 sc in the end of each dc row, from Row 6 down to Row 1.
– On the other half, 2 sc in the end of each dc row, from Row 1 up to Row 6.
– 1 sc in the end of Row 7.
That gives 26 sc along the straight edge. Then sc in each of the 40 sts of Row 7 and join with a sl st to the first sc. (26 + 40 = 66 sc)
The 26 straight-edge stitches become the flat back of the pocket. The 40 stitches along the curve become the rounded front.
Walls (worked in joined rounds, right side facing)
The ch 1 at the start of each sc round does not count as a stitch.
Round W1: Ch 1, sc BLO in each st, join. (66 sc) Working in the back loops creates a ridge that turns the wall upward.
Rounds W2–W6: Ch 1, sc in each st, join. (66 sc)
Round W7 (windows): Ch 3 (counts as a dc), ch 2, sk 2, dc in the next st, ch 2, sk 2; repeat from * 21 times. Join to the 3rd ch of the beginning ch-3. (22 dc and 22 ch-2 sps)
Round W8: Ch 1, sc in the dc, 2 sc in the ch-2 sp; repeat from * 22 times, join. (22 + 44 = 66 sc)
Rounds W9–W10: Ch 1, sc in each st, join. (66 sc)
Round W11 (scallops): Ch 1, sc in the next st, sk 2, Scallop in the next st, sk 2; repeat from * 11 times, join. (11 sc and 11 scallops; 66 sts used)
Fasten off and leave a 30 in (76.2 cm) tail for sewing. On the top round, put a marker at each end of the 26-stitch back section so you can find it easily when you sew.
Butterflies (Make 3)
Use the contrast color.
Round 1: Make a magic ring, ch 1, work 8 sc into the ring, join. (8 sc)
Round 2 (wing loops): Ch 1, sc in the first st, ch 12, sk 1, sc in the next st, ch 8, sk 1, sc in the next st, ch 8, sk 1, sc in the next st, ch 12, sk 1, join to the first sc. (4 sc, 2 ch-12 loops, 2 ch-8 loops)
Round 3 (filling the wings):
– In each ch-12 loop (upper wing), work: sc, hdc, 3 dc, ch 3, 3 tr, ch 3, 3 dc, hdc, sc. (13 sts and 2 ch-3 sps)
– In each ch-8 loop (lower wing), work: sc, hdc, 2 dc, ch 2, 2 dc, hdc, sc. (8 sts and 1 ch-2 sp)
– Sl st into each sc between the loops.
Round 4 (lace edge):
– Upper wing: Sc in the first sc, ch 4, sk the hdc and the next dc, sc in the next dc, ch 4, (sc, ch 4, sc) in the ch-3 sp, ch 4, sc in the center tr, ch 4, (sc, ch 4, sc) in the next ch-3 sp, ch 4, sk 1 dc, sc in the next dc, ch 4, sc in the last sc. (8 ch-4 loops)
– Lower wing: Sc in the first sc, ch 4, sc in the 2nd dc, ch 4, (sc, ch 4, sc) in the ch-2 sp, ch 4, sc in the 3rd dc, ch 4, sc in the last sc. (5 ch-4 loops)
– Sl st into each sc between the wings. Join and fasten off.
Each butterfly has 26 ch-4 loops in total. It measures about 3.5 in (8.9 cm) wide x 2.75 in (7.0 cm) tall.
Body (make 3): Ch 10. Starting in the 2nd ch from the hook, sc in the next 8 ch, work 3 sc in the last ch, then sc in the 8 ch along the other side of the chain. (19 sc) Fasten off and leave a long tail. Sew the body vertically over the center ring of the butterfly. Then use the tail to backstitch two antennae, each about 0.75 in (1.9 cm) long.
Mesh Back Panel
Use the main color.
Foundation: Ch 26.
Row 1: Sc in the 2nd ch from the hook, ch 5, sk 3 ch, sc in the next ch; repeat from * 6 times. (6 loops, 7 sc)
Row 2: Ch 5 (counts as a dc + ch 2), turn, sc in the first loop, ch 5, sc in the next loop; repeat from * 5 times, ch 2, dc in the last sc. (5 full loops and 2 half loops)
Row 3: Ch 1, turn, sc in the dc, ch 5, sc in the next ch-5 loop; repeat from * 5 times, ch 5, sc in the 3rd ch of the turning ch. (6 loops)
Rows 4–24: Repeat Rows 2 and 3, ending with a Row 2. Checkpoint: the panel measures 6 in (15.2 cm) wide x 18 in (45.7 cm) tall.
Taper
Row 25: Ch 1, turn, sk the dc and the half loop, sc in the first full loop, ch 5, sc in the next loop; repeat from * 4 times. (4 loops)
Row 26: Ch 1, turn, sc in the first loop, ch 5, sc in the next loop; repeat from * 3 times. (3 loops)
Row 27: Ch 1, turn, sc in the first loop, ch 5, sc in the next loop; repeat from * 2 times. (2 loops)
Row 28: Ch 1, turn, sc in the first loop, ch 5, sc in the next loop. (1 loop)
The taper adds 3 in (7.6 cm) to the panel’s height.
Hanging Strap
Row 29: Ch 1, turn, work 6 sc into the last loop. (6 sc)
Rows 30–37: Ch 1, turn, sc in each st. (6 sc) The strap is about 1.75 in (4.4 cm) long.
Fasten off and leave a 12 in (30.5 cm) tail. Slide the ring onto the strap, fold the strap to the back and sew its last row to the back of Row 29. Wrap the leftover tail tightly around the base of the strap a few times to make a neat collar.
Make All Pieces
- Main color: 3 pockets and 1 panel
- Contrast color: 3 butterflies and 3 bodies
Layout (front view):
          ( ring )
            |  |
          /      \     taper, Rows 25–28
        |  mesh  |     Rows 20–24
        | [ P1 ] |     Rows 15–19
        |  mesh  |     Rows 13–14
        | [ P2 ] |     Rows 8–12
        |  mesh  |     Rows 6–7
        | [ P3 ] |     Rows 1–5
        |________|     border
Border
The border uses the same gauge as the solid fabric: 4 sc per 1 in (2.5 cm). Work the border before you attach the pockets. It is worked as a row that starts and ends at the base of the strap.
Row 1: With the right side facing, join the main color at the right side of the strap base (top of Row 28).
– Right taper: 3 sc in the end of Row 28, 4 sc in Row 27, 3 sc in Row 26 and 4 sc in Row 25. (14 sc)
– Right side: 3 sc in each row end, from Row 24 down to Row 1. (72 sc)
– Bottom: Working into the foundation chain, 3 sc in the first ch, sc in the next 23 ch, then 3 sc in the last ch. (29 sc)
– Left side: 3 sc in each row end, from Row 1 up to Row 24. (72 sc)
– Left taper: 4 sc in Row 25, 3 sc in Row 26, 4 sc in Row 27 and 3 sc in Row 28. (14 sc)
– Sl st into the strap base. Total: 14 + 72 + 29 + 72 + 14 = 201 sc.
Row 2: Ch 1, turn, sc in each st, working 3 sc in the center stitch of each bottom corner group. Sl st into the strap base. (201 + 4 = 205 sc: 14 on each taper, 72 on each side, 33 across the bottom)
Why the math works: 24 rows x 0.75 in = 18 in, and 18 in x 4 sc per inch = 72 sc per side. Across the bottom, 25 foundation chains cover the 6 in width, and the extra stitches in the corner groups turn the corners cleanly. Each taper edge is a diagonal of about 3.6 in (9.1 cm), and 14 sc gives just under 4 stitches per inch, which keeps the angled edge flat. The border adds 0.45 in (1.1 cm) on each side, bringing the panel width to 6.9 in (17.5 cm).
Joining
Sew the pockets on with their main-color tails, using a tapestry needle and whipstitch.
Placement: Lay the panel flat with the right side up. Each pocket’s back covers 4 mesh rows (4 x 0.75 in = 3 in), which matches the 3 in wall height.
– Pocket 3 (bottom): base along the top of Row 1, top edge along Row 5.
– Pocket 2: base along Row 8, top edge along Row 12.
– Pocket 1 (top): base along Row 15, top edge along Row 19.
The pockets are 7 rows apart, which is 5.25 in (13.3 cm). That leaves enough room for a standard 4.25 in (10.8 cm) roll.
How to sew:
1. Line the 26 back stitches of the base up along one mesh row.
2. Whipstitch through each base stitch and into the nearest sc or loop of the mesh.
3. Center the pocket so 0.2 in (0.5 cm) of border shows on each side.
4. Sew the 26 back stitches of the top round (between your markers) to the mesh row 4 rows higher.
5. Tack each back corner of the pocket straight up through all 4 rows.
Tension: Pull each stitch snug, but not so tight that the mesh puckers. The mesh should stay flat and the loops should stay open. Work from the center of each pocket outward so the pocket can’t shift sideways as you sew.
Checkpoint: The top of Pocket 1 should sit about 14.25 in (36.2 cm) above the bottom of Row 1. There should be 3.75 in (9.5 cm) of mesh above it before the taper begins.
Next, center a butterfly on the front of each pocket so the upper wings rise about 0.5 in (1.3 cm) above the scallops. Pin it in place. With the contrast yarn, sew around Round 1 and tack down the tip of each wing.
Final Blocking
- Soak the whole holder in cool water, then gently squeeze it in a towel to remove excess water.
- Lay it flat on a blocking mat, right side up.
- Pin the panel edges straight. It should be 6.9 in (17.5 cm) wide and 21.45 in (54.5 cm) long from the bottom of the border to the strap base.
- Open each mesh diamond with your fingers.
- Stuff each pocket lightly with a rolled-up towel to set the D shape.
- Pin the butterfly wing loops open.
- Let everything dry completely before you remove the pins.
Final Quality-Control Checklist
- Each base has 66 sts in Round 8 (26 across the back + 40 across the front).
- Each pocket wall has 66 sts, is 3 in (7.6 cm) tall and has 11 scallops.
- Each butterfly has 26 ch-4 loops in Round 4.
- The panel has 24 straight rows and 4 taper rows.
- Border Row 2 has 205 sc.
- The pockets are evenly spaced, 7 rows apart.
- The strap is sewn securely and the ring doesn’t slip.
- All yarn ends are woven in on the back.
Troubleshooting
- The base cups or ruffles: Your dc rows are too tight or too loose. Change hook size for the base only.
- A pocket leans forward: Tack the back corners more firmly and add a stitch at the center back.
- The mesh sags under the weight of the rolls: Your loops are too long. Work the ch-5 loops more tightly, or use ch-4 loops instead.
- The border waves: Work 3 sc in every taper row end instead of alternating 3 and 4.
- A butterfly curls: Steam it lightly and pin the wings flat.
- The holder hangs crooked: Check that the strap is centered on Row 28, and re-sew it if needed.
- A roll fits too tightly: Block the pocket over a slightly larger towel roll so it stretches a little.
Care
Hand wash in cool water with mild soap, gently press out the water and dry flat. If you need to soak the holder, remove the wooden ring first.
Final Notes
Each measurement builds on the one before it. A gauge of 16 sc = 4 in gives a 66-stitch pocket with a 6.5 in (16.5 cm) back and 3 in (7.6 cm) walls. Each mesh row is 0.75 in (1.9 cm), so every pocket covers exactly 4 rows, and 24 rows make an 18 in (45.7 cm) panel. The border adds 0.45 in (1.1 cm) on each side, bringing the width to 6.9 in (17.5 cm). With the taper, strap and ring, the holder is about 24 in (61.0 cm) tall.
Happy crocheting!