

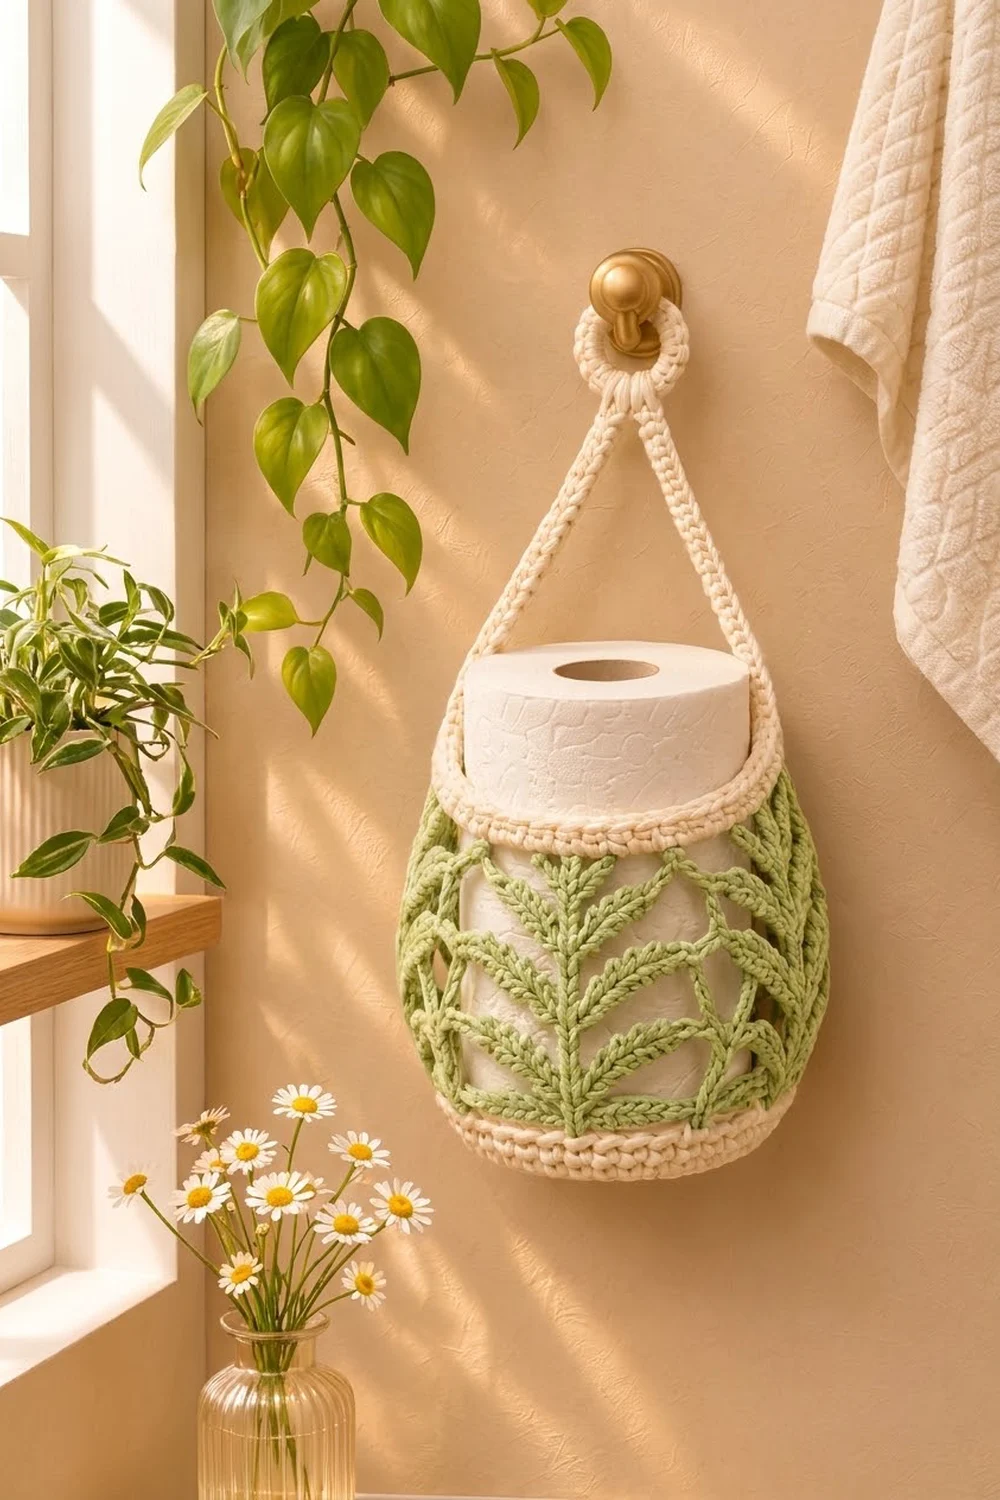
This hanging basket holds a spare roll of toilet paper and leaves it partly visible through sage green fern lace. The base, bottom band and rim are solid cream, so the basket keeps its shape when it hangs. The openwork body lets you see the roll inside.
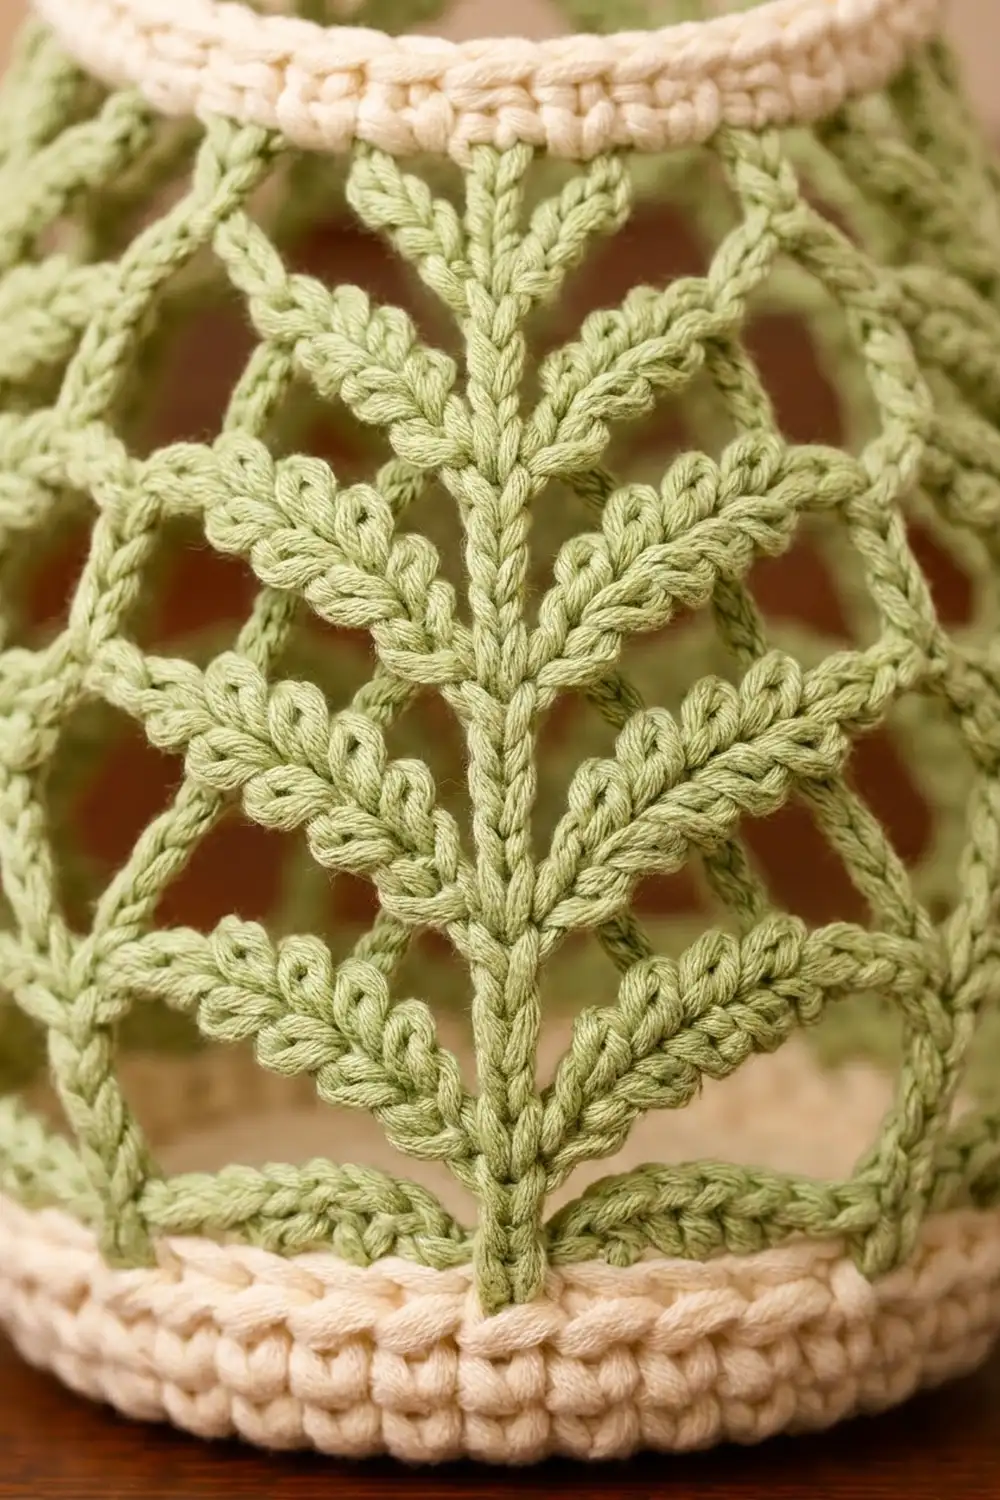
The design uses two calm colors: cream for the structure and sage green for the fern panels. Each fern has a raised central stem with leaf clusters on both sides. Chain arches between the ferns form diamond-shaped openings. It suits a botanical, farmhouse or neutral bathroom.
The pattern uses US crochet terms. The finished body is about 5.75 in (14.6 cm) tall, about 6.75 in (17.1 cm) across at its widest, and 5.75 in (14.6 cm) across the rim opening. With the strap and ring, the basket hangs about 12.5 in (31.8 cm) long overall.
The whole basket is one piece, worked in joined rounds from the bottom up. You make a flat cream base, turn the wall up with a back-loop round, and work a short cream band. Then come eight green lace rounds that widen and narrow again, and a cream rim band. Last, you work two strap legs up from the rim and finish them with a ring.
Finished Size and Construction
- Finished size: body 5.75 in (14.6 cm) tall; widest diameter about 6.75 in (17.1 cm); overall hanging length about 12.5 in (31.8 cm)
- Skill level: Intermediate
- Terminology: US crochet terms
- Yarn weight: #4 worsted, cotton or cotton blend
- Hook: 5.0 mm (H-8)
- Number of pieces: 1 (worked in one piece, strap attached)
- Layout: round base → cream band → 8 lace rounds → cream rim → two strap legs → ring
- Base size: 5.5 in (14.0 cm) diameter, 72 stitches
- Size before rim band: about 4.9 in (12.4 cm) tall
- Rim band depth: 4 rounds, about 0.9 in (2.3 cm)
Materials
Choose a smooth worsted cotton or a cotton-acrylic blend. Cotton keeps the lace crisp and helps the basket hold its shape when it is full. Avoid fuzzy yarns, because they blur the fern texture.
- Cream: about 90 g / 162 m (base, bottom band, rim, strap and ring)
- Sage green: about 55 g / 99 m (lace body)
These quantities include a margin of about 15% for gauge swatches and tension differences.
Tools:
– 5.0 mm (H-8) crochet hook
– Locking stitch markers (at least 2)
– Tapestry needle
– Scissors
– Measuring tape
– Rust-proof pins and a spray bottle for blocking
– A balloon, or a roll of toilet paper wrapped in plastic, to use as a blocking form
Abbreviations (US Terms)
- ch – chain
- sl st – slip stitch
- sc – single crochet
- dc – double crochet
- FPdc – front post double crochet
- BLO – back loop only
- sk – skip
- sp(s) – space(s)
- st(s) – stitch(es)
- rnd(s) – round(s)
Special stitch – Leaf: [Yarn over, insert hook in the indicated stitch or space, yarn over, pull up a loop, yarn over, draw through 2 loops] 3 times. Yarn over and draw through all 4 loops on the hook, then ch 1 to close. The closing ch-1 does not count as a stitch. Each Leaf counts as 1 stitch.
Gauge and Checkpoints
Gauge: 16 sc and 18 rnds = 4 in (10.2 cm) in sc worked in the round.
Before you start the basket, work Rnds 1–6 of the base as a test piece. It should measure about 2.75 in (7.0 cm) across. If you can, use these rounds as the start of your basket.
Checkpoints:
– After Rnd 6: 36 sts, about 2.75 in (7.0 cm) diameter
– After Rnd 12: 72 sts, about 5.5 in (14.0 cm) diameter, lying flat
– After Rnd 16: wall about 0.9 in (2.3 cm) tall
– After Rnd 22: circumference about 21–22 in (53.3–55.9 cm)
– After Rnd 24: body about 4.9 in (12.4 cm) tall
– After Rnd 28: body about 5.75 in (14.6 cm) tall, rim opening 5.75 in (14.6 cm) across
If your piece is too big: go down to a 4.5 mm hook. A rim that is too wide will let the basket sag.
If your piece is too small: go up to a 5.5 mm hook. The rim opening must be at least 5 in (12.7 cm) across, or a standard 4.5 in (11.4 cm) roll will not fit.
Base (Cream)
Work in joined rounds. Do not turn. The ch-1 at the start of each round does not count as a stitch.
Rnd 1: Make a magic ring, ch 1, work 6 sc in the ring, sl st to the first sc. (6 sts)
Rnd 2: Ch 1, work 2 sc in each st around, sl st to join. (12 sts)
Rnd 3: Ch 1, sc in the next st, 2 sc in the next st, repeat 6 times, sl st to join. (18 sts)
Rnd 4: Ch 1, sc in the next 2 sts, 2 sc in the next st, repeat 6 times, sl st to join. (24 sts)
Rnd 5: Ch 1, sc in the next 3 sts, 2 sc in the next st, repeat 6 times, sl st to join. (30 sts)
Rnd 6: Ch 1, sc in the next 4 sts, 2 sc in the next st, repeat 6 times, sl st to join. (36 sts)
Rnd 7: Ch 1, sc in the next 5 sts, 2 sc in the next st, repeat 6 times, sl st to join. (42 sts)
Rnd 8: Ch 1, sc in the next 6 sts, 2 sc in the next st, repeat 6 times, sl st to join. (48 sts)
Rnd 9: Ch 1, sc in the next 7 sts, 2 sc in the next st, repeat 6 times, sl st to join. (54 sts)
Rnd 10: Ch 1, sc in the next 8 sts, 2 sc in the next st, repeat 6 times, sl st to join. (60 sts)
Rnd 11: Ch 1, sc in the next 9 sts, 2 sc in the next st, repeat 6 times, sl st to join. (66 sts)
Rnd 12: Ch 1, sc in the next 10 sts, 2 sc in the next st, repeat 6 times, sl st to join. (72 sts)
Check that the base is flat and about 5.5 in (14.0 cm) across. If it ruffles, your increases are too loose. If it cups, they are too tight.
Bottom Band (Cream)
Rnd 13: Ch 1, sc in the BLO of each st around, sl st to join. (72 sts) This round turns the edge upward and leaves a neat ridge around the base.
Rnds 14–15: Ch 1, sc in each st around, sl st to join. (72 sts)
Change to sage green on the final sl st of Rnd 15. Fasten off cream.
Rnd 16 (green): Ch 1, sc in each st around, sl st to join. (72 sts)
The wall should now stand about 0.9 in (2.3 cm) tall. Each 12-stitch section of Rnd 16 becomes one fern panel, so the basket has 6 panels in total.
Fern Lace Body (Sage Green)
Each repeat has 1 stem, 2 Leaves, 1 valley sc and 4 chain spaces. In every lace round, a full round contains 6 stems, 12 Leaves, 6 valley sc and 24 ch-sps. Only the chain length changes, and that is what shapes the bulge.
Rnd 17 (set-up): Ch 3 (counts as the first dc, which is the stem). Ch 2, sk 2 sts, Leaf in the next st, ch 2, sk 2 sts, sc in the next st (valley), ch 2, sk 2 sts, Leaf in the next st, ch 2, sk 2 sts, dc in the next st (stem). Repeat from * to * 5 more times, ending the last repeat at **. Sl st to the top of the beginning ch-3.
Count: 6 stems, 12 Leaves, 6 sc, 24 ch-2 sps. Each repeat uses exactly 12 sts of Rnd 16 (1 + 2 + 1 + 2 + 1 + 2 + 1 + 2 = 12).
The spaces in each repeat are, in order: sp A (stem to right Leaf), sp B (Leaf to valley), sp C (valley to left Leaf) and sp D (left Leaf to the next stem).
Rnd 18: Ch 2 (does not count). FPdc around the stem, ch 2, Leaf in sp A, ch 2, sk the Leaf and sp B, sc in the valley sc, ch 2, sk sp C and the Leaf, Leaf in sp D, ch 2. Repeat 6 times. Sl st to the top of the first FPdc.
Count: 6 FPdc, 12 Leaves, 6 sc, 24 ch-2 sps.
Placing the Leaves in the spaces right next to the stem makes them stack upward and lean outward, like fern fronds. The FPdc lifts the stem so it stands out on the front.
Rnds 19–22: Work the same as Rnd 18, but ch 3 in place of each ch 2.
Count for each round: 6 FPdc, 12 Leaves, 6 sc, 24 ch-3 sps.
This is the widest part of the basket. After Rnd 22, the circumference should be about 21–22 in (53.3–55.9 cm). The ch-3 arches between the panels open into the diamond-shaped windows.
Rnds 23–24: Work the same as Rnd 18, with ch 2.
Count for each round: 6 FPdc, 12 Leaves, 6 sc, 24 ch-2 sps.
The shorter chains pull the top in again and give the egg shape. Change to cream on the final sl st of Rnd 24. Fasten off green. The body should measure about 4.9 in (12.4 cm) tall from the base.
Border: Rim Band and Hanging Strap (Cream)
Border gauge: 16 sc = 4 in (10.2 cm), the same as the base. With 72 sts, the rim circumference is 18 in (45.7 cm), which gives an opening about 5.75 in (14.6 cm) across.
Rnd 25 (conversion): Ch 1. Sc in the FPdc, 2 sc in the next ch-2 sp, sc in the top of the Leaf, 2 sc in the next ch-2 sp, sc in the valley sc, 2 sc in the next ch-2 sp, sc in the top of the Leaf, 2 sc in the next ch-2 sp. Repeat 6 times. Sl st to join.
Count: 24 sts worked one into each existing stitch, plus 48 sc worked into the 24 ch-sps, for 72 sts in total. That is 12 per panel.
Rnds 26–28: Ch 1, sc in each st around, sl st to join. (72 sts) Fasten off.
Why the math works: The base and the rim both have 72 sts, so the opening matches the base and a roll can drop straight in. Each half of the rim has 36 sts (3 panels of 12 sts). Starting the two strap legs at sts 1 and 37 centers each leg over a fern stem on opposite sides.
Strap Leg A: With the right side facing, join cream in st 1 of Rnd 28.
Row 1: Ch 1, sc in sts 1, 2 and 3. Turn. (3 sts)
Rows 2–27: Ch 1, sc in each st across. Turn. (3 sts)
The leg should measure 6 in (15.2 cm) long and 0.75 in (1.9 cm) wide. Fasten off, leaving a 12 in (30.5 cm) tail.
Strap Leg B: Join cream in st 37 of Rnd 28 and work Rows 1–27 the same as for Leg A.
Edging the legs: On each leg, work sl sts loosely along both long edges, 1 sl st per row end (27 per edge). This rounds the strap into the corded look and stops it from stretching.
Joining the legs: Place the top of Leg A over the top of Leg B, keeping both right sides facing out and making sure neither leg is twisted. With Leg B’s working yarn, sl st through both layers across all 3 sts.
Ring: From the joined top, ch 12 and sl st into the first ch to form a ring. Ch 1, work 20 sc tightly into the ring, and sl st to the first sc. The ring should measure about 1.5 in (3.8 cm) across. Fasten off. Weave the remaining tail around the base of the ring to reinforce the point that takes the strain.
Final Blocking
- Weave in all ends on the inside of the basket, working along solid stitches rather than through the lace.
- Mist the basket evenly with water until it is damp but not dripping.
- Put the blocking form inside. A balloon inflated to about 6.75 in (17.1 cm) across works well, as does a toilet paper roll wrapped in plastic with a folded towel around it.
- Gently open each diamond window and straighten each fern stem so it runs vertically.
- Pat the rim into a true circle 5.75 in (14.6 cm) across, and press the base flat.
- Pin the strap legs flat on a towel, straight and untwisted, at 6 in (15.2 cm) each.
- Let everything dry completely, usually 12–24 hours, before removing the form.
Final Quality-Control Checklist
- Base is flat, 72 sts, about 5.5 in (14.0 cm) across
- BLO ridge circles the base evenly
- 6 fern panels, each with 1 raised stem and Leaves on both sides
- Every lace round has 6 stems, 12 Leaves, 6 sc and 24 ch-sps
- Widest circumference is 21–22 in (53.3–55.9 cm)
- Rim has exactly 72 sts and an opening 5.75 in (14.6 cm) across
- Strap legs are at sts 1 and 37, each 6 in (15.2 cm) long
- Ring is firm and reinforced
- All ends are secured on the inside
Troubleshooting
Base ruffles: Your increases are too loose. Go down half a hook size for the base only.
Stems lean in a spiral: Make sure each FPdc goes around the stem directly below it, not the stitch next to it.
Leaves look flat: Pull up each loop of the Leaf to the same height, and always close it with ch 1.
Basket doesn’t bulge: Your chains are too tight. Use a larger hook for the ch-3 rounds only.
Roll won’t fit: The rim is too tight. Rework Rnd 25 and make sure you put exactly 2 sc in every ch-sp.
Basket tilts when hanging: One leg is longer than the other. Count the rows again; each leg needs exactly 27.
Strap stretches: Add a second pass of sl sts along the edges, or use a cotton yarn with less give.
Care
Hand wash in cool water with mild soap, press out the water in a towel, and dry the basket over a form to keep its shape. Do not tumble dry.
Final Notes
The basket depends on one chain of measurements. A gauge of 16 sc = 4 in (10.2 cm) gives a 72-st base about 5.5 in (14.0 cm) across. The cream band brings the wall to 0.9 in (2.3 cm). The eight lace rounds widen to 21–22 in (53.3–55.9 cm) around and return to 72 sts at the rim, opening 5.75 in (14.6 cm) across. Two 6 in (15.2 cm) legs and a 1.5 in (3.8 cm) ring complete a basket about 12.5 in (31.8 cm) long. Check each link as you go and the finished basket will hang straight.
Happy crocheting!