

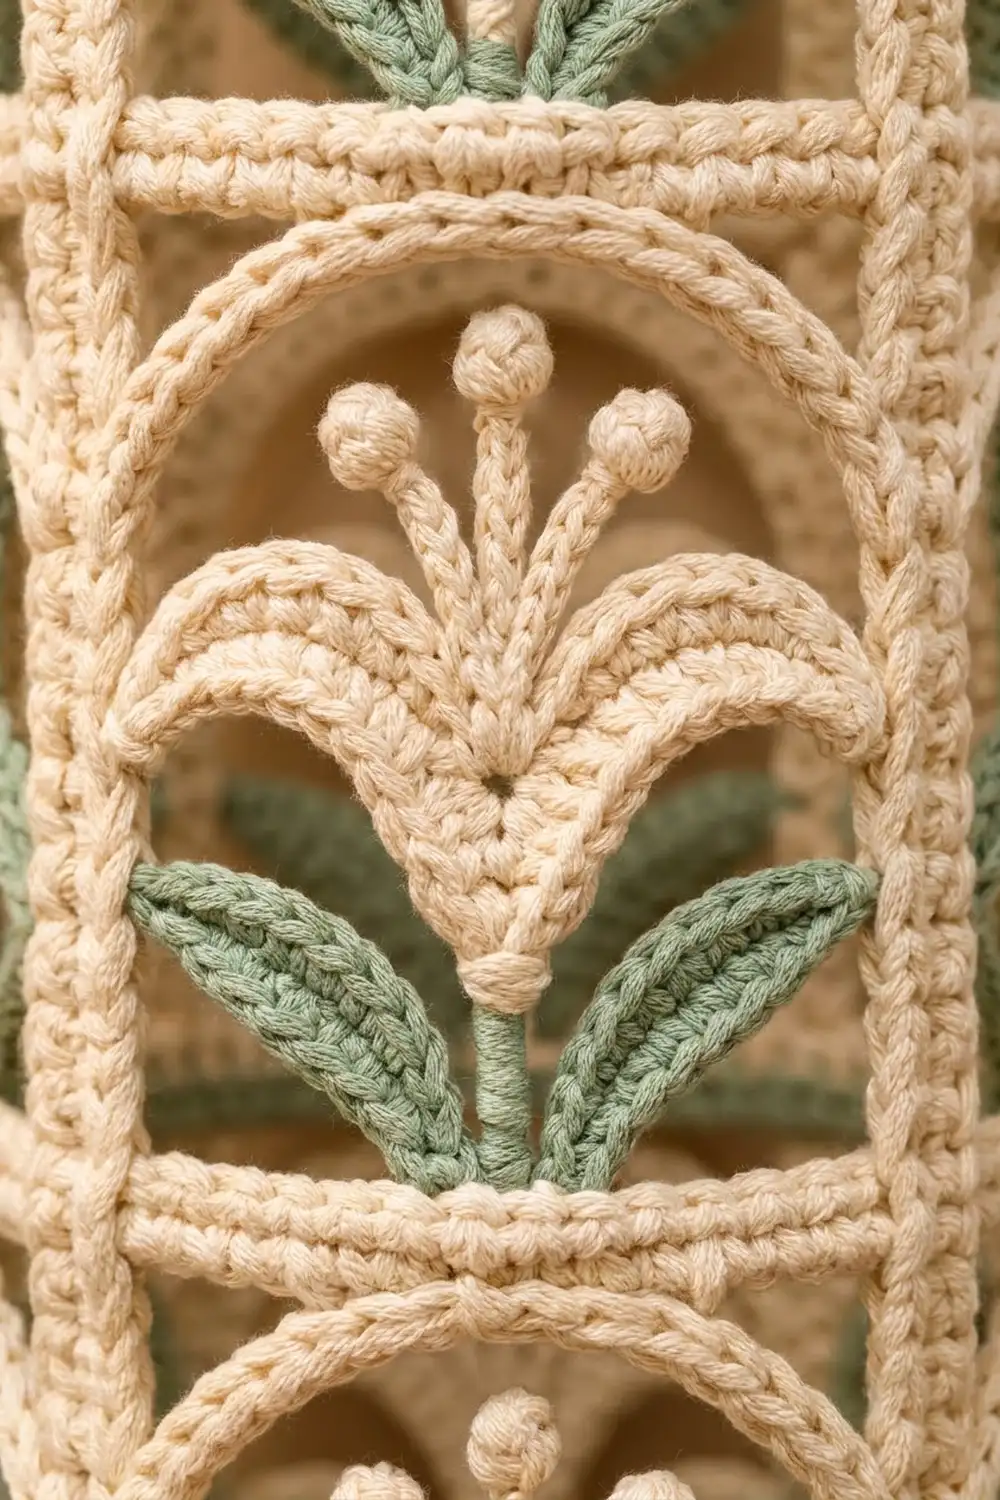
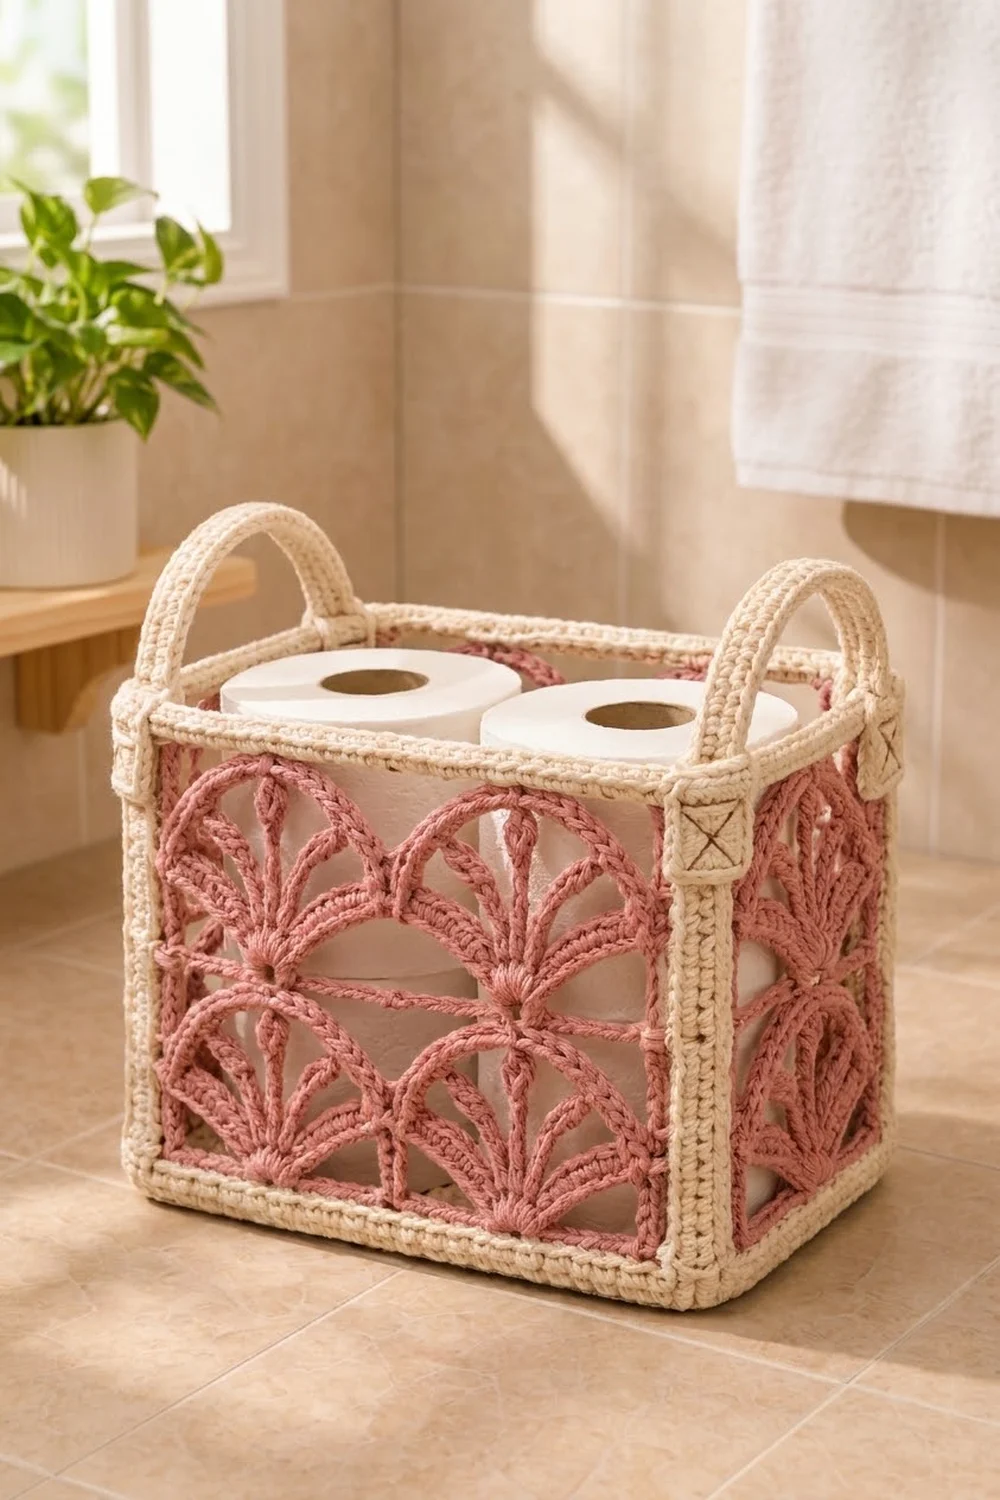
The Rosewood Fan Lace Basket is a small rectangular storage basket with lacy walls. Every wall panel has two tiers of dusty rose fans. Each fan starts from a small puff “bud”, opens into treble rays and finishes with a scalloped arch. A sturdy cream frame outlines every panel, giving the basket thick cream corner posts, a solid cream base and a rope-like top rim.
Two cream arched handles with square tabs sit on the short ends. The tabs are sewn on with a backstitched square and X, which holds them firmly and adds a tailored detail. The basket holds two standard 4.5 in (11.4 cm) toilet rolls side by side, so it suits a bathroom. It also works for yarn, washcloths or toiletries.
This pattern uses US crochet terms. The finished basket measures about 10 in (25.4 cm) wide, 6 in (15.2 cm) deep and 9 in (22.9 cm) tall, not counting the handles. The handles rise about 2 in (5.1 cm) above the rim.
Construction is modular:
- Crochet a cream base in rows.
- Crochet four rose lace panels in rows and give each one a cream frame.
- Join the framed panels into a tube with single crochet seams, then join the tube to the base.
- Add a two-round cream border and sew on the handles.
Finished Size and Construction
- Finished size: 10 x 6 x 9 in (25.4 x 15.2 x 22.9 cm), not counting handles
- Skill level: Intermediate
- Terminology: US
- Yarn weight: Bulky (#5) cotton or cotton blend
- Hook: 6 mm (US J-10)
- Number of pieces: 7 (1 base, 2 long panels, 2 short panels, 2 handles)
- Layout: 4 framed panels joined in a ring on a rectangular base
- Long panel, framed: 9 2/3 x 8 1/3 in (24.6 x 21.2 cm)
- Short panel, framed: 5 2/3 x 8 1/3 in (14.4 x 21.2 cm)
- Height before border: 8 1/3 in (21.2 cm)
- Border depth: 2/3 in (1.7 cm), 2 rounds
Materials
Choose a smooth, firm bulky cotton or cotton blend. Cotton holds the lace shape and keeps the walls upright. Very soft acrylic will sag. The amounts below assume about 120 m (131 yd) per 100 g.
- Dusty rose (Color A): 150 g, about 180 m (197 yd), for the four lace panels
- Cream (Color B): 200 g, about 240 m (262 yd), for the base, frames, seams, border and handles
These amounts include a margin of about 25% for swatching and differences in tension.
Tools:
– 6 mm (US J-10) crochet hook
– Tapestry needle
– 2 lengths of 5 mm (3/16 in) cotton piping cord, each 22 in (55.9 cm)
– 8 or more stitch markers
– Pins, a blocking mat and a spray bottle
– Optional: fabric stiffener or starch
Abbreviations (US Terms)
- ch – chain
- sl st – slip stitch
- sc – single crochet
- sc2tog – single crochet 2 together
- dc – double crochet
- tr – treble crochet
- rev sc – reverse single crochet (crab stitch)
- sk – skip
- sp – space
- st(s) – stitch(es)
- RS / WS – right side / wrong side
Puff st: (Yarn over, insert hook in st, pull up a loop) 4 times. Yarn over and pull through all 9 loops on the hook, then ch 1 to close. This closing ch 1 is the top of the puff. It does not count as a separate stitch.
Gauge and Checkpoints
- Sc gauge: 12 sts and 12 rows = 4 in (10.2 cm). One sc is about 1/3 in (0.8 cm) wide and tall.
- Lace gauge: One 12-st fan repeat = 4 in (10.2 cm) wide. One 5-row tier = 3 1/3 in (8.5 cm) tall.
Make one short lace panel first and use it as your swatch. It is small, and you can keep it if it measures correctly.
Checkpoints:
– Base before edging: 9 1/3 x 5 1/3 in (23.7 x 13.5 cm)
– Base after edging: 10 x 6 in (25.4 x 15.2 cm)
– Long lace panel: 8 1/3 x 7 in (21.2 x 17.8 cm)
– Short lace panel: 4 1/3 x 7 in (11.0 x 17.8 cm)
– Framed long panel: 9 2/3 x 8 1/3 in (24.6 x 21.2 cm)
– Framed short panel: 5 2/3 x 8 1/3 in (14.4 x 21.2 cm)
If your pieces are too big, use a hook one size smaller. If they are too small, use a hook one size larger. Width matters most, because the panels must match the base stitch for stitch. Height can be off by about 1/4 in (0.6 cm) without causing problems.
Base (Make 1, Color B)
Foundation: Ch 29.
Row 1: Sc in 2nd ch from hook and in each ch across, turn. (28 sts)
Rows 2–16: Ch 1, sc in each st across, turn. (28 sts)
Checkpoint: 9 1/3 x 5 1/3 in (23.7 x 13.5 cm).
Edging Round: Ch 1. Do not turn.
- 3 sc in the first st of Row 16, sc in the next 26 sts, then 3 sc in the last st.
- Sc in each of the 14 row ends between Row 16 and Row 1.
- Along the foundation chain: 3 sc in the first ch, sc in the next 26 ch, then 3 sc in the last ch.
- Sc in each of the 14 row ends on the other side. Join with a sl st.
Mark the middle sc of each 3-sc group as a corner.
- Long sides: 1 + 26 + 1 = 28 sts, + 2 corners = 30 sts per side
- Short sides: 1 + 14 + 1 = 16 sts, + 2 corners = 18 sts per side
- Total: (2 x 30) + (2 x 18) − 4 shared corners = 92 sts
Fasten off. The base measures 10 x 6 in (25.4 x 15.2 cm).
Lace Panels (Color A)
Both panel sizes use the same 5-row tier, worked twice. Long panels have 2 fan repeats and short panels have 1. Treat Row 1 as the RS.
Long panel (make 2): Ch 26.
Row 0: Sc in 2nd ch from hook and in each ch across, turn. (25 sts)
Short panel (make 2): Ch 14.
Row 0: Sc in 2nd ch from hook and in each ch across, turn. (13 sts)
Both counts are a multiple of 12 + 1.
Row 1 (puff row): Ch 1, sc in first st. *Ch 4, sk 5 sts, puff st in next st, ch 4, sk 5 sts, sc in next st; rep from * across, turn.
– Long: 3 sc, 2 puffs, 4 ch-4 loops
– Short: 2 sc, 1 puff, 2 ch-4 loops
Row 2 (fan row): Ch 4 (counts as tr). *Sk ch-4 loop, in top of puff work (tr, ch 1) 4 times, then tr. Sk ch-4 loop, tr in next sc; rep from * across, turn.
– Each fan: 5 tr and 4 ch-1 sps
– Long: 2 fans + 3 single tr
– Short: 1 fan + 2 single tr
Row 3 (arch row): Ch 1, sc in first tr. *Ch 2, sc in first ch-1 sp of fan, (ch 3, sc in next ch-1 sp) 3 times, ch 2, sc in next single tr; rep from * across, turn.
– Per repeat: 5 sc and 5 ch-sps
– Long: 11 sc
– Short: 6 sc
This row forms the scalloped arch over each fan.
Row 4 (bar row): Ch 3 (counts as dc). *Dc in ch-2 sp, 3 dc in each of next 3 ch-3 sps, dc in next ch-2 sp, dc in next sc; rep from * across, turn. Skip the sc that sit in the fan spaces.
– Per repeat: 1 + 9 + 1 + 1 = 12 dc
– Long: 1 + (2 x 12) = 25 sts
– Short: 1 + 12 = 13 sts
Row 5 (sc row): Ch 1, sc in each st across, turn. (Long: 25 sts. Short: 13 sts.)
Rows 6–10: Repeat Rows 1–5 for the second tier.
Fasten off. Each panel now has 11 rows: Row 0 plus 2 tiers.
Checkpoint: long panel 8 1/3 x 7 in (21.2 x 17.8 cm), short panel 4 1/3 x 7 in (11.0 x 17.8 cm). Pin the fans open and steam lightly before framing.
Panel Frame (Color B, All 4 Panels)
Work the frame in the round with the RS facing. It turns the lace edges into solid cream posts.
Rnd 1: Join Color B in the first st of Row 10.
- Ch 1, 3 sc in the same st. Sc in each st across to the last st, then 3 sc in the last st.
- Work 19 sc down the side in the row ends of Rows 9 to 1. Use this many sc per row: Row 9: 2, Row 8: 1, Row 7: 4, Row 6: 2, Row 5: 1, Row 4: 2, Row 3: 1, Row 2: 4, Row 1: 2. This adds up to 19.
- Along the foundation chain: 3 sc in the first ch, sc in each ch to the last ch, then 3 sc in the last ch.
- Work 19 sc up the other side using the same row-end amounts in reverse. Join with a sl st.
Stitch counts:
– Long panel: Top and bottom: 1 + 23 + 1 = 25, + 2 corners = 27 per side. Sides: 1 + 19 + 1 = 21, + 2 corners = 23 per side. Total 100 sts.
– Short panel: Top and bottom: 1 + 11 + 1 = 13, + 2 corners = 15 per side. Sides: 23 per side. Total 76 sts.
Rnd 2: Ch 1, sc in each st around, working 3 sc in each corner st. Join.
– Long panel: 29 sts per side top and bottom, 25 sts per side on the sides. Total 108 sts.
– Short panel: 17 sts per side top and bottom, 25 sts per side on the sides. Total 84 sts.
Fasten off. Check the sizes: long panel 9 2/3 x 8 1/3 in (24.6 x 21.2 cm), short panel 5 2/3 x 8 1/3 in (14.4 x 21.2 cm).
Handles (Make 2, Color B)
Foundation: Ch 6.
Row 1: Sc in 2nd ch from hook and in each ch across, turn. (5 sts)
Rows 2–5: Ch 1, sc in each st, turn. (5 sts) This completes the first tab.
Row 6: Ch 1, sc2tog, sc in next st, sc2tog, turn. (3 sts)
Rows 7–18: Ch 1, sc in each st, turn. (3 sts)
Row 19: Ch 1, 2 sc in first st, sc in next st, 2 sc in last st, turn. (5 sts)
Rows 20–23: Ch 1, sc in each st, turn. (5 sts) This completes the second tab.
Before edging, the handle measures:
– Length: 7 2/3 in (19.5 cm)
– Tabs: 1 2/3 in (4.2 cm) square
– Strap width: 1 in (2.5 cm)
Edging Round: Lay the piping cord along the edge and enclose it in every sc.
- Ch 1, 3 sc in the first st, sc in the next 3 sts, then 3 sc in the last st.
- Work 21 sc along the row ends.
- 3 sc in the first foundation ch, sc in the next 3 ch, then 3 sc in the last ch.
- Work 21 sc along the other side. Join.
Stitch counts: short ends 5 + 2 corners = 7 per side, long sides 21 + 2 corners = 23 per side. Total 56 sts.
Trim the cord and tuck the ends inside the stitches. The finished handle is 8 1/3 in (21.2 cm) long with tabs about 2 1/3 in (5.9 cm) wide. The enclosed cord helps the strap hold its arch.
Make All Pieces
- Color A: 2 long lace panels (25 sts) and 2 short lace panels (13 sts)
- Color B: 1 base, 4 panel frames and 2 handles, plus all seams and the border
Layout (basket opened flat, outside view):
            [  LONG PANEL – back  ]
[ SHORT  ]  [        BASE         ]  [ SHORT  ]
[+handle ]  [     30 x 18 sts     ]  [+handle ]
            [  LONG PANEL – front ]
Joining
Use Color B and work single crochet seams through both layers.
Corner seams: Hold one long and one short panel with WS together so the seam ridge forms on the outside. Match the 25-st side edges, corner to corner. Sc through both layers in each of the 25 stitch pairs. Repeat for all 4 corners to make a tube. These raised seams form the cream corner posts.
Base seam: Hold the base and the bottom of the tube with WS together. Line up a base corner with the bottom-left corner stitch of the front panel. Sc through both layers, one stitch to one stitch, all the way around:
- Base corner + 28 long-side sts → the long panel’s 29 bottom sts
- Base corner + 16 short-side sts → the short panel’s 17 bottom sts
- Total: 29 + 17 + 29 + 17 = 92, which equals the base’s 92 sts
Do not work into the corner seam stitches.
Tension: Keep your seam stitches the same size as your frame stitches. Tight seams pull the corners in. Loose seams let the walls lean.
Checkpoint: The basket should stand 8 1/3 in (21.2 cm) tall on a 10 x 6 in (25.4 x 15.2 cm) base.
Border
The border uses the same sc gauge: 3 sts per 1 in (2.5 cm). Each round adds 1/3 in (0.8 cm) of height.
Rnd 1: Join Color B at a back corner. Ch 1, sc in each top st of every panel, skipping the seam stitches. Join.
– Front 29 + side 17 + back 29 + side 17 = 92 sts
Rnd 2: Ch 1, rev sc in each st around. Join and fasten off. (92 sts)
Why the math works: Each side of the border sits on one panel, so each side starts with 1 x that panel’s top count (29 or 17). The walls are straight and the opening has the same 92 sts as the base, so the border needs no increases. It lies flat and adds 2/3 in (1.7 cm), which brings the height to 9 in (22.9 cm).
Attaching the Handles
Center one handle on each short panel.
- Place the tabs with their outer edges against the corner seams and their tops level with the top of the border.
- This leaves about 1 in (2.5 cm) between the tabs, and the strap arches about 2 in (5.1 cm) above the rim.
- With Color B, backstitch a square around each tab, then stitch an X from corner to corner through all layers.
Final Blocking
- Mist the basket until it is damp, not soaked.
- Stuff it firmly with a towel-wrapped box about 10 x 6 in (25.4 x 15.2 cm).
- Square up the walls and corner posts.
- Pin each fan open and even out the arches.
- Optional: brush stiffener onto the rose lace only.
- Let it dry completely, at least 24 hours, before removing the box.
Final Quality-Control Checklist
- The base has 92 edge sts and measures 10 x 6 in (25.4 x 15.2 cm).
- All 4 panels show 2 tiers of even fans.
- The frames have 108 sts (long panels) and 84 sts (short panels).
- Each corner seam has 25 sts.
- The border has 92 sts and lies flat.
- The basket is 9 in (22.9 cm) tall.
- The handles match and are placed symmetrically.
- All ends are woven in on the inside.
Troubleshooting
- Fans look crowded: Work the puffs loosely and keep the trebles tall.
- Bar row count is off: Recheck the 1 / 3 / 3 / 3 / 1 dc placement in the spaces.
- Walls lean inward: The seams are too tight. Re-block over a form or use stiffener.
- Base is wider than the walls: Recount frame Rnd 2 (29 / 17 per side). A missing corner stitch is the usual cause.
- Rim ruffles: Make sure you skipped the seam stitches in border Rnd 1.
- Handles flop: Check that the cord runs through the whole edging round.
Care
Hand wash in cool water and press out the water without wringing. Reshape the basket over a form and let it dry.
Final Notes
The measurements build on each other in this order:
- 12 sc = 4 in (10.2 cm)
- Lace panels are 25 and 13 sts wide.
- Frames have 29 and 17 sts per side: 9 2/3 in (24.6 cm) and 5 2/3 in (14.4 cm).
- The base is 30 x 18 sts: 10 x 6 in (25.4 x 15.2 cm).
- The base seam and border are each 92 sts.
- The finished basket is 10 x 6 x 9 in (25.4 x 15.2 x 22.9 cm).
If each step measures correctly, the pieces will fit together. Happy crocheting!