

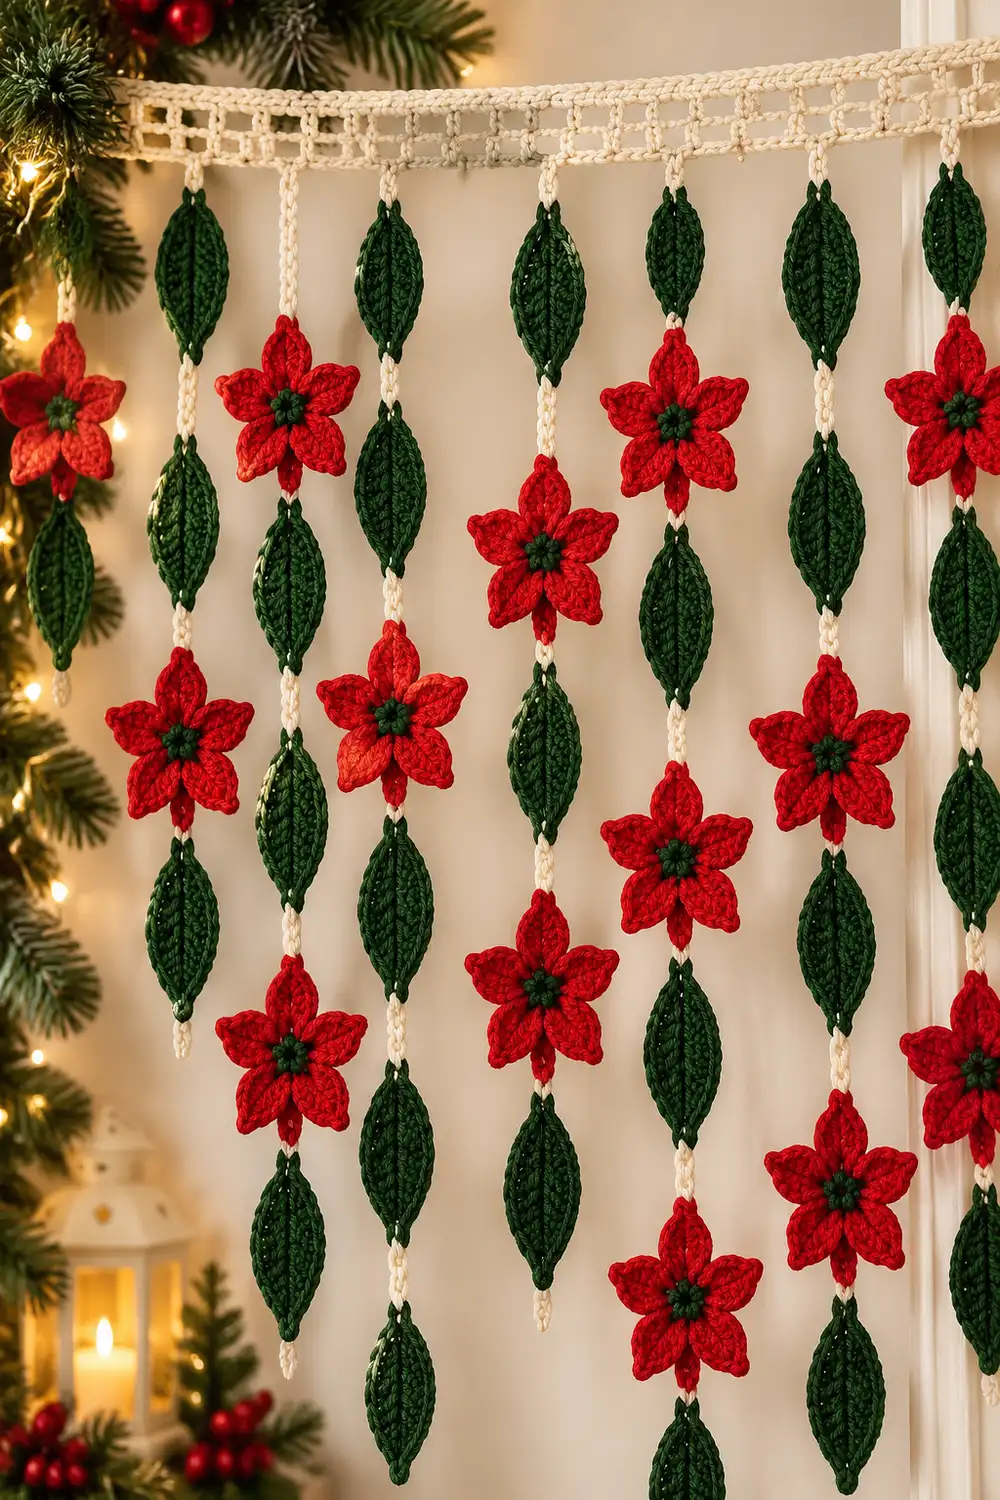
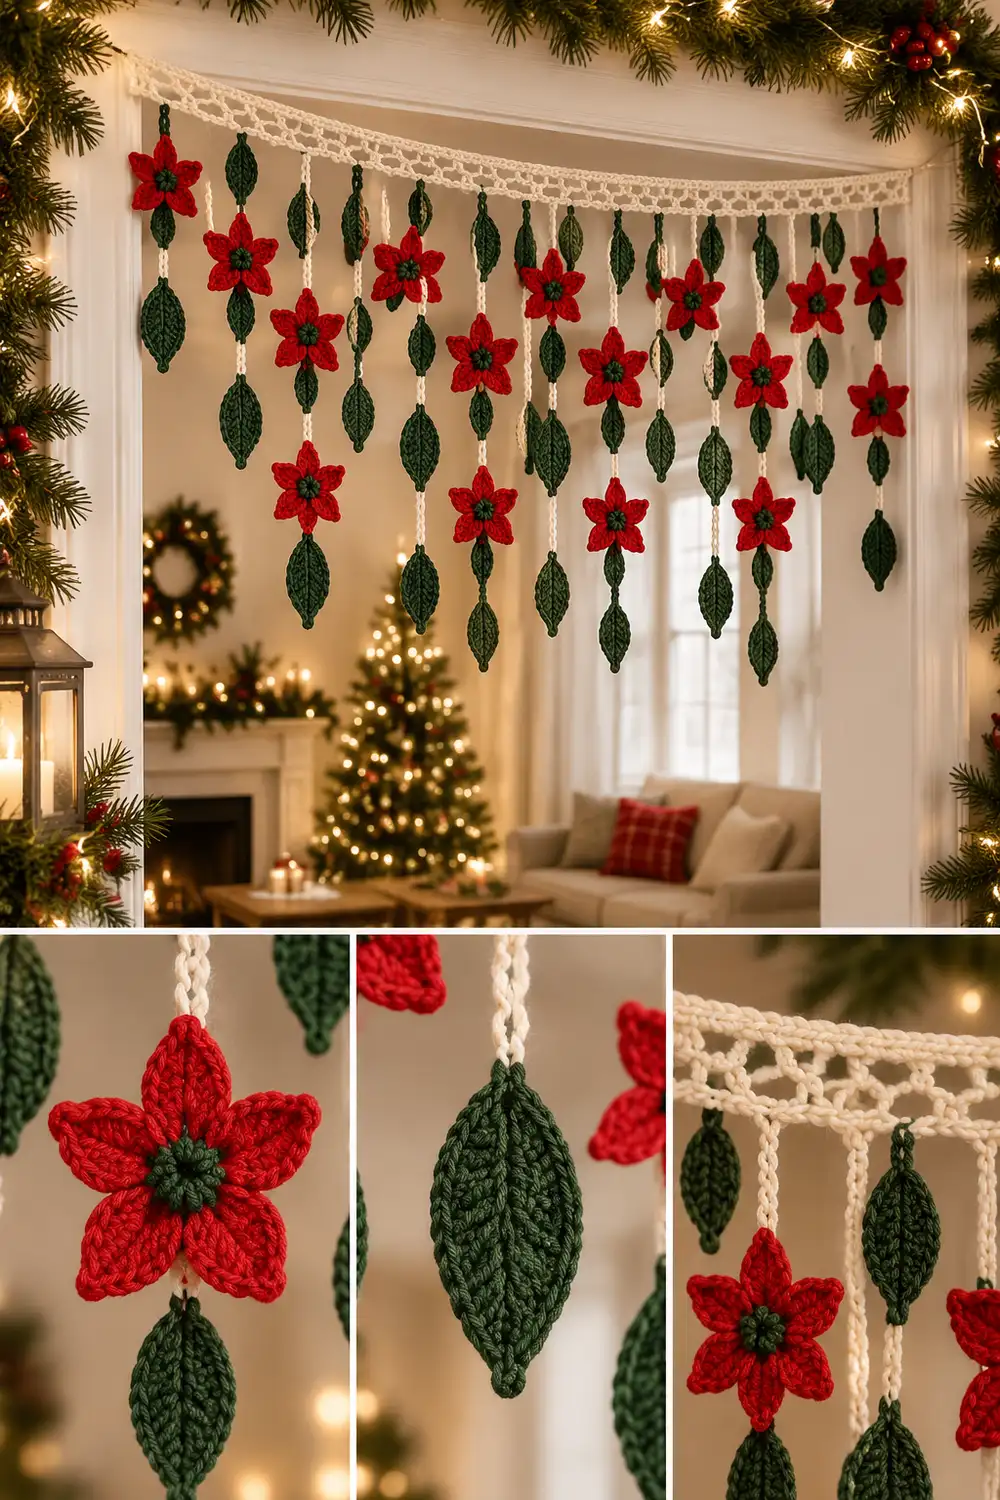
This hanging garland brings a classic holiday look to a doorway, window, or mantel wall. Bright red poinsettia flowers alternate with dark forest green leaves along cream cords, all suspended from a cream header strip that runs across the top.
Each flower has five rounded petals worked around a dark green center. A back-loop ridge gives the petals visible texture. The leaves are elongated and pointed, with a raised surface-stitched midrib. The style is clean and graphic, and it reads clearly from across a room.
The pattern uses US crochet terms. The finished garland measures 24.75 in (62.9 cm) wide and about 19 in (48.3 cm) tall from the top of the header to the bottom of the longest strand.
You will make one header strip, eight cream cords, 20 flowers, and 20 leaves. You sew the motifs onto the cords and attach the cords to the header’s foundation edge. A one-round border then locks everything in place.
Finished Size and Construction
- Finished size: 24.75 in (62.9 cm) wide x about 19 in (48.3 cm) tall
- Skill level: Advanced beginner
- Terminology: US crochet terms
- Yarn weight: Worsted (#4)
- Hook: 4.5 mm (US 7)
- Number of pieces: 49 (1 header, 8 cords, 20 flowers, 20 leaves)
- Layout: 8 hanging strands, alternating Strand A and Strand B, spaced 3 in (7.6 cm) apart
- Piece sizes: flower 2.5 in (6.4 cm) across; leaf 1.75 in (4.4 cm) long; Strand A 16.25 in (41.3 cm); Strand B 17 in (43.2 cm)
- Header size before border: 24.25 in x about 1.5 in (61.6 cm x 3.8 cm)
- Border depth: 0.25 in (0.6 cm) per edge, giving a 24.75 in x 2 in (62.9 cm x 5.1 cm) header
Materials
Yarn: Use a smooth worsted weight yarn in acrylic, cotton, or a cotton blend. Cotton gives crisper petals and leaf points. Acrylic is lighter and less likely to stretch the cords. Avoid fuzzy or highly textured yarns, because they hide the petal ridge and the leaf midrib.
- Bright red (flowers): 70 g, about 130 m
- Dark forest green (leaves and flower centers): 50 g, about 90 m
- Cream or off-white (header, cords, sewing): 100 g, about 180 m
All quantities include a margin for gauge swatches, sewing tails, and small tension differences.
Tools:
- 4.5 mm (US 7) crochet hook
- Tapestry needle
- Stitch markers (at least 10)
- Scissors
- Measuring tape
- Blocking mat, rust-proof pins, and a spray bottle
Abbreviations (US Terms)
- ch – chain
- sl st – slip stitch
- sc – single crochet
- hdc – half double crochet
- dc – double crochet
- st(s) – stitch(es)
- sp – space
- BLO – back loop only
- MR – magic ring
- rnd – round
- RS – right side
Special stitch – surface slip stitch: Hold the working yarn behind the work. Insert the hook from front to back through the fabric, yarn over, and pull a loop through the fabric and through the loop on the hook. Repeat, moving a short distance each time. This creates a raised chain line on the front.
Back-bump sl st: Work the sl st into the bump on the back of the chain instead of the top loops. This gives a neat, firm cord.
Gauge and Checkpoints
Gauge: 16 sc and 18 rows = 4 in (10.2 cm) in sc rows.
Cord gauge: 4 back-bump sl st = 1 in (2.5 cm).
Make one flower and one leaf before anything else. They are your real gauge test.
Checkpoints:
- Flower, after Rnd 2: about 1.25 in (3.2 cm) across.
- Finished flower: 2.5 in (6.4 cm) from petal edge to opposite valley edge.
- Finished leaf: 1.75 in (4.4 cm) long and 0.75–1 in (1.9–2.5 cm) wide.
- Header, Row 1: the first 40 sc measure 10 in (25.4 cm).
- Cord: 20 sl st measure 5 in (12.7 cm).
If your pieces are too big, go down one hook size (4.0 mm). If they are too small, go up one size (5.0 mm). Cord gauge matters most for the strand lengths. If your cord is off, change hooks for the cords only.
Pattern
Flower (make 20)
Rnd 1 (green): MR, ch 1, 10 sc in ring, sl st to first sc. Pull the ring closed. (10 sc) Fasten off green.
Rnd 2 (red): Join red in any sc, ch 1, 2 sc in each st around, sl st to first sc. (20 sc)
Check that the piece is about 1.25 in (3.2 cm) across.
Rnd 3 (petals, worked in BLO): Ch 1. Sc in next st, (hdc, dc, dc) in next st, (dc, dc, hdc) in next st, sc in next st. Repeat from * 4 more times. Sl st to first sc.
This round uses 4 sts per petal x 5 petals = 20 sts, which matches Rnd 2. It makes 8 sts per petal. (40 sts, 5 petals)
The two sc at each petal junction form the valley between petals. The dc pairs form the rounded petal tops. The unused front loops of Rnd 2 leave a raised ring around the center, which gives the texture detail.
Fasten off and leave a 12 in (30.5 cm) red tail for sewing. Weave in the green tail.
Leaf (make 20)
Foundation (green): Ch 8.
Rnd 1: Sl st in 2nd ch from hook, sc in next ch, hdc in next ch, dc in each of next 2 ch, hdc in next ch, (sc, ch 2, sc) in last ch for the tip.
Rotate the piece. Working in the opposite side of the foundation chain, hdc in next ch, dc in each of next 2 ch, hdc in next ch, sc in next ch, sl st in the ch that holds the first sl st. (14 sts plus one ch-2 tip)
The sl st at the base and the ch-2 at the tip give the leaf its elongated, pointed shape.
Midrib: With the RS facing and the green tail, work surface slip stitch along the foundation-chain line, from the base to just below the tip. Use about 7 surface sl st. Fasten off and leave a 10 in (25.4 cm) tail.
Check that the leaf is 1.75 in (4.4 cm) long.
Header Strip (make 1)
Foundation (cream): Ch 98.
Row 1: Sc in 2nd ch from hook and in each ch across, turn. (97 sc)
Rows 2–7: Ch 1 (does not count as a st), sc in each st across, turn. (97 sc)
Do not fasten off. Keep the loop on a marker for the border.
Check that the header measures 24.25 in x about 1.5 in (61.6 cm x 3.8 cm).
Cords (make 4 of each)
Cord A (cream): Ch 66. Work a back-bump sl st in the 2nd ch from hook and in each ch across. (65 sl st = 16.25 in / 41.3 cm)
Cord B (cream): Ch 69. Work a back-bump sl st in the 2nd ch from hook and in each ch across. (68 sl st = 17 in / 43.2 cm)
Leave an 8 in (20.3 cm) tail at the starting end of each cord. This end is the top, and you will attach it to the header.
Make All Pieces
Quantities:
- Red: 20 flowers (Strand A uses 2 each x 4 = 8; Strand B uses 3 each x 4 = 12)
- Green: 20 leaves (Strand A uses 3 each x 4 = 12; Strand B uses 2 each x 4 = 8) and 20 flower centers
- Cream: 1 header strip, 4 of Cord A, 4 of Cord B
Pin the flowers and leaves to size, mist them lightly, and let them dry before you assemble the strands.
Strand order (left to right): A B A B A B A B
Layout grid (motif order down each strand):
ROW 1: LEAF   FLOWER LEAF   FLOWER LEAF   FLOWER LEAF   FLOWER
ROW 2: FLOWER LEAF   FLOWER LEAF   FLOWER LEAF   FLOWER LEAF
ROW 3: LEAF   FLOWER LEAF   FLOWER LEAF   FLOWER LEAF   FLOWER
ROW 4: FLOWER LEAF   FLOWER LEAF   FLOWER LEAF   FLOWER LEAF
ROW 5: LEAF   FLOWER LEAF   FLOWER LEAF   FLOWER LEAF   FLOWER
Flowers and leaves have different heights, so the rows shift slightly as they go down. This creates a gentle staggered effect.
Joining
Step 1: Mark the cords
Count sl sts from the top (tail) end of each cord and place markers.
Cord A: markers in sts 8, 15, 19, 29, 33, 40, 44, 54, 58, and 65. The motifs go in this order:
- Leaf: sts 9–15
- Flower: sts 20–29
- Leaf: sts 34–40
- Flower: sts 45–54
- Leaf: sts 59–65
This gives a 2 in (5.1 cm) bare top, 1 in (2.5 cm) gaps between motifs, and the last leaf ending at the cord’s end.
Cord B: markers in sts 8, 18, 22, 29, 33, 43, 47, 54, 58, and 68. The motifs go in this order:
- Flower: sts 9–18
- Leaf: sts 23–29
- Flower: sts 34–43
- Leaf: sts 48–54
- Flower: sts 59–68
The math: At 4 sts per inch, a leaf spans 7 sts (1.75 in) and a flower spans 10 sts (2.5 in).
- Cord A: 8 + 7 + 4 + 10 + 4 + 7 + 4 + 10 + 4 + 7 = 65 sts
- Cord B: 8 + 10 + 4 + 7 + 4 + 10 + 4 + 7 + 4 + 10 = 68 sts
Step 2: Sew the motifs
Lay each motif RS up over its marked section, with the cord running behind it through the center.
- Leaves: align the leaf vertically. Sew the base and tip to the cord with the green tail, then add two tacks along the midrib.
- Flowers: point one petal down. Use the red tail to sew around Rnd 2, catching the cord every 2–3 sts.
Sew through the back loops only so the stitches stay hidden. Keep the tension snug but not puckered.
Step 3: Attach the cords to the header
Number the 97 foundation-chain loops on the bottom edge of the header from 1 to 97, starting at the right edge. Attach cords at loops 7, 19, 31, 43, 55, 67, 79, and 91.
Check the spacing: 6 loops + 8 cord loops + (7 gaps x 11 loops) + 6 loops = 97. Each strand sits 12 sts (3 in / 7.6 cm) from the next, with equal 6-st margins at each end.
Thread each cord’s top tail through its loop. Sew back into the cord twice and leave the tail hanging. The border will lock it in place.
Size checkpoint: Hang the header. The strands should be 3 in (7.6 cm) apart. Cord A should hang 16.25 in (41.3 cm) and Cord B should hang 17 in (43.2 cm).
Border
Border gauge: 4 sc per inch, the same as the header. The border is worked around the header strip only.
Rnd 1 (sc): With the working loop from Row 7, ch 1.
- Top edge: 3 sc in the first st, sc in each of the next 95 sts, 3 sc in the last st. This is 97 sts worked into, giving 101 sc including both corner groups.
- Left side: 1 sc in each of the row ends of Rows 2–6. (5 sc)
- Bottom edge: working into the foundation chain, 3 sc in loop 97, sc in each of loops 96–2, 3 sc in loop 1. (101 sc including both corner groups)
- At each strand position (loops 7–91): work the sc through the loop and the cord top together, then pull the cord tail to the back.
- Right side: 1 sc in each of the row ends of Rows 2–6. (5 sc)
Sl st to the first sc.
Round total: (194 sc worked 1 per st on top and bottom + 10 sc worked 1 per row end on the sides) + 8 extra corner sc (2 at each of 4 corners) = 212 sc.
Rnd 2 (sl st and hanging loops): Sl st in each st around. At each top corner center sc: sl st, ch 12, sl st in the same st. Sl st to the first st. (214 sl st plus two ch-12 hanging loops)
Why the math works:
- One sc per st keeps the width at 4 sc per inch, so the strand spacing stays exactly 3 in (7.6 cm).
- Three sc in each corner turns the 90° corner flat.
- On the short sides, 5 row ends at 4.5 rows per inch take 5 sc. This keeps the edge flat over about 1.1 in (2.8 cm).
- The border adds 0.25 in (0.6 cm) per edge, bringing the header to 24.75 in x 2 in (62.9 cm x 5.1 cm).
Weave in all cord tails along the back of the header.
Final Blocking
- Lay the garland flat on a blocking mat, RS up.
- Pin the header to 24.75 in x 2 in (62.9 cm x 5.1 cm), keeping the edges straight.
- Straighten each cord and check that the strands are 3 in (7.6 cm) apart.
- Re-pin the petal edges to 2.5 in (6.4 cm) and the leaf tips to 1.75 in (4.4 cm).
- Mist evenly with water. Use light steam instead for acrylic, held above the yarn and never touching it.
- Let the garland dry completely, at least 12 hours.
- Unpin it and hang it for a day so the cords settle to their final length.
Final Quality-Control Checklist
- The header measures 24.75 in x 2 in (62.9 cm x 5.1 cm) and lies flat.
- There are 8 strands in the order A B A B A B A B, spaced 3 in (7.6 cm) apart.
- Cord A hangs 16.25 in (41.3 cm) and Cord B hangs 17 in (43.2 cm).
- Each flower has 5 rounded petals and a green center, and measures 2.5 in (6.4 cm).
- Each leaf is pointed at both ends, has a visible midrib, and measures 1.75 in (4.4 cm).
- No sewing stitches show on the RS.
- All tails are woven in, and both hanging loops are secure.
Troubleshooting
- The flower cups: Your Rnd 2 is too tight. Go up a hook size for Rnd 2 only.
- The petals blur together: Make sure there are two sc in each valley and that Rnd 3 is worked in BLO.
- The leaf curls: Block it pinned flat. Loosen the surface sl sts on the midrib.
- The cords twist: Lightly steam them while they are hanging and weighted.
- The cords are longer than stated: Use a smaller hook for the cords or switch to acrylic. Re-measure 20 sts = 5 in (12.7 cm).
- The header puckers at the strands: Your tension was too tight when attaching cords in Step 3. Loosen and re-sew the cords.
- The header waves: Rnd 1 is too loose. Rework it with a smaller hook.
Care
Spot clean or hand wash in cool water, press out the water gently, and dry flat with the cords straightened. Store the garland flat or loosely rolled around a tube to avoid tangling.
Final Notes
The measurement chain is simple:
- Gauge: 4 sc per inch gives a 97-st header of 24.25 in (61.6 cm).
- Border: one sc round brings the header to 24.75 in (62.9 cm).
- Spacing: strands every 12 sts sit 3 in (7.6 cm) apart.
- Cords: at 4 sl st per inch, Cord A is 16.25 in (41.3 cm) and Cord B is 17 in (43.2 cm).
- Motifs: 2.5 in (6.4 cm) flowers and 1.75 in (4.4 cm) leaves fit the marked sections exactly.
Optional: for a wider doorway, add strands in multiples of 12 header sts and keep the A/B order.
Happy crocheting!