

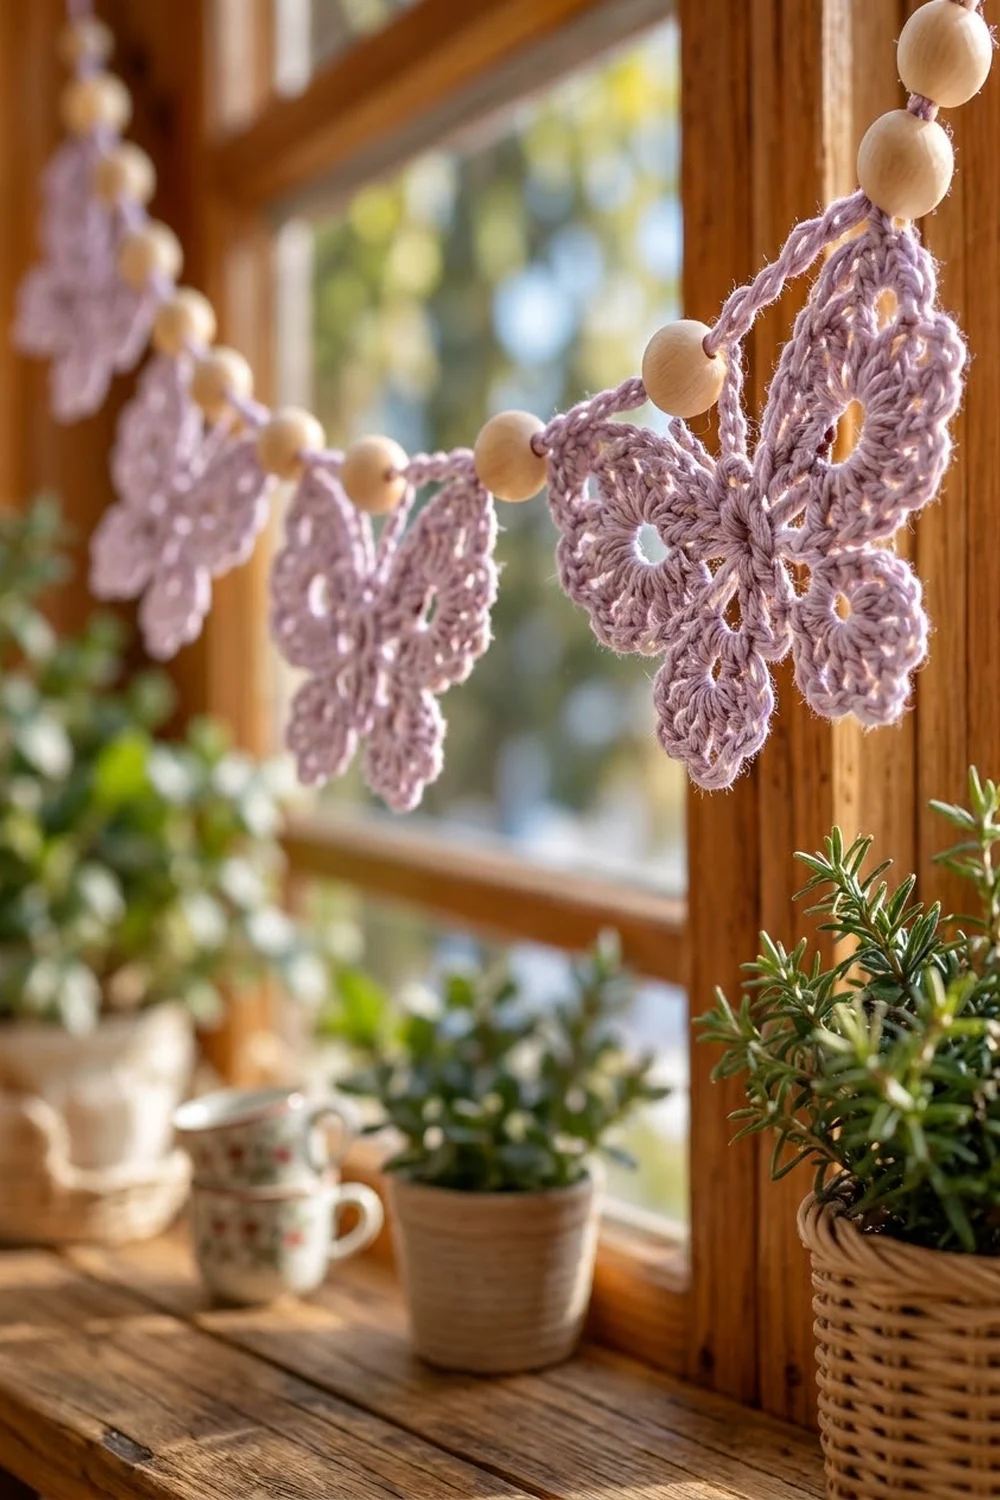
The Lavender Flutter Butterfly Garland is a light, airy string of seven lacy butterflies in soft pastel lavender. Wooden beads sit between the butterflies on a simple chain cord. It looks lovely across a window, over a mantel, or above a nursery shelf, and the plain wood beads set off the lavender nicely.
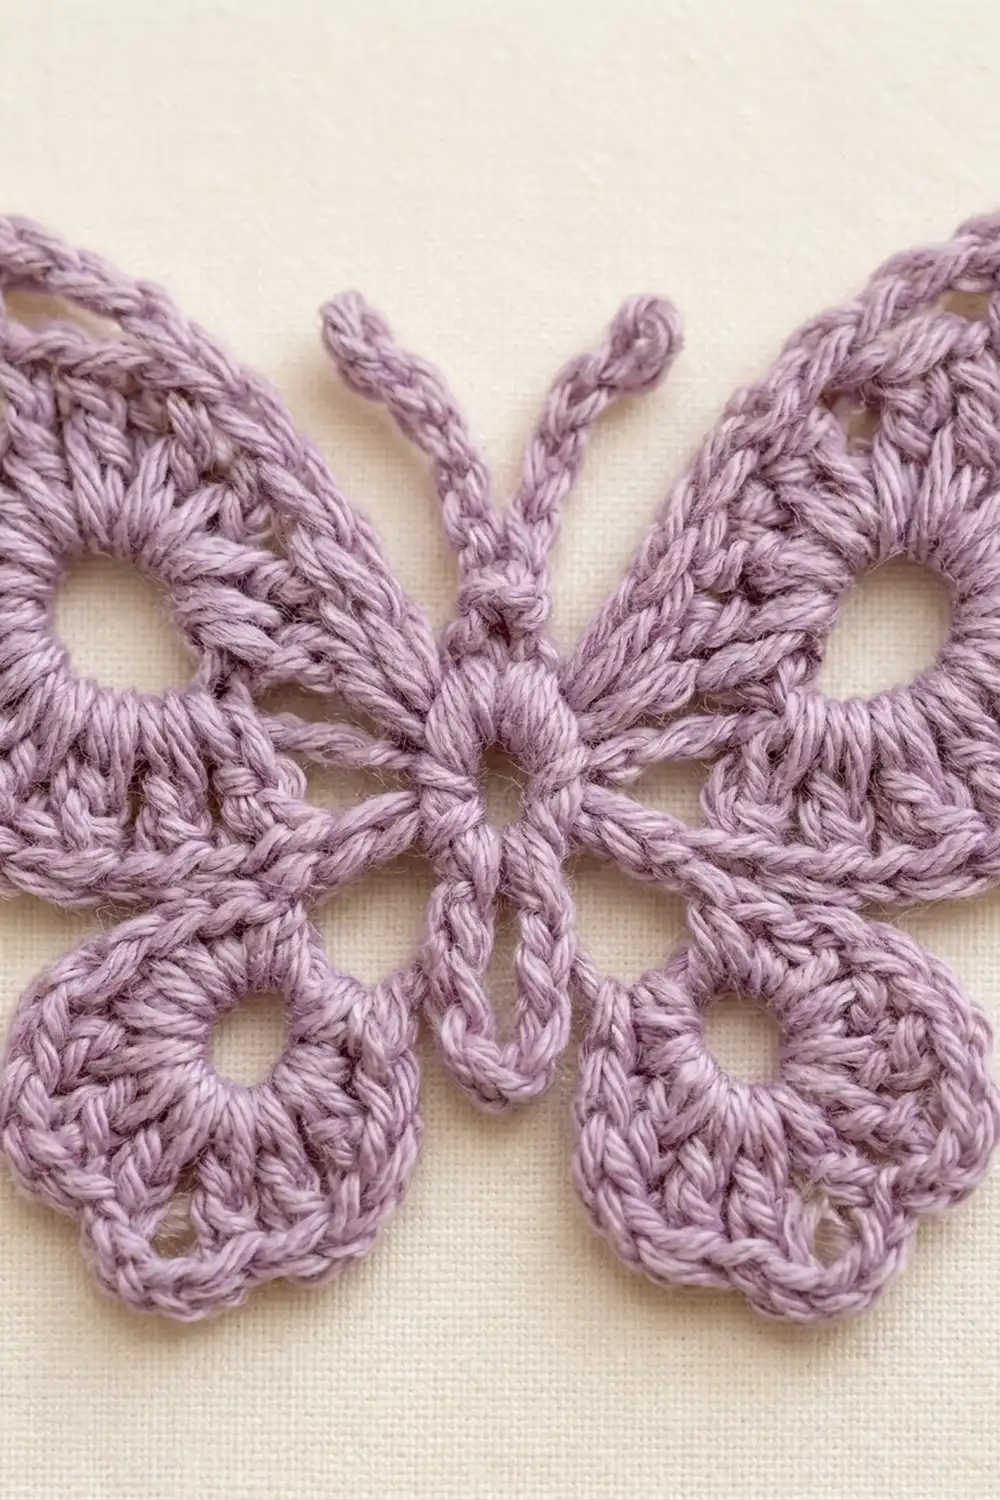
Each butterfly is made in one piece. It starts from a small center ring and builds out into four wings: two larger upper wings with pointed tips and two smaller rounded lower wings. Every wing has a round eyelet hole near the body, so the motif looks lacy without being fussy.
This pattern uses US crochet terms. Each butterfly is 3.75 in (9.5 cm) wide and 3 in (7.6 cm) tall, not counting the antennae. The row of seven butterflies is 36 in (91.4 cm) long. The full garland measures 53.5 in (135.9 cm) from the end of one hanging loop to the end of the other.
Here is the order of work. Make seven butterflies, block them flat, and thread eight beads onto the yarn. Then crochet the cord and join each butterfly to it as you go, with a slip stitch into the tip of each upper wing.
Finished Size and Construction
- Finished size: 53.5 in (135.9 cm) end to end, including the hanging loops
- Butterfly row: 36 in (91.4 cm)
- Skill level: Easy (beginner-friendly, but you need to know tr)
- Terminology: US
- Yarn weight: DK (light, #3) cotton or cotton blend
- Hook: 3.5 mm (US E-4)
- Number of pieces: 7 butterflies + 1 cord
- Layout: 1 row of 7 butterflies, with a bead between each pair
- Piece size: 3.75 in × 3 in (9.5 cm × 7.6 cm); about 3 in (7.6 cm) between the two upper wing tips
- Size before border: 7 separate butterflies
- Border depth: the chain cord is about 0.25 in (0.6 cm) thick; the beads are 0.5 in (1.3 cm) wide
Materials
Yarn: Choose a smooth, mercerized DK cotton. It shows the stitches clearly, blocks crisply, and keeps the wing tips sharp. Fuzzy yarns blur the eyelet holes. The amounts below assume about 2.3 m per gram.
- Lavender: 40 g (92 m) in total
- Butterflies: about 4 g (9 m) each, so 28 g (64 m) for all seven
- Cord: about 3 g (7 m)
These quantities already include a safety margin of about 9 g (21 m) for swatching, tails, and fixing mistakes.
Tools:
– 3.5 mm (US E-4) crochet hook
– 8 natural wooden beads, 0.5 in (1.3 cm) wide (about 12 mm), with holes at least 4 mm across
– Tapestry needle
– Big-eye beading needle or dental floss threader, for stringing the beads
– Rust-proof pins and a blocking mat
– Spray bottle
– Scissors
– Measuring tape
Abbreviations (US Terms)
- ch – chain
- sl st – slip stitch
- sc – single crochet
- hdc – half double crochet
- dc – double crochet
- tr – treble crochet
- sk – skip
- st(s) – stitch(es)
- sp – space
- RS – right side
- MR – magic ring
Special stitch: bead chain (bch). Slide one pre-strung bead up against the hook. Yarn over beyond the bead and pull through the loop on the hook. The bead is now locked inside that chain. One bch counts as 1 stitch. It is listed separately from the regular chains so the cord counts are easy to check.
Gauge and Checkpoints
Make one complete butterfly before you start the rest. Gauge for this design is set by the butterfly itself and by the chain cord.
- After Round 1: the ring is 0.75 in (1.9 cm) across.
- After Round 3: the butterfly is about 3.25 in (8.3 cm) wide.
- After Round 4: 3.75 in × 3 in (9.5 cm × 7.6 cm), with the upper wing tips 3 in (7.6 cm) apart.
- Cord gauge: 16 ch = 4 in (10.2 cm), measured without stretching.
A difference of up to 0.25 in (0.6 cm) is fine. If your butterfly is too big, go down to a 3.25 mm hook. If it is too small, go up to a 3.75 mm hook. If only the tip-to-tip distance is off, keep your hook and change the cord span later (see Border).
Butterfly Pattern (Make 7)
To make the stitch positions easy to follow, the 12 sc of Round 1 are named A1 to A12, going clockwise. Hold the work RS facing. A12 is the head (top center) and A6 is the tail (bottom center).
Round 1 (center ring): Make a MR. Ch 1, then work 12 sc into the ring. Pull the ring snug but leave a small hole. Sl st to the first sc. (12 sc)
Checkpoint: 0.75 in (1.9 cm) across.
Round 2 (wing loops): Ch 1, sc in the same st (A1).
– Ch 12, sk 2 sc, sc in A4. This is the upper right wing loop.
– Ch 8, sk 1 sc, sc in A6. This is the lower right wing loop.
– Ch 8, sk 1 sc, sc in A8. This is the lower left wing loop.
– Ch 12, sk 2 sc, sc in A11. This is the upper left wing loop.
Leave A12 unworked. Sl st to the first sc (A1).
(5 sc in A1, A4, A6, A8, A11 + two ch-12 loops + two ch-8 loops)
Each chain loop and the edge of the ring around it will become one wing’s round eyelet.
Round 3 (wing fans): Work every stitch into the chain loop, not into individual chains.
– Upper right wing, in the first ch-12 loop: sc, hdc, 3 dc, 4 tr, ch 2, 4 tr, 3 dc, hdc, sc. Sl st in A4. (18 sts + ch-2 tip)
– Lower right wing, in the next ch-8 loop: sc, hdc, 7 dc, hdc, sc. Sl st in A6. (11 sts)
– Lower left wing, in the next ch-8 loop: sc, hdc, 7 dc, hdc, sc. Sl st in A8. (11 sts)
– Upper left wing, in the last ch-12 loop: sc, hdc, 3 dc, 4 tr, ch 2, 4 tr, 3 dc, hdc, sc. Sl st in A11. (18 sts + ch-2 tip)
– Sl st in A12, then sl st in A1.
(Round total: 58 sts = 18 + 11 + 11 + 18, plus 2 ch-2 tips. The sl sts don’t count.)
The tr in the middle of each upper wing make it tall, and the ch-2 becomes the point. The lower wings use dc only, so they stay short and round.
Round 4 (edging): This is a trim round. Work 1 sc in every stitch, plus extra stitches in the tr and the tips.
– Upper right wing: sc in the sc, sc in the hdc, sc in each of the 3 dc, 2 sc in each of the 4 tr, (2 sc, ch 2, 2 sc) in the ch-2 sp, 2 sc in each of the 4 tr, sc in each of the 3 dc, sc in the hdc, sc in the sc. Sl st in A4. (18 worked 1-per-stitch + 8 extra in the tr + 4 in the tip = 30 sc)
– Lower right wing: sc in the sc, sc in the hdc, sc in the first dc, 2 sc in each of the next 5 dc, sc in the last dc, sc in the hdc, sc in the sc. Sl st in A6. (11 + 5 extra = 16 sc)
– Lower left wing: work as for the lower right wing. Sl st in A8. (16 sc)
– Upper left wing: work as for the upper right wing. Sl st in A11. (30 sc)
(Round total: 58 + 26 extra + 8 in the tips = 92 sc, plus 2 ch-2 points)
This sc edge gives the outline its beaded look. The extra stitches over the tall tr let the wings lie flat instead of cupping.
Checkpoint: 3.75 in × 3 in (9.5 cm × 7.6 cm), with the tips 3 in (7.6 cm) apart.
Antennae: Sl st in A12.
– Ch 8. Sl st in the 2nd ch from the hook and in each of the next 6 ch, then sl st in A12. (7 sl sts)
– Make a second antenna the same way and sl st in A12.
Fasten off. Each antenna stands about 0.75 in (1.9 cm) above the head. Curl the tips with your fingers while blocking.
Body tail: Join the yarn with a sl st in A6. Ch 5. Sl st in the 2nd ch from the hook and in each of the next 3 ch, then sl st in A6. (4 sl sts) Fasten off. The tail hangs about 0.5 in (1.3 cm) below the center.
Weave in all ends along the back of the edging.
Make All Pieces
- Lavender butterflies: 7
- Cord: 1, crocheted last, with 8 beads threaded on before you start
Layout grid, from left to right:
CORD: LOOP – BEAD – B1 – BEAD – B2 – BEAD – B3 – BEAD – B4 – BEAD – B5 – BEAD – B6 – BEAD – B7 – BEAD – LOOP
ROW 1: LAVENDER LAVENDER LAVENDER LAVENDER LAVENDER LAVENDER LAVENDER
Block all seven butterflies to 3.75 in × 3 in (9.5 cm × 7.6 cm) before joining. Flat butterflies make the tip-to-tip spacing reliable.
Joining
Method: The butterflies are joined to the cord as you crochet it. On each butterfly, the ch-2 tips of the two upper wings are the only places that touch the cord.
Stitch logic: Hold the butterfly RS facing with its head up, just below the cord.
– When the pattern says to join the left tip, insert the hook into the ch-2 tip sp of the upper left wing and sl st.
– Chain the span.
– Then sl st into the ch-2 tip sp of the upper right wing.
The sl st locks the cord to the tip without adding any length.
Tension: Keep the span chains at the same tension as your gauge chain. If the span is too tight, the wing tips get pulled toward each other and the butterfly folds. If it is too loose, the butterfly droops and tilts.
Size checkpoint: After joining Butterfly 2, lay the work flat. From the left tip of B1 to the right tip of B2 should measure 3 + 2.5 + 3 = 8.5 in (21.6 cm).
Border: Beaded Hanging Cord
On a garland, the cord acts as the border. It is worked in one pass, and each section has a fixed count.
Border gauge: 16 ch = 4 in (10.2 cm), so 4 ch = 1 in (2.5 cm). Each bch adds 0.5 in (1.3 cm).
Preparation: Use the beading needle to thread all 8 beads onto the yarn, then push them down the ball end and out of the way.
Starting end:
– Ch 10, sl st in the first ch to make the hanging loop. (10 ch)
– Ch 24. This lead is 6 in (15.2 cm).
– Bch.
– Ch 4. This is 1 in (2.5 cm).
– (Lead section: 28 ch + 1 bch = 7.5 in / 19.1 cm)
Butterflies 1 to 6:
– Sl st in the left tip of the butterfly.
– Ch 12 for the span, which is 3 in (7.6 cm).
– Sl st in the right tip.
– Ch 4, bch, ch 4. This gap is 2.5 in (6.4 cm).
– (Each repeat: 12 span ch + 8 gap ch + 1 bch)
Butterfly 7: Sl st in the left tip, ch 12, sl st in the right tip.
Finishing end:
– Ch 4, bch, ch 24.
– Ch 10, sl st in the 11th ch from the hook to close the loop.
– Fasten off and weave in the ends.
Counts:
– Spans: 7 × 12 = 84 ch
– Gaps: 6 × 8 = 48 ch + 6 bch
– Leads: 2 × 28 = 56 ch + 2 bch
– Cord total between the loops: 84 + 48 + 56 = 188 ch + 8 bch
– Loops: 2 × 10 = 20 ch
Why the math works:
– 188 ch ÷ 4 = 47 in (119.4 cm). The 8 beads add 4 in (10.2 cm), for 51 in (129.5 cm) between the loops.
– Each loop hangs 1.25 in (3.2 cm), which brings the total to 53.5 in (135.9 cm).
– The butterfly row is 132 ch (84 + 48) = 33 in, plus 6 beads at 3 in, for 36 in (91.4 cm).
– Each 12-ch span measures 3 in, the same as the butterfly’s tip-to-tip distance. That is why the butterflies hang flat without being stretched or bunched.
If your tips measure 2.75 in (7.0 cm) instead, use 11 span ch. If they measure 3.25 in (8.3 cm), use 13 span ch. Use the same number for all seven spans.
Final Blocking
- Lay the garland flat on a blocking mat, with the cord in a straight line.
- Measure and pin the cord: 36 in (91.4 cm) from the first wing tip to the last.
- Pin each butterfly to 3.75 in × 3 in (9.5 cm × 7.6 cm). Put one pin in each wing tip and one in each lower wing.
- Pin each eyelet open into a neat circle, using a pin in the center hole.
- Shape the antennae into small outward curls.
- Mist evenly until damp, but not soaked.
- Leave it to dry completely, about 6 to 8 hours, before unpinning.
Final Quality-Control Checklist
- [ ] There are 7 butterflies, each 3.75 in × 3 in (9.5 cm × 7.6 cm).
- [ ] Every butterfly has four open eyelets and a center hole.
- [ ] Each upper wing has 30 sc and each lower wing has 16 sc in Round 4.
- [ ] Both antennae and the tail are present and curled or straight as intended.
- [ ] Every span is 12 ch and every gap is ch 4, bch, ch 4.
- [ ] There are 8 beads: 6 between butterflies and 1 near each end.
- [ ] The butterfly row is 36 in (91.4 cm) and the garland is 53.5 in (135.9 cm) overall.
- [ ] All ends are woven in invisibly.
Troubleshooting
- Wings cup or ruffle: Check the extra stitches in Round 4. Too few makes the wings cup, and too many makes them ruffle. Recount: each upper wing should have 30 sc.
- Eyelets closed up: The Round 2 chains were too tight. Chain more loosely, or go up half a hook size for Round 2 only.
- Butterfly folds on the cord: The span is too short. Add 1 ch to every span.
- Butterfly droops or tilts: The span is too long, or the sl st went into the wrong stitch. Make sure it goes into the ch-2 tip itself.
- Bead won’t slide: The bead hole is too small. Use beads with holes of 4 mm or more.
- Center hole too big: Pull the magic ring tighter before weaving in that end.
Care
Hand wash in cool water, roll in a towel to remove moisture, and dry flat, pinned to shape. Keep it out of strong direct sun so the lavender doesn’t fade.
Final Notes
Here is how the measurements build on each other:
– The ring is 0.75 in (1.9 cm) after Round 1.
– The butterfly is 3.25 in (8.3 cm) wide after Round 3.
– The finished butterfly is 3.75 in × 3 in (9.5 cm × 7.6 cm), with tips 3 in (7.6 cm) apart.
– Each 12-ch span is 3 in and each beaded gap is 2.5 in (6.4 cm).
– Together they make a 36 in (91.4 cm) butterfly row and a 53.5 in (135.9 cm) garland.
If each measurement matches at its checkpoint, the next one will too. Take your time with the first butterfly, and the other six and the cord will go quickly.
Happy crocheting!