

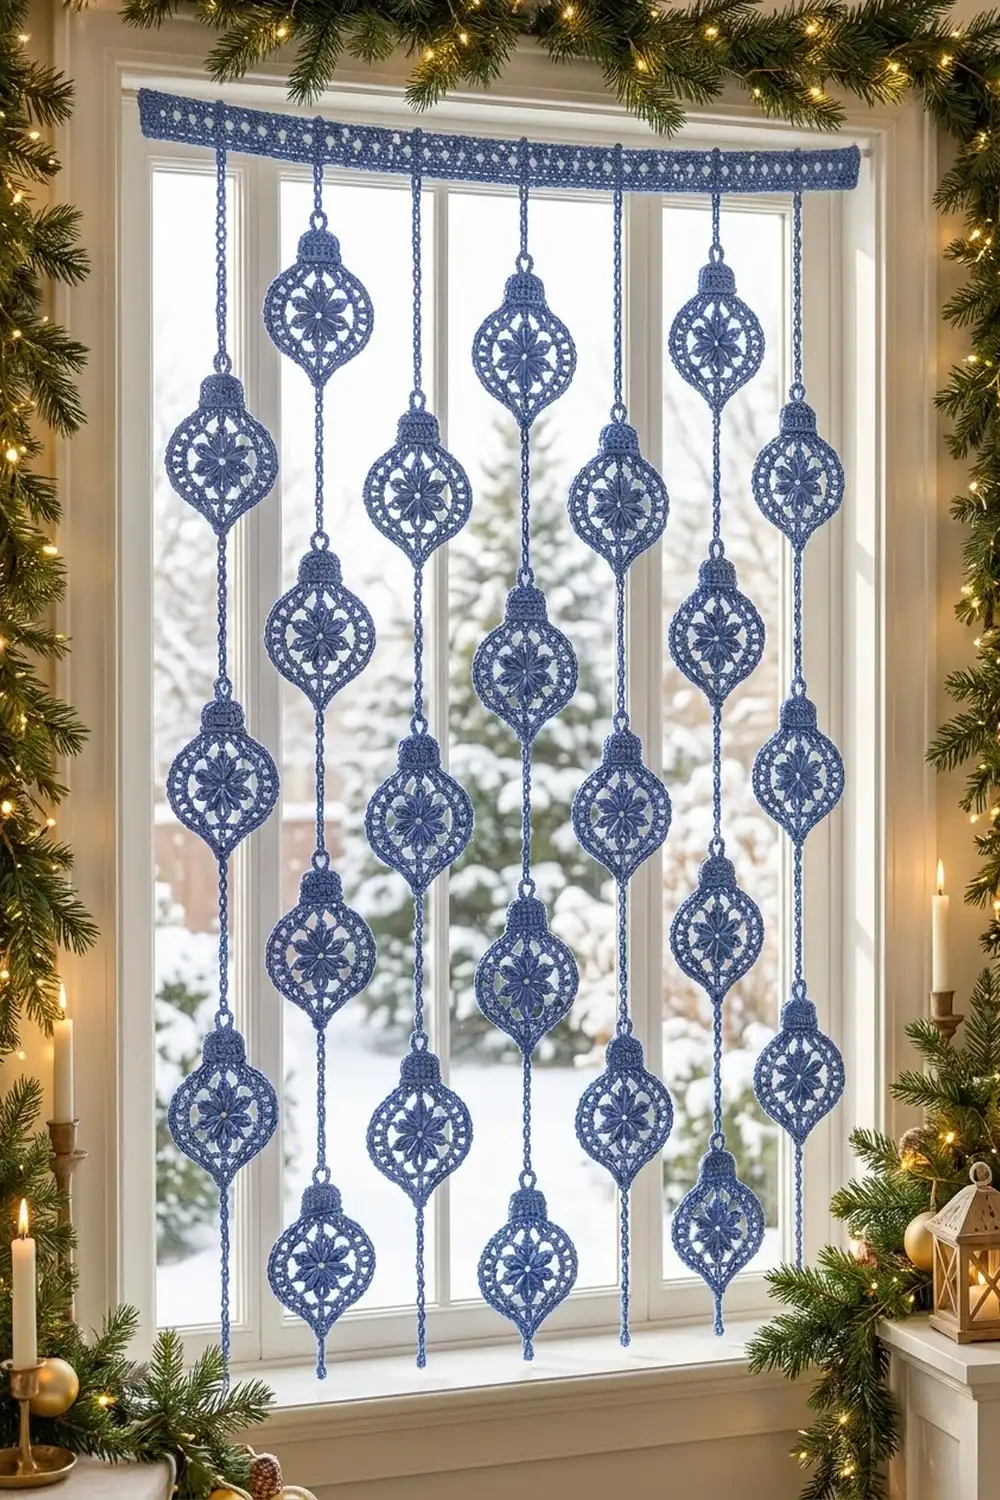
This lace curtain is made from rows of crochet bauble ornaments hanging on fine chain strands from a slim mesh band. Each ornament has an eight-petal flower in the center, an open mesh ring, a pointed lacy edge and a little ridged cap, so it reads as a Christmas bauble while still letting plenty of light through the window.
The whole curtain uses one color: a soft cornflower blue in smooth mercerized cotton. Using one color keeps the attention on the lace texture and on the staggered pattern of the ornaments, which alternate in height from strand to strand.
The pattern uses US crochet terms. The finished curtain measures 36.2 in (91.9 cm) wide and 43.75 in (111.1 cm) long, with 7 strands and 24 ornaments.
You crochet the ornaments one at a time in the round, link them into strands with chain segments, then make the top band and chain each strand up to it. Nothing is sewn. Every connection is a chain worked straight into a loop.
Finished Size and Construction
- Finished size: 36.2 in (91.9 cm) wide x 43.75 in (111.1 cm) long
- Skill level: Intermediate
- Terminology: US crochet terms
- Yarn weight: Sport (2), mercerized cotton
- Hook: 3.0 mm
- Number of pieces: 24 ornament motifs + 1 top band
- Layout: 7 vertical strands, alternating 3 and 4 ornaments, staggered
- Piece size: each ornament is 3.5 in (8.9 cm) wide x 5 in (12.7 cm) tall, including its hanging loop
- Size before border: strands measure 38 in (96.5 cm) for 4-ornament strands and 33 in (83.8 cm) for 3-ornament strands, from top hanging loop to tail end
- Border depth: a 1.75 in (4.4 cm) top band, plus drop chains of 4 in (10.2 cm) or 9 in (22.9 cm)
Materials
Yarn: Use a smooth, tightly plied mercerized cotton in sport weight, about 140 m per 50 g. Cotton holds the lace shape and doesn’t stretch much under its own weight, which matters for a hanging piece. Avoid fuzzy or very stretchy acrylic.
- Cornflower blue: 200 g, about 560 m (four 50 g balls)
This covers 24 ornaments at about 5 g each (120 g), the band (about 30 g) and the chains (about 10 g). Quantities include a margin of about 40 g for swatching and the occasional redo.
Tools:
– 3.0 mm crochet hook
– Tapestry needle
– Stitch markers
– Rust-proof pins and a blocking board
– Tape measure
– Spray starch (optional)
– Curtain rod or tension rod, 36 in (91.4 cm) or wider
Abbreviations (US Terms)
- ch – chain
- sl st – slip stitch
- sc – single crochet
- hdc – half double crochet
- dc – double crochet
- tr – treble crochet
- sc2tog – single crochet 2 together
- blo – back loop only
- sk – skip
- sp – space
- st(s) – stitch(es)
- RS – right side
Special stitches:
- Petal cluster (PC): Yarn over twice, insert hook in the stitch, pull up a loop, [yarn over, pull through 2 loops] twice; repeat from * to * 2 more times in the same stitch (4 loops on hook), yarn over and pull through all 4 loops.
- Beginning petal cluster (beg PC): Ch 4 (counts as first tr), then work the PC steps only 2 times in the same stitch (3 loops on hook), yarn over and pull through all 3 loops.
Gauge and Checkpoints
Gauge: 20 sc and 22 rows = 4 in (10.2 cm) in sc rows. Chain gauge: 5 ch = 1 in (2.5 cm), measured while the chain hangs lightly.
Before you make 24 ornaments, make one test ornament and check it at each stage:
- After Rnd 1: 0.75 in (1.9 cm) across
- After Rnd 3: 2.25 in (5.7 cm) across
- After Rnd 4: 2.75 in (7.0 cm) across
- After Rnd 6: 3.5 in (8.9 cm) wide x 3.75 in (9.5 cm) tall
- With the cap and loop: 3.5 in (8.9 cm) wide x 5 in (12.7 cm) tall
If your ornament comes out more than 0.25 in (0.6 cm) too large, go down to a 2.75 mm hook. If it’s too small, go up to 3.25 mm. If the size is right but the center flower cups, loosen your chains in Rnd 2.
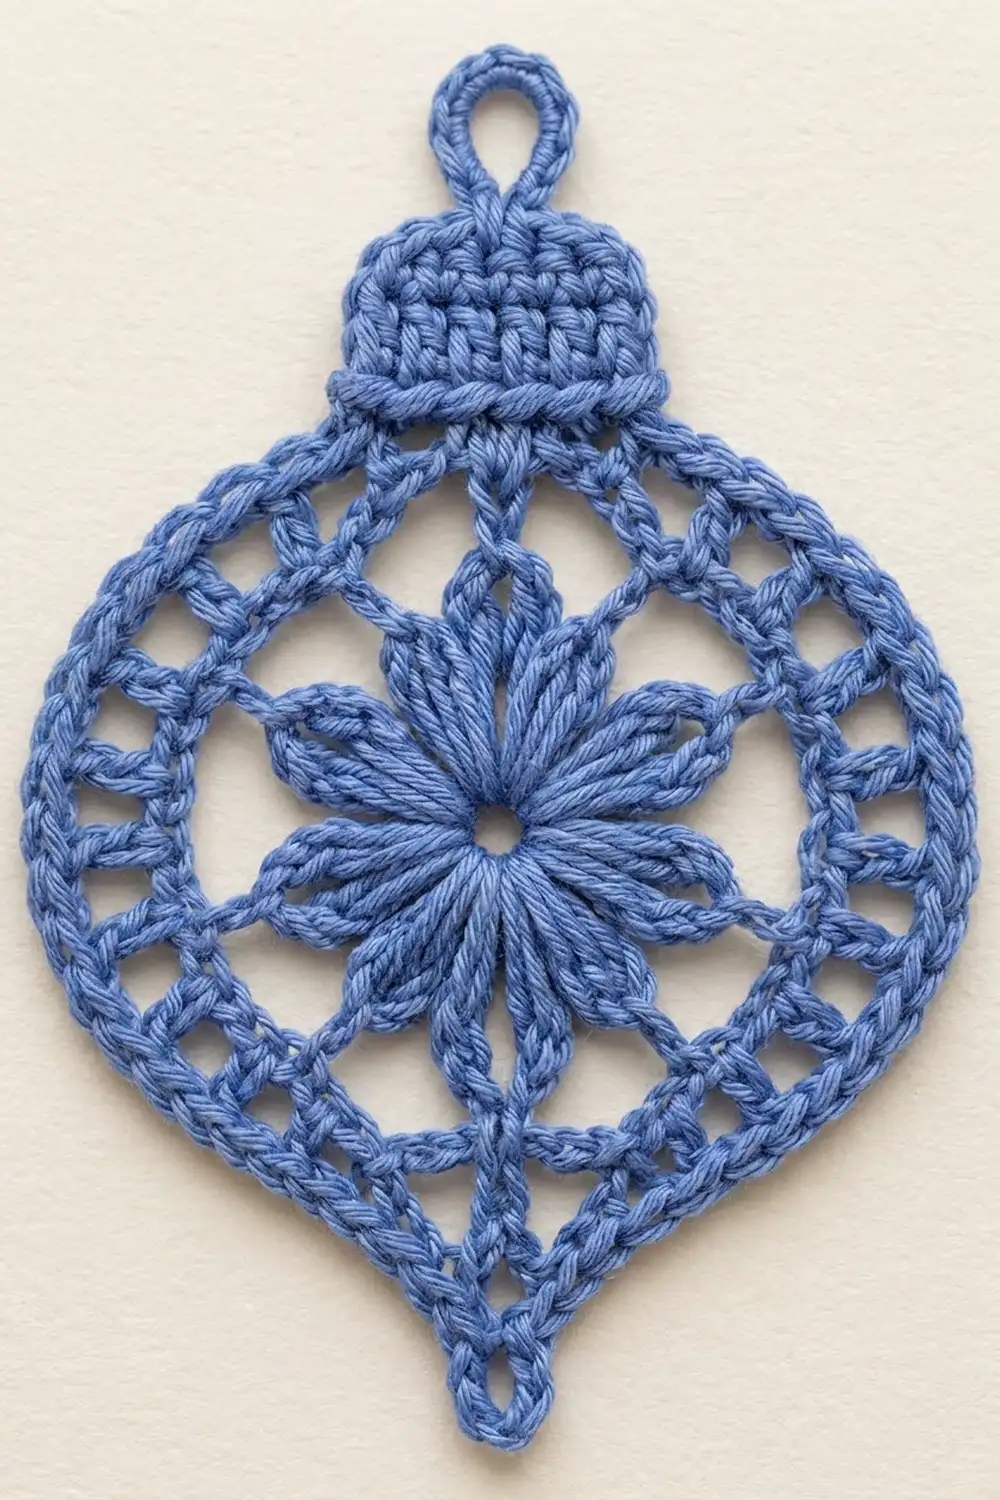
Ornament Motif (make 24)
Work the rounds with the RS facing. Do not turn.
Rnd 1: Make a magic ring. Ch 3 (counts as dc), work 15 dc in the ring, then sl st to the top of the beginning ch-3. Pull the ring closed. (16 dc)
Rnd 2: Work a beg PC in the same st. Ch 4, sk next st, PC in next st; repeat from * to * 6 more times. Ch 4, sk last st, sl st to top of beg PC. (8 PC, 8 ch-4 sps)
This round makes the eight-petal flower.
Rnd 3: Ch 1, sc in the top of the same PC, 5 dc in next ch-4 sp. Sc in next PC, 5 dc in next ch-4 sp; repeat from * to * 6 more times. Sl st to first sc. (8 sc + 40 dc = 48 sts)
Rnd 4: Ch 4 (counts as dc + ch 1), sk next st. Dc in next st, ch 1, sk next st; repeat from * to * 22 more times. Sl st to 3rd ch of beginning ch-4. (24 dc + 24 ch-1 sps = 48 sts)
This is the open mesh ring.
Rnd 5 (shaping): In this round, count every dc and every ch-1 sp as one stitch, for 48 stitches in total. Stitch 1 is the joining dc. The top center of the ornament sits between stitch 48 and stitch 1. Place a marker there.
Ch 1. Work 1 sc in st 1 and 1 sc in each of the next 3 sts (4 sc). Then work 6 hdc, 8 dc and 6 tr, one in each st, which finishes st 24. Ch 2 to make the bottom tip sp. Now mirror that sequence over sts 25–48: 6 tr, 8 dc, 6 hdc, 4 sc. Sl st to the first sc. (48 sts + 1 ch-2 tip sp)
The taller stitches push the bottom down into the onion point. The short stitches keep the top flatter for the cap.
Rnd 6 (lace edge): Ch 1, sc in st 1. Ch 3, sk 1 st, sc in next st; repeat from * to * 10 more times, which ends with a sc in st 23. Ch 3, sk st 24, then work (sc, ch 5, sc) in the ch-2 tip sp. Ch 3, sk st 25, sc in st 26. Ch 3, sk 1 st, sc in next st; repeat from * to * 10 more times, which ends with a sc in st 48. Ch 3, sl st to the first sc. (26 sc, 25 ch-3 loops, 1 ch-5 tip loop)
Checkpoint: 3.5 in (8.9 cm) wide x 3.75 in (9.5 cm) tall.
Cap: Work the cap in rows across the top of the ornament. Turn at the end of each row. Rows 2–4 are worked in blo, which gives the horizontal ridges.
Row 1: With RS facing, sl st into the ch-3 loop between sts 46 and 48. Ch 1, work 3 sc in that loop, sc in the sc at st 48, 3 sc in the center top loop, sc in the sc at st 1, and 3 sc in the loop between sts 1 and 3. Turn. (11 sc)
Row 2: Ch 1, sc2tog in blo, sc blo in next 7 sts, sc2tog in blo. Turn. (9 sc)
Row 3: Ch 1, sc blo in each st across. Turn. (9 sc)
Row 4: Ch 1, sc2tog in blo, sc blo in next 5 sts, sc2tog in blo. Turn. (7 sc)
Row 5 (hanging loop): Ch 1, sc in next 3 sts. Work (sc, ch 8, sc) in the next st, then sc in the last 3 sts. (8 sc + 1 ch-8 hanging loop)
Fasten off and weave in the ends through the cap. The cap adds 0.75 in (1.9 cm) and the loop adds 0.5 in (1.3 cm), for a total height of 5 in (12.7 cm).
Make All Pieces
Cornflower blue: 24 ornaments + 1 top band.
Number the strands 1–7 from left to right. Odd strands (1, 3, 5, 7) carry 3 ornaments each, for 12 in total. Even strands (2, 4, 6) carry 4 ornaments each, for 12 in total. That gives 24 ornaments.
Layout grid by height tier (O = ornament, – = chain only):
TIER 1: –  O  –  O  –  O  –
TIER 2: O  –  O  –  O  –  O
TIER 3: –  O  –  O  –  O  –
TIER 4: O  –  O  –  O  –  O
TIER 5: –  O  –  O  –  O  –
TIER 6: O  –  O  –  O  –  O
TIER 7: –  O  –  O  –  O  –
The tiers are 5 in (12.7 cm) apart. That is half of one strand’s 10 in (25.4 cm) repeat of an ornament plus its chain, which is what creates the checkerboard stagger.
Joining
Method: Join the ornaments into strands with chain segments. Each segment runs from the bottom tip of one ornament to the hanging loop of the next ornament below it.
Stitch-to-stitch logic:
- Join yarn with a sl st in the ch-5 tip loop of the upper ornament.
- Ch 25, which gives 5 in (12.7 cm).
- Work 2 sc around the ch-8 hanging loop of the next ornament. Fasten off.
- Repeat until the strand has all its ornaments.
- Tail: join at the tip loop of the bottom ornament. Ch 15 (3 in / 7.6 cm) on even strands or ch 40 (8 in / 20.3 cm) on odd strands. Fasten off and tie a small overhand knot at the end.
Chain totals per strand (below the top ornament):
– Even strands: 3 x 25 + 15 = 90 ch
– Odd strands: 2 x 25 + 40 = 90 ch
Tension: Count chains rather than measuring them. Keep each chain the same size as your gauge chain, and don’t tighten up near the end of a segment. Weave each end back along its own chain so the strand stays slim.
Size checkpoint: Hang each strand from its top loop.
– Even strands: 4 x 5 in + 3 x 5 in + 3 in = 38 in (96.5 cm)
– Odd strands: 3 x 5 in + 2 x 5 in + 8 in = 33 in (83.8 cm)
Border: Top Band
Border gauge: 20 sc = 4 in (10.2 cm). Seven rows make 1.75 in (4.4 cm).
Work the band flat in rows and turn at the end of each row. Every row has 181 sts.
Row 1: Ch 182, sc in 2nd ch from hook and in each ch across. (181 sc)
Row 2: Ch 1, sc in each st. (181 sc)
Row 3 (mesh): Ch 4 (counts as dc + ch 1), sk next st. Dc in next st, ch 1, sk next st; repeat from * to * 88 more times, then dc in the last st. (91 dc + 90 ch-1 sps = 181 sts)
Row 4: Ch 1, sc in each dc and each ch-1 sp. (181 sc)
Row 5 (mesh): Repeat Row 3. (181 sts)
Row 6: Repeat Row 4. (181 sc)
Row 7: Ch 1, sc in each st. (181 sc) Fasten off.
Attaching the strands: Row 7 is the bottom edge. Place markers in sts 19, 43, 67, 91, 115, 139 and 163.
At each marker, join yarn with a sl st. Then make the drop chain:
– Odd strands: ch 45 (9 in / 22.9 cm)
– Even strands: ch 20 (4 in / 10.2 cm)
Work 2 sc around the hanging loop of that strand’s top ornament and fasten off.
Why the math works:
– 181 = 1 + (2 x 90), so both mesh rows start and end with a dc and the mesh is symmetric.
– The markers are 24 sts apart (4.8 in / 12.2 cm), and 19 + (6 x 24) = 163. That leaves 18 sts (3.6 in / 9.1 cm) at each end, so the strands sit evenly.
– Each strand hangs 42 in (106.7 cm): odd strands are 9 in + 33 in, and even strands are 4 in + 38 in.
– The 5 in (12.7 cm) difference between the drop chains is exactly one tier.
To hang the curtain, slide the rod through the Row 3 mesh spaces, going over and under every 2 dc.
Final Blocking
- Soak the ornaments in cool water for 10 minutes, then press the water out in a towel. Don’t wring them.
- Draw a template on paper for the ornament body: 3.5 in (8.9 cm) wide x 3.75 in (9.5 cm) tall, with a pointed bottom. Pin each ornament to it.
- Pin out each ch-3 loop, the ch-5 tip and each flower petal.
- Mist with starch if you want crisp ornaments, then let them dry completely.
- Pin the band flat to 36.2 in (91.9 cm) x 1.75 in (4.4 cm) and let it dry.
- Hang the curtain and let the strands settle for 24 hours. Then check the lengths.
Final Quality-Control Checklist
- 24 ornaments, each 3.5 in x 5 in (8.9 cm x 12.7 cm)
- Each ornament has 8 petals, 24 mesh spaces, 26 edge sc and 1 tip loop
- Each cap has 11, 9, 9, 7 and 8 sc in Rows 1–5
- Even strands have 4 ornaments and odd strands have 3
- Each band row has 181 sts, and the markers are at sts 19 through 163 in steps of 24
- All strands hang 42 in (106.7 cm) below the band
- The stagger matches the layout grid
- All ends are woven in and the tails are knotted
Troubleshooting
- Flower petals ruffle: Your Rnd 2 chains are too tight. Loosen them or work ch 5.
- Ornament is round, not pointed: Check the Rnd 5 stitch heights. You need the 6 tr on each side of the tip.
- Cap leans to one side: Row 1 must start in the loop between sts 46 and 48. Recheck your top-center marker.
- Strands have different lengths: Count the chains again. Chain size drifts more than stitch counts do.
- Band curves: The foundation chain is too tight. Redo it with a hook one size larger.
- Ornaments twist: Starch them and block them again flat.
Care
Hand wash in cool water with mild soap and dry flat, pinned to shape. Re-starch if needed before hanging the curtain again.
Final Notes
The measurement chain is:
– 16 dc → 8 petals → 48 sts → a 3.5 x 3.75 in (8.9 x 9.5 cm) body
– Cap and loop bring each ornament to 5 in (12.7 cm)
– 25-ch gaps of 5 in (12.7 cm) make 38 in (96.5 cm) and 33 in (83.8 cm) strands
– 20-ch and 45-ch drop chains bring every strand to 42 in (106.7 cm)
– Adding the 1.75 in (4.4 cm) band gives a 36.2 x 43.75 in (91.9 x 111.1 cm) curtain
Check your test ornament first and everything else follows from it.
Happy crocheting!