

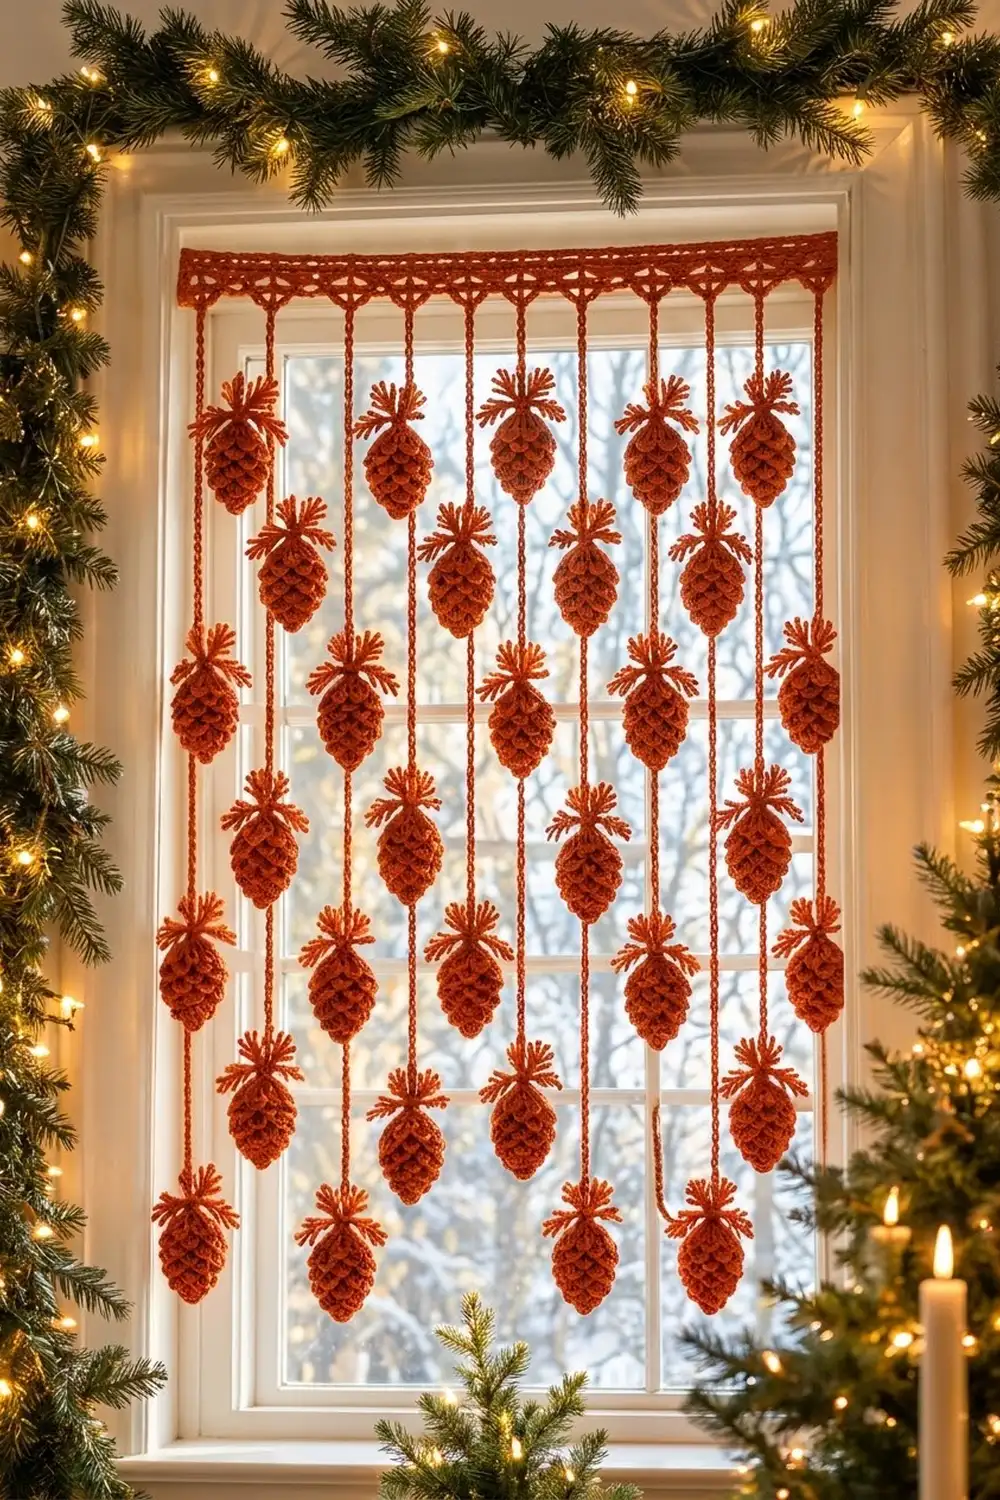
The Ember Pine Pinecone Curtain is a lacy window hanging made from 36 small pinecones, nine slip-stitch cords, and one simple lattice header. Each cone has five tiers of overlapping scales and two branched needle sprigs at the top.
The whole curtain uses a single warm rust shade. With only one color, the look stays calm and seasonal and the texture carries the design. Sunlight through the window shows off every scale.
This pattern uses US crochet terms. The finished curtain measures 36 1/4 in (92.1 cm) wide and 44 1/4 in (112.4 cm) long at its longest point, including the 2 1/4 in (5.7 cm) header.
The curtain is built in separate parts. You make the pinecones flat and top-down, using crocodile-style scales. Next you make the cords and tack the cones onto them. Last, you work the header so its final row catches the top of every cord.
Finished Size and Construction
- Finished size: 36 1/4 in (92.1 cm) wide x 44 1/4 in (112.4 cm) long
- Skill level: Intermediate
- Terminology: US crochet terms
- Yarn weight: Worsted (#4)
- Hook: 4.5 mm (US 7)
- Number of pieces: 36 pinecones, 9 cords, 1 header (46 pieces)
- Layout: 9 cords, 4 pinecones per cord, staggered
- Pinecone size: 2 3/4 in (7.0 cm) wide x 3 1/2 in (8.9 cm) long; 5 1/2 in (14.0 cm) across the sprigs
- Size before border: cord field 32 in (81.3 cm) from first to last cord; long cords 42 in (106.7 cm), short cords 37 in (94.0 cm)
- Border (header) depth: 2 1/4 in (5.7 cm)
Materials
Choose a smooth worsted yarn with good stitch definition. Cotton or a cotton-acrylic blend gives crisp scales and hangs straight. Avoid fuzzy or loosely plied yarn, because the scales will blur and the cords will stretch.
- Rust / burnt orange: 400 g, about 720 m (four 100 g / 180 m skeins)
Approximate use: 15 m per pinecone (540 m total), 71 m for all cords, and 30 m for the header. The quantity above includes a margin of about 12% for swatches and tails.
Tools:
- 4.5 mm (US 7) crochet hook
- Tapestry needle
- Stitch markers (at least 10)
- Rust-proof pins and blocking mats
- Measuring tape and scissors
- Spray bottle or steam iron
- Slim tension rod or 10 curtain clip rings, for hanging
Abbreviations (US Terms)
- ch – chain
- sl st – slip stitch
- sc – single crochet
- dc – double crochet
- sk – skip
- sp – space
- st(s) – stitch(es)
- RS – right side
Special stitches:
- V-st (V): (dc, ch 1, dc) in the same st or sp.
- Scale: Turn the work so the first dc of the V you’re working on lies sideways. Working down that post, make 5 dc around it. Ch 1. Then work up the post of the second dc of the same V, making 5 dc around it. One scale = 10 dc plus a ch-1 tip. The scales fold down over the row below on their own.
- Needle: ch 5, sl st in 2nd ch from hook and in next 3 ch (4 sl sts).
Gauge and Checkpoints
- Sc gauge: 16 sc and 18 rows = 4 in (10.2 cm)
- Dc gauge: 16 dc and 8 rows = 4 in (10.2 cm)
- Cord gauge: 5 sl sts = 1 in (2.5 cm)
Make one complete pinecone before anything else and use it as your gauge swatch.
Pinecone checkpoints:
- After Row 1: the V-st fan measures 1 3/4 in (4.4 cm) across.
- After Row 4: the widest tier measures 2 3/4 in (7.0 cm) across.
- Finished: 3 1/2 in (8.9 cm) from ring to tip.
Cord checkpoint: a 20-st test cord should measure 4 in (10.2 cm).
Header checkpoint: Row 1 of 145 sc should measure 36 1/4 in (92.1 cm).
If your cone is wider than 2 3/4 in (7.0 cm), go down one hook size. If it’s narrower, go up one size. If only the scales flare, keep the same hook and work the 5 dc around each post more tightly.
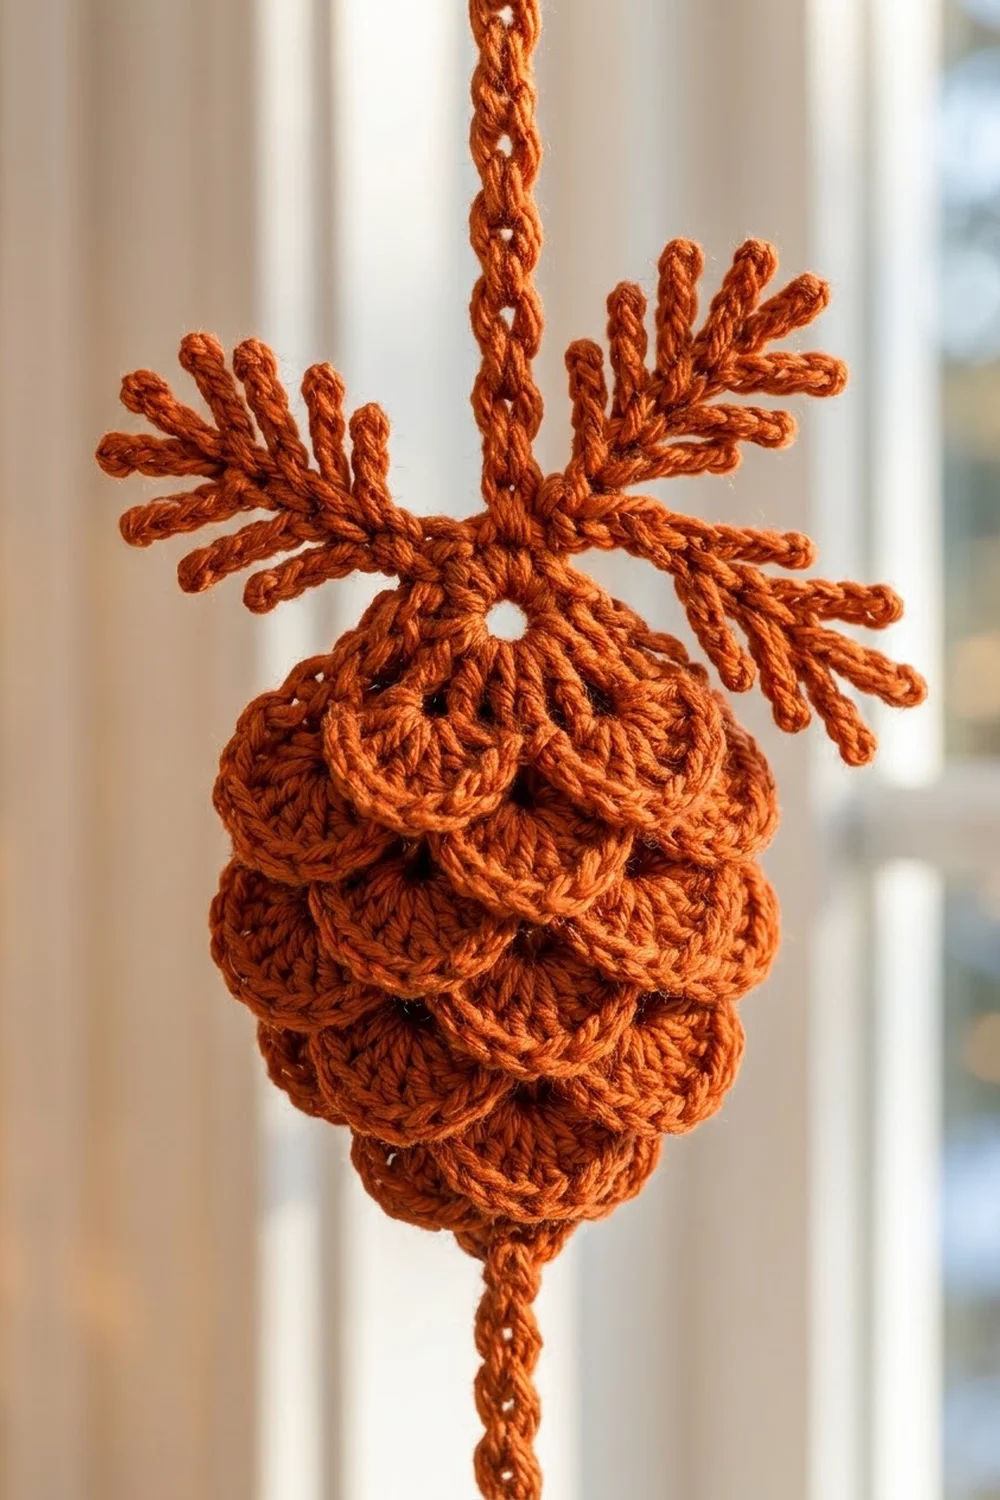
Pinecone (Make 36)
Work flat and top-down, turning at the end of each row. The scales fall toward the RS.
Ring: Ch 4, sl st in first ch to form a ring.
Row 1 (V row): Ch 4 (counts as dc and ch 1), dc in ring (first V made). [V in ring] 4 times. Turn. (5 V)
Row 2 (Tier 1, scales): Ch 1, sl st in first dc (edge anchor). [Scale over next V, sl st in ch-1 sp of next V] twice, scale over last V, sl st in 3rd ch of turning ch (edge anchor). Turn. (3 scales)
Row 3 (V row): Ch 4 (counts as dc and ch 1), dc in same edge-anchor sl st (edge V). [V in ch-1 tip of next scale, V in next sl st between scales] twice, V in ch-1 tip of last scale, V in edge-anchor sl st. Turn. (7 V)
Row 4 (Tier 2, scales): Ch 1. [Scale over next V, sl st in ch-1 sp of next V] 3 times, scale over last V. Turn. (4 scales)
Row 5 (V row): Sl st in ch-1 tip of first scale, ch 4 (counts as dc and ch 1), dc in same sp. [V in next sl st, V in ch-1 tip of next scale] 3 times. Turn. (7 V)
Row 6 (Tier 3, scales): Sl st in first dc and in ch-1 sp of first V. [Scale over next V, sl st in ch-1 sp of next V] 3 times. Turn. (3 scales)
Row 7 (V row): Sl st in ch-1 tip of first scale, ch 4, dc in same sp. [V in next sl st, V in ch-1 tip of next scale] twice. Turn. (5 V)
Row 8 (Tier 4, scales): Sl st in first dc and in ch-1 sp of first V. [Scale over next V, sl st in ch-1 sp of next V] twice. Turn. (2 scales)
Row 9 (V row): Sl st in ch-1 tip of first scale, ch 4, dc in same sp, V in next sl st, V in ch-1 tip of next scale. Turn. (3 V)
Row 10 (Tier 5, scales): Sl st in first dc and in ch-1 sp of first V, scale over next V, sl st in ch-1 sp of last V. (1 scale)
Fasten off, leaving a 12 in (30.5 cm) tail for tacking. Total: 3 + 4 + 3 + 2 + 1 = 13 scales.
The V rows set the shape. Row 3 adds an edge V on each side, so the cone grows from 3 scales to 4. From Row 5 on, each V row starts and ends at a scale tip. That means each tier has one scale fewer than the last, and the cone narrows to a point.
Needle Sprigs (2 per Pinecone)
With RS facing, join yarn at the top of the ring, just right of center.
Sprig 1: Ch 13. Sl st in 2nd ch from hook and next 3 ch (tip needle made). [Needle, needle, sl st in next 2 ch of stem] 4 times, sl st in ring. (12 stem sts worked: 4 + 4 x 2)
Sprig 2: Sl st in ring just left of center. Work as Sprig 1. Fasten off and weave in.
Each sprig has 9 needles: one at the tip and four pairs along the stem. Each sprig is about 2 1/2 in (6.4 cm) long.
Checkpoint: the cone with sprigs spread measures 5 1/2 in (14.0 cm) across.
Cords (Make 9)
Each cord is a sl st cord worked into the back bumps of a chain.
Cord A (make 5): Ch 186. Sl st in back bump of 2nd ch from hook and each ch across. (185 sl sts = 37 in / 94.0 cm)
Cord B (make 4): Ch 211. Sl st in back bump of 2nd ch from hook and each ch across. (210 sl sts = 42 in / 106.7 cm)
Leave a 6 in (15.2 cm) tail at each end. Lay each cord flat and measure it. If it’s off by more than 1/2 in (1.3 cm), add or remove chains now.
Make All Pieces
All pieces are rust:
- Pinecones with sprigs: 36
- Cord A (37 in / 94.0 cm): 5
- Cord B (42 in / 106.7 cm): 4
- Header: 1, worked last
Cords alternate A and B across the curtain. Positions show where the top of each cone sits, measured down from the top of the cord.
CORD:     1  2  3  4  5  6  7  8  9
TYPE:     A  B  A  B  A  B  A  B  A
2 in:     X  .  X  .  X  .  X  .  X
7 in:     .  X  .  X  .  X  .  X  .
12 in:    X  .  X  .  X  .  X  .  X
17 in:    .  X  .  X  .  X  .  X  .
22 in:    X  .  X  .  X  .  X  .  X
27 in:    .  X  .  X  .  X  .  X  .
32 in:    X  .  X  .  X  .  X  .  X
37 in:    .  X  .  X  .  X  .  X  .
In cm, the A positions are 5.1, 30.5, 55.9, and 81.3 cm. The B positions are 17.8, 43.2, 68.6, and 94.0 cm. Each cord holds 4 cones: 5 x 4 + 4 x 4 = 36.
Joining
Joining has two stages. Here you attach the cones to the cords. The cords join the header later, in the Border section.
Method: Use the cone’s tail and a tapestry needle to tack each cone to the front of its cord. The cord runs behind the cone, so it looks like it goes in at the ring and comes out at the tip.
Stitch logic:
- Mark each cone position on the cord with a stitch marker. At 5 sl sts per inch, 2 in = st 10, 7 in = st 35, and each 10 in (25.4 cm) step = 50 sts.
- Center the ring over the marker. Whipstitch 3 times through the ring and both loops of the cord.
- Run the tail down the back of the cone, catching the back of the center scale on each tier.
- At the Tier 5 tip, whipstitch 2 times into the cord. Weave in.
Tension: Keep the tacking snug but not tight. If you pull too hard, the cord shortens and puckers behind the cone.
Checkpoint: On Cord A, the last cone ends at 35 1/2 in (90.2 cm), leaving 1 1/2 in (3.8 cm) of cord below. On Cord B, the last cone ends at 40 1/2 in (102.9 cm), also leaving 1 1/2 in (3.8 cm).
Border: Header Band
The header is the curtain’s only border. You work it flat in 5 rows, and Row 5 catches the tops of the cords.
Border gauge: 16 sc = 4 in (10.2 cm), or 4 sts per inch.
Row 1 (top edge): Ch 146. Sc in 2nd ch from hook and each ch across. Turn. (145 sc)
Row 2: Ch 3 (counts as dc), dc in each st across. Turn. (145 dc)
Row 3 (lattice): Ch 1, sc in first st. [Ch 5, sk 3 sts, sc in next st] 36 times. Turn. (37 sc and 36 ch-5 sps)
Row 4: Ch 3 (counts as dc). [3 dc in next ch-5 sp, dc in next sc] 36 times. Turn. (37 + 108 = 145 dc)
Row 5 (bottom edge, cord join): Ch 1, sc in each st across. (145 sc) At sts 9, 25, 41, 57, 73, 89, 105, 121, and 137, insert the hook through the dc and then through the first ch of a cord, and work the sc through both. Join cords in order A, B, A, B, A, B, A, B, A. Fasten off.
To hang, attach 10 clip rings evenly along Row 1, or weave a slim tension rod through Row 2, passing over 4 dc and under 4 dc.
Why the math works:
- The lattice repeat is 4 sts, plus 1 to close: 4 x 36 + 1 = 145.
- Row 4 brings the count back to 145: 1 dc in each sc (37) plus 3 dc in each space (36 x 3 = 108).
- Cords sit every 16 sts, which is 4 in (10.2 cm) at gauge: 9 + 8 x 16 = 137.
- Margins are equal: sts 1–8 and 138–145, 8 sts or 2 in (5.1 cm) each.
- Every cord stitch is one more than a multiple of 4, so each cord sits directly under a lattice sc.
- Total width: 145 ÷ 4 = 36 1/4 in (92.1 cm).
Final Blocking
- Lay the curtain face down on blocking mats.
- Pin the header straight to 36 1/4 in (92.1 cm) x 2 1/4 in (5.7 cm).
- Lay each cord straight and perpendicular to the header, 4 in (10.2 cm) apart.
- Turn each cone face up. Press the scales down so each tier overlaps the one below.
- Pin each sprig at about 45 degrees, and pin each pair of needles into a V.
- For cotton, mist with water. For acrylic, hold the steam iron 1 in (2.5 cm) above the work and steam without pressing.
- Let everything dry for at least 12 hours before unpinning.
- Hang the curtain for a day. Cords may relax by up to 1/2 in (1.3 cm).
Final Quality-Control Checklist
- Header is 36 1/4 in (92.1 cm) wide and lies flat.
- Row 3 shows 36 even ch-5 openings.
- 9 cords are attached at sts 9, 25, 41, 57, 73, 89, 105, 121, and 137.
- Cords alternate A and B, starting and ending with A.
- Each cone has 13 scales in tiers of 3, 4, 3, 2, 1.
- Each cone has two sprigs with 9 needles each.
- Cone tops match the layout grid within 1/4 in (0.6 cm).
- All tails are woven in and hidden behind cones or in the header.
Troubleshooting
Scales stand up instead of lying flat. Your dc are too tall. Pull up shorter loops, or use a 4 mm hook for the scale rows only.
The cone twists to one side. Make sure every V row starts at a scale tip and that you turned at the end of each row. One missed turn shifts the tiers off-center.
A tier has the wrong number of scales. Count the V row below it. Tiers 1–5 need 5, 7, 7, 5, and 3 V-sts underneath.
Header ruffles. Your ch-5 loops are too long. Try ch 4 in Row 3, but still work 3 dc in each space in Row 4.
Cords too long after hanging. Remove chains from the bottom end and re-finish with a sl st.
Care
Hand wash in cool water, roll in a towel to remove water, and dry flat with the cones pinned into shape. To store, roll the curtain loosely around a tube so the cords don’t tangle.
Final Notes
Check each measurement in order. Your test cone confirms gauge at 2 3/4 in (7.0 cm) wide and 3 1/2 in (8.9 cm) long. At 5 sl sts per inch, the cords measure 37 in (94.0 cm) and 42 in (106.7 cm). The 145-st header holds them 4 in (10.2 cm) apart. The finished curtain is 36 1/4 in (92.1 cm) wide and 44 1/4 in (112.4 cm) long.
Happy crocheting!