

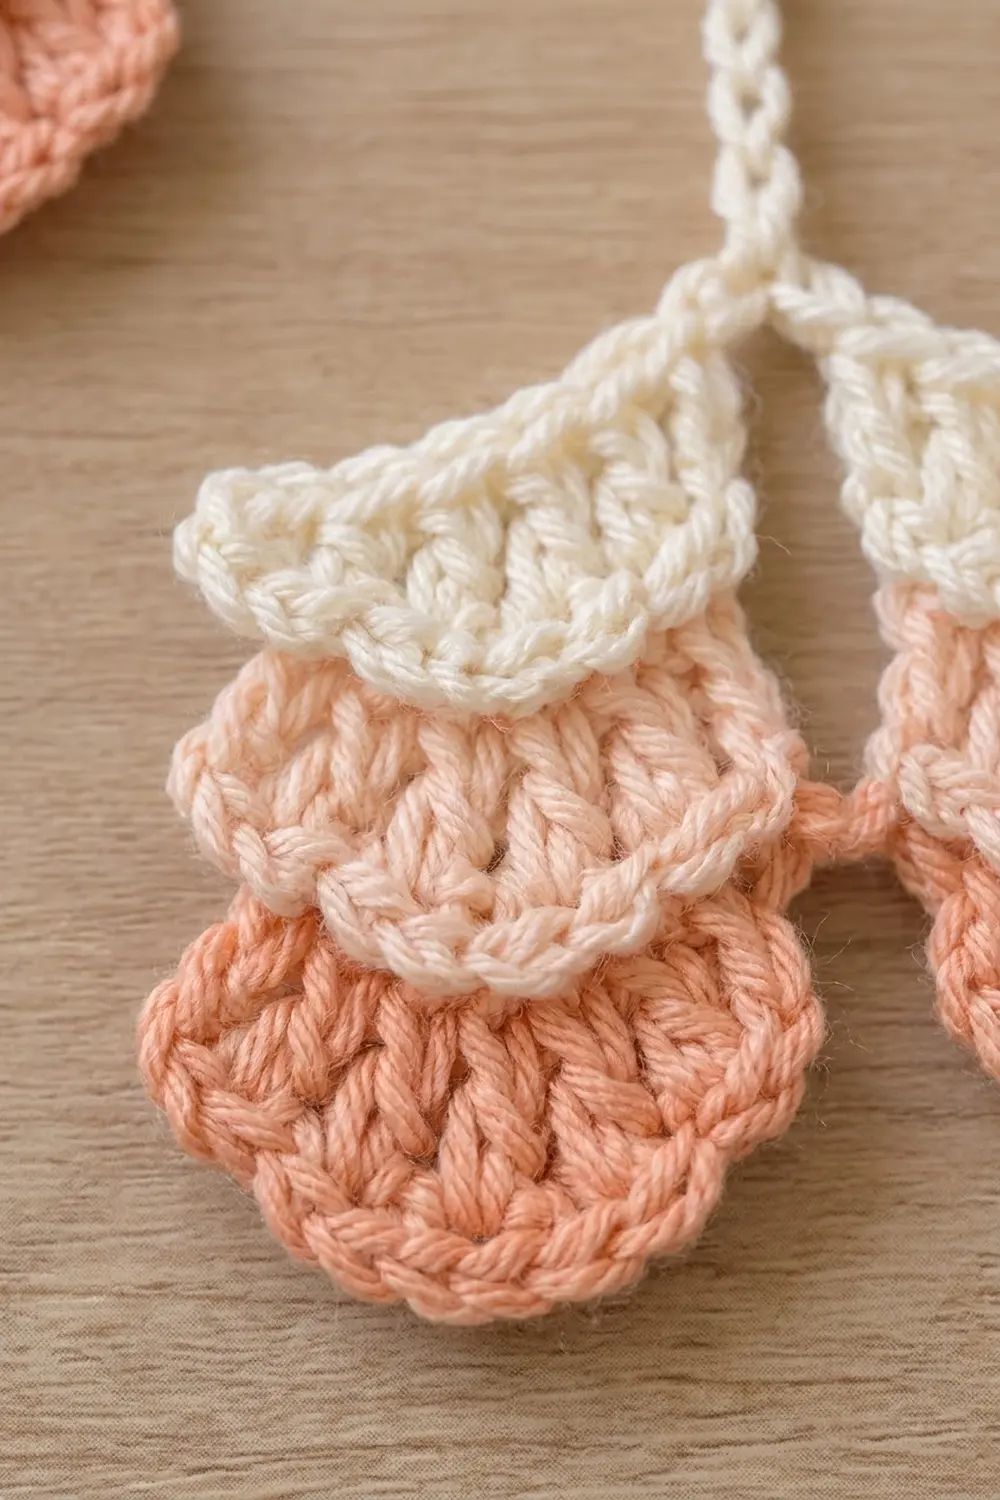
The Peach Cascade motif is a small hanging ornament made of two matching “drops.” Each drop is built from three layered tiers with scalloped hems. The top tier is a narrow cream wedge, the middle tier is pale blush peach, and the bottom tier is a warm salmon peach. The scallops overlap like roof shingles, so each drop shades from light to dark, top to bottom.
The two drops hang side by side from a Y-shaped cream chain. A short peach chain link ties them together at the lower tier so they stay level and evenly spaced. The look is soft and romantic. It works well as seasonal decor, a gift topper, or a window charm.
This pattern uses US crochet terms. The finished motif measures about 5.7 in (14.5 cm) wide and 7.75 in (19.7 cm) tall, including the hanging loop. Each drop is 2.6 in (6.6 cm) wide and 2.8 in (7.1 cm) tall.
Each drop is worked from the top down in turned rows of double crochet, getting wider as it goes. Each new color starts in the back loops only, which leaves a ridge of free loops behind. Later you work a shell edging into those loops, and that creates the layered scallops. When both drops are finished, you add the link chain and the Y hanger.
Finished Size and Construction
- Finished size: about 5.7 in (14.5 cm) wide × 7.75 in (19.7 cm) tall, including the hanger
- Skill level: Easy+ (you should be comfortable with back-loop work and shells)
- Terminology: US crochet terms
- Yarn weight: DK (#3), cotton or cotton blend
- Hook: 3.5 mm (E-4)
- Number of pieces: 1 motif (two drops joined by a chain link, plus a Y hanger)
- Layout: two drops side by side, about 0.5 in (1.3 cm) apart
- Piece size (one drop): 2.6 in (6.6 cm) wide × 2.8 in (7.1 cm) tall
- Size before border (one drop, Rows 1–6): 2.6 in (6.6 cm) wide × 2.4 in (6.1 cm) tall
- Border depth: the bottom scallop row adds 0.4 in (1.0 cm)
Materials
Choose a smooth DK cotton, either mercerized or matte. Cotton gives crisp shells that hold their shape when the motif hangs. Avoid fuzzy yarn, because the shingle effect depends on clear, defined shell edges.
- Cream (Color A): 3 g, about 7 m (7.7 yd)
- Light Peach (Color B): 2 g, about 5 m (5.5 yd)
- Peach (Color C): 2 g, about 5 m (5.5 yd)
These amounts are for one complete motif and include a margin for joining and weaving in ends. Leftovers and mini skeins are perfect for this project.
Tools:
- 3.5 mm (E-4) crochet hook
- Tapestry needle
- Scissors
- Stitch markers (2)
- Rustproof pins and a foam blocking mat
- Spray bottle with cool water
- Ruler or tape measure
Abbreviations (US Terms)
- ch – chain
- sl st – slip stitch
- sc – single crochet
- dc – double crochet
- BLO – back loop only
- st(s) – stitch(es)
- sk – skip
- RS / WS – right side / wrong side
- rep – repeat
Special stitch – Shell: work 5 dc into the same stitch or loop.
Special technique – Back loop only: In this pattern, BLO always means the loop farther from you as you work that row. Every BLO row is a RS row, so the unworked near loops stay on the RS as a visible ridge. These are the “free loops” used for the tier edgings.
Turning chain: ch 3 at the start of a dc row counts as the first dc throughout.
Gauge and Checkpoints
Gauge: 20 dc × 10 rows = 4 in (10.2 cm) in DK cotton with a 3.5 mm hook. That works out to 5 dc per 1 in (2.5 cm), and each dc row is 0.4 in (1.0 cm) tall. Chains work up at about 4 ch per 1 in (2.5 cm).
Make one complete drop as your test piece before you start the second. A drop is small, so it shows your gauge faster than a swatch does.
Checkpoints for one drop:
- After Row 2: 1.8 in (4.6 cm) wide
- After Row 4: 2.6 in (6.6 cm) wide
- After Row 6: 2.6 in (6.6 cm) wide × 2.4 in (6.1 cm) tall
- After Row 7: 2.8 in (7.1 cm) tall
If your drop is too big, go down to a 3.25 mm (D-3) hook. If it is too small, go up to a 3.75 mm (F-5) hook. A difference of 0.1 in (0.3 cm) is fine. If you are off by 0.25 in (0.6 cm) or more after Row 4, change hooks.
Also check that both drops match. A width difference between the two drops shows more than a small difference in overall size.
Drop Pattern (Make 2)
Work each drop from the top down. Rows 1, 3, 5, and 7 are RS rows.
Tier A – Cream
Row 1 (RS): With Cream, ch 7. Dc in 4th ch from hook and in each of next 3 ch. Turn. (5 dc)
Row 2 (WS): Ch 3 (counts as dc), dc in first st, 2 dc in next st, dc in next st, 2 dc in next st, 2 dc in top of turning ch. (9 dc) Fasten off.
Row 2 increases in 4 of the 5 stitches. This gives the top tier its short wedge shape.
Tier B – Light Peach
Row 3 (RS): With RS facing, join Light Peach with a sl st in BLO of the first st at the right-hand edge. Work in BLO for the whole row: ch 3, dc in same st, dc in each of next 7 sts, 2 dc in last st. Turn. (11 dc)
Row 4 (WS): Ch 3, dc in first st, dc in each of next 9 sts, 2 dc in top of turning ch. (13 dc) Fasten off.
Tier C – Peach
Row 5 (RS): With RS facing, join Peach with a sl st in BLO of the first st at the right-hand edge. Work in BLO for the whole row: ch 3, dc in each of next 12 sts. Turn. (13 dc)
Row 6 (WS): Ch 3, dc in each of next 12 sts, working the last dc in top of turning ch. Turn. (13 dc)
Rows 5 and 6 have no increases. This lets the bottom tier hang flat and round instead of flaring.
Checkpoint: The drop should now measure 2.6 in (6.6 cm) wide × 2.4 in (6.1 cm) tall. You should see two ridges of free loops on the RS. One is at the Cream/Light Peach line (9 loops), and the other is at the Light Peach/Peach line (13 loops).
Row 7 is the bottom scallop hem. You’ll find it in the Border section below, because it uses the same shell math as the tier edgings. Work Row 7 and both edgings on each drop before you link the drops.
Linking the Drops and Adding the Hanger
This motif is a single piece, so you don’t need to join a set of motifs. The two drops are linked during finishing.
Link chain: Lay both drops RS up, side by side, with Drop 1 on the left. With Peach, join with a sl st in the side of Row 5 on the inner (right) edge of Drop 1. Ch 3, then sl st in the side of Row 5 on the inner (left) edge of Drop 2. Fasten off. Once the motif hangs, the 3-ch link holds the drops about 0.5 in (1.3 cm) apart.
Y hanger: With Cream and the top edges facing up, join with a sl st in the free loop of the foundation ch at the base of the center (3rd) dc of Row 1 on Drop 1. Ch 16, then sl st in the same spot on Drop 2. Fasten off.
Place a marker in the 8th ch of the 16-ch arm, which is the center. Join Cream with a sl st in the marked ch. Ch 18, then sl st in the 6th ch from hook to form the hanging loop. Fasten off. (12-ch stem + 6-ch loop)
At 4 ch per 1 in (2.5 cm), each 8-ch arm is 2 in (5.1 cm) long. When the motif hangs, the arms form a V that rises about 1.25 in (3.2 cm). The stem adds 3 in (7.6 cm), and the loop adds about 0.7 in (1.8 cm).
Border: Scallop Hem and Tier Edgings
Border gauge: One shell repeat (sc, sk 1, shell, sk 1) uses 4 base stitches, so it spans 0.8 in (2.0 cm). The shell row is 0.4 in (1.0 cm) deep.
Every scalloped edge in this motif has (4 × number of shells) + 1 stitches. The extra stitch is for the final sc, so every scallop row begins and ends with an sc that anchors it.
Row 7 – Bottom hem (Peach, RS): Ch 1, sc in first st, sk 1 st, shell in next st, sk 1 st, sc in next st; rep from * 2 more times, working the last sc in top of turning ch. Fasten off. (3 shells, 4 sc; 13 sts used)*
Tier B edging (Light Peach): Turn the drop upside down, RS facing. Join Light Peach with a sl st in the first free loop at the right-hand end of the Light Peach/Peach ridge. Ch 1, sc in same loop, sk 1 loop, shell in next loop, sk 1 loop, sc in next loop; rep from * 2 more times. Fasten off. (3 shells, 4 sc; 13 loops used)*
Tier A edging (Cream): With the drop still upside down and RS facing, join Cream in the first free loop at the right-hand end of the Cream/Light Peach ridge. Ch 1, sc in same loop, sk 1 loop, shell in next loop, sk 1 loop, sc in next loop; rep from * once more. Fasten off. (2 shells, 3 sc; 9 loops used)*
When you turn the drop right side up, both edgings fall downward. Each one overlaps the top of the tier below it like a shingle.
Why the math works:
- Row 7: 13 sts = (4 × 3) + 1 → 3 shells
- Tier B edging: 13 free loops (from Row 4) = (4 × 3) + 1 → 3 shells
- Tier A edging: 9 free loops (from Row 2) = (4 × 2) + 1 → 2 shells
The free-loop counts always match the stitch counts of the rows they came from, because Rows 3 and 5 used only one loop of each stitch. Row 3 increases from 9 to 11 stitches, but the ridge under it still has 9 loops, which is exactly what the Tier A edging needs.
Final drop size: 2.4 in (6.1 cm) + 0.4 in (1.0 cm) = 2.8 in (7.1 cm) tall, 2.6 in (6.6 cm) wide.
Final Blocking
- Weave in all ends through stitches of the same color, so no tails show through the lighter tiers.
- Lay the motif RS up on a foam mat, with the hanger at the top.
- Pin each drop to 2.6 in (6.6 cm) wide at Row 6 and 2.8 in (7.1 cm) tall.
- Pin the tip of each bottom shell so the three Peach scallops are evenly rounded.
- Lift the Light Peach and Cream edgings slightly so they lie over the tier below instead of tucking under it.
- Pin the V arms and the stem straight, and check that the overall width is 5.7 in (14.5 cm).
- Mist with cool water until damp but not soaked.
- Let the motif dry completely, about 2–4 hours, before you unpin it.
Final Quality-Control Checklist
- Both drops measure 2.6 in (6.6 cm) wide × 2.8 in (7.1 cm) tall.
- Rows 1–6 on each drop have 5, 9, 11, 13, 13, and 13 dc.
- The Cream edging has 2 shells, and the Light Peach edging and bottom hem each have 3 shells.
- All edgings overlap downward on the RS.
- The link chain sits at Row 5 on both drops, so they hang level.
- The V arms are equal at 8 ch each, and the stem is centered.
- The full motif measures about 5.7 in (14.5 cm) × 7.75 in (19.7 cm).
- All ends are secured and hidden.
Troubleshooting
The edgings point up instead of down. You worked them with the drop right side up. Pull them out and rework them with the drop upside down.
There is no free-loop ridge. Row 3 or Row 5 was worked through both loops. Redo that row in BLO.
The shells cup or ruffle. Your shells are worked more tightly than the base. Go up one hook size for the edgings only, or work 4 dc per shell.
The drops hang at different heights. The link chain is attached at different rows. Move it so it sits at Row 5 on both drops.
The V is lopsided. The stem is not attached at the center ch. Count 8 ch from either end and rejoin.
The sides of the drop are wavy or slanted. You may have forgotten to count the turning chain as a stitch. Count the ch-3 as the first dc on every row and work into its top.
Tails show through the Cream tier. Reweave them on the WS through Cream stitches only.
Care
Hand wash in cool water with mild soap and lay flat to dry, re-pinning the shells if needed. Don’t tumble dry, and don’t iron the scallops flat.
Final Notes
The measurement chain is short and easy to check. Gauge is 5 dc per 1 in (2.5 cm) and 0.4 in (1.0 cm) per row. Row 2 at 9 dc gives 1.8 in (4.6 cm), and Row 4 at 13 dc gives 2.6 in (6.6 cm). Six rows reach 2.4 in (6.1 cm), and the scallop hem brings each drop to 2.8 in (7.1 cm).
Two drops of 2.6 in (6.6 cm) plus a 0.5 in (1.3 cm) link give a width of 5.7 in (14.5 cm). Add the drop, the 1.25 in (3.2 cm) V, the 3 in (7.6 cm) stem, and the 0.7 in (1.8 cm) loop for a total height of about 7.75 in (19.7 cm).
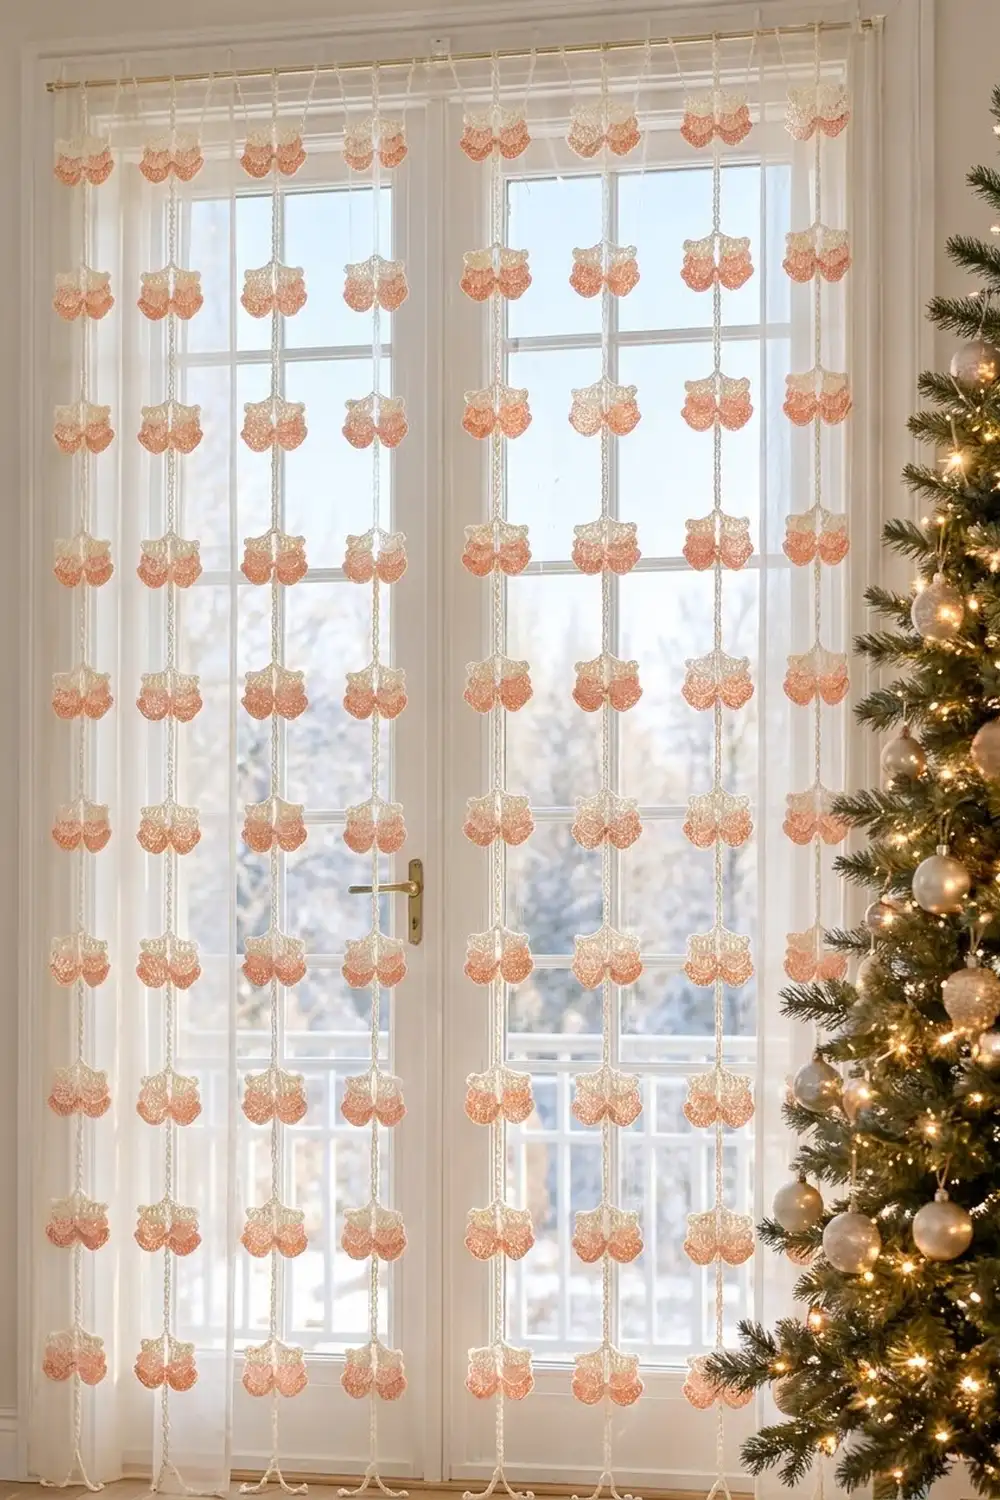
If you love the result, make several motifs and hang them from long cream chains as a decorative strand. Start with one and check it against these numbers, and every copy after it will match.
Happy crocheting!