

These lacy angel wings are a small, quick motif with a lot of charm. Each wing fans out from a narrow center. It starts with solid double crochet rays, opens into a lattice of diamond-shaped windows, and finishes with soft rounded scallops along the outer edge.
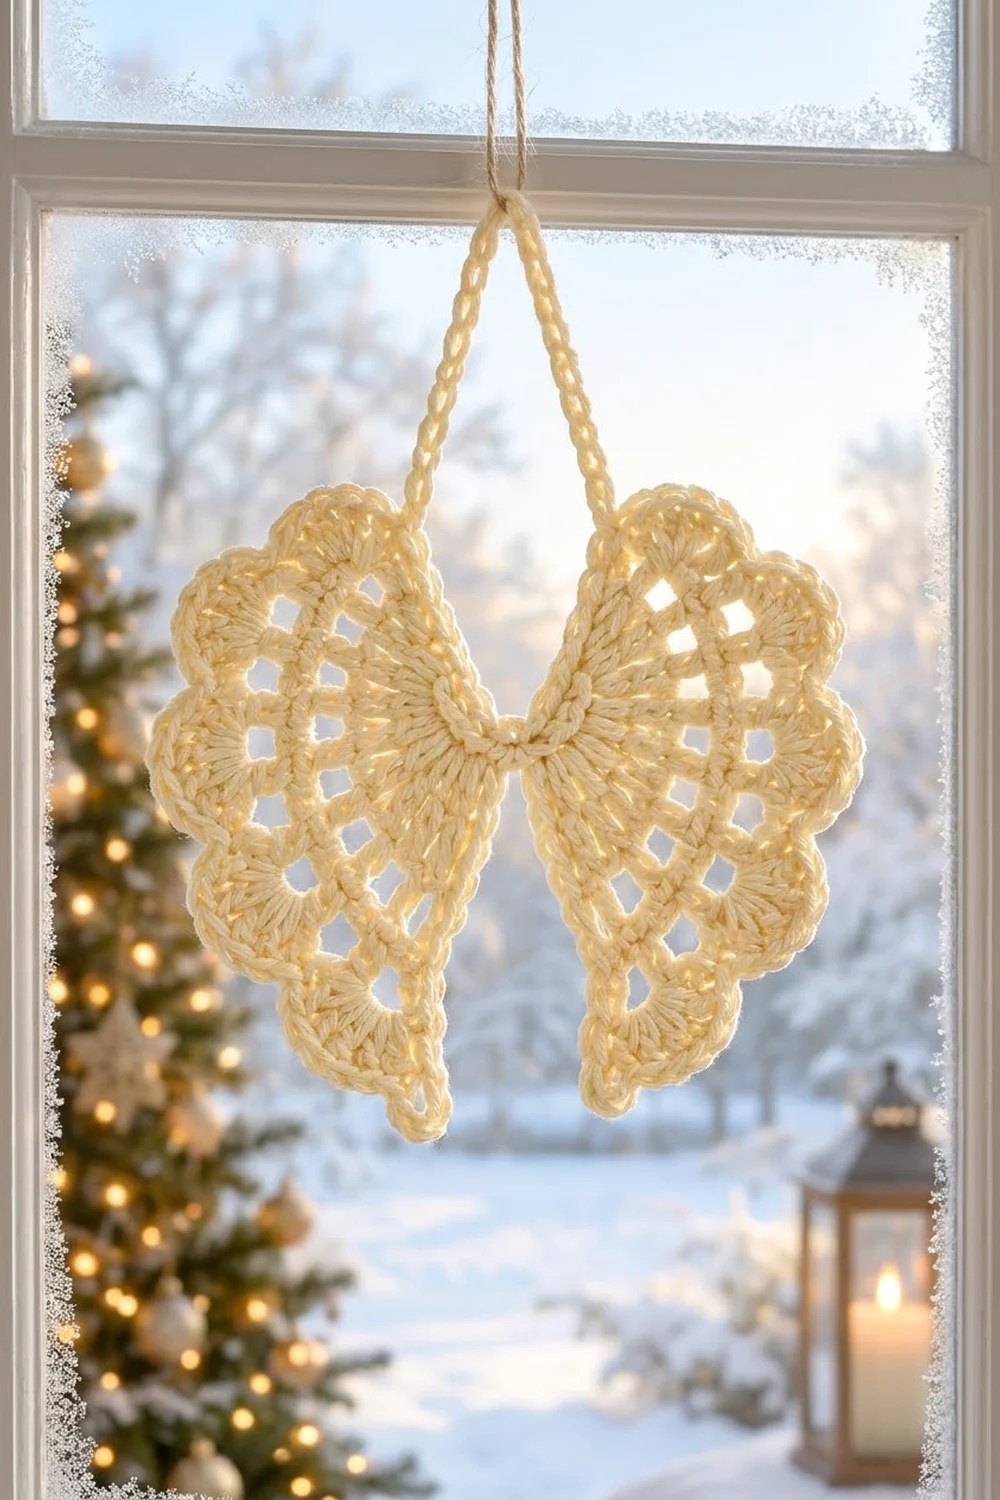
The whole piece is worked in one color, a warm cream cotton that glows like candlelight against a window. The style is classic and delicate, a little vintage. It works as a Christmas ornament, a gift tag topper, or an appliqué.
This pattern uses US crochet terms. After blocking, the finished pair of wings measures 6 in (15.2 cm) wide by 4 in (10.2 cm) tall, plus an optional chain hanging loop.
Construction is simple. You make two identical wings in short fan rows, sew their center points together and cinch the middle. Then you work a two-round border around the whole outline in one pass.
Finished Size and Construction
- Finished size: 6 in (15.2 cm) wide x 4 in (10.2 cm) tall
- Skill level: Easy to intermediate (you should be comfortable with turning rows and chain loops)
- Terminology: US crochet terms
- Yarn weight: DK (#3 light) cotton
- Hook: 3.5 mm (E-4)
- Number of pieces: 2 wings, joined into one finished motif
- Layout: 2 mirrored wings side by side, joined at the center point
- Piece size (one wing, before border): 2.5 in (6.4 cm) wide x 3 in (7.6 cm) tall
- Size before border (joined pair): 5 in (12.7 cm) wide x 3 in (7.6 cm) tall
- Border depth: 0.5 in (1.3 cm) on every outer edge
Materials
Choose a smooth mercerized or soft matte cotton in DK weight. Cotton holds the lace open, blocks crisply, and doesn’t fuzz over the diamond windows. Avoid fluffy acrylic or mohair blends, because they blur the lattice.
Yarn:
- Cream (butter ivory): 15 g, about 35 m
One pair of wings uses roughly 9 g. The amount above includes a margin for the gauge check, the hanging loop and long sewing tails.
Tools:
- 3.5 mm (E-4) crochet hook
- Tapestry needle
- Scissors
- 1 stitch marker
- Ruler or tape measure
- Blocking mat and rust-proof pins
- Spray bottle with water (optional: light spray starch)
Abbreviations (US Terms)
- ch: chain
- sl st: slip stitch
- sc: single crochet
- dc: double crochet
- st(s): stitch(es)
- sp(s): space(s)
- RS: right side
- MR: magic ring
Special stitch (shell): 7 dc worked into the same ch-5 space. The 4th dc is the shell’s center dc.
Turning chains: In Rows 1 and 2, the beginning ch 3 counts as a dc. In all sc rows and rounds, the ch 1 does not count as a stitch.
Gauge and Checkpoints
You measure gauge on the piece itself, so make one wing first and check it before you make the second.
- Rows 1–2: fan radius of 1 in (2.5 cm), measured from the center of the magic ring to the top of Row 2.
- Rows 1–5 (one wing): radius of 2.5 in (6.4 cm) from the ring to the outer loops. Gently shaped, the wing measures 2.5 in (6.4 cm) wide x 3 in (7.6 cm) tall.
- Joined pair before border: 5 in (12.7 cm) wide x 3 in (7.6 cm) tall.
- Border sc gauge: 12 sc = 2.5 in (6.4 cm) along each straight edge.
- Finished piece: 6 in (15.2 cm) x 4 in (10.2 cm).
If your wing is too big: go down to a 3.25 mm (D-3) hook, or keep your chain loops snug. If it is too small: go up to a 3.75 mm (F-5) hook. Lace is forgiving, but a radius that’s off by more than 0.25 in (0.6 cm) will show once the wings sit side by side.
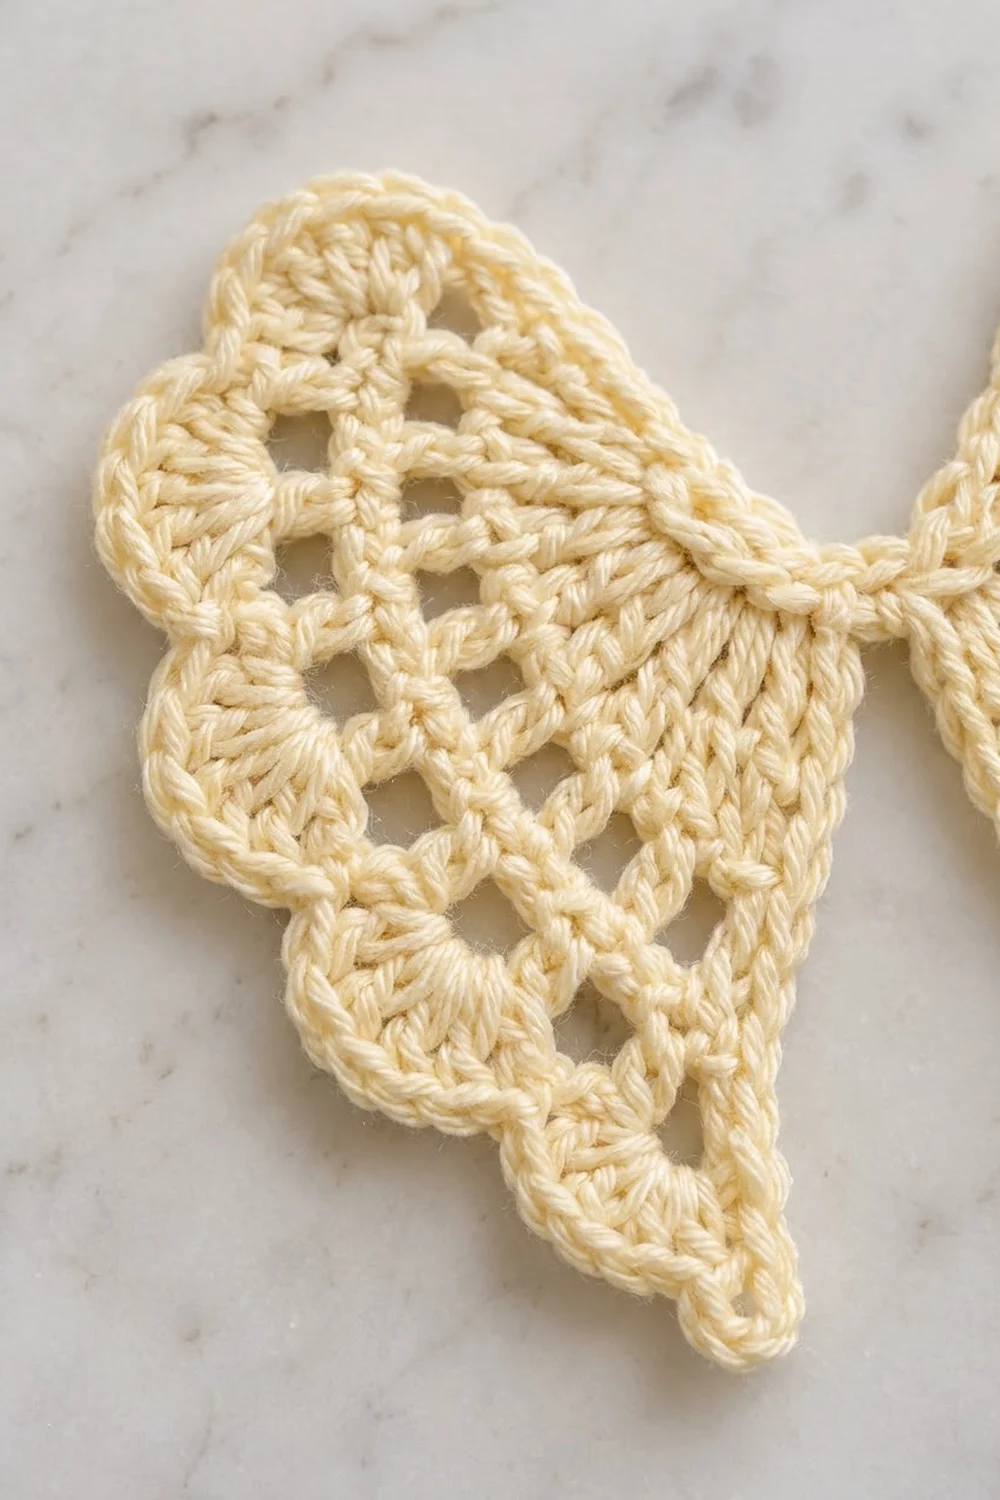
Wing (Make 2)
Work both wings exactly the same way. Before joining, you flip the second wing over so it becomes a mirror image of the first.
On the first wing, leave a 10 in (25.4 cm) starting tail. You will use it for joining.
Row 1 (RS): Make a MR. Ch 3 (counts as dc), 8 dc in ring. Pull the ring closed until the dc sit side by side in a half-circle fan. Do not join. Turn. (9 dc)
These 9 dc are the solid rays at the center of the wing.
Row 2: Ch 3 (counts as dc), dc in same st, 2 dc in each of next 7 sts, dc in top of turning ch. Turn. (17 dc)
The rays now double and widen. Checkpoint: the radius is 1 in (2.5 cm).
Row 3 (first lattice row): Ch 1, sc in first st, ch 4, skip next st, sc in next st; repeat from * 7 more times. The last sc goes in the top of the turning ch. Turn. (9 sc, 8 ch-4 sps)*
This row opens the first ring of windows.
Row 4: Ch 1, sc in first sc, ch 5, sc in first ch-4 sp, ch 5, sc in next ch-4 sp; repeat from * 6 more times, ch 5, sc in last sc. Turn. (10 sc, 9 ch-5 sps)*
Each ch-5 loop crosses over a loop from Row 3, which makes the diamond lattice. The extra loop at each end lets the fan keep growing.
Row 5: Ch 1, sc in first sc, ch 5, sc in next ch-5 sp; repeat from * 8 more times, ch 5, sc in last sc. (11 sc, 10 ch-5 sps)*
Fasten off, leaving a 4 in (10.2 cm) tail, and weave it in. Keep the long starting tail on the first wing.
Wing checkpoint: Lay the wing flat. The outer arc of loops should sit 2.5 in (6.4 cm) from the ring. The first sc of Row 5 is the top corner and the last sc of Row 5 is the tip corner. Put a marker in the tip corner sc.
Make the second wing the same way. Leave a 4 in (10.2 cm) starting tail and weave it in.
Make All Pieces
You need 2 wings in Cream. There are no color changes.
Layout, viewed from the front:
ROW 1: WING A (RS up, top corner up) | CENTER | WING B (flipped, top corner up)
Wing B is turned over so its wrong side faces you. That puts its top corner up and its tip down, mirroring Wing A. The lace looks almost the same on both sides, so the flip doesn’t show.
Joining
The wings are joined only at their center points, the magic rings.
- Lay Wing A on the left, RS up, with its top corner up and pointing left. Lay Wing B on the right, flipped, with its top corner up and pointing right.
- Slide the two rings together so they overlap by 0.25 in (0.6 cm).
- Thread Wing A’s long starting tail onto a tapestry needle.
- Join stitch to stitch. First sew through the base of the first Row 1 dc on Wing A and the base of the last Row 1 dc on Wing B. Then sew through the base of the last dc on Wing A and the first dc on Wing B. Repeat this pair of stitches twice more to lock the rings together.
- Wrap the tail firmly around the center 5 times to make a neat cinched waist. Anchor the tail with 2 stitches through the back of the wraps.
Tension: Pull the wraps snug, not tight. If you over-tighten, Row 2 puckers and the wings won’t lie flat. After wrapping, the center should be about 0.5 in (1.3 cm) tall.
Size checkpoint: The joined pair measures 5 in (12.7 cm) wide x 3 in (7.6 cm) tall. Don’t weave in the tail yet; tuck it to the back.
Border
The border runs around the entire outline of both wings in one continuous pass and adds 0.5 in (1.3 cm) on every outer edge.
Border gauge: Along the straight edges you work 3 sc per row-end, so 12 sc = 2.5 in (6.4 cm). The shells are 0.4 in (1.0 cm) tall, and the sc outline adds 0.1 in (0.3 cm).
Path around the outline: Wing A arc (top corner to tip), Wing A lower edge (tip to center), Wing B lower edge (center to tip), Wing B arc (tip to top corner), Wing B top edge (top corner to center), Wing A top edge (center to top corner).
Round 1 (shell round): With RS facing, join yarn with a sc in the top corner sc of Wing A.
- Wing A arc: Shell in next ch-5 sp, sc in next ch-5 sp; repeat from * 4 more times, sc in tip corner sc. (1 + 5 × 8 + 1 = 42 sts, 5 shells)*
- Wing A lower edge: 3 sc in each row-end of Rows 4, 3, 2 and 1. (12 sc)
- Center: No stitches. Pass straight from Wing A to Wing B, keeping the working yarn snug against the wraps.
- Wing B lower edge: 3 sc in each row-end of Rows 1, 2, 3 and 4. (12 sc)
- Wing B arc: Sc in tip corner sc, sc in next ch-5 sp, shell in next ch-5 sp; repeat from * 4 more times, sc in top corner sc. (42 sts, 5 shells)*
- Wing B top edge: 3 sc in each row-end of Rows 4, 3, 2 and 1. (12 sc)
- Wing A top edge: 3 sc in each row-end of Rows 1, 2, 3 and 4. Sl st to first sc. (12 sc)
Round 1 total: 66 sts per wing (12 + 42 + 12) x 2 wings = 132 sts.
Round 2 (outline round): Ch 1, sc in each st around. Work 2 sc in the center dc of every shell and 3 sc in each tip corner sc. Sl st to first sc and fasten off.
Round 2 total: 132 sts worked 1 per stitch + 10 extra sc at the shell centers + 4 extra sc at the two tips = 146 sts (73 per wing).
Why the math works: Row 5 ends with 10 ch-5 loops. The arc uses them in pairs (one shell, one sc), so 10 loops ÷ 2 = exactly 5 scallops with no leftover loop. The corner sc at each end of Row 5 frames the arc, which gives 42 arc stitches. The arc ends with two sc side by side at the tip, so the lower edge narrows to a point instead of a scallop. Each straight edge gets 4 row-ends x 3 sc = 12 sc. At 12 sc per 2.5 in (6.4 cm), that matches the 2.5 in (6.4 cm) radius, so the edges lie flat without rippling.
Hanging loop (optional): Join yarn in the 6th Round 2 sc of the Wing A top edge, counting from the center. Ch 30, about 8 in (20.3 cm). Sl st in the 6th sc of the Wing B top edge, counting from the center. Fasten off. The loop forms a V that rises about 3.5 in (8.9 cm) above the center.
Final Blocking
- Weave in all remaining tails. Run the joining tail through the wraps and the Row 1 dc.
- Wet the piece thoroughly in cool water and press out the excess in a towel. Don’t wring it.
- Lay the piece RS up on a blocking mat.
- Pin the center waist first. Then pin each top corner so the pair measures 6 in (15.2 cm) across.
- Pin each tip down so the height measures 4 in (10.2 cm).
- Pin the center dc of each shell outward to round the scallops. Open every diamond window with your fingertip.
- For a crisp ornament, spray lightly with starch. Let it dry completely (6–8 hours), then unpin and measure again.
Final Quality-Control Checklist
- On both wings, Rows 1–5 count 9 dc, 17 dc, 9 sc, 10 sc and 11 sc.
- Each wing has exactly 5 scallops and 1 pointed tip.
- Round 1 totals 132 sts and Round 2 totals 146 sts.
- The wings are mirror images, with their top corners level.
- The center wraps are neat and snug, with no visible knot on the front.
- The finished piece measures 6 in (15.2 cm) x 4 in (10.2 cm).
- The hanging loop is centered and both sides are equal.
- All tails are woven in and trimmed.
Troubleshooting
The fan cups or curls up. Your chain loops are too tight. Loosen your chains, or go up a hook size for Rows 3–5 only.
The fan ruffles. Your loops are too long. Keep the ch 4 and ch 5 snug, or drop to a 3.25 mm (D-3) hook.
The magic ring opens. Pull it closed again, then weave the tail back through the base of the Row 1 dc twice before joining.
The arc has the wrong number of loops. Recount Row 5. You need exactly 10 ch-5 sps. If an end loop is missing in Row 4 or Row 5, the scallops won’t come out even.
The wings are uneven heights. Make sure Wing B is flipped over, not rotated. Both top corners must point up.
The straight edges ripple. Work 2 sc instead of 3 into the Row 3 and Row 4 row-ends. Round 1 will then total 124 sts and Round 2 will total 138 sts.
Care
Hand wash in cool water with mild soap, roll the piece in a towel and dry it flat, reshaping the scallops while it’s damp. If you want the wings stiff again, re-starch them after washing.
Final Notes
The measurement chain is short and easy to check:
- Rows 1–2 give a 1 in (2.5 cm) fan.
- Rows 3–5 build the lattice out to a 2.5 in (6.4 cm) radius, so one wing measures 2.5 in (6.4 cm) x 3 in (7.6 cm).
- Two wings joined at the center make 5 in (12.7 cm) x 3 in (7.6 cm).
- The two-round border adds 0.5 in (1.3 cm) on each edge, for a finished size of 6 in (15.2 cm) x 4 in (10.2 cm).
If every checkpoint matches, your wings will hang flat and open, with even scallops. Make one pair as a gift, or a few for the tree.
Happy crocheting!