

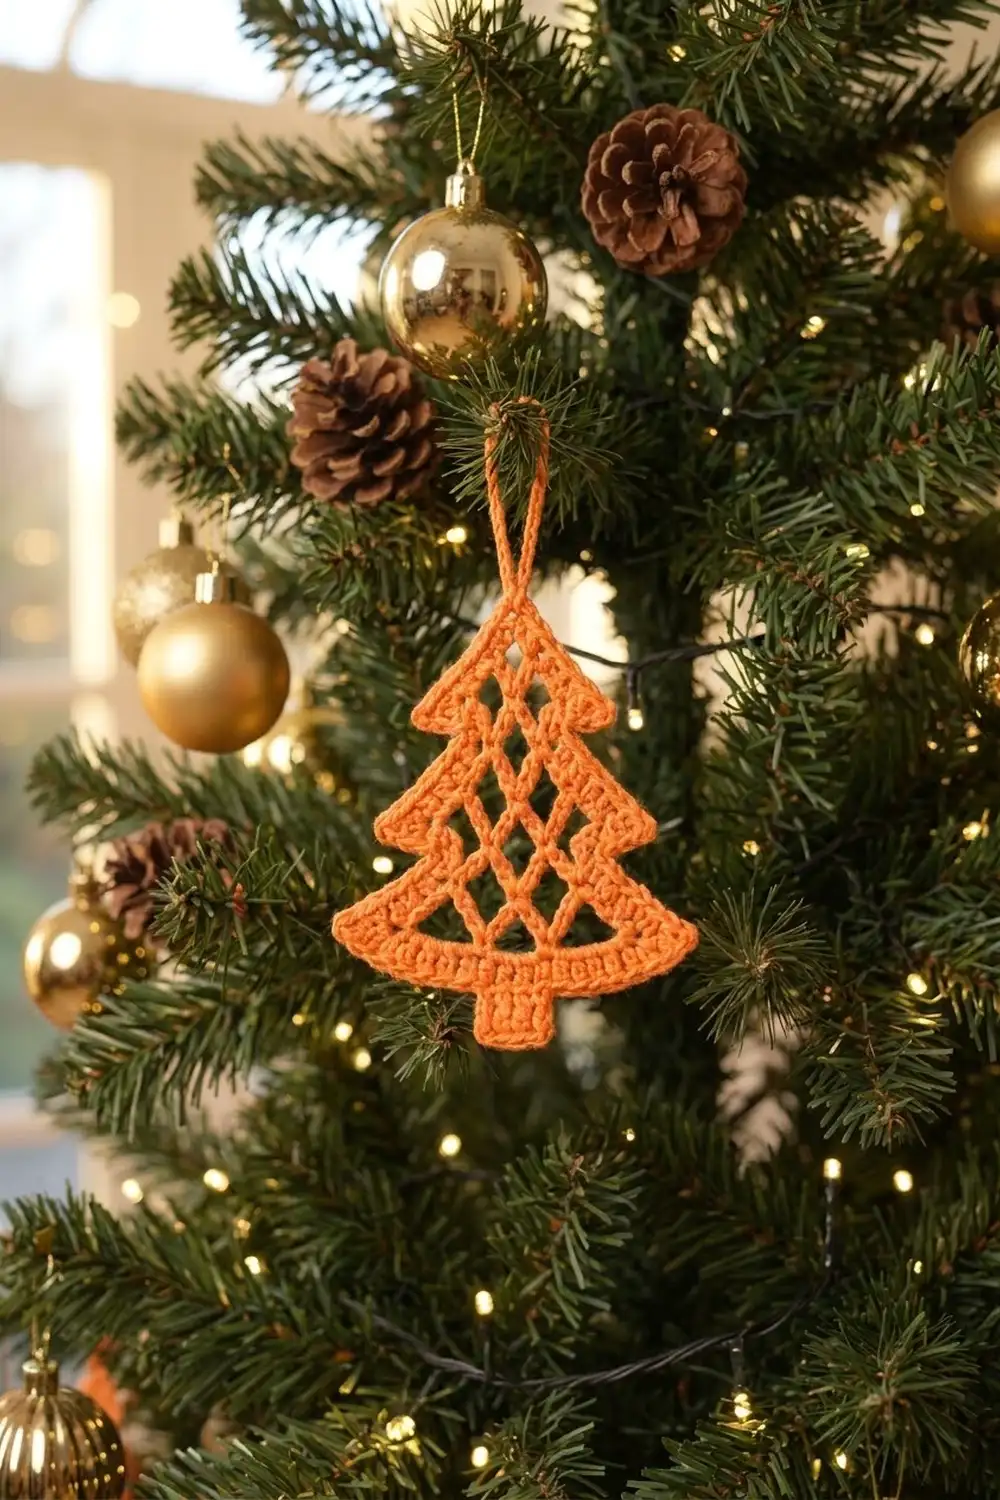
This little tree is one of those projects that looks delicate on the branch but works up quickly in your hands. The body is an openwork diamond lattice that lets the tree lights glow through. A neat single crochet outline gives it a crisp silhouette, and a small rectangular trunk anchors the base.
The ornament is made entirely in one bright orange yarn, and the hanging loop is worked in the same color. Orange reads warm and cheerful against green branches and gold baubles, but the pattern works in any solid color.
This pattern uses US crochet terms. The finished ornament measures about 4.6 in (11.7 cm) tall and 3.9 in (9.9 cm) wide, plus a 1.5 in (3.8 cm) hanging loop.
Construction overview: You work the triangular body bottom-up in rows. A single crochet foundation row is followed by staggered double crochet lattice rows, and each row is one mesh space narrower than the last. Next you work the trunk directly into the bottom of the foundation. Finally, one round of single crochet outlines the whole shape, and you chain the hanging loop at the tip as part of that round. The result is one piece with no sewing.
Finished Size and Construction
- Finished size: 4.6 in (11.7 cm) tall × 3.9 in (9.9 cm) wide, excluding the hanging loop
- Hanging loop: 1.5 in (3.8 cm)
- Skill level: Easy / advanced beginner
- Terminology: US crochet terms
- Yarn weight: DK (#3), cotton or cotton blend
- Hook: 3.5 mm (US E-4)
- Number of pieces: 1. The trunk is worked onto the body, and the border and loop are part of the same piece.
- Layout: A single tree shape: triangular lattice body, centered trunk, loop at the tip
- Size before border: 4.2 in (10.7 cm) tall × 3.5 in (8.9 cm) wide, trunk included
- Border depth: 0.2 in (0.5 cm) on every edge, from one round of sc
Materials
Yarn advice: Choose a smooth, mercerized or matte cotton in DK weight. Cotton holds the lattice open, blocks crisply, and doesn’t fuzz over the diamond windows. Avoid fuzzy acrylics and mohair blends, because they blur the mesh.
- Orange (main and only color): 8 g (18 m / 20 yd)
This quantity includes a margin of roughly 50% for your gauge swatch, the tails, and any ripped-back rows. The ornament itself uses about 5 g.
Tools:
- 3.5 mm (US E-4) crochet hook
- Tapestry needle
- Scissors
- Stitch marker (optional)
- Blocking mat or folded towel
- Rust-proof pins
- Spray bottle with water
- Optional: fabric stiffener or a diluted starch spray, for a firmer ornament
Abbreviations (US Terms)
- ch – chain
- sl st – slip stitch
- sc – single crochet
- dc – double crochet
- sp(s) – space(s)
- st(s) – stitch(es)
- sk – skip
- rep – repeat
- free loop – the unworked loop on the underside of the foundation chain
Special technique: Lattice step. At the start of each lattice row, turn and sl st into the first ch-2 sp. Then ch 3; this ch-3 counts as the first dc. Work across the row, but stop after the dc in the last ch-2 sp. This moves the row inward by half a mesh on each side, so you lose one mesh space per row. The dc posts provide the height, and the stepping creates the triangle.
Gauge and Checkpoints
Gauge: 22 sc and 24 rows = 4 in (10.2 cm), which is 5.5 sc and 6 rows per inch. Each lattice row measures about 0.5 in (1.3 cm) tall when gently stretched flat.
Test one piece first. Your foundation row doubles as a gauge swatch. Work the foundation and Row 1, then measure before you go any further.
Checkpoints:
- After Row 1: 19 sc measure about 3.5 in (8.9 cm) wide.
- After Row 4: the body is about 1.7 in (4.3 cm) tall, measured gently stretched.
- After Row 8: the body is about 3.7 in (9.4 cm) tall from the bottom edge to the tip.
- After the trunk: the total height is about 4.2 in (10.7 cm). The trunk measures about 0.5 in (1.3 cm) wide and 0.5 in (1.3 cm) tall.
- After the border and blocking: the ornament is 4.6 in (11.7 cm) tall × 3.9 in (9.9 cm) wide.
If Row 1 is too wide (over 3.7 in / 9.4 cm), go down to a 3.25 mm hook. If it is too narrow (under 3.3 in / 8.4 cm), go up to a 3.75 mm or 4 mm hook.
Don’t change the stitch counts. The border math depends on them.
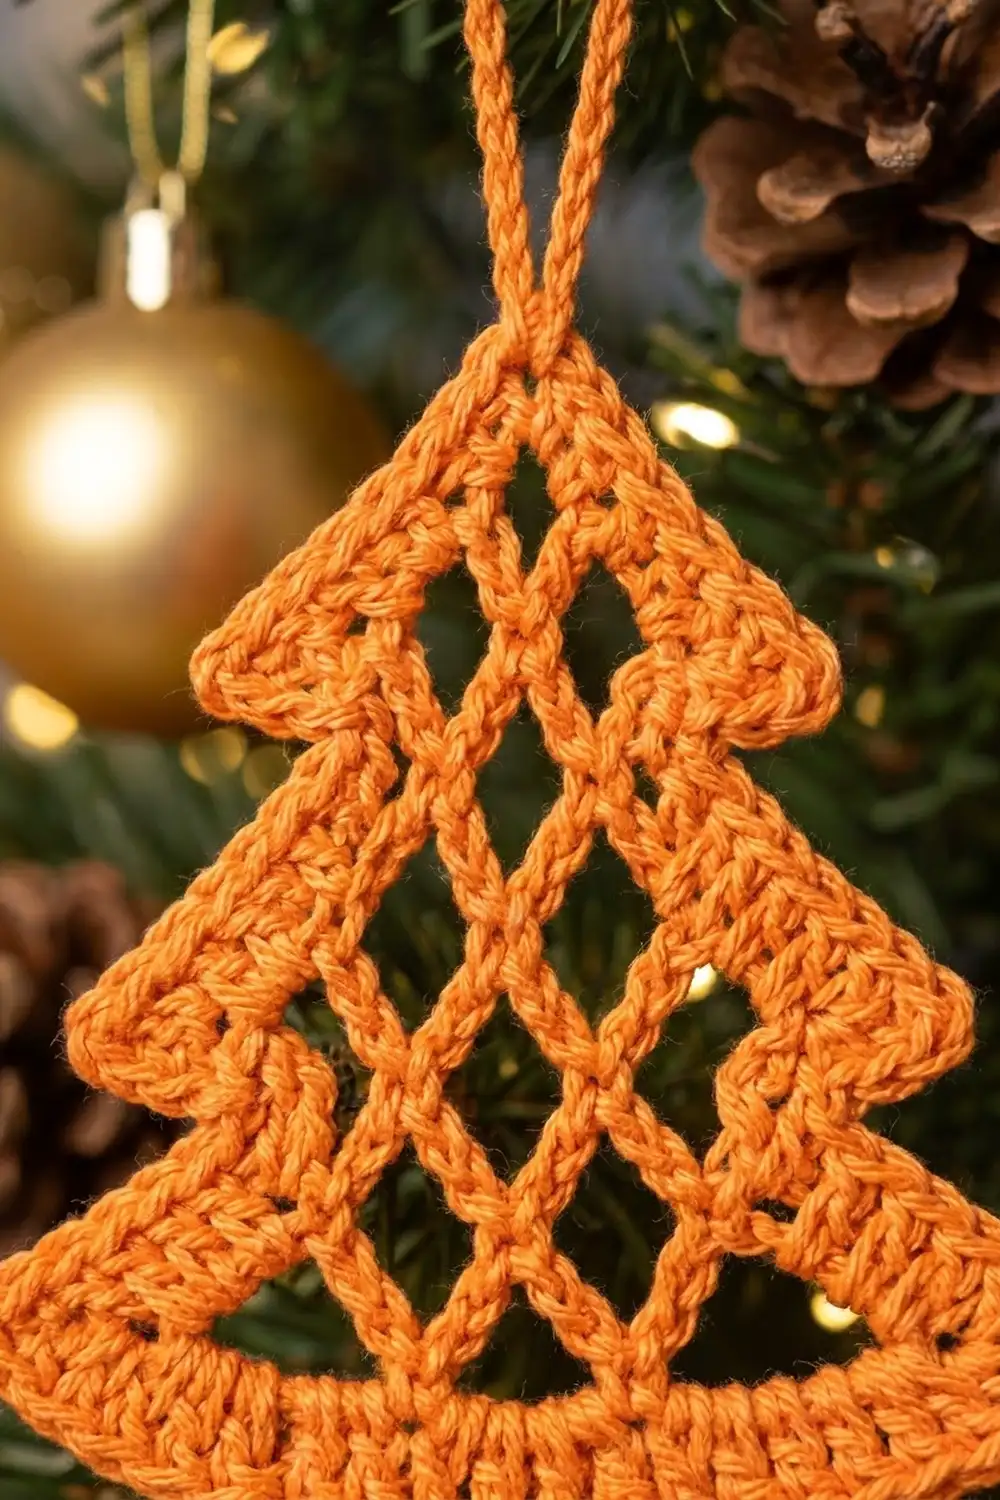
Body (Triangular Lattice)
Foundation: Ch 20.
Row 1: Sc in 2nd ch from hook and in each ch across. Turn. (19 sc)
Row 2: Ch 3 (counts as dc in the first sc). Ch 2, sk 2 sc, dc in next sc; rep from * 5 more times (6 repeats total). Turn. (7 dc, 6 ch-2 sps)
Check: 1 starting st + 6 repeats × 3 sts = 19 sts, so every Row 1 st is used.
Row 3: Sl st into first ch-2 sp, ch 3 (counts as dc). Ch 2, dc in next ch-2 sp; rep from * 4 more times. Turn. (6 dc, 5 ch-2 sps)
Each dc sits in the center of a space below, so the posts stagger and the windows open into diamonds.
Row 4: Sl st into first ch-2 sp, ch 3 (counts as dc). Ch 2, dc in next ch-2 sp; rep from * 3 more times. Turn. (5 dc, 4 ch-2 sps)
Row 5: Sl st into first ch-2 sp, ch 3 (counts as dc). Ch 2, dc in next ch-2 sp; rep from * 2 more times. Turn. (4 dc, 3 ch-2 sps)
Row 6: Sl st into first ch-2 sp, ch 3 (counts as dc). Ch 2, dc in next ch-2 sp; rep from * once more. Turn. (3 dc, 2 ch-2 sps)
Row 7: Sl st into first ch-2 sp, ch 3 (counts as dc), ch 2, dc in next ch-2 sp. Turn. (2 dc, 1 ch-2 sp)
Row 8 (tip): Sl st into the ch-2 sp, ch 3 (counts as dc), dc in same sp. (2 dc)
Fasten off, leaving a 4 in (10.2 cm) tail.
Symmetry check: The Row 2 posts sit over sts 1, 4, 7 … 19. Each row moves inward by 1.5 sts per side, and the two Row 8 dc meet over st 10, the exact center.
Trunk
The trunk is worked into the free loops on the underside of the foundation chain. It uses the center 3 of the 19 sts, leaving 8 sts free on each side.
Turn the body upside down so the foundation chain faces up.
Row 1: Join yarn in the free loop of the 9th foundation st. Ch 1, sc in same st and in next 2 sts. Turn. (3 sc)
Rows 2–3: Ch 1, sc in each sc across. Turn. (3 sc)
Fasten off and weave in the ends.
Checkpoint: The trunk measures 0.5 in (1.3 cm) wide and 0.5 in (1.3 cm) tall, and it sits centered under the body.
Border and Hanging Loop
Border gauge: The border is worked at the same density as the fabric, about 5.5 sc per inch, so it lies flat without cupping or ruffling.
Round 1: With RS facing, join yarn at the tip, between the two Row 8 dc. Work every section below in order around the outline, then sl st to the first sc and fasten off.
| Section | What to work | Count |
|---|---|---|
| Tip | (Sc, ch 16, sc) in the joining spot. The ch-16 is the hanging loop. | 2 sc |
| Side A (slanted) | 3 sc around each row-end post of Rows 8, 7, 6, 5, 4, 3, 2 (7 rows × 3) | 21 sc |
| Bottom corner A | 3 sc in the first foundation st (covers the Row 1 row-end and the corner) | 3 sc |
| Bottom left | 1 sc in each free loop of foundation sts 2–8 | 7 sc |
| Trunk side | 1 sc in the row-ends of trunk Rows 1 and 2 | 2 sc |
| Trunk corner | 3 sc in the first st of trunk Row 3 | 3 sc |
| Trunk bottom | 1 sc in the middle st of trunk Row 3 | 1 sc |
| Trunk corner | 3 sc in the last st of trunk Row 3 | 3 sc |
| Trunk side | 1 sc in the row-ends of trunk Rows 2 and 1 | 2 sc |
| Bottom right | 1 sc in each free loop of foundation sts 12–18 | 7 sc |
| Bottom corner B | 3 sc in the last foundation st (st 19) | 3 sc |
| Side B (slanted) | 3 sc around each row-end post of Rows 2 through 8 | 21 sc |
Round total: 2 + 21 + 3 + 7 + 11 (trunk) + 7 + 3 + 21 = 75 sc, plus the ch-16 loop.
Foundation st check: Sts 1 and 19 are the corners, sts 2–8 and 12–18 are the bottom runs, and sts 9–11 hold the trunk. That accounts for all 19 sts, with none skipped and none doubled.
Why the math works:
- Slanted sides. Each side rises 3.7 in (9.4 cm) over a half-width of about 1.75 in, so its true length is about 4.1 in (10.4 cm). It carries 21 sc plus roughly half of each adjacent corner group, about 22–23 sc in all. That works out to about 5.5 sc per inch, which matches the fabric gauge.
- Bottom edges. These are worked 1 sc per foundation st, so they match the fabric gauge automatically.
- Trunk sides. The trunk is sc fabric at 6 rows per inch, worked 1 sc per row. That is close enough to 5.5 sc per inch to lie flat over such a short edge.
- Corners. The 3-sc corners supply the extra stitches each outside corner needs to turn without pulling.
Loop checkpoint: A ch-16 in DK cotton is about 2.9 in (7.4 cm) long. Folded at the tip, it makes a loop about 1.5 in (3.8 cm) tall.
Final Blocking
- Weave in all ends along the border stitches, not across the lattice, so the tails stay hidden.
- Spritz the ornament until it is evenly damp but not dripping.
- Lay it face up on the blocking mat.
- Pin the tip and both bottom corners first, to measure 4.1 in (10.4 cm) along each slanted side and 3.9 in (9.9 cm) across the base.
- Pin the trunk corners straight down so the trunk is rectangular and centered.
- Use a few pins or a blunt needle to open each diamond window evenly. The posts should lean into clean diagonals.
- Lay the hanging loop straight up from the tip.
- Optional: For a firmer ornament, mist with diluted starch or brush on fabric stiffener.
- Let it dry completely, usually 6–12 hours, before you unpin it.
- Measure again. The ornament should be 4.6 in (11.7 cm) tall × 3.9 in (9.9 cm) wide.
Final Quality-Control Checklist
- Row 1 has 19 sc, and the row measures about 3.5 in (8.9 cm).
- The lattice rows count down 7, 6, 5, 4, 3, 2 dc, ending with a 2-dc tip.
- The tip sits centered over foundation st 10.
- The trunk is 3 sc wide, 3 rows tall, and joined at foundation sts 9–11.
- The border round has 75 sc, and the hanging loop is attached at the tip.
- Both slanted sides are straight and the same length.
- The diamond windows are open and even.
- All ends are woven into the border.
- The finished size is 4.6 in (11.7 cm) × 3.9 in (9.9 cm).
Troubleshooting
The tree leans to one side. You probably missed the starting sl st on a lattice row, or added an extra repeat. Count the dc in each row against the pattern.
The slanted sides ruffle. You have too many border stitches. Work 3 sc per row-end exactly, and keep the border tension the same as the body.
The slanted sides cup or pull inward. Your border is too tight, or you worked only 2 sc in some row-ends. Loosen up, or go up 0.25 mm for the border round only.
The diamonds look like squares. This usually means the piece is under-blocked. Re-wet it and pin each window open diagonally.
The trunk is off-center. Count the free loops from both ends before joining. There should be exactly 8 sts on each side of the trunk.
The hanging loop is too short or too long. Adjust the chain by 2 ch at a time. Each 2 ch changes the loop height by about 0.2 in (0.5 cm).
The ornament is floppy. Use cotton rather than acrylic, or apply stiffener after blocking.
Care
Spot clean only, or hand wash in cool water. Reshape the ornament and dry it flat, pinned if needed. If you used stiffener, re-stiffen after washing.
Final Notes
The whole ornament follows one measurement chain. The 19-sc foundation measures 3.5 in (8.9 cm). The staggered lattice steps in by one mesh per row to a centered tip, at 3.7 in (9.4 cm) tall. The 3-sc trunk brings the height to 4.2 in (10.7 cm). The 75-sc border adds 0.2 in (0.5 cm) on every edge, for a finished size of 4.6 in (11.7 cm) × 3.9 in (9.9 cm).
If your foundation row matches and your counts are right, the rest falls into place.
Optional: if you’d like a coordinated set, simply repeat the pattern. Each ornament stays a separate piece.
Happy crocheting!