

The Evergreen Lace Tree Motif is a single triangular motif: a sage green Christmas tree of three stacked fan tiers, set inside an open cream frame of chain mesh. Each tier flares wider than the one above it. A small eyelet sits at every tier junction, so the tree looks light even though the fans are solid.
The palette is just two colors: a soft sage green for the tree and a warm cream for the frame. The look is vintage lace with a calm, modern feel. It works as an ornament, a gift tag, or a window decoration, and it hangs from its own built-in loop.
This pattern uses US crochet terms. The finished motif measures 5.5 in (14.0 cm) wide across the base and 5 in (12.7 cm) tall, not counting the hanging loop.
Construction is simple. You crochet the tree in green, flat, in 9 turned rows from the top point down. Then you work 3 rounds of cream around the tree to build the triangle frame. The first round makes anchor loops, the second makes mesh loops, and the last makes solid sides, a scalloped base, and a hanging loop.
Finished Size and Construction
- Finished size: 5.5 in (14.0 cm) wide x 5 in (12.7 cm) tall, plus a hanging loop of about 0.75 in (1.9 cm)
- Skill level: Easy
- Terminology: US crochet terms
- Yarn weight: DK (light, #3) cotton or cotton blend
- Hook: 3.5 mm (E-4)
- Number of pieces: 1 single motif, nothing to join
- Layout: one upright triangle, tree centered, point at the top
- Piece size (tree only): 3.5 in (8.9 cm) wide x 3.5 in (8.9 cm) tall
- Size before border: 3.5 in (8.9 cm) x 3.5 in (8.9 cm), the green tree
- Border depth: about 0.75 in (1.9 cm) above and below the tree, and about 1 in (2.5 cm) beyond each bottom tier tip
Materials
Choose a smooth mercerized cotton or a cotton blend in DK weight, about 115 m per 50 g. Cotton gives crisp fans and holds the mesh shape well after blocking. Avoid fuzzy yarns, because they blur the eyelets and the chain lines.
A finer cotton with a smaller hook will make a smaller ornament. All the sizes in this pattern assume DK weight and the stated gauge.
- Sage green (tree): 8 g, about 18 m
- Cream (frame): 7 g, about 16 m
These quantities include a margin of roughly 30 percent for your test tier and for tails.
Tools:
- 3.5 mm (E-4) crochet hook
- Tapestry needle
- Scissors
- Stitch markers (7, for the border anchor points)
- Ruler or tape measure
- Blocking mat and rust-proof pins
- Spray bottle with cool water
Abbreviations (US Terms)
- ch = chain
- sl st = slip stitch
- sc = single crochet
- dc = double crochet
- st(s) = stitch(es)
- sp = space
- sk = skip
- beg = beginning
Special stitch: V-eyelet. Ch 5 (counts as dc plus ch 2), then dc in the same space. This gives two dc legs with a ch-2 space between them. That ch-2 space becomes the eyelet at a tier junction, and the next tier fans out from it.
Note: In this pattern, ch 3 at the start of a row counts as a dc. Ch 1 at the start of a row or round does not count as a stitch.
Gauge and Checkpoints
Gauge: 18 dc and 10 rows = 4 in (10.2 cm) in plain rows. Each dc row is about 0.4 in (1.0 cm) tall.
You don’t need a separate swatch. Test the motif itself: work Rows 1 and 2 (tier 1) and measure. This small fan tells you almost everything. Measure tier 1 straight across from tip to tip, flat on the table, without stretching it.
Checkpoints:
- After Row 2: tier 1 is about 1.5 in (3.8 cm) wide.
- After Row 5: tier 2 is about 2.25 in (5.7 cm) wide, and the tree is about 2 in (5.1 cm) tall.
- After Row 9: tier 3 is about 3.5 in (8.9 cm) wide, and the tree is about 3.5 in (8.9 cm) tall.
- After border Round 1: the base is about 4.25 in (10.8 cm) wide.
- After border Round 3 and blocking: the motif is 5.5 in (14.0 cm) wide x 5 in (12.7 cm) tall.
If tier 1 is too big (wider than about 1.75 in / 4.4 cm), go down to a 3.25 mm hook. If it is too small (narrower than about 1.25 in / 3.2 cm), go up to a 3.75 mm hook. Change the hook, not the stitch counts: the counts control the shape, and the hook controls the size.
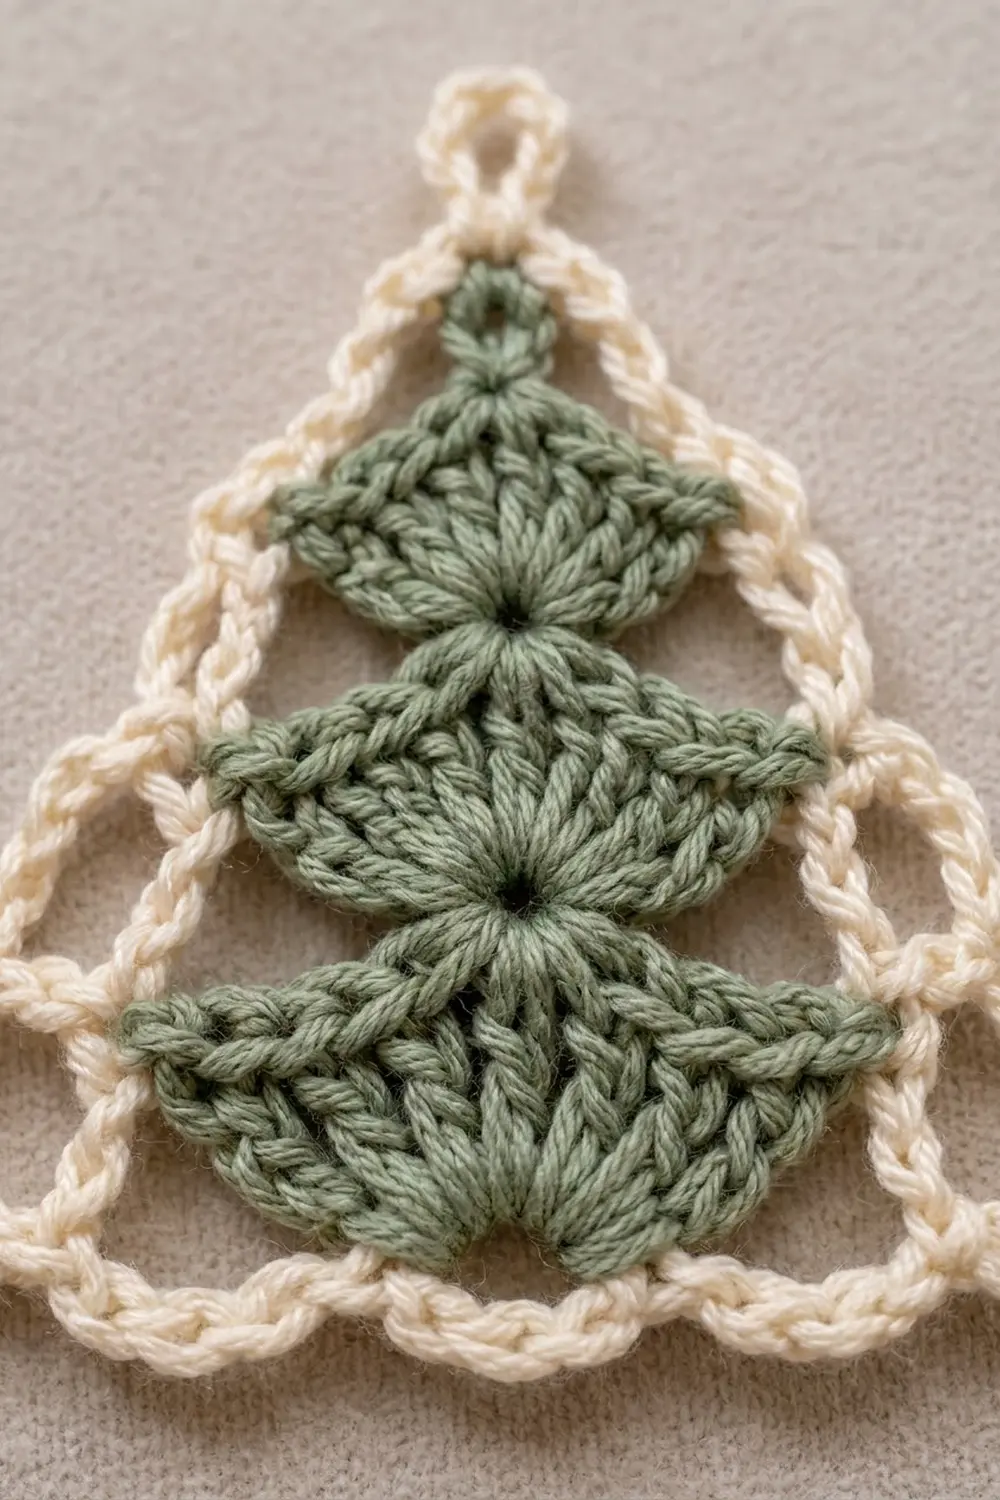
Tree (Sage Green)
The tree is worked in turned rows from the top point down. Each tier is a half-circle fan. Tier 1 starts from a ring. Tiers 2 and 3 each start from a V-eyelet worked at the center of the tier above.
Because the rows are turned, the tree looks nearly the same on both sides. When it’s done, use the side with the neater eyelets as the front.
Tier 1
Row 1: Ch 4, sl st in first ch to form a ring. Ch 3 (counts as dc), 6 dc in ring. Turn. (7 dc)
The 7 dc cover only the lower half of the ring. The upper half stays free, and you’ll join the cream there later.
Row 2: Ch 3, dc in first st, 2 dc in each of next 6 sts. Turn. (14 dc)
Checkpoint: about 1.5 in (3.8 cm) wide.
Tier 2
Row 3 (V-eyelet row): Ch 1, sl st loosely in each of first 7 sts, then sl st in the space between the 7th and 8th sts (the exact center). Ch 5 (counts as dc plus ch 2), dc in same space. Turn. (2 dc, 1 ch-2 sp)
Keep the slip stitches loose so the bottom edge of tier 1 doesn’t pucker.
Row 4: Ch 3, 9 dc in ch-2 sp, dc in 3rd ch of beg ch-5. Turn. (11 dc)
Row 5: Ch 3, dc in first st, 2 dc in each of next 10 sts. Turn. (22 dc)
Checkpoint: tier 2 is about 2.25 in (5.7 cm) wide, and the tree is about 2 in (5.1 cm) tall.
Tier 3
Row 6 (V-eyelet row): Ch 1, sl st loosely in each of first 11 sts, then sl st in the space between the 11th and 12th sts (the center). Ch 5, dc in same space. Turn. (2 dc, 1 ch-2 sp)
Row 7: Ch 3, 11 dc in ch-2 sp, dc in 3rd ch of beg ch-5. Turn. (13 dc)
Row 8: Ch 3, dc in first st, 2 dc in each of next 12 sts. Turn. (26 dc)
Row 9: Ch 3 (counts as dc), dc in next st, [2 dc in next st, dc in next st] 11 times, dc in each of last 2 sts. (37 dc)
Row 9 works into all 26 sts: 2 + 22 + 2 = 26. It makes 2 + 33 + 2 = 37 dc, which is 11 increases. Fasten off and weave in the green tails.
Checkpoint: tier 3 is about 3.5 in (8.9 cm) wide, and the tree is about 3.5 in (8.9 cm) tall.
The fans follow a simple half-circle rule. Each fan doubles in its second row (7 to 14, 11 to 22, 13 to 26). Tier 3 then adds a third row at half that rate (26 to 37). That’s why each tier lies flat and flares gently instead of ruffling.
Border (Cream Frame)
The cream frame is this motif’s border. It is 3 rounds deep and turns the tree into a triangle. Work every cream round with the front of the tree facing you.
Keep your chains even and relaxed. The chains are the visible lace, so uneven chain tension shows more than anything else.
Border gauge: 21 sc = 4 in (10.2 cm) along the finished frame. Each side loop of 7 sc measures about 1.3 in (3.3 cm). Each bottom scallop is about 0.5 in (1.3 cm) wide.
Anchor points. Before you start, place markers on these 7 points:
- the free top half of the ring (the top point)
- both end sts of Row 2 (tier 1 tips)
- both end sts of Row 5 (tier 2 tips)
- both end sts of Row 9 (tier 3 tips, which become the bottom corners)
Round 1 (anchor loops)
Join cream with sc in the free top half of the ring.
- Side A: Ch 6, sc in tier 1 tip; ch 6, sc in tier 2 tip; ch 6, sc in the end st of Row 9 on this side (corner A). (3 ch-6 loops)
- Base: [Ch 4, sk 3 sts, sc in next st] 9 times. The last sc lands in the end st on the other side (corner B). (9 ch-4 loops)
- Side B: Ch 6, sc in tier 2 tip; ch 6, sc in tier 1 tip; ch 6, sl st in first sc. (3 ch-6 loops)
Round 1 total: 15 sc and 15 loops (6 ch-6 loops and 9 ch-4 loops).
To check the base: 1 st for corner A, then 9 repeats of 4 sts each, gives 1 + 36 = 37 sts. Every Row 9 st is used.
Round 2 (mesh)
This round puts one sc in every loop, plus one sc on each of the 3 corner sc. That way each corner gets its own loops.
Ch 1, sc in same sc (top point).
- Side A: [Ch 7, sc in next ch-6 loop] 3 times, ch 7, sc in corner A sc. (4 ch-7 loops)
- Base: [Ch 4, sc in next ch-4 loop] 9 times, ch 4, sc in corner B sc. (10 ch-4 loops)
- Side B: [Ch 7, sc in next ch-6 loop] 3 times, ch 7, sl st in first sc. (4 ch-7 loops)
Round 2 total: 18 sc and 18 loops: 4 on each side and 10 across the base.
Round 3 (frame and scallops)
Ch 1.
- Top corner: (sc, ch 12, sc) in first sc. The ch-12 is the hanging loop.
- Side A: 7 sc in each of next 4 ch-7 loops. (28 sc)
- Corner A: (sc, ch 3, sc) in corner sc.
- Base: (sc, ch 3, sc) in each of next 10 ch-4 loops. (20 sc, 10 ch-3 scallops)
- Corner B: (sc, ch 3, sc) in corner sc.
- Side B: 7 sc in each of next 4 ch-7 loops. (28 sc)
Sl st in first sc. Fasten off and weave in the ends.
Round 3 counts per side, not counting corner sc:
- Side A: 28 sc
- Side B: 28 sc
- Base: 20 sc plus 10 scallops
Each of the 3 corners has 2 sc of its own. Total: 28 + 28 + 20 + 6 = 82 sc.
Why the math works:
- Straight sides. Each side loop is ch 7 and gets exactly 7 sc, one per chain. That 1:1 fill keeps the sides straight and flat.
- Scalloped base. Each base loop is ch 4 but gets only 2 sc plus a ch-3. That’s slightly shorter than a full fill, so the base pulls into small, even scallops.
- Clean corners. Each corner gets its own sc point in Round 2, so it turns cleanly without cupping.
- Even spacing. Each round puts one sc in every loop of the round before (15 loops, then 18 loops including the 3 corner points), so nothing drifts out of place.
Final Blocking
- Weave in all tails into stitches of their own color.
- Lay the motif face up on a blocking mat.
- Pin the top point and both bottom corners first, forming a triangle 5.5 in (14.0 cm) across the base and 5 in (12.7 cm) tall.
- Pin the sides straight between the corners, with one pin per side loop.
- Pin the base with one pin in each ch-3 scallop so all 10 are even.
- Ease each tree tier flat, and open each eyelet with a fingertip.
- Pin the hanging loop straight up, centered above the tree.
- Mist with cool water until damp, not soaking.
- Let it dry completely, at least 6 hours, before unpinning.
For a crisper ornament, use a light fabric stiffener instead of plain water at step 8.
Final Quality-Control Checklist
- Tier counts are 14, 22, and 37 dc after Rows 2, 5, and 9.
- Each tier junction shows one clear, open eyelet.
- The tree measures 3.5 in (8.9 cm) wide and 3.5 in (8.9 cm) tall.
- Round 1 has 15 loops, and Round 2 has 18 loops.
- Each side has 28 sc in Round 3, not counting corners.
- The base has 10 even scallops plus 2 corner scallops.
- The hanging loop sits directly above the tree.
- The finished size is 5.5 in (14.0 cm) x 5 in (12.7 cm).
- All tails are woven in and invisible from the front.
Troubleshooting
Tiers ruffle. Your tension is loose, or you added extra increases. Recount Rows 5, 8, and 9, then go down a hook size.
Tiers cup. You’re working too tightly. Go up a hook size and keep the dc tall.
Tier edge puckers above an eyelet. The slip stitches in Row 3 or Row 6 are too tight. Redo them loosely, or work them with a larger hook.
Eyelets close up. The ch 5 of the V-eyelet is too tight. Chain it in a relaxed way.
Tree is off-center. The V-eyelet isn’t at the exact center. In Row 3 it must sit between sts 7 and 8, and in Row 6 between sts 11 and 12.
Base loops don’t line up. Recount Row 9. You need exactly 37 dc for the 9 ch-4 loops in Round 1.
Sides bow inward. The side loops are too short, or you worked fewer than 7 sc per loop. Check the ch-7 counts in Round 2.
Corners curl. You skipped a corner sc in Round 2. Each corner needs its own sc, with a loop on each side.
Hanging loop twists. Chain the ch-12 loosely and pin it straight while blocking.
Care
Hand wash in cool water with mild soap, roll in a towel, and dry flat. If the mesh relaxes, reshape it and pin it again.

Final Notes
The whole motif follows one chain of measurements:
- Tier 1 is 1.5 in (3.8 cm) wide.
- Tier 2 is 2.25 in (5.7 cm) wide.
- Tier 3 is 3.5 in (8.9 cm) wide, and the tree is 3.5 in (8.9 cm) tall.
- Border Round 1 brings the base to 4.25 in (10.8 cm).
- The blocked triangle is 5.5 in (14.0 cm) wide and 5 in (12.7 cm) tall.
The stitch counts are just as short: 14, 22, and 37 dc in the tree, then 15 loops, 18 loops, and 82 sc in the frame.
Check tier 1 before anything else. If it’s right, the rest follows from the counts.
Happy crocheting!