

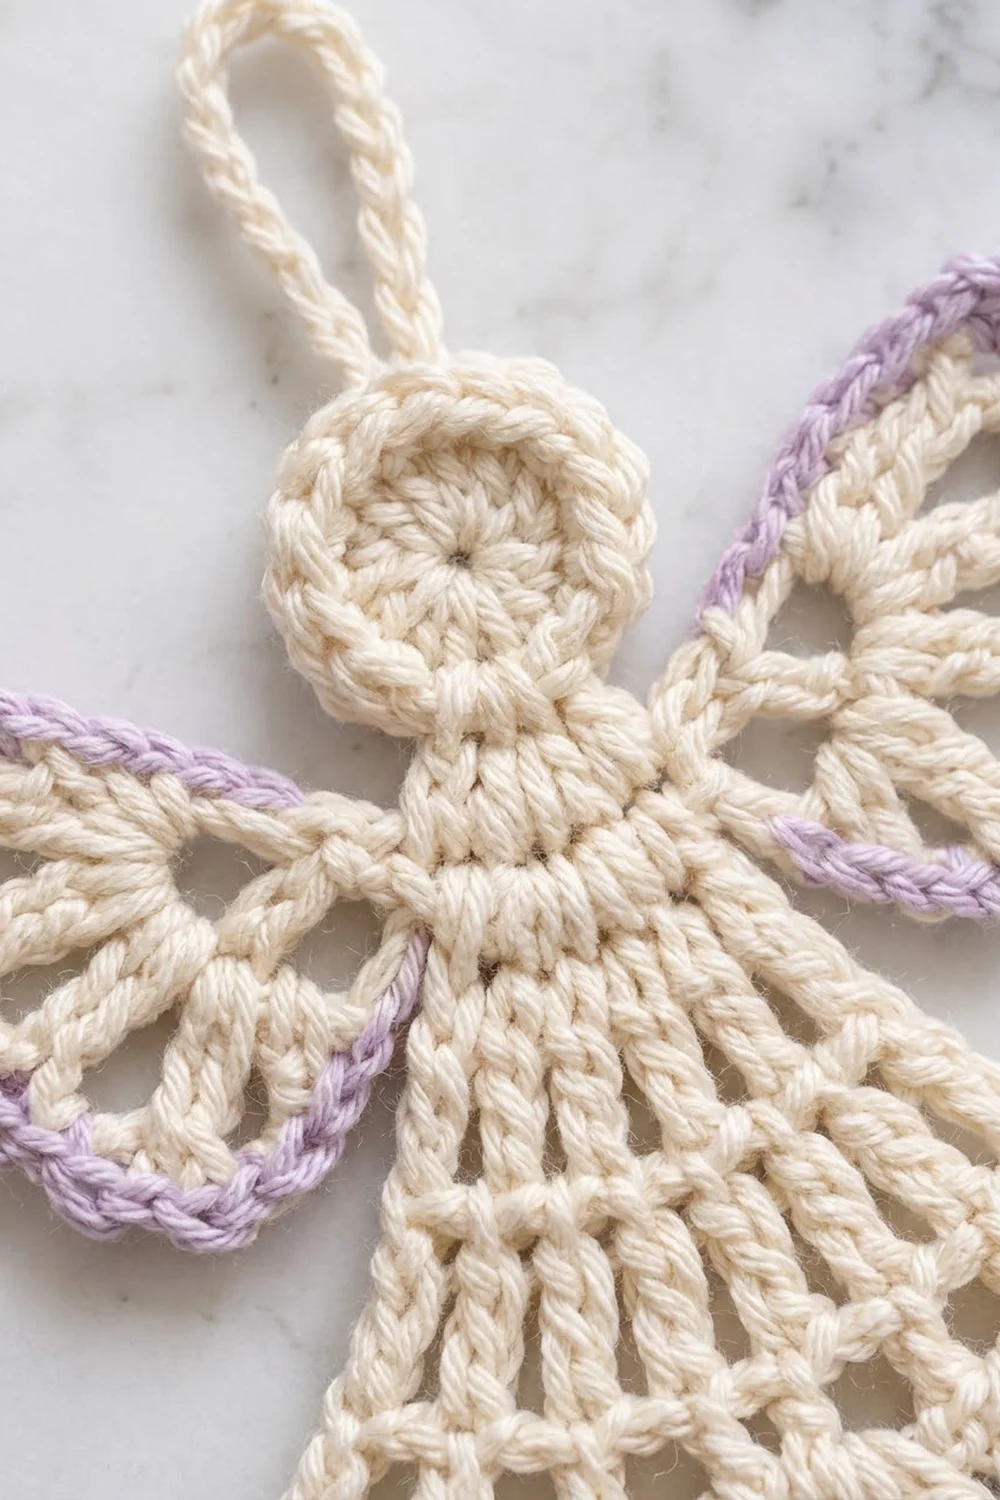
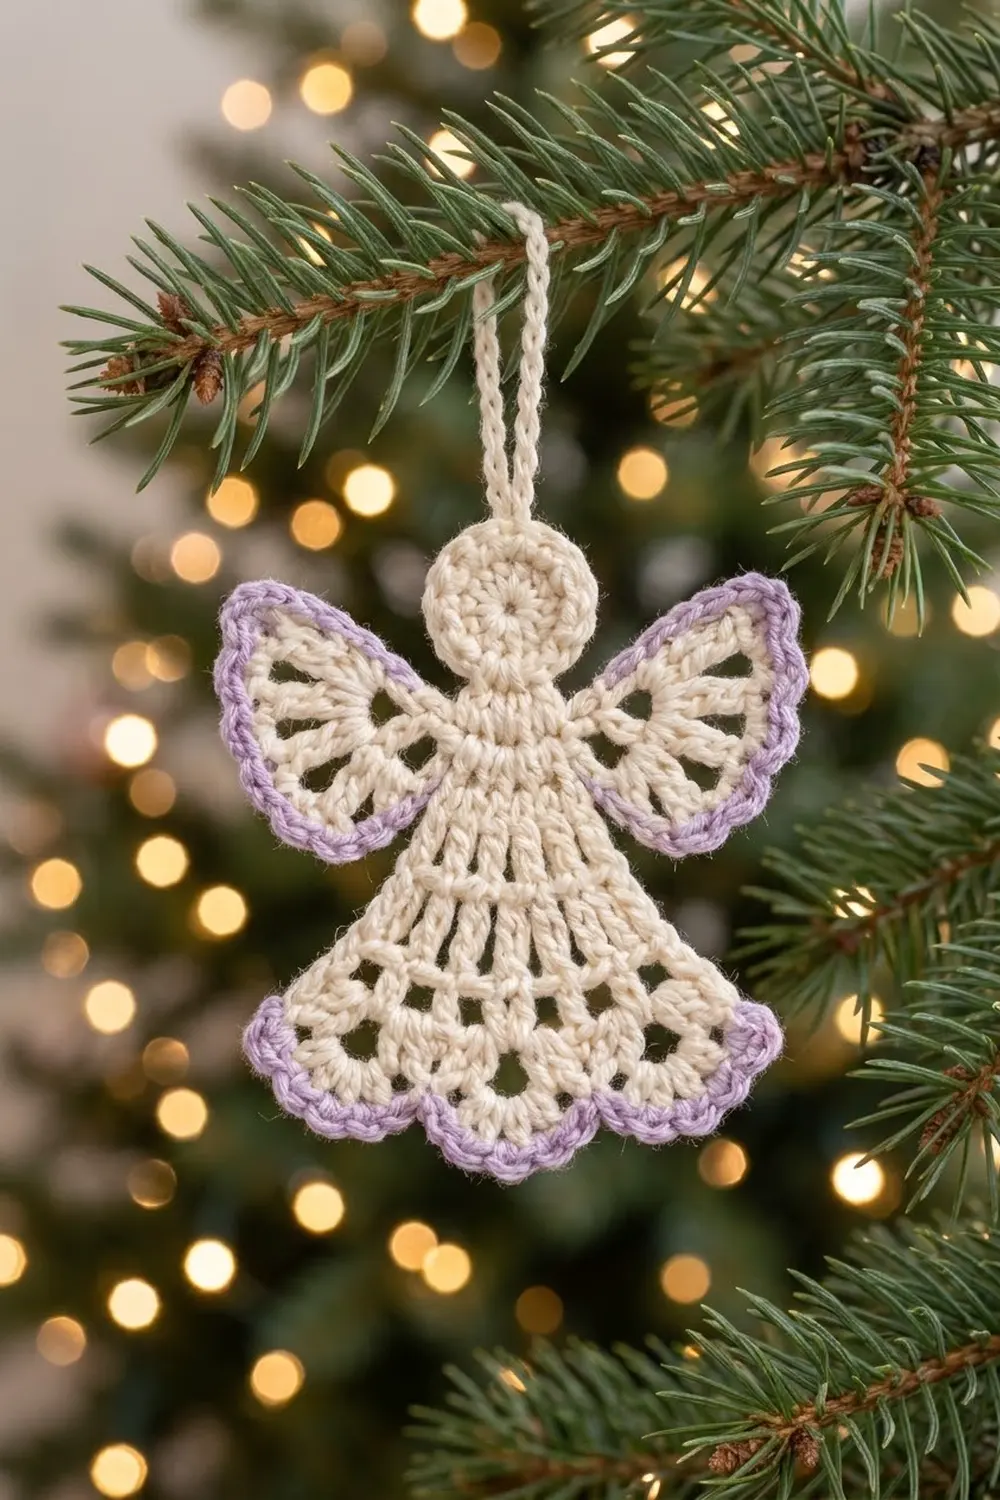
This lace angel is a small, flat ornament worked in soft cream with a thin lavender edge. It has a round head, a flared bell skirt, two open fan wings and a scalloped hem. The lavender outlines the wings and the hem, so the shape stands out against a tree, a window or a gift tag.
The style is light and lacy rather than solid. Rows of upright double crochet give the skirt soft vertical ribs. Below them, one row of open mesh and a row of shell scallops make a delicate border. The wings are mostly open space framed by stitch spokes, so light shows through when the angel hangs.
This pattern uses US crochet terms throughout. The finished angel measures about 4 in (10.2 cm) tall without the loop and 4.5 in (11.4 cm) wide. The hanging loop adds about 1.25 in (3.2 cm).
The angel is one continuous piece. First you work the head in the round. Then the skirt is worked in turned rows straight off the bottom of the head. Each wing is worked into the side of the second skirt row. Last, a lavender edge goes around the hem and the wings, and a cream loop is added at the top.
Finished Size and Construction
- Finished size: 4 in (10.2 cm) tall × 4.5 in (11.4 cm) wide, excluding the loop
- Hanging loop: about 1.25 in (3.2 cm)
- Skill level: Easy / advanced beginner
- Terminology: US crochet terms
- Yarn weight: DK / light worsted (weight 3) cotton
- Hook: 3.25 mm (US D-3)
- Number of pieces: 1 (worked in one piece; nothing to sew together)
- Layout: head at the top, wings at the shoulders, skirt below
- Head size: 1.25 in (3.2 cm) across
- Size before the edge: about 3.75 in (9.5 cm) tall × 4.25 in (10.8 cm) wide
- Edge depth: about 0.25 in (0.6 cm) at the scallop and wing tips
Materials
Yarn advice: Use a smooth mercerized cotton or cotton blend in DK weight. Cotton shows the lace clearly, holds its shape after blocking and doesn’t go fuzzy. Avoid fluffy or textured yarns, because they fill in the open spaces.
- Cream (main color): 10 g, about 24 m (26 yd)
- Lavender (edge color): 5 g, about 12 m (13 yd)
Both amounts include a margin for your gauge swatch, a few practice stitches and weaving in ends. One angel uses only about two-thirds of the listed amounts.
Tools:
- 3.25 mm (US D-3) crochet hook
- Tapestry needle
- Scissors
- 1 stitch marker
- Blocking mat or foam board and rustproof pins
- Spray bottle of water, plus fabric stiffener or spray starch if you want (both optional)
- Ruler or tape measure
Abbreviations (US Terms)
- ch – chain
- sl st – slip stitch
- sc – single crochet
- dc – double crochet
- sk – skip
- st(s) – stitch(es)
- sp(s) – space(s)
- tch – turning chain
- RS – right side
- * * – repeat the steps between asterisks as directed
Special technique – working around a row-end post: Instead of working into the top of a stitch, put your hook into the gap beside the end stitch of a row (a dc or a ch-3 turning chain), so the new stitches wrap around its side. This anchors each wing firmly at the shoulder.
Turning chains: A ch-3 at the start of a row counts as 1 dc. A ch-4 counts as 1 dc plus ch 1. A ch-5 counts as 1 dc plus ch 2.
Gauge and Checkpoints
Gauge: 18 dc and 9 rows = 4 in (10.2 cm) in cream.
The whole angel is one small piece, so it works as its own gauge test. Measure at each checkpoint below, and if a number is off by more than 0.125 in (0.3 cm), change your hook before going on.
- After Head Round 2: 1.25 in (3.2 cm) across
- After Skirt Row 1: about 1.5 in (3.8 cm) wide
- After Skirt Row 2: about 2.5 in (6.4 cm) wide
- After Skirt Row 3: about 3.25 in (8.3 cm) wide
- After Skirt Row 4: about 4.25 in (10.8 cm) wide at the lower edge, and the skirt is about 1.75 in (4.4 cm) long
- After the wings: each wing reaches about 1.5 in (3.8 cm) from shoulder to tip
- After the edge: 4 in (10.2 cm) × 4.5 in (11.4 cm)
If your angel is too big: go down to a 3.0 mm hook, or check that your dc stitches aren’t loose and tall.
If your angel is too small: go up to a 3.5 mm (US E-4) hook. A small angel tends to cup at the hem, because the scallops have no room to spread.
Pattern
Head (Cream)
Round 1: Make a magic ring. Ch 3 (counts as dc), then work 11 dc into the ring. Sl st to the top of the ch-3 to join, and pull the ring closed. (12 dc)
Round 2: Ch 1, then work 2 sc in each st around. Sl st to the first sc to join. (24 sc)
Checkpoint: the head is a flat circle 1.25 in (3.2 cm) across. Don’t fasten off. The joining stitch marks the bottom of the head, and the skirt starts here.
Skirt (Cream)
Work the skirt in turned rows straight down from the head.
Row 1: Ch 3 (counts as dc). Work 1 dc in the same st as the join, 3 dc in the next st and 2 dc in the next st. Turn. (7 dc)
These 7 dc are worked into 3 head stitches. The middle stitch of the group sits at the bottom center of the head. Place a marker in the middle dc of the 3-dc group to mark the center front.
Row 2: Ch 3 (counts as dc). Work 1 dc in the same st, 2 dc in the next st, 1 dc in each of the next 3 sts, 2 dc in the next st, and 2 dc in the top of the tch. Turn. (11 dc)
Row 3: Ch 3 (counts as dc). Work 1 dc in the same st, 1 dc in each of the next 3 sts, 2 dc in the next st, 1 dc in the next st, 2 dc in the next st, 1 dc in each of the next 3 sts, and 2 dc in the top of the tch. Turn. (15 dc)
Row 4: Ch 3 (counts as dc). Work 1 dc in the same st, 1 dc in each of the next 5 sts, 2 dc in the next st, 1 dc in the next st, 2 dc in the next st, 1 dc in each of the next 5 sts, and 2 dc in the top of the tch. Turn. (19 dc)
Each of Rows 2–4 adds exactly 4 stitches, placed the same way on both halves. This keeps the bell shape even, with the increases lined up so the ribs fan out.
Checkpoint: the lower edge is about 4.25 in (10.8 cm) wide.
Row 5 (mesh row): Ch 5 (counts as dc + ch 2). Sk the next 2 sts and work 1 dc in the next st. Then repeat *ch 2, sk 2 sts, dc in the next st* 5 times, so the last dc goes in the top of the tch. Turn. (7 dc and 6 ch-2 sps)
Check the math: 7 dc + (6 × 2 ch) = 19 stitch positions, which matches Row 4. That’s why Row 4 needs exactly 19 stitches (3 × 6 + 1).
Row 6 (scallop row): Ch 1 and work 1 sc in the first dc. Then repeat *5 dc in the next ch-2 sp, sc in the next dc* 6 times, so the last sc goes in the 3rd ch of the tch-5. (7 sc and 30 dc = 37 sts; 6 scallops)
Fasten off the cream and weave in the end.
Checkpoint: the angel now measures about 3.75 in (9.5 cm) from the top of the head to the scallop tips.
Wings (Cream, Make 2)
Work the first wing on one end of Skirt Row 2, then the second wing on the other end the same way.
Wing Row 1: With the RS facing, join cream with a sl st around the end post of Skirt Row 2. On one side this post is the ch-3 tch, and on the other side it is the last dc. Ch 4 (counts as dc + ch 1). Then work *dc, ch 1* 4 times around the same post, and 1 more dc around the same post. Turn. (6 dc and 5 ch-1 sps)
The 6 spokes fan out from one point, which gives the wing its rounded, radiating shape.
Wing Row 2: Ch 3 (counts as dc) and work 1 dc in the same st. Then repeat *ch 2, sk the ch-1 sp, 2 dc in the next dc* 5 times, so the last pair goes in the 3rd ch of the tch-4. Turn. (12 dc and 5 ch-2 sps)
Wing Row 3: Ch 3 (counts as dc) and work 1 dc in the next dc. Then repeat *ch 3, sk the ch-2 sp, dc in each of the next 2 dc* 5 times. (12 dc and 5 ch-3 sps)
Fasten off the cream and weave in the end. Repeat on the other side of Skirt Row 2.
Checkpoint: each wing reaches about 1.5 in (3.8 cm) from shoulder to tip. The paired spokes and ch-3 spaces make the big open windows you can see in the finished wing.
Hanging Loop (Cream)
Find the head stitch directly opposite the center of Skirt Row 1, which is 12 stitches around from it. Join cream there with a sl st, ch 15, and sl st into the same stitch. Fasten off securely and weave the end through the head twice.
Lavender Edge
This angel is a single piece, so the lavender edge plays the role of the border. It goes only along the hem and the outer edges of the wings, matching the photo. The head, the sides of the skirt and the loop stay cream.
Edge gauge: about 5 sc per 1 in (2.5 cm) along a straight edge. Because of the increases at the curves, the edge lies flat without pulling in.
Hem Edge
Row 7: With the RS facing, join lavender in the first sc of Row 6 and ch 1. Work 1 sc in the same sc. Then repeat *1 sc in each of the next 2 dc, 2 sc in the next dc (the center dc of the scallop), 1 sc in each of the next 2 dc, 1 sc in the next sc* 6 times. (43 sc)
Why the math works: each scallop takes 5 dc, which become 6 sc with the center increase. Add the 1 sc between scallops and that’s 7 sc per repeat. So 6 repeats × 7 sc = 42, plus the first sc = 43. The 2-sc increase sits at the very top of each curve, so the edge rounds the scallop instead of flattening it.
Fasten off and weave in the end.
Wing Edge (Make 2)
With the RS facing, join lavender at the lower base of one wing, where Wing Row 1 meets the skirt.
- Lower side: Work 2 sc around each row-end post of Wing Rows 1, 2 and 3. (6 sc)
- Outer edge, along the top of Wing Row 3: Work 2 sc in the first dc and 1 sc in the next dc. Then repeat *3 sc in the next ch-3 sp, 1 sc in each of the next 2 dc* 4 times. Finish with 3 sc in the last ch-3 sp, 1 sc in the next dc and 2 sc in the last dc. (29 sc)
- Upper side: Work 2 sc around each row-end post of Wing Rows 3, 2 and 1. (6 sc)
- Sl st into the skirt at the shoulder.
Wing edge total: 6 + 29 + 6 = 41 sc.
Here’s how the 29 adds up. There are 12 dc along the top, and each gets 1 sc, which makes 12. The 2 corner dc each get 1 extra sc, which adds 2. The 5 spaces get 3 sc each, which adds 15. That’s 12 + 2 + 15 = 29. The extra corner stitches let the edge turn smoothly at the wing tips.
Fasten off and weave in the end. Repeat on the second wing.
Checkpoint: the finished angel measures 4 in (10.2 cm) tall × 4.5 in (11.4 cm) wide.
Final Blocking
- Weave in all the ends along stitches of the same color, so no cream shows through the lavender and no lavender shows through the cream.
- Lightly spray the angel with water until it is damp but not dripping.
- Lay it face up on your blocking mat.
- Pin the top of the head and the bottom center scallop so the angel is 4 in (10.2 cm) tall.
- Pin the outer tip of each wing so the span is 4.5 in (11.4 cm), with the wings tilted slightly upward.
- Pin the tip of each of the 6 scallops so the hem is even and 4.5 in (11.4 cm) wide.
- Open each ch-3 space in the wings with a pin so the windows stay clear.
- If you want a crisp ornament, spray it with starch or brush on diluted fabric stiffener.
- Let it dry completely before you unpin it, usually 6–12 hours.
Final Quality-Control Checklist
- The head is round and flat, 1.25 in (3.2 cm) across
- The skirt has 4 dc rows, 1 mesh row with 6 open spaces, and 6 scallops
- The skirt counts are 7, 11, 15 and 19 dc
- Each wing has 6 spokes in Row 1, then 12 dc in Rows 2 and 3
- The hem edge has 43 sc and each wing edge has 41 sc
- The lavender appears only on the hem and the outer edges of the wings
- Both wings are the same size and sit at the same height
- The loop is centered on top of the head
- The finished size is 4 in (10.2 cm) × 4.5 in (11.4 cm)
- All ends are woven in and trimmed
Troubleshooting
The skirt curls or cups. Your increases are too tight, or you skipped an increase. Recount Rows 2–4 (11, 15, 19), and go up a hook size if needed.
The hem ruffles. Your scallops are too loose. Work the 5 dc more firmly, or use a 3.0 mm hook for Row 6.
The mesh row doesn’t fit. Row 4 must have exactly 19 stitches. Any other number leaves stitches over at the end of Row 5.
The wings are uneven. Make sure both wings start around the end post of Row 2, not Row 1 or Row 3.
The wing edge pulls tight. Check the 3 sc in every ch-3 space and the 2 sc at each corner.
The head puckers. The magic ring wasn’t pulled fully closed. Tighten it and secure the tail.
Care
Hand wash in cool water with mild soap, press out the water in a towel, and reshape it flat to dry. Re-block after washing if you used stiffener.
Final Notes
The measurements build on each other. The head is 1.25 in (3.2 cm) across. Row 1 of the skirt is 1.5 in (3.8 cm) wide, Row 2 is 2.5 in (6.4 cm) and Row 3 is 3.25 in (8.3 cm). Row 4 reaches 4.25 in (10.8 cm), and the mesh and scallop rows bring the length to 3.75 in (9.5 cm). Each wing adds about 1.5 in (3.8 cm) from the shoulder. The lavender edge adds the last 0.25 in (0.6 cm), for a finished angel of 4 in (10.2 cm) × 4.5 in (11.4 cm).
If your head and Row 4 checkpoints match, the rest of the angel will fall into place. Keep your tension steady, count after each row, and block carefully so the lace opens up.
Happy crocheting!