

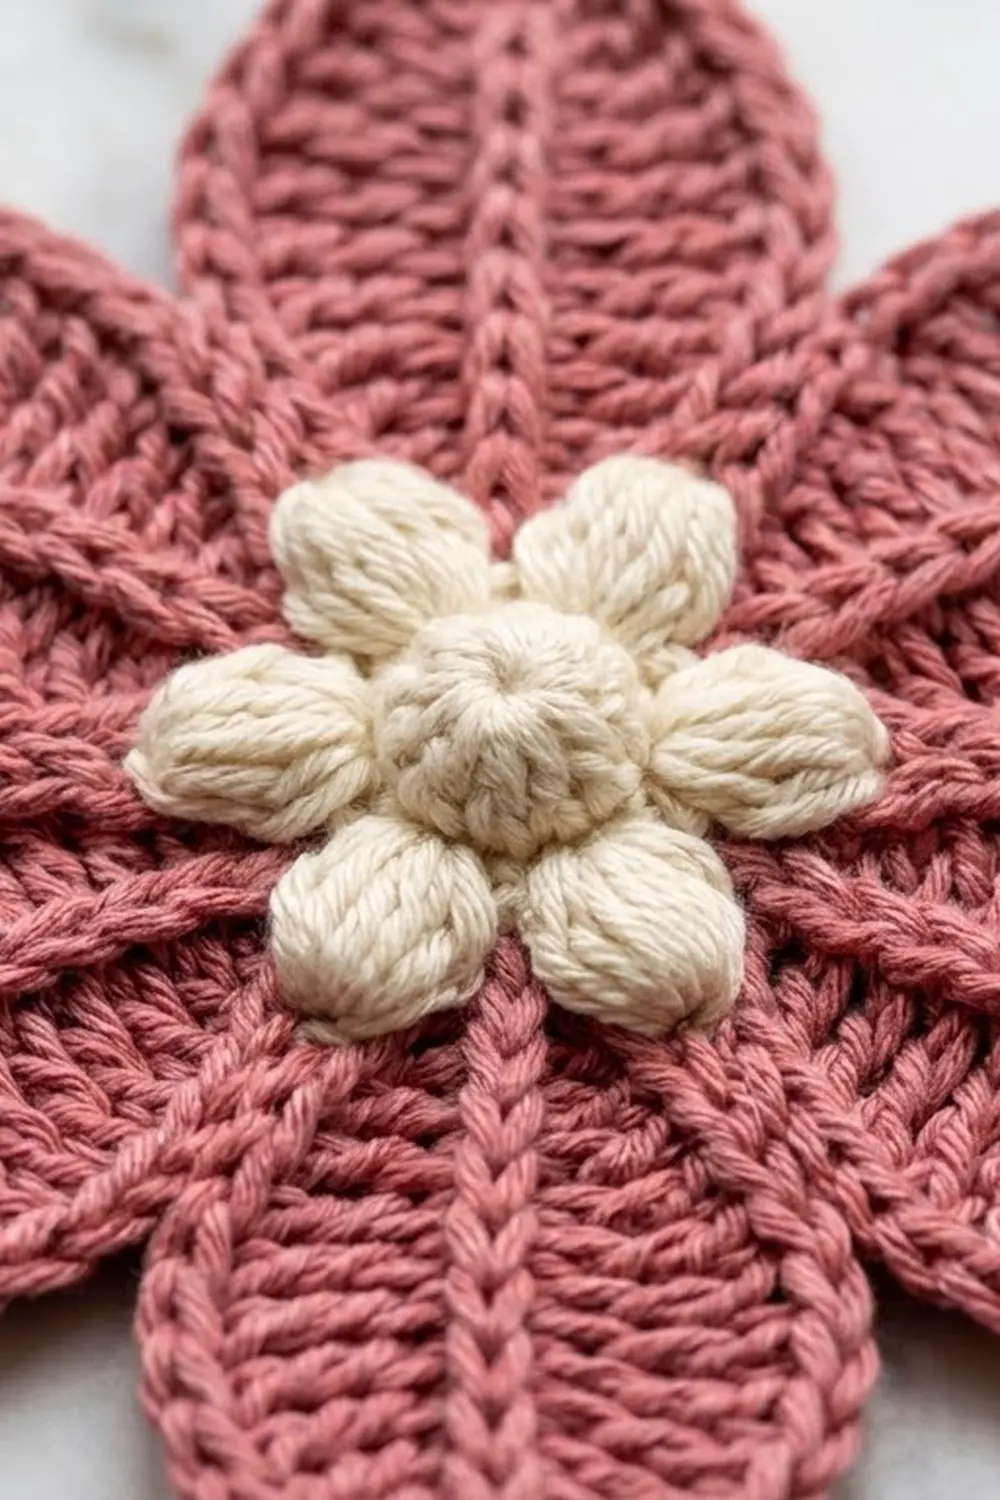
The Rosewood Poinsettia is a six-petal flower motif with pointed leaf-shaped petals and a soft, raised cream center. It looks like a classic holiday poinsettia, but the dusty rose shade gives it a gentle, vintage feel instead of a bright red one.
Each petal is built on a chain “spine.” You work stitches up one side of the spine and down the other, which leaves a fine vein down the middle of the petal. A final single crochet rim gives every petal a clean outline and a sharp tip. The center is a ring of six cream puff stitches with one round bobble sewn into the middle.
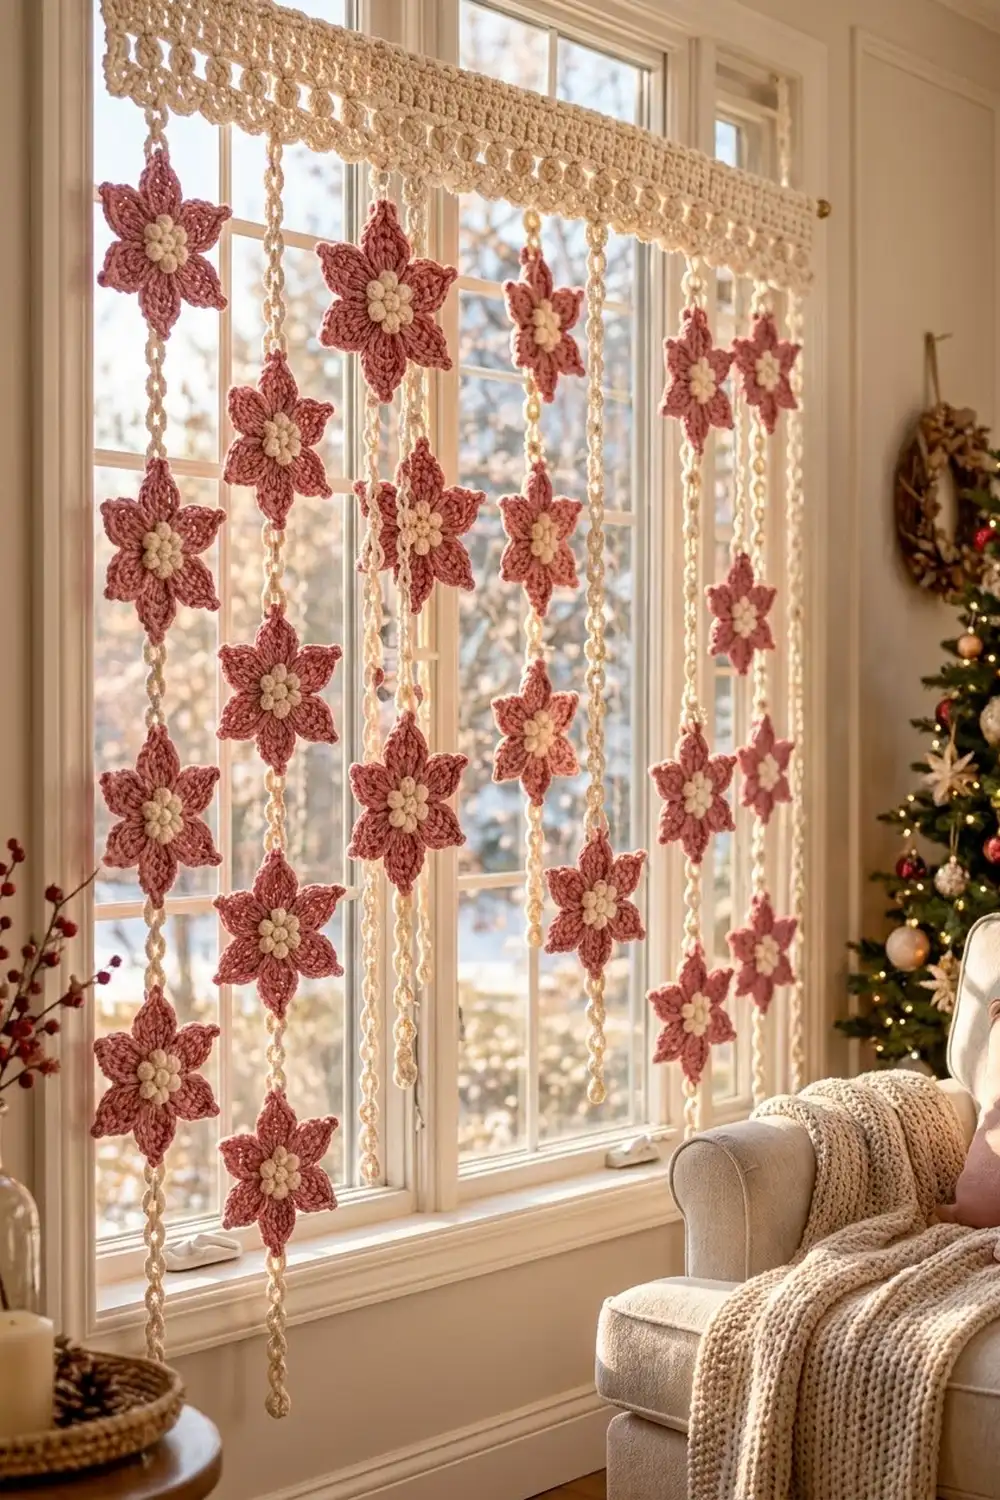
This pattern uses US crochet terms. The finished motif measures 6 in (15.2 cm) from tip to tip and lies flat. You can use it as an ornament, gift topper, appliqué, or hanging decoration.
Construction overview: work the cream center in the round (Rounds 1–2), switch to rose for the base round, chain six spines, work the petals around the spines, then finish with an edging round. The tiny center bobble is made separately and sewn into the middle.
Finished Size and Construction
- Finished size: 6 in (15.2 cm) tip to tip
- Skill level: Easy–Intermediate
- Terminology: US crochet terms
- Yarn weight: Worsted (#4), soft cotton or cotton blend
- Hook: 4.0 mm (US G/6)
- Number of pieces: 1 motif, plus 1 small center bobble sewn on
- Layout: Single radial motif with 6 petals
- Piece size: 6 in (15.2 cm) tip to tip
- Size before border: 5.5 in (14.0 cm) tip to tip after Round 5
- Border depth: 0.25 in (0.6 cm), one round of sc
Materials
Yarn: Use a smooth, firm worsted-weight cotton or cotton-acrylic blend. Cotton keeps the petal tips crisp and holds its shape after blocking. Fuzzy yarns will hide the petal veins.
- Color A – Dusty Rose: 10 g, about 20 m (22 yd)
- Color B – Cream: 3 g, about 6 m (7 yd)
These quantities include a margin of about 25% for gauge swatching and weaving in ends.
Tools:
- 4.0 mm (US G/6) crochet hook
- Tapestry needle
- Scissors
- 2 stitch markers
- Ruler or tape measure
- Blocking mat and rust-proof pins
- Spray bottle with water
Abbreviations (US Terms)
- ch – chain
- sl st – slip stitch
- sc – single crochet
- hdc – half double crochet
- dc – double crochet
- tr – treble crochet
- st(s) – stitch(es)
- sp – space
- yo – yarn over
- rep – repeat
- sc3tog – single crochet 3 together: (insert hook in next st, yo, pull up a loop) 3 times, yo, pull through all 4 loops on hook.
Special stitches:
- Puff stitch (puff): (Yo, insert hook in st, yo, pull up a loop to about 0.5 in / 1.3 cm tall) 3 times, so you have 7 loops on the hook. Yo and pull through all 7 loops.
- 4-dc bobble: (Yo, insert hook in ring, yo, pull up a loop, yo, pull through 2 loops) 4 times, so you have 5 loops on the hook. Yo and pull through all 5 loops.
- Spine: Ch 12, then sl st in the back bump of the 2nd ch from the hook and in the back bump of each of the next 10 ch (11 sl st). The first ch you skipped is the tip ch.
Gauge and Checkpoints
Exact gauge is not critical for an ornament, but your motif should match the measurements below. Make one test motif before making a set.
Checkpoints:
- After Round 1: 0.75 in (1.9 cm) across
- After Round 2: 1.25 in (3.2 cm) across
- After Round 3: 1.5 in (3.8 cm) across
- Each spine (Round 4): 2 in (5.1 cm) long, measured flat from base to tip
- After Round 5: 5.5 in (14.0 cm) tip to tip, with each petal about 1.25 in (3.2 cm) at its widest
- After Round 6: 6 in (15.2 cm) tip to tip, with each petal about 1.5 in (3.8 cm) at its widest
If your motif is too big: go down to a 3.75 mm (US F/5) hook, or tighten your chains. Loose spine chains are the most common reason petals end up too long.
If your motif is too small: go up to a 4.5 mm (US 7) hook. Check that you are pulling your puff loops up to the full 0.5 in (1.3 cm).
If only the petals are off, change your chain tension and keep the center as it is.
Pattern: Cream Center
With Color B (Cream):
Round 1: Make a magic ring. Ch 1 (does not count as a st), work 6 sc in the ring. Pull the ring closed and sl st to the first sc. (6 sc)
Round 2: Ch 1. Puff in next sc, ch 1; rep from * 5 more times. Sl st to the top of the first puff. (6 puffs, 6 ch-1 sps)*
Fasten off and weave in the tail. The center should measure 1.25 in (3.2 cm) across, and the six puffs should form an even ring.
Pattern: Rose Base and Petals
With Color A (Dusty Rose):
Round 3 (conversion round): Join Color A in any ch-1 sp. Ch 1. 2 sc in the ch-1 sp, sc in the top of the next puff; rep from * 5 more times. Sl st to the first sc.
(6 sc worked 1 per puff + 12 sc added in the ch-1 sps = 18 sc)*
Think of the 18 sc as 6 groups of 3. The first sc of each group is where a petal will grow from.
Round 4 (spines): Ch 1, sc in the same st as the join, make 1 spine, sc in next 2 sc. Sc in next sc, make 1 spine, sc in next 2 sc; rep from * 4 more times. Sl st to the first sc.
(18 sc + 6 spines of 11 sl st each)*
Place a stitch marker in the first sc. Lay the piece flat. The six spines should point straight outward and be evenly spaced, like the spokes of a wheel.
Round 5 (petals): Ch 1, sc in the same st as the join.
Petal: Working up the spine from the base, into the 11 sl sts (under both loops of each sl st): hdc in the first sl st, dc in next 2, tr in next 4, dc in next 2, hdc in next, sc in last sl st. (11 sts)*
In the tip ch, work (sc, ch 2, sc).
Rotate the piece. Working down the other side of the spine, into the chain Vs (under both loops of each ch): sc in first ch, hdc in next, dc in next 2, tr in next 4, dc in next 2, hdc in last ch. (11 sts)
Sc in next 3 base sc.*
Rep from * to * 4 more times. Then work 1 more petal, sc in the last 2 base sc, and sl st to the first sc.
Stitch count for Round 5:
- Per petal: 11 + 2 tip sc + 11 = 24 sts and 1 ch-2 sp
- Base sc: 1 + (5 × 3) + 2 = 18 sc
- Total: (6 × 24) + 18 = 162 sts and 6 ch-2 sps
The stitches go hdc, dc, tr, dc, hdc, sc on each side. That height pattern makes each petal narrow at the base, widest in the middle, and pointed at the tip, which is the leaf shape you want. The spine stays in the middle as a raised vein.
Checkpoint: the motif should measure 5.5 in (14.0 cm) tip to tip.
Pattern: Center Bobble (Appliqué)
With Color B (Cream): Make a magic ring. Ch 2, work a 4-dc bobble in the ring, then ch 1 to lock it. Pull the ring fully closed so the bobble puffs into a ball. Fasten off, leaving a 6 in (15.2 cm) tail.
Thread the tail onto a tapestry needle and push it down through the hole in the middle of Round 1. Stitch the bobble in place from the back with 2–3 small stitches and knot it securely. The bobble should sit slightly higher than the ring of puffs, making a cluster of seven cream bumps about 1.5 in (3.8 cm) across.
Border
The edging round (Round 6) is the border. It outlines every petal, sharpens the tips, and pulls the valleys between petals into neat V shapes.
Border gauge: One round of sc adds 0.25 in (0.6 cm) on every edge. That adds 0.5 in (1.3 cm) to the tip-to-tip measurement, taking it from 5.5 in (14.0 cm) to 6 in (15.2 cm).
Round 6 (Color A): Ch 1 (does not count as a st).
Sc in each of the next 11 sts up the petal, sc in the next sc, (sc, ch 2, sc) in the ch-2 tip sp, sc in the next sc, sc in each of the next 11 sts down the petal, sc3tog over the next 3 base sc.
Rep from * to * 5 more times. On the last repeat, the sc3tog uses the last 2 base sc plus the marked first sc of Round 5. Sl st to the first sc and fasten off.
Counts per petal side:
- Up side: 11 + 1 = 12 sc
- Tip: (sc, ch 2, sc)
- Down side: 1 + 11 = 12 sc
- Valley: 1 sc3tog
Total: 6 × (12 + 2 + 12 + 1) = 162 sts and 6 ch-2 sps
Why the math works: Round 5 had 162 sts. In Round 6, each valley turns 3 base sc into 1 stitch, which removes 2 sts per valley (12 in total). Each tip adds 2 new sc, which adds 12 in total. The count stays at 162, so the edging adds no extra fullness and the motif lies flat. The sc3tog pulls each valley inward while the extra tip stitches push each point outward. That gives the star-like outline.
Optional hanging loop: On one petal only, work (sc, ch 8, sc) at the tip instead of (sc, ch 2, sc). The stitch count stays at 162, but one tip sp becomes a ch-8 loop about 1.25 in (3.2 cm) long.
Final Blocking
- Weave in all ends on the back, following stitches of the same color.
- Lightly mist the motif with water until it is damp but not wet.
- Lay it face up on a blocking mat.
- Pin the center flat with 2 pins through Round 3.
- Pin each petal tip through its ch-2 sp, 3 in (7.6 cm) out from the center point, so the full width is 6 in (15.2 cm).
- Check that the six tips are evenly spaced, about 60 degrees apart.
- Gently shape each petal so it is smooth and symmetrical, with the spine running straight down the middle.
- Pin into each valley V so it stays sharp.
- Fluff the center puffs and bobble with your fingertips. Do not flatten them.
- Let the motif dry completely, for about 4–6 hours, before unpinning.
Final Quality-Control Checklist
- Round 3 has exactly 18 sc.
- There are 6 spines, each with 11 sl sts.
- Round 5 has 162 sts and 6 ch-2 sps.
- Round 6 has 162 sts and 6 ch-2 sps.
- Each petal side has 12 sc in Round 6.
- All 6 petals are the same length, within 0.125 in (0.3 cm).
- The finished motif measures 6 in (15.2 cm) tip to tip.
- The center bobble is secure and sits slightly above the puffs.
- No ends show on the front.
- The motif lies flat with no cupping or ruffling.
Troubleshooting
Petals curl toward the front. Your spine chains are too tight. Go up a hook size for the ch 12 only.
Petals ruffle or wave. Your chains are too loose, or you added extra stitches. Recount the 11 sts on each side.
The motif cups like a bowl. Round 3 may be short of stitches. Make sure you worked 2 sc in every ch-1 sp, for 18 sc total.
The petals look lopsided. You probably worked one side into the wrong loops. Work up the side through the sl sts and down the other side through the chain Vs.
The valleys are not sharp. Make sure every valley uses an sc3tog, not separate sc.
The puffs look flat. Pull each loop up to the full 0.5 in (1.3 cm) before closing the puff.
The center bobble wobbles. Add 1–2 more anchoring stitches from the back through Round 1.
Care
Hand wash in cool water with mild soap, roll gently in a towel, and dry flat, re-pinning the tips if needed. Do not tumble dry, as heat will relax the crisp petal points.
Final Notes
The measurements build in a simple chain. The cream center grows from 0.75 in (1.9 cm) to 1.25 in (3.2 cm), and the rose base brings it to 1.5 in (3.8 cm). Six spines of 2 in (5.1 cm) each give a petaled motif of 5.5 in (14.0 cm). The 0.25 in (0.6 cm) edging finishes it at 6 in (15.2 cm) tip to tip.
The stitch counts follow the same logic: 6 sc, then 6 puffs, then 18 sc, then 6 spines, and 162 sts in both of the last two rounds. If you check each count and measurement as you go, every motif will match the last.
Happy crocheting!