

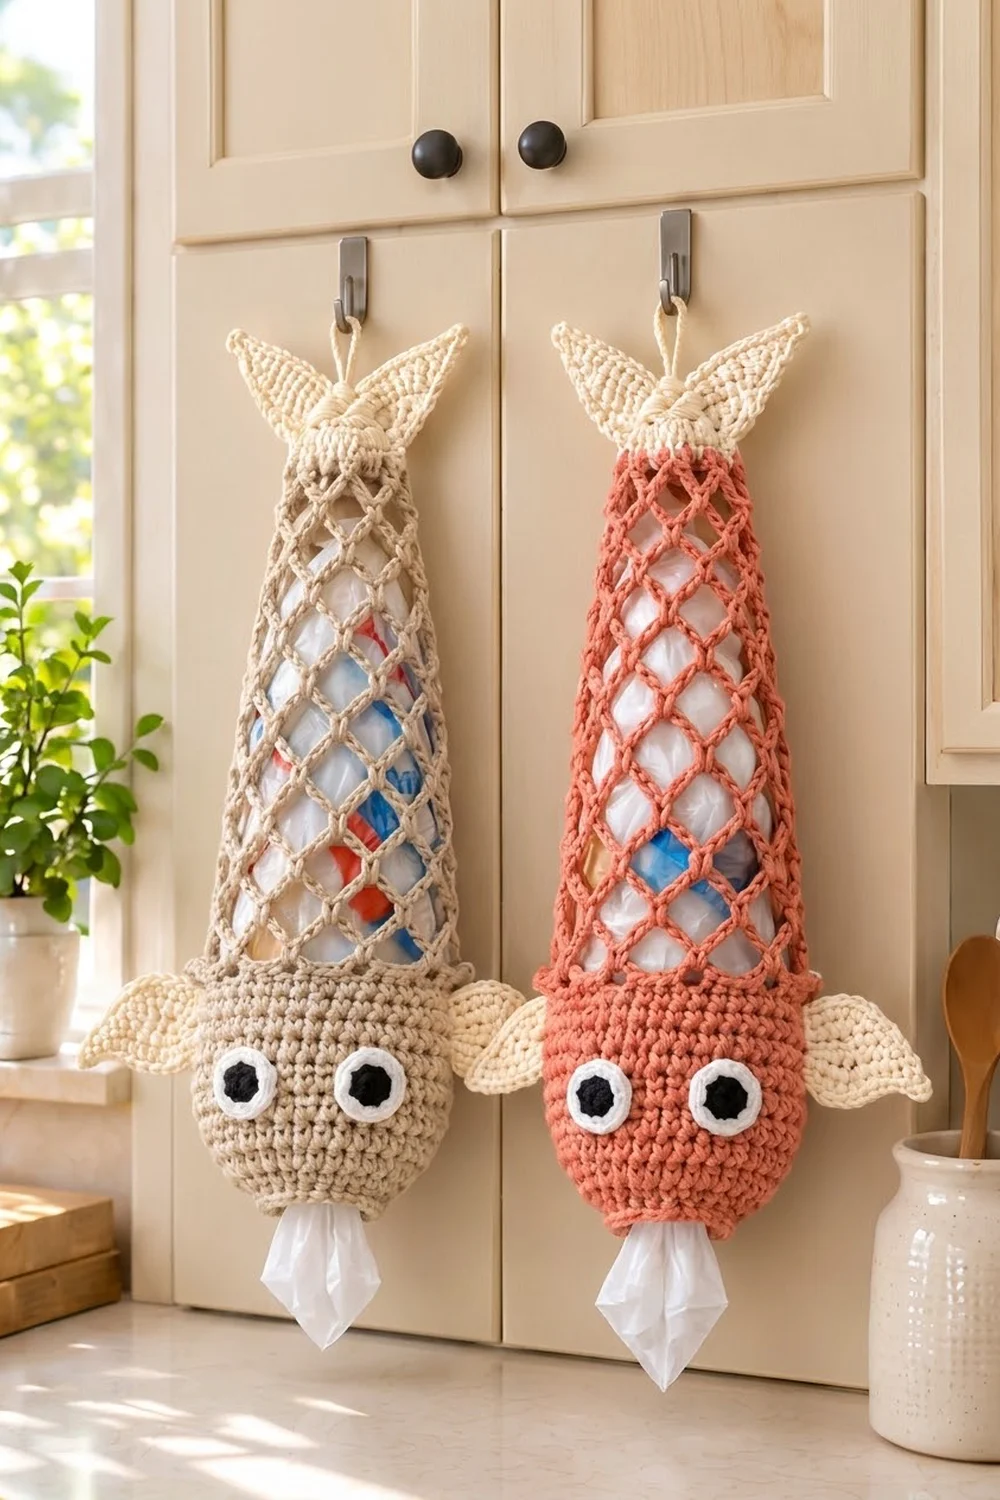
This cheerful fish keeps your stash of plastic grocery bags tidy and easy to reach. Stuff the bags in through the top, then pull one out through the fish’s mouth whenever you need it. It’s a practical kitchen piece that also makes people smile.
The sample is worked in oatmeal beige cotton with cream fins and tail, plus white and black for the eyes. Coral or any other solid color works just as well for the body. The style is simple and modern: a dense single crochet head, an open diamond mesh you can see the bags through, and crisp pointed fins.
This pattern uses US crochet terms. The finished holder measures about 20 in (50.8 cm) from tail tip to mouth and about 12 in (30.5 cm) across the side fins when hanging.
The fish is worked in one continuous piece from the mouth upward. You crochet the solid head first, then the chain-loop mesh body, then a cream band at the top. After that you make four identical fins and two eyes, sew them on, and thread a drawstring through the band. The drawstring also forms the hanging loop.
Finished Size and Construction
- Finished size: about 20 in (50.8 cm) long x 12 in (30.5 cm) wide across the side fins
- Skill level: Easy
- Terminology: US crochet terms
- Yarn weight: worsted weight (#4) cotton
- Hook: 5.0 mm (H-8)
- Number of pieces: 1 holder made of 1 main body, 4 fins, 2 eyes and 1 drawstring
- Layout: head at the bottom, mesh body in the middle, tail fins and hanging loop at the top
- Head: 7.5 in (19.1 cm) wide when flattened, 3.5 in (8.9 cm) tall
- Size before border: body about 17.5 in (44.5 cm) long, not counting the tail fins
- Border depth: one round of reverse single crochet, about 0.25 in (0.6 cm), at the mouth and at the top band
Materials
Choose a smooth, sturdy cotton or cotton blend. Cotton holds the mesh open and doesn’t stretch out under the weight of the bags. Avoid fuzzy yarns, because they hide the diamond pattern.
- Color A, oatmeal beige (head and body): 80 g, about 150 m (164 yd)
- Color B, cream (fins, band and drawstring): 25 g, about 50 m (55 yd)
- Color C, white (eye rims): 6 g, about 12 m (13 yd)
- Color D, black (eye centers): 3 g, about 6 m (7 yd)
All quantities include a margin of about 15 percent for your gauge swatch and seaming tails.
Tools:
- 5.0 mm (H-8) crochet hook
- Tapestry needle
- 4 locking stitch markers
- Scissors
- Measuring tape
- Rust-proof pins and a spray bottle for blocking
Abbreviations (US Terms)
- ch – chain
- sl st – slip stitch
- sc – single crochet
- inc – 2 sc in the same stitch
- sc2tog – single crochet 2 together
- rev sc – reverse single crochet (crab stitch)
- sp – space
- st(s) – stitch(es)
- rep – repeat
- Rnd – round
Special stitch: reverse single crochet (rev sc). Working from left to right (right-handers), insert the hook into the next stitch to the right, yarn over and pull up a loop, then yarn over and pull through both loops. This makes a firm, corded edge.
Gauge and Checkpoints
Gauge: 16 sc x 18 rnds = 4 in (10.2 cm) in single crochet worked in the round. That works out to 4 sts per inch.
Test with the head first. It’s small, and it shows you right away whether your gauge is right.
Checkpoints:
- After head Rnd 7: the piece lies flat as a ring about 4.8 in (12.2 cm) across, with a mouth opening about 1.9 in (4.8 cm) across.
- After head Rnd 16: flattened, the head is 7.5 in (19.1 cm) wide and about 3.5 in (8.9 cm) tall.
- After Mesh Rnd 8: the mesh measures about 6.5 in (16.5 cm) above the head, hanging loosely.
- After Mesh Rnd 19: the mesh measures about 13 in (33.0 cm) above the head.
- One fin: about 3.75 in (9.5 cm) wide x 3 in (7.6 cm) tall after its edging.
Too big? Switch to a 4.5 mm hook. Too small? Switch to a 5.5 mm hook. Check the head again before you start the mesh. The mesh is forgiving, but a head that’s too loose lets bags fall out of the mouth.
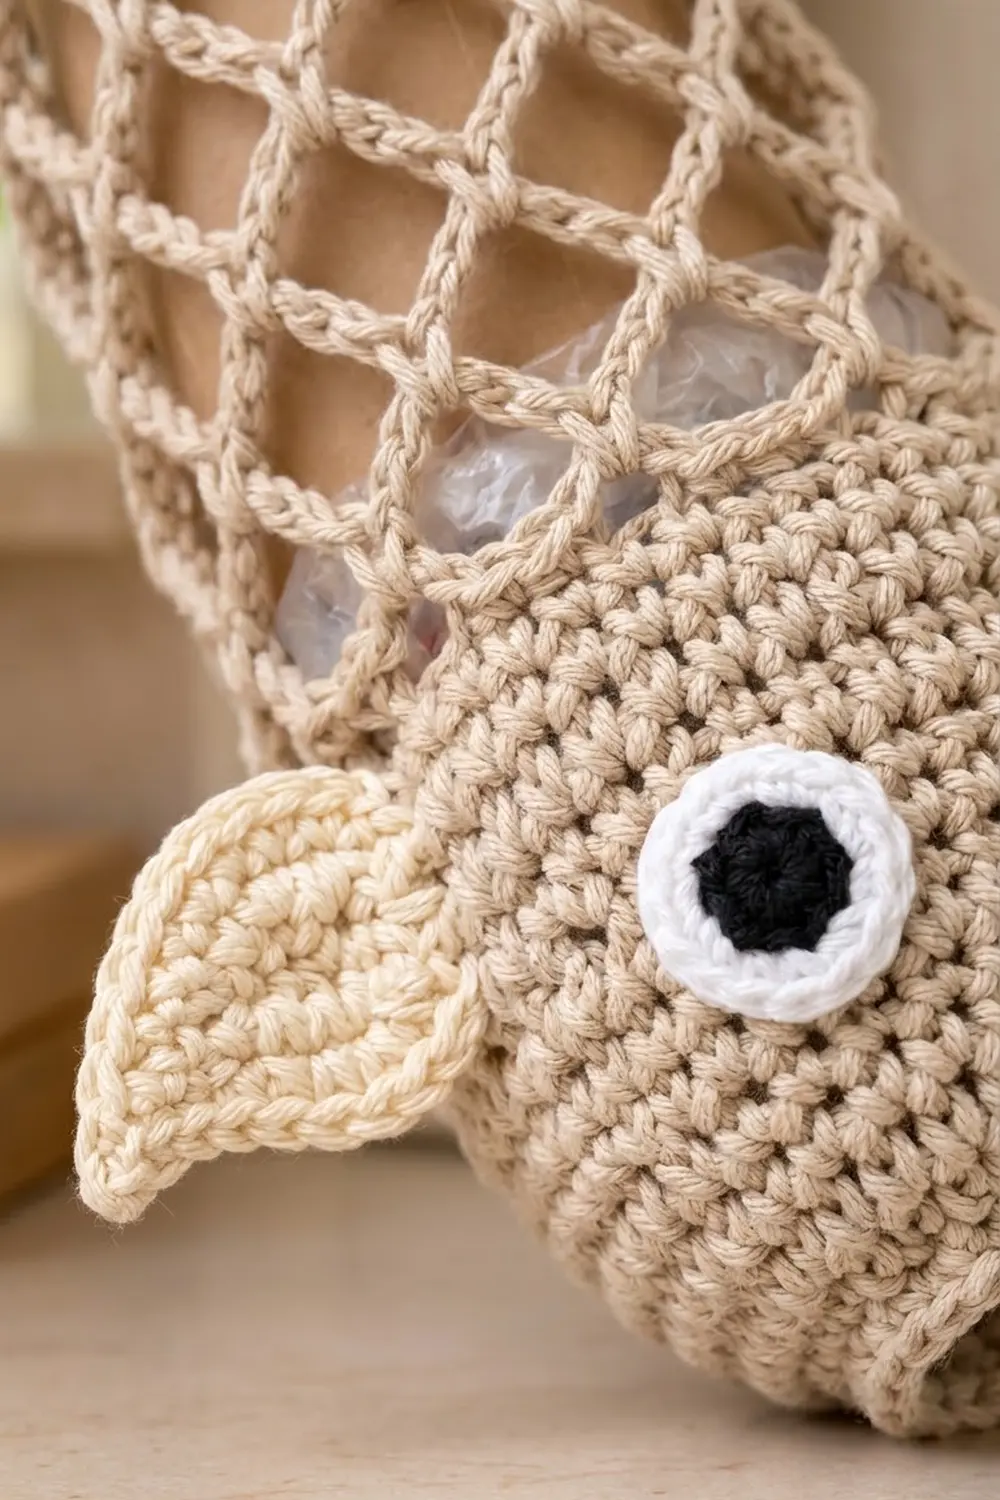
Head
Work the head in Color A, starting at the mouth. Join each round with a sl st to the first sc. The ch 1 at the start of a round does not count as a stitch.
Foundation: Ch 24 and join with a sl st to the first ch to form a ring. Don’t twist the chain.
Rnd 1: Ch 1, sc in each ch around, join. (24 sts)
Rnd 2: Ch 1, *sc in next 3 sts, inc; rep from * 6 times, join. (30 sts)
Rnd 3: Ch 1, *sc in next 4 sts, inc; rep from * 6 times, join. (36 sts)
Rnd 4: Ch 1, *sc in next 5 sts, inc; rep from * 6 times, join. (42 sts)
Rnd 5: Ch 1, *sc in next 6 sts, inc; rep from * 6 times, join. (48 sts)
Rnd 6: Ch 1, *sc in next 7 sts, inc; rep from * 6 times, join. (54 sts)
Rnd 7: Ch 1, *sc in next 8 sts, inc; rep from * 6 times, join. (60 sts)
Check Checkpoint 1 now.
Rnds 8–16: Ch 1, sc in each st around, join. (60 sts in each round)
These nine straight rounds turn the flat disc into a rounded bowl, which gives the fish its plump head. Don’t fasten off.
Mesh Body
The mesh is worked in a continuous spiral. Don’t join the rounds. Place a marker in the first sc of each round and move it up as you go.
Mesh Rnd 1: *Ch 5, skip next 3 sts, sc in next st; rep from * 15 times. The last sc lands in the last stitch of Rnd 16. (15 ch-5 loops; 15 x 4 sts = 60 sts used)
Mesh Rnds 2–8: *Ch 5, sc in next ch-5 sp; rep from * around. (15 ch-5 loops in each round)
Check Checkpoint 3.
Mesh Rnds 9–14: *Ch 4, sc in next sp; rep from * around. (15 ch-4 loops in each round)
Mesh Rnds 15–19: *Ch 3, sc in next sp; rep from * around. (15 ch-3 loops in each round)
You never drop any loops. The body narrows toward the tail because the chains get shorter, from 5 to 4 to 3. Each sc sits in the middle of the loop below it, and that’s what makes the diamonds.
In the last sc of Mesh Rnd 19, change to Color B. Cut Color A, leaving a 6 in (15.2 cm) tail.
Tail Band
From here on, join each round with a sl st again.
Band Rnd 1: Ch 1, 2 sc in each ch-3 sp around, join. (15 sps x 2 sc = 30 sts)
Band Rnd 2: Ch 1, *sc in next 3 sts, sc2tog; rep from * 6 times, join. (24 sts)
Band Rnd 3: Ch 1, sc in each st around, join. (24 sts)
Don’t fasten off. You’ll work the top border next (see Border).
The band is 24 sts around, which is 6 in (15.2 cm). Flattened, it’s 3 in (7.6 cm) wide, so the opening is easy to stuff with bags.
Fins (Make 4)
All four fins are identical. Two become side fins and two become tail fins. Use Color B and work in rows. Ch 1 at the start of each row does not count as a stitch.
Row 1: Ch 2, sc in 2nd ch from hook, turn. (1 st)
Row 2: Ch 1, 3 sc in st, turn. (3 sts)
Row 3: Ch 1, sc in each st across, turn. (3 sts)
Row 4: Ch 1, inc, sc in next st, inc, turn. (5 sts)
Row 5: Ch 1, sc across, turn. (5 sts)
Row 6: Ch 1, inc, sc in next 3 sts, inc, turn. (7 sts)
Row 7: Ch 1, sc across, turn. (7 sts)
Row 8: Ch 1, inc, sc in next 5 sts, inc, turn. (9 sts)
Row 9: Ch 1, sc across, turn. (9 sts)
Row 10: Ch 1, inc, sc in next 7 sts, inc, turn. (11 sts)
Row 11: Ch 1, sc across, turn. (11 sts)
Row 12: Ch 1, inc, sc in next 9 sts, inc. Don’t turn. (13 sts)
Fin Edging: Ch 1. Rotate the fin and work down the first slanted side: 1 sc in the row-end of each of Rows 12 to 2 (11 sc). Work 3 sc in the Row 1 tip. Work up the second side: 1 sc in the row-end of each of Rows 2 to 12 (11 sc). Then sc in each of the 13 sts of Row 12. Join with a sl st to the first sc. (11 + 3 + 11 + 13 = 38 sts)
The 3 sc at the tip give it a sharp point. The row-end stitches make the raised outline you can see on the sample fins.
Fasten off, leaving a 12 in (30.5 cm) tail for sewing. Without the edging, a fin is 3.25 in (8.3 cm) wide x 2.7 in (6.9 cm) tall. With the edging, it should match Checkpoint 5.
Eyes (Make 2)
Rnd 1: With Color D, make a magic ring and work 6 sc into it. Join with a sl st to the first sc, changing to Color C. Pull the ring closed. (6 sts)
Rnd 2: With Color C, ch 1, inc in each st around, join. (12 sts)
Rnd 3: Ch 1, *sc in next st, inc; rep from * 6 times, join. (18 sts)
Fasten off, leaving a 10 in (25.4 cm) tail. Each eye is about 1.25 in (3.2 cm) across.
Drawstring and Assembly
Drawstring: With Color B, ch 80. That’s about 20 in (50.8 cm). Fasten off.
- Eyes: Flatten the head so the mouth is at the bottom. Pin the eyes between Rnds 8 and 13, with about 1 in (2.5 cm) of space between them. Whipstitch around the edge of each eye.
- Side fins: Pin a fin to each side of the head across Rnds 10 to 15. Point the tips outward and slightly downward. Sew along the 13-st base edge only, so the rest of the fin stands free.
- Tail fins: Fold the band flat. Sew one fin’s base edge to the front of Band Rnds 1–3 and the other fin to the back. Tilt the tips outward so the two fins form a V.
- Drawstring: Weave the drawstring in and out of Band Rnd 2, going over 2 sts and under 2 sts, so both ends come out at the center between the tail fins. Pull it snug and tie a square knot. Then knot the two ends together about 2.5 in (6.4 cm) above the band to make the hanging loop.
To refill the holder, untie the first knot, push the bags in, and pull the drawstring snug again.
Border
Border gauge: rev sc is worked at the same 4 sts per inch as the body. The border adds about 0.25 in (0.6 cm) of depth and doesn’t change the circumference.
Top border (Color B): Continue from Band Rnd 3. Ch 1, rev sc in each st around, join. (24 sts) Fasten off.
Mouth border, Rnd A (Color A): Join yarn in any free loop on the underside of the foundation chain. Ch 1, sc in each of the 24 free loops, join. (24 sts)
Mouth border, Rnd B: Ch 1, rev sc in each st around, join. (24 sts) Fasten off.
Why the math works: The foundation ring has 24 chains, so it has 24 free loops. Working one stitch in each loop keeps the opening at 6 in (15.2 cm) around, without ruffling or pulling in. The top band also ends at 24 sts, so its rev sc round needs exactly 24 stitches. Because the corded edge stays firm, the mouth lets out one bag at a time instead of several.
Final Blocking
- Weave in all ends. Run each one through the solid sc areas, not the mesh, where tails would show.
- Lightly mist the whole holder with water until it’s damp but not wet.
- Stuff the head with a rolled towel and shape it into a smooth dome.
- Lay the mesh flat and gently pull it lengthwise until the diamonds open evenly. It should measure about 13 in (33.0 cm).
- Pin each fin flat with its tip sharply pointed. Check that it measures 3.75 in (9.5 cm) x 3 in (7.6 cm).
- Let it dry completely. Then hang it and confirm the total length of about 20 in (50.8 cm).
Final Quality-Control Checklist
- Head is 7.5 in (19.1 cm) wide when flattened, and the eyes sit level
- Mesh has 15 loops in every round, with no skipped or doubled loops
- Diamonds get smaller evenly at the change from ch-5 to ch-4 and from ch-4 to ch-3
- Band and both borders have exactly 24 sts each
- All four fins have 38 edging sts and sharp tips
- Side fins point outward at the same height on both sides
- Drawstring knot holds firmly, and the hanging loop is centered between the tail fins
- Mouth is about 1.9 in (4.8 cm) across and lets out one bag at a time
Troubleshooting
Head ruffles: Your tension is loose or you have extra increases. Recount Rnds 2–7. Each round should add exactly 6 sts.
Head cups too early: You’re working tightly. Go up a hook size for Rnds 2–7 only.
Mesh twists around the body: This is normal in a spiral. Block it straight, and keep your marker on the first sc of each round.
Bags slip out of the mouth: Work the mouth border’s Rnd A one hook size smaller.
Fin tips are rounded: Work all 3 sc firmly into the Row 1 tip, then pin the tip sharply while blocking.
Lopsided tail: Unpick one tail fin and re-sew it directly opposite the other one.
Care
Hand wash in cool water and lay flat to dry, shaping the head and fins while damp. Don’t tumble dry, because heat can shrink cotton and distort the mesh.
Final Notes
Each stage builds on the one before it. Your 16 sc x 18 rnds gauge gives a 60-st head that’s 7.5 in (19.1 cm) wide. That head feeds 15 mesh loops, which taper over about 13 in (33.0 cm). The mesh ends in a 24-st band that’s 6 in (15.2 cm) around, and the 24-st borders keep both openings firm. Add four 3.75 in (9.5 cm) fins and two 1.25 in (3.2 cm) eyes, and you have a fish about 20 in (50.8 cm) long that keeps your bags in order.
Happy crocheting!