

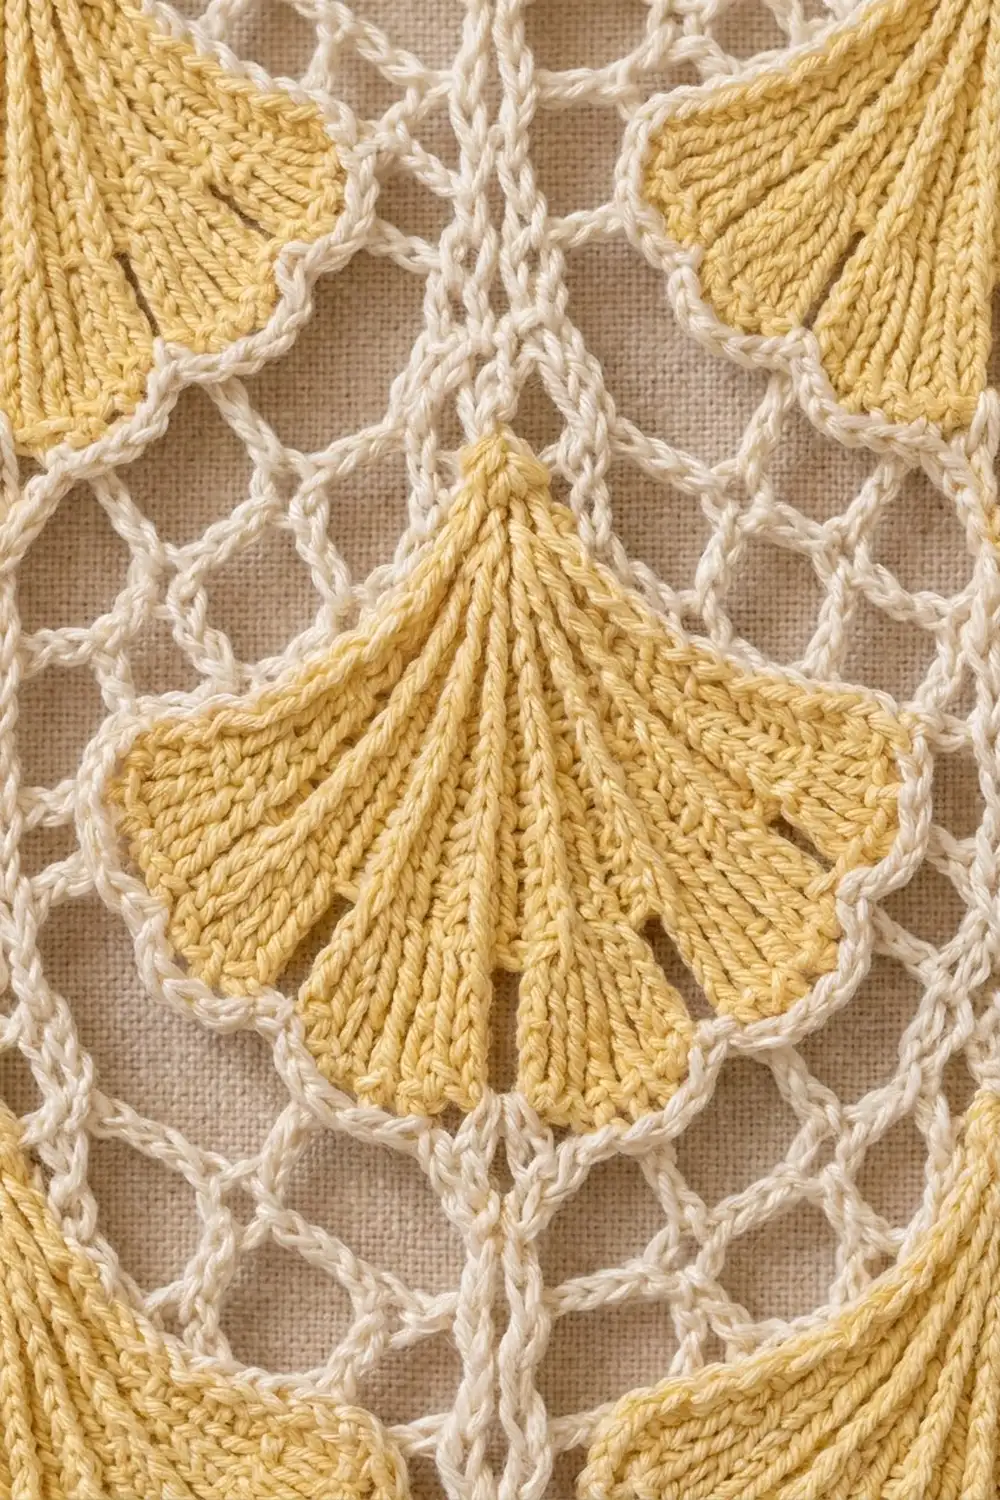
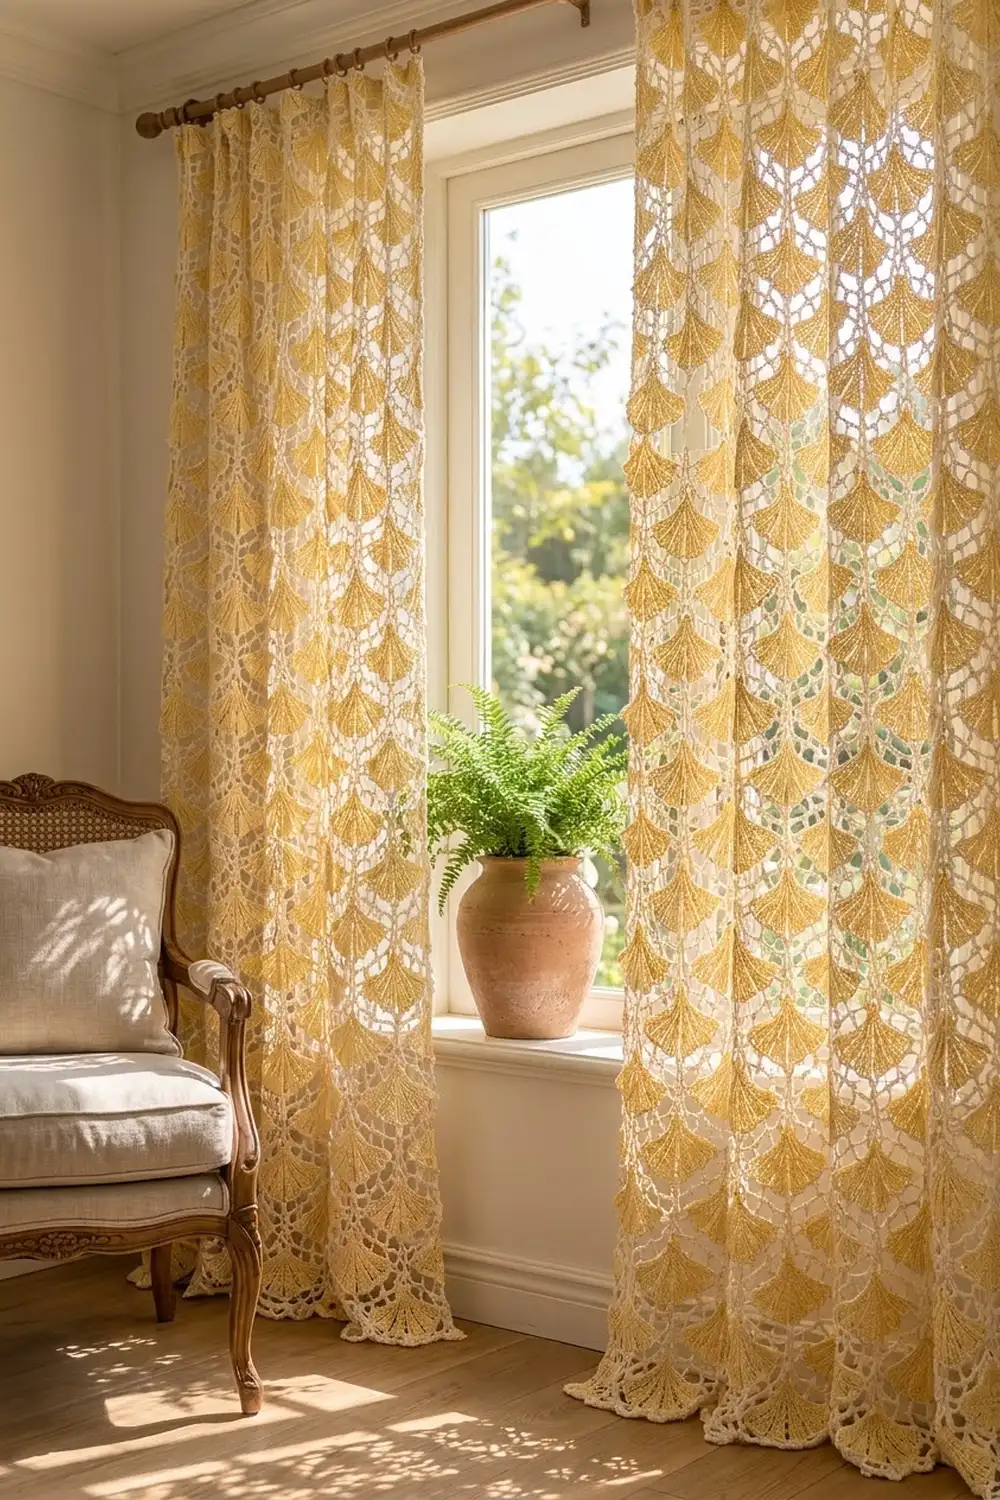
This curtain panel is made of soft yellow ginkgo fans set in an airy cream lattice. Each fan has five ribbed lobes and a cream outline around its scalloped edge. When light comes through, the fans glow and the mesh throws lacy shadows into the room.
The design uses two colors: butter yellow for the fans, and cream for the outlines, mesh, joins and border. The style is cottage-romantic lace. The fans in neighboring columns are offset by half a motif, so the rows of fans read as a gentle staggered pattern.
All instructions use US crochet terms. One finished panel measures 50 x 82 in (127.0 x 208.3 cm) after blocking. Make two panels for a standard window pair.
For construction, each fan is worked flat in rows from a magic ring. Next, cream rounds outline it and square it into an 8 in (20.3 cm) motif. Half-height mesh blocks fill the top and bottom of every second column. The pieces are joined into vertical strips, the strips are joined side by side, and a three-round picot border finishes the edges.
Finished Size and Construction
- Finished size: 50 x 82 in (127.0 x 208.3 cm) per panel
- Skill level: Intermediate
- Terminology: US crochet terms
- Yarn weight: DK / light worsted (#3) cotton
- Hook: 4.0 mm (US G-6)
- Number of pieces: 57 fan motifs + 6 half blocks = 63 pieces
- Layout: 6 columns; columns 1, 3, 5 have 10 motifs; columns 2, 4, 6 have 1 half block + 9 motifs + 1 half block
- Piece size: motif 8 x 8 in (20.3 x 20.3 cm); half block 8 x 4 in (20.3 x 10.2 cm)
- Size before border: 48 x 80 in (121.9 x 203.2 cm)
- Border depth: 1 in (2.5 cm)
Materials
Use a smooth mercerized or combed cotton in DK weight. Mercerized cotton shows the fan ribs clearly and holds its shape when it hangs. Avoid fuzzy blends, because they blur the mesh.
- Color A, butter yellow: 420 g (950 m)
- Color B, cream: 750 g (1,700 m)
These amounts are for one panel and include a margin of about 15%. Double them for a pair.
Tools:
– 4.0 mm (US G-6) hook
– 4.5 mm (US 7) hook for joining (optional)
– Stitch markers
– Tapestry needle
– Blocking mats, rustproof pins and a spray bottle
– Tape measure
Abbreviations (US Terms)
- ch – chain
- sl st – slip stitch
- sc – single crochet
- hdc – half double crochet
- dc – double crochet
- sp – space
- st(s) – stitch(es)
- RS / WS – right side / wrong side
Special stitch – picot: ch 3, sl st in the 3rd ch from the hook.
Gauge and Checkpoints
- Edge gauge: 16 sc = 4 in (10.2 cm), measured across the last round of a motif
- Fan gauge: Rows 1–9 measure 4 in (10.2 cm) from the ring to the tip of the center lobe
Make one complete motif first and block it before you start production.
Checkpoints:
– After fan Row 9: 4 in (10.2 cm) tall and about 6.25 in (15.9 cm) across the lobe tips
– After Round A: about 6.75 in (17.1 cm) wide
– After Round D, blocked: 8 x 8 in (20.3 x 20.3 cm)
If the blocked motif is larger than 8.25 in (21.0 cm), go down a hook size. If it is smaller than 7.75 in (19.7 cm), go up a size. The joining and border math depends on every piece being the same size.
Fan Motif (make 57)
Fan (Color A)
Work in rows. Turn at the end of each row. The ch 3 at the start of a row counts as a dc.
Row 1 (RS): Make a magic ring. Ch 3, then work 4 dc in the ring. Pull the ring closed. (5 dc)
Row 2: Ch 3, dc in the same st, then 2 dc in each st across. (10 dc)
Row 3: Ch 3, dc in each st across. (10 dc)
Row 4: Ch 3, dc in the same st, dc in the next st, then [2 dc in the next st, dc in the next st] 4 times. (15 dc; 5 lobes of 3)
Row 5: Ch 3, dc in each st across. (15 dc)
Row 6: Ch 3, dc in the same st, dc in the next 2 sts, then [2 dc in the next st, dc in the next 2 sts] 4 times. (20 dc; 5 lobes of 4)
Row 7 (slits open): Ch 3, dc in the next 3 sts, then [ch 1, dc in the next 4 sts] 4 times. (20 dc + 4 ch-1 sps)
Row 8: Ch 3, dc in the same st, dc in the next 3 sts, then [ch 2, skip the ch-1 sp, 2 dc in the next st, dc in the next 3 sts] 4 times. (25 dc + 4 ch-2 sps; 5 lobes of 5)
Row 9 (RS, rounding the lobes): Ch 1. On each lobe, work sc in the first dc, hdc in the next dc, 3 dc in the center dc, hdc in the next dc, and sc in the last dc. Between lobes, sl st in the ch-2 sp. (35 sts + 4 sl sts) Fasten off.
The dc columns stack into the ribs that spread out from the point. The ch spaces in Rows 7–8 open into the deep slits between the lobes.
Outline and Mesh (Color B)
Round A (RS, outline): Join B with a sl st at the apex (the top of Row 1) and ch 3 for the apex loop.
- Work 17 sc down the first side: 2 sc in each of the Row 8–1 row ends, then 1 sc in the Row 9 row end.
- Across the bottom, work 1 sc in each Row 9 st and 1 sl st in each Row 9 sl st.
- Work 17 sc up the second side, then sl st into the base of the apex loop.
(69 sc + 4 sl sts + 1 apex ch-3 loop)
Round B (loops): Sl st into the apex loop, ch 1, then sc in the loop. This is anchor 1. You will work 20 loops in total.
- Down the first side, [ch 5, sc in the next anchor] 5 times. The anchors are the 3rd, 6th, 9th, 12th and 15th sc.
- Across the bottom, [ch 5, sc in the next anchor] 9 times. The anchors are, in order, the center (4th) sc of each lobe and each sl st between lobes.
- Up the second side, [ch 5, sc in the next anchor] 5 times, on the 3rd, 6th, 9th, 12th and 15th sc counted from the bottom.
- Ch 5 and sl st to the first sc.
Then make loops 1, 2, 19 and 20 (the four loops next to the apex) ch 7 instead of ch 5. This gives the shoulders more fill. (20 loops)
Number the loops 1–20, starting from the apex and going down the first side. Mark loops 3, 8, 13 and 18 as corner loops.
Round C (lattice): Sl st to the center of loop 1, ch 1, and sc in the same loop. Then ch 5 and sc in the next loop. In each corner loop, work (sc, ch 7, sc) instead of a single sc. Work around and end with ch 5 and a sl st to the first sc. (20 ch-5 loops + 4 ch-7 corner loops)
Each side now has 5 ch-5 loops between corners. The 5 loops between corner loops 18 and 3 sit along the top edge, centered on the apex.
Round D (squaring): Ch 1. Work 6 sc in each ch-5 loop and (sc, ch 2, sc) in each ch-7 corner loop. Sl st to the first sc. (128 sc + 4 ch-2 corner sps) Fasten off.
Per-side count: 1 corner sc + 30 sc + 1 corner sc = 32 sc. The ch-2 corner sp is not counted. Check: 4 x 32 = 128.
Half Block (make 6, Color B)
Row 1 (RS): Ch 31. Sc in the 2nd ch from the hook and in each ch across. (30 sc)
Row 2: Ch 3 (counts as dc), dc in the next sc, then [ch 1, skip 1 sc, dc in the next sc] 14 times. (16 dc + 14 ch-1 sps = 30 sts)
Rows 3–8: Ch 3 (counts as dc). Work a dc over each dc and a ch 1 over each ch-1 sp. Work the last dc in the top of the turning ch. (30 sts)
Row 9: Ch 1, then sc in each dc and each ch-1 sp. (30 sc) Do not fasten off.
Edging round: Work (sc, ch 2, sc) at each corner.
- Along the long sides, work 1 sc in each Row 9 st and 1 sc in each foundation ch (30 sc each).
- Along the short sides, work 2 sc in each Row 2–8 row end (14 sc each).
Count: each long side is 1 + 30 + 1 = 32; each short side is 1 + 14 + 1 = 16. Total: 96 sc + 4 ch-2 sps.
The half block measures 7.5 x 3.5 in (19.1 x 8.9 cm) before edging and 8 x 4 in (20.3 x 10.2 cm) after edging and blocking. Two half blocks add up to one motif height: 16 + 16 = 32.
Make All Pieces
| Piece | Quantity | Color A | Color B |
|---|---|---|---|
| Fan motif | 57 | fan | outline + mesh |
| Half block | 6 | none | whole piece |
Layout grid (each line = 4 in / 10.2 cm; F = full motif, which fills two lines; h = half block):
Line   C1  C2  C3  C4  C5  C6
 1     F1  h   F1  h   F1  h
 2     F1  F1  F1  F1  F1  F1
 3     F2  F1  F2  F1  F2  F1
 4     F2  F2  F2  F2  F2  F2
 ...  (pattern continues)
18     F9  F8  F9  F8  F9  F8
19     F10 F9  F10 F9  F10 F9
20     F10 h   F10 h   F10 h
All fans point up. The half blocks shift the even columns down by 4 in (10.2 cm), which creates the staggered look.
Joining
Method: Use a slip stitch join in Color B. Hold the two pieces RS together and work through the inside loops only, so the outer loops form a neat ridge on the WS.
Step 1 – strips: Join each column top to bottom. Each seam matches 32 sts to 32 sts, one stitch to one stitch. Work one sl st through both corner ch-2 sps at each end of a seam. A half block’s long side also has 32 sts, so it matches a motif exactly.
Step 2 – strips side by side: Every strip’s long edge has 320 sts.
- Columns 1, 3, 5: 10 x 32 = 320
- Columns 2, 4, 6: 16 + (9 x 32) + 16 = 320
Join stitch to stitch along the full length. The seams between pieces fall at different heights in neighboring strips, which is fine because the stitch counts still match. Place a marker every 32 sts on both strips to keep them aligned.
Tension: Sl st joins tighten easily. If a seam puckers, switch to the 4.5 mm hook. Each seam should lie flat and stretch as much as the motifs do.
Size checkpoint: Each strip should be 80 in (203.2 cm) long. The joined panel should be 48 x 80 in (121.9 x 203.2 cm).
Border
Border gauge: 16 sts = 4 in (10.2 cm), the same as the motif edges.
Starting counts:
– Top and bottom edges: 6 pieces x 32 sts = 192 sts
– Side edges: 320 sts (10 x 32 on the left; 16 + 9 x 32 + 16 on the right)
At each seam you will find two corner ch-2 sps side by side. Skip them and add no stitches there.
Round 1 (sc, conversion round): Join B at a corner. Work 1 sc in each edge st. In each of the 4 outer corner ch-2 sps, work (sc, ch 2, sc).
– Top and bottom: 192 worked 1 per stitch + 2 corner sc = 194 sts per side
– Left and right: 320 worked 1 per stitch + 2 corner sc = 322 sts per side
Round 2 (dc, conversion round): Ch 3 (counts as dc). Work dc in each sc and (dc, ch 2, dc) in each corner sp.
– Top and bottom: 194 worked 1 per stitch + 2 corner dc = 196 sts per side
– Left and right: 322 worked 1 per stitch + 2 corner dc = 324 sts per side
Round 3 (picot pairs): Ch 1. Along each side, [sc in the next st, picot, sc in the next st] across. Work (sc, picot, sc) in each corner sp.
– Top and bottom: 98 pairs per side (196 sc + 98 picots)
– Left and right: 162 pairs per side (324 sc + 162 picots)
Fasten off and weave in the ends.
Why the math works:
– 192 sts at 4 sts per in = 48 in (121.9 cm), and 320 sts = 80 in (203.2 cm), so the border matches the panel exactly.
– Each round adds only its own 2 corner stitches per side, which keeps every side count even.
– The picots pair off evenly, with no stitches left over.
– The three rounds add about 0.25 in, 0.5 in and 0.25 in (0.6, 1.3 and 0.6 cm), for 1 in (2.5 cm) per side.
– Final size: 48 + 2 = 50 in (127.0 cm) wide and 80 + 2 = 82 in (208.3 cm) long.
Final Blocking
- Soak the panel in cool water for 15 minutes, then press the water out gently. Don’t wring it.
- Roll it in towels to remove more water.
- Lay it flat on mats. Pin it to 50 x 82 in (127.0 x 208.3 cm), starting with the four corners and the midpoint of each side.
- Pin each picot and open the Round C loops so the lattice is even.
- Shape each fan lobe into a rounded scallop and open the slits.
- Let it dry completely, at least 24 hours, before you unpin it.
Final Quality-Control Checklist
- 57 motifs, each blocked to 8 in (20.3 cm) square
- 6 half blocks, each 8 x 4 in (20.3 x 10.2 cm)
- Every fan points up, and the even columns are offset by 4 in (10.2 cm)
- All seams lie flat, with corner sps joined
- Border counts are 194 / 196 / 98 pairs on the top and bottom, and 322 / 324 / 162 pairs on the sides
- Finished size is 50 x 82 in (127.0 x 208.3 cm)
- All ends are woven in along the seams
Troubleshooting
- The fan cups instead of lying flat: Your Row 8 increases are too tight. Work loosely, or block the fan before Round A.
- The fan ruffles: You probably added extra dc. Recount Rows 4, 6 and 8 (15, 20 and 25 dc).
- The motif isn’t square: Recheck your corner loops (3, 8, 13, 18) and the ch-7 shoulder loops.
- A strip is shorter than 80 in (203.2 cm): Your seams are too tight. Rework them with the 4.5 mm hook.
- The border waves: You may have worked into the seam ch-2 sps. Remove those stitches.
Care
Hand wash cool or machine wash on a gentle cycle inside a mesh bag, then lay flat to dry. Hanging the panel wet will stretch it lengthwise.
Final Notes
The measurement chain is:
- 16 sts = 4 in (10.2 cm)
- One motif = 32 sts per side = 8 in (20.3 cm)
- One half block = 16 sts = 4 in (10.2 cm)
- Six columns = 192 sts = 48 in (121.9 cm)
- Each strip = 320 sts = 80 in (203.2 cm)
- 1 in (2.5 cm) of border on each side brings the panel to 50 x 82 in (127.0 x 208.3 cm)
Check each link in that chain as you go, and the panel will hang straight and even.
Happy crocheting!