

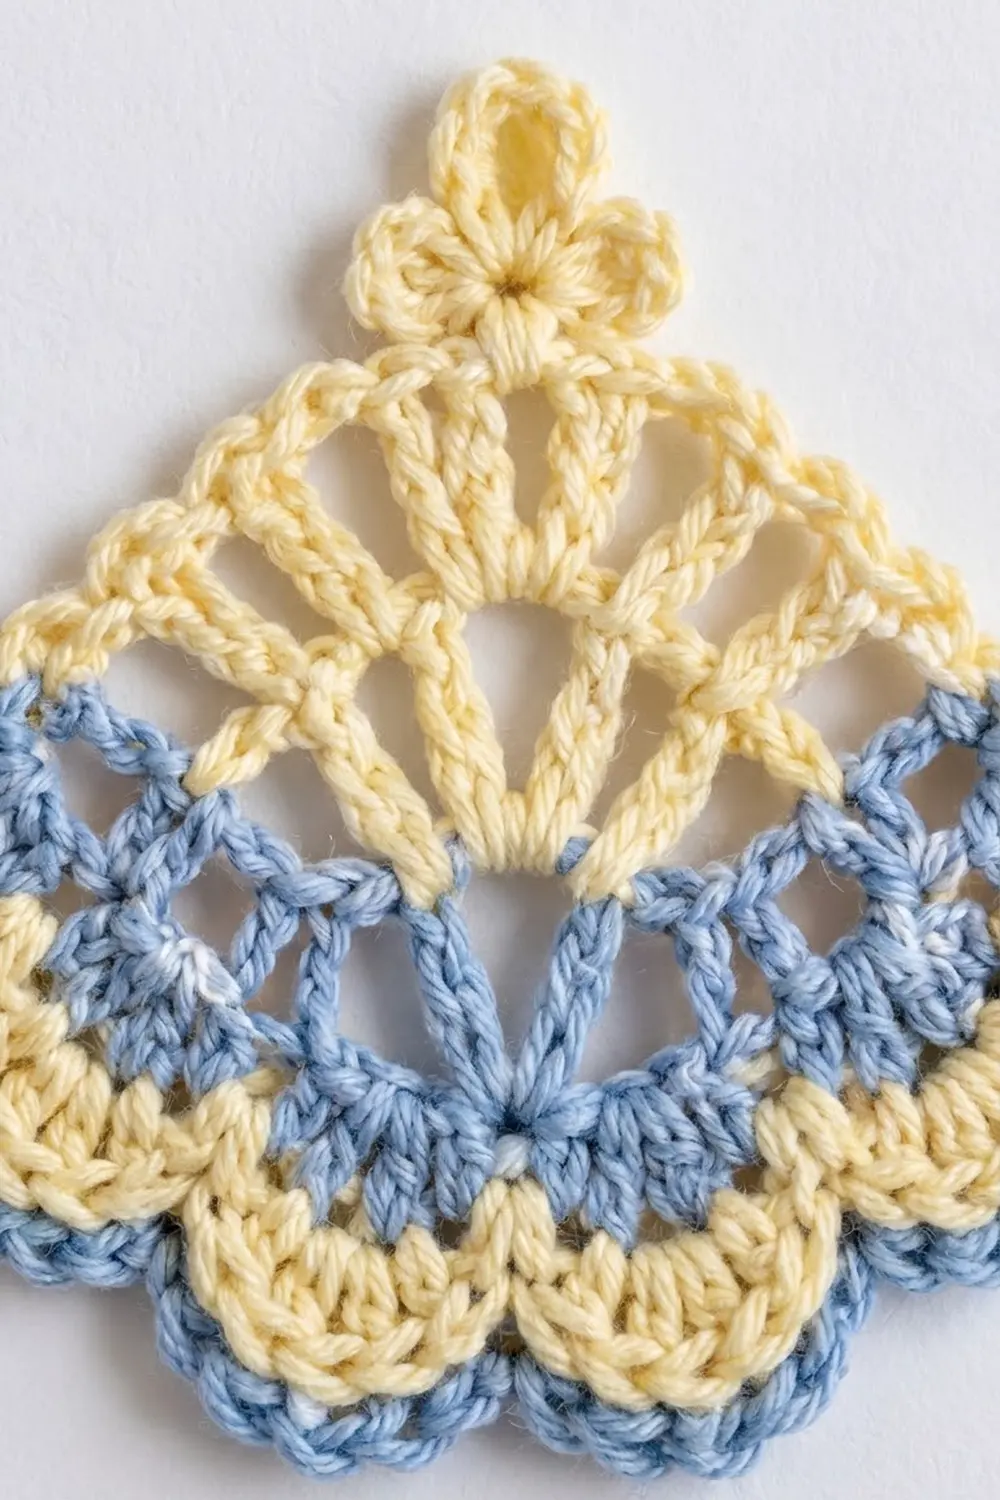
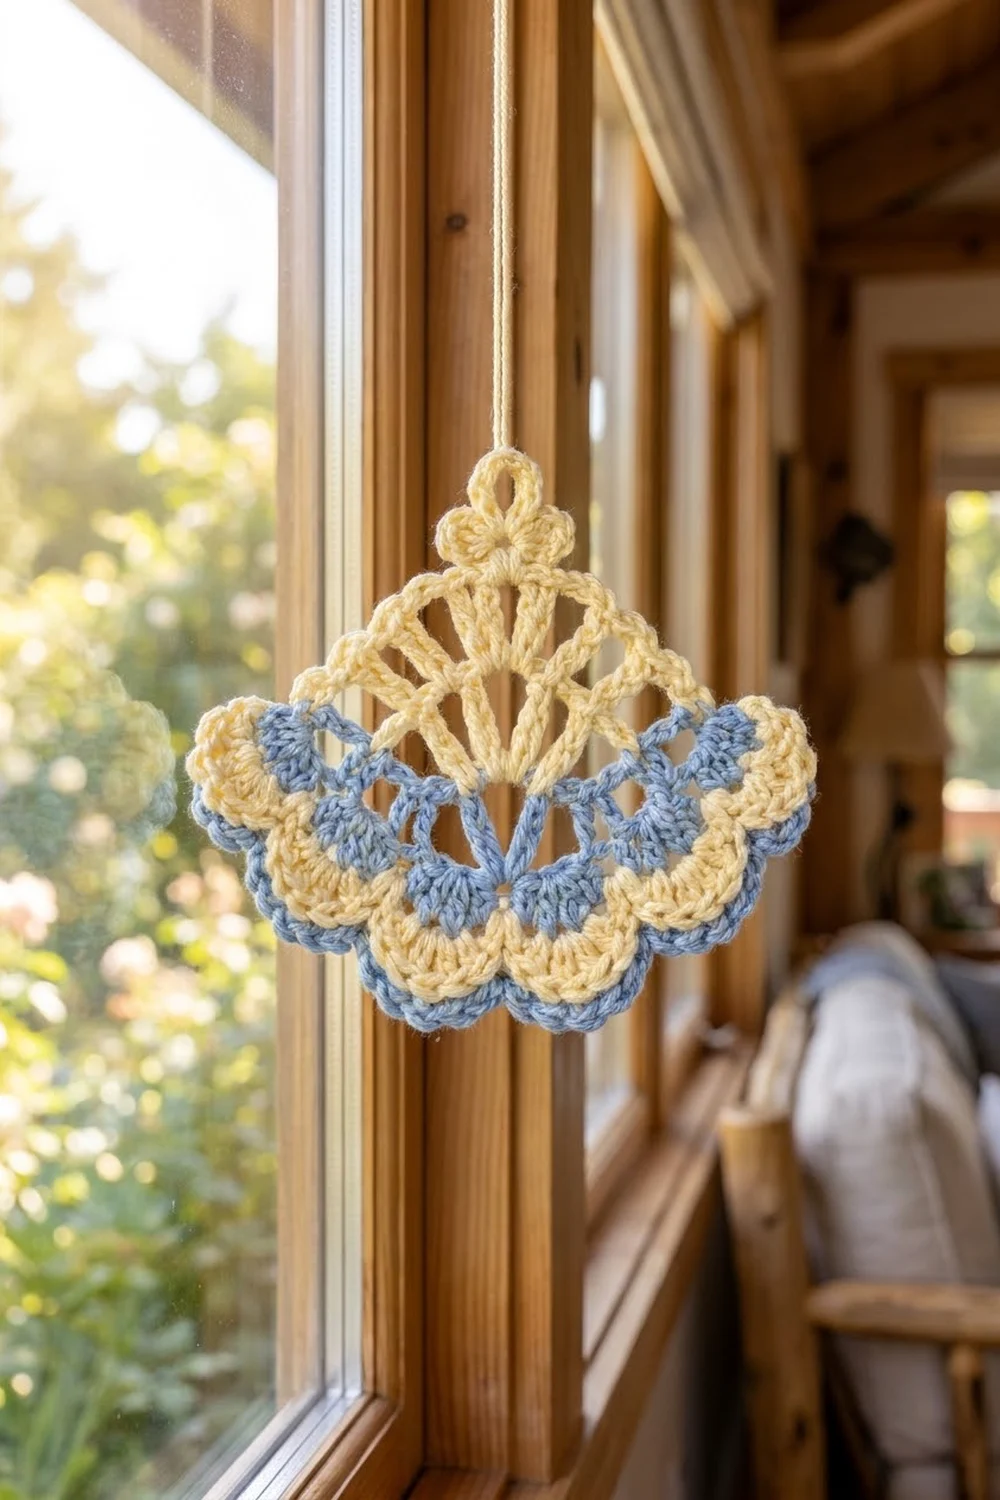
The Sunlit Shell Fan is a single half-circle lace motif with a soft, vintage look. A small three-petal flower sits at the top. Below it, the fan opens into tall yellow spokes, then a blue openwork band of shells, then a wavy yellow scalloped edge with a neat blue single crochet trim.
The colors are butter yellow and cornflower blue, two quiet shades that suit a sunny kitchen window. The motif is airy but holds its shape. The spokes run straight, the shells sit evenly between them, and each scallop lines up with the shell below it.
The pattern uses US crochet terms. The finished motif is about 7.0 in (17.8 cm) wide across the straight top edge and 4.5 in (11.4 cm) tall from the tip of the flower to the bottom of the center trim. You can use it as an appliqué, a window ornament, or a hanging accent.
The construction is simple. You work the fan in turned rows from a magic ring and change colors at the ends of rows. Rows 1-5 make the fan body. Rows 6-7 make the border along the curved edge. The flower goes on the top point last.
Finished Size and Construction
- Finished size: 7.0 in (17.8 cm) wide x 4.5 in (11.4 cm) tall, including the top flower
- Skill level: Easy-intermediate
- Terminology: US crochet terms
- Yarn weight: DK (weight 3), cotton or cotton blend
- Hook: 4.0 mm (G-6)
- Number of pieces: 1 single motif
- Layout: One half-circle fan, straight edge at the top, curved edge at the bottom
- Piece size before border: 6.0 in (15.2 cm) wide x 3.0 in (7.6 cm) deep (radius)
- Border depth: 0.75 in (1.9 cm) at the center of the curve, worked along the curved edge only
- Top flower: adds about 0.75 in (1.9 cm) above the straight edge
Materials
Choose a smooth DK cotton, either mercerized or matte. Cotton keeps the spokes and scallops crisp and blocks flat. A typical ball gives about 2.5 m per gram (for example, 50 g / 125 m). Acrylic also works, but it needs gentle steam blocking to lie flat.
For the colors, pick a yellow that is pale but not white, and a blue of medium value. If the two colors are too close in value, the shell band gets lost against the spokes. If they are too far apart, the trim can look harsh.
- Color A, Butter Yellow: 12 g (30 m)
- Color B, Cornflower Blue: 8 g (20 m)
These quantities include a margin of about 20 percent for swatching, tails, and the odd row you have to pull out.
Tools:
- 4.0 mm (G-6) crochet hook
- Tapestry needle
- Scissors
- Stitch markers (2)
- Ruler or tape measure
- Blocking mat and rust-proof pins
- Spray bottle with water
Abbreviations (US Terms)
- ch – chain
- sl st – slip stitch
- sc – single crochet
- dc – double crochet
- tr – treble crochet
- MR – magic ring
- sk – skip
- sp – space
- st(s) – stitch(es)
- RS / WS – right side / wrong side
Special stitches:
- V-st (V-stitch): (dc, ch 2, dc) in the same stitch.
- Shell: 5 dc in the same space.
- Scallop: 7 dc in the same stitch.
- Petal: (ch 3, 2 dc, ch 3, sl st) all in the same space.
Turning chains: A beginning ch 3 counts as a dc. A beginning ch 4 counts as a tr, except in Row 1, where it counts as a dc plus ch 1. On every row, work the last stitch into the top of the previous row’s turning chain.
Gauge and Checkpoints
Row height matters more than stitch width here, because each row adds to the fan’s radius. Crochet Rows 1-3 first as your test piece. Measure it on a flat surface without stretching, and give the stitches a gentle tug lengthwise first so they settle.
- After Row 1: 1.0 in (2.5 cm) across the straight edge, 0.5 in (1.3 cm) deep
- After Row 2: 2.5 in (6.4 cm) across, 1.25 in (3.2 cm) deep
- After Row 3: 4.0 in (10.2 cm) across, 2.0 in (5.1 cm) deep
- After Row 5: 6.0 in (15.2 cm) across, 3.0 in (7.6 cm) deep
- After Row 7: 7.0 in (17.8 cm) across, 3.75 in (9.5 cm) deep
If your test piece is too big by more than 0.25 in (0.6 cm) after Row 3, switch to a 3.75 mm hook. If it is too small by the same amount, switch to a 4.5 mm hook.
If the width is right but the fan cups upward, your chains are too tight, so loosen them. If the fan ruffles, your tall stitches are too loose. Snug the yarn on the hook before you pull through each loop.
Measure the depth from the center of the ring straight down to the middle of the curve, not out to one end. The straight edge measurement tells you about stitch tension. The depth tells you about row height. Check both.
Fan Body
Work the fan body in turned rows. Row 1 is the RS.
Row 1 (Color A): MR, ch 4 (counts as dc + ch 1), [dc, ch 1] 5 times in ring, dc in ring. Pull the ring closed until the straight edge lies flat without gathering. Turn. (7 dc, 6 ch-1 sp)
Place a marker in the center of the ring at the straight edge. This marks the top point where the flower will go. Leave the ring tail long and weave it in only after Row 2. That way you can adjust the ring if the top edge pulls.
Row 2 (Color A): Ch 4 (counts as tr), tr in first dc, [ch 2, sk ch-1 sp, 2 tr in next dc] 6 times, working the last 2 tr in the 3rd ch of the beginning ch-4. Turn. (14 tr in 7 pairs, 6 ch-2 sp)
These 7 pairs are the main spokes of the fan. Keep each pair snug together so the spokes read as solid lines.
Row 3 (Color A): Ch 4 (counts as tr), tr in next tr, [ch 2, tr in next ch-2 sp, ch 2, tr in each of next 2 tr] 6 times. Fasten off Color A. (20 tr: 7 pairs + 6 single tr; 12 ch-2 sp)
The single tr between each pair of spokes is the anchor for the blue V-sts.
Row 4 (Color B): Turn. Join Color B with a sl st in the first tr. Ch 3 (counts as dc), dc in next tr, [ch 2, sk ch-2 sp, V-st in next single tr, ch 2, sk ch-2 sp, dc in each of next 2 tr] 6 times. Turn. (26 dc: 7 pairs (14 dc) + 6 V-sts (12 dc); 18 ch-2 sp)
Work over the Color A and Color B tails for the first few stitches. This hides them and saves weaving time later.
Row 5 (Color B): Ch 3 (counts as dc), dc in next dc, [ch 2, sk ch-2 sp and next dc, shell in V-st ch-2 sp, sk next dc and ch-2 sp, ch 2, dc in each of next 2 dc] 6 times. Fasten off Color B. (44 dc: 7 pairs (14 dc) + 6 shells (30 dc); 12 ch-2 sp)
Checkpoint: The fan should measure 6.0 in (15.2 cm) across the straight edge and 3.0 in (7.6 cm) from the ring to the middle of the curve. Count the shells. There must be exactly 6, each sitting between two blue dc spokes.
Border
The border runs along the curved edge only. The straight top edge has no border, so the motif keeps its clean fan shape.
Border gauge: One 7-dc scallop over a 5-dc shell covers about 0.75 in (1.9 cm) of the curve. At the center, the two border rows together add 0.75 in (1.9 cm) of depth. Each end of the border starts with short sc, so the ends add only about 0.5 in (1.3 cm) per side. That takes the width from 6.0 in (15.2 cm) to 7.0 in (17.8 cm). The motif has only one working edge, the curve, so all the counts below are for that edge.
Row 6 (Color A, scallop row): Turn. Join Color A with a sl st in the first dc. Ch 1, sc in same dc and in next dc, [2 sc in next ch-2 sp, sk 2 dc, scallop in next dc (the center dc of the shell), sk 2 dc, 2 sc in next ch-2 sp, sc in each of next 2 dc] 6 times. Fasten off Color A. (80 sts: 38 sc + 42 dc)
Count check: the first 2 sc, plus 6 repeats of (2 sc + 7 dc + 2 sc + 2 sc), gives 2 + (6 x 13) = 80 sts. Sc: 2 + (6 x 6) = 38. Dc: 6 x 7 = 42.
Keep the 7 dc of each scallop the same height. The middle three should not stand taller than the outer ones.
Row 7 (Color B, trim row): Turn. Join Color B with a sl st in the first sc. Ch 1, sc in same st and in each st across, working 2 sc in the 4th (center) dc of each scallop. Fasten off. (86 sc: 80 sts worked 1 per stitch + 6 extra at the scallop tips)
Why the math works: Each repeat in Row 6 sits on exactly one repeat of Row 5. The sc land on the dc spokes and ch-2 spaces, and each scallop lands on the center of a shell. Six shells give six scallops, so the yellow waves line up with the blue shells below. In Row 7, the one extra stitch at each scallop tip lets the trim go around the curve without flattening the scallop. The sc worked over the spokes keep the dips between scallops sharp.
Top Flower
Flower (Color A): With the RS facing and the straight edge up, join Color A with a sl st into the magic ring at the marked top point. Work [Petal] 3 times in the same spot. Fasten off, leaving a 6 in (15.2 cm) tail.
Use the tail to tack the center petal upright with one small stitch through its base, so the three petals spread evenly above the point. Weave in all ends along the spokes, where the tall stitches hide them.
Final Blocking
- Weave in all ends before blocking, but don’t trim them close yet.
- Lightly mist the motif with water until it is damp, not soaked.
- Lay it RS up on the blocking mat with the straight edge at the top.
- Pin the two top corners 7.0 in (17.8 cm) apart along a straight line.
- Pin the ring and flower at the center of that line.
- Pin the bottom of the center spoke 3.75 in (9.5 cm) below the straight edge.
- Pin the tip of each of the 6 scallops so they sit evenly around the curve.
- Open each chain space with your fingers so the spokes run straight from the ring.
- Shape the three petals with your fingertips so they lie flat and evenly spaced.
- Let it dry completely, then unpin it and trim the ends.
Final Quality-Control Checklist
- 7 yellow spoke pairs spread evenly from the ring
- 6 blue V-sts and 6 blue shells, each centered between spokes
- Row 5 has 44 dc and 12 ch-2 sp
- Row 6 has 80 sts with 6 scallops
- Row 7 has 86 sc and covers only the curved edge
- The straight top edge lies flat with no gathering at the ring
- Three even petals at the top point
- Finished size about 7.0 in x 4.5 in (17.8 cm x 11.4 cm)
- All ends are secure and invisible from the RS
Troubleshooting
The top puckers at the center. The magic ring is too tight. Loosen it a little before Row 2, then secure the tail.
The fan curls into a cone. Your chain spaces are too short. Work the ch-2 spaces a little looser, or use a hook one size larger for the chains only.
The edge ruffles. Your tr and dc are too loose. Try a 3.75 mm hook for Rows 2-5.
The scallops don’t line up with the shells. You miscounted a skip in Row 6. Skip exactly 2 dc on each side of the center dc of every shell.
Row 7 flattens the scallops. Check that you worked 2 sc at every scallop tip. A missed increase makes that wave shallower than the rest.
One side of the fan is longer than the other. You probably missed the stitch in the turning chain at the end of a row. Count each row’s total before fastening off.
The color changes look messy. Join each new color in the first stitch and work over the tail for the next few stitches.
Care
Hand wash in cool water with mild soap. Press out the water in a towel and dry flat, pinning the scallops back into shape if needed. Don’t hang the motif while it is wet, because that stretches the spokes.
Final Notes
The measurements build on each other: 1.0 in (2.5 cm) after Row 1, 4.0 in (10.2 cm) after Row 3, 6.0 in (15.2 cm) after Row 5, and 7.0 in (17.8 cm) after the border. If each checkpoint is right, the finished motif will be right too.
The stitch counts follow a simple pattern. 7 spokes make 6 sections, the 6 sections hold 6 shells, and the 6 shells carry 6 scallops. Keep those numbers in mind and the fan will lie flat and even.
Once you have made one fan, the same row sequence works in any colors you like. Swap the yellow and blue for seasonal shades, or try a single color for a lacier, all-white look.
Happy crocheting!