

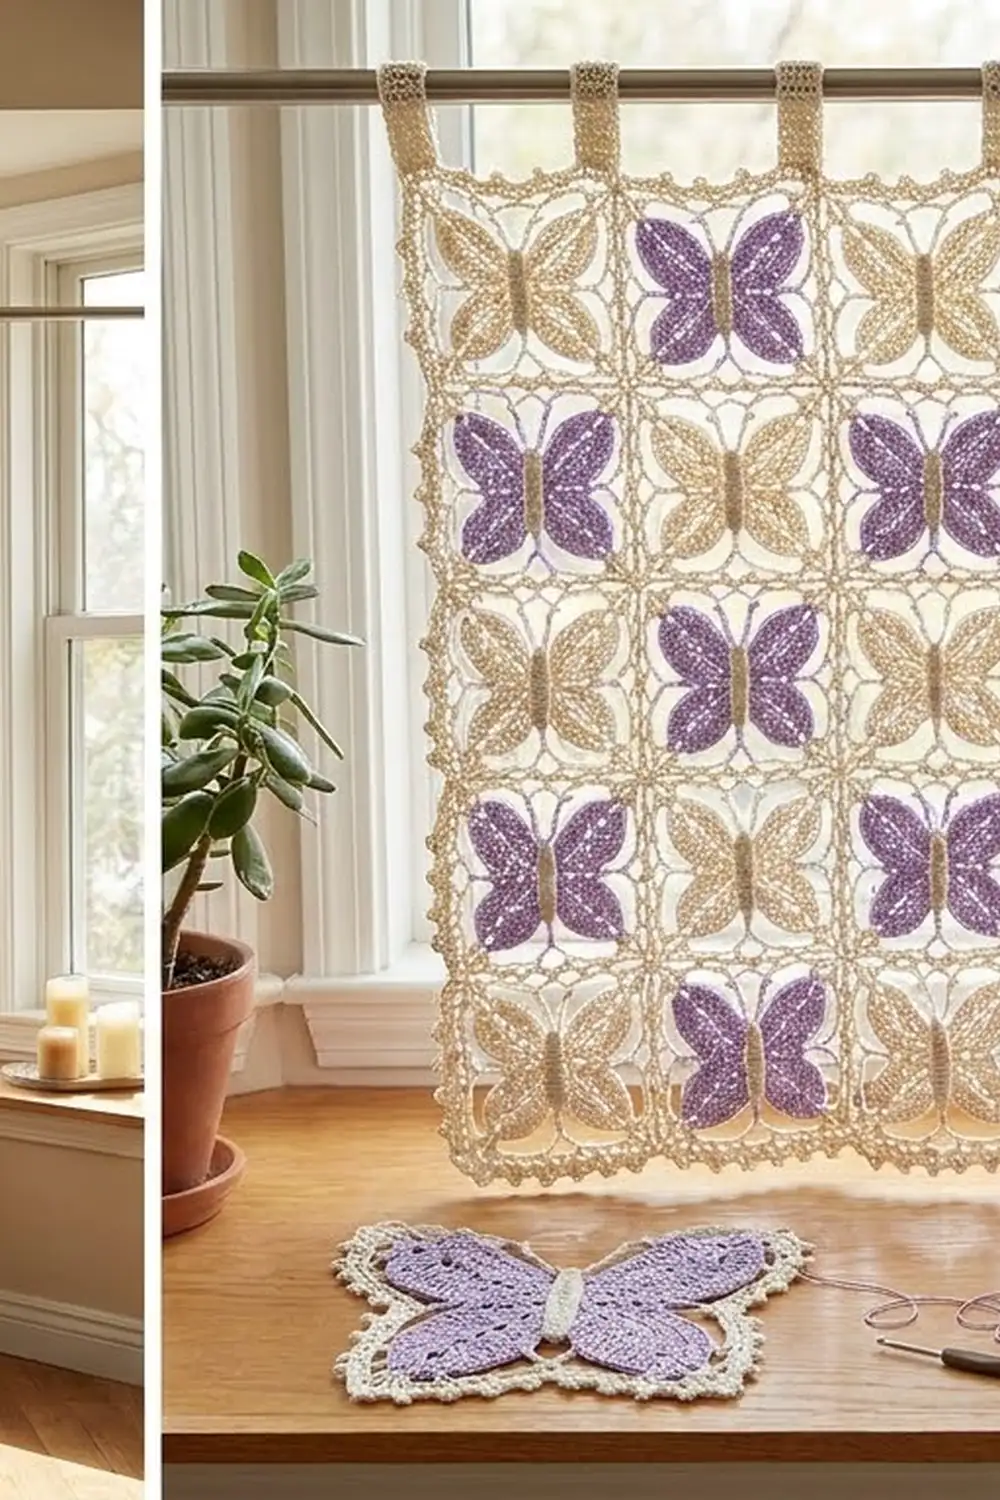
This lace curtain is built from butterfly motifs set in a checkerboard. Half of the butterflies have soft lavender wings and the other half have cream wings. Every butterfly has a ridged cream body and the same open cream chain frame, so light comes through the panel the way it does through real lace.
Each wing is a fan of tall stitches worked into one point on the body, which gives it long, glossy strands that meet at the center. Chain-loop rounds turn the butterfly into a square with a small picot at each corner. The look is airy and cottage-style.
The pattern uses US crochet terms. The finished curtain is 46″ x 31″ (116.8 x 78.7 cm) without the hanging tabs. It is made of 54 motifs, each 5″ (12.7 cm) square, set 9 across and 6 down.
Construction overview: first you crochet a small ridged body, then four fan wings, then two framing rounds. The third frame round joins the motifs as you go. A two-round border squares off the edges, and ten tabs are worked off the top edge to hang the curtain.
Finished Size and Construction
- Finished size: 46″ x 31″ (116.8 x 78.7 cm), not counting tabs
- Skill level: Intermediate
- Terminology: US crochet terms
- Yarn weight: DK / light (#3) cotton
- Hook: 3.5 mm (E-4)
- Number of pieces: 54 butterfly motifs, joined as you go
- Layout: 9 motifs across x 6 motifs down, checkerboard of wing colors
- Motif size: 5″ (12.7 cm) square
- Size before border: 45″ x 30″ (114.3 x 76.2 cm)
- Border depth: 0.5″ (1.3 cm) on every side
Materials
Mercerized or combed cotton is the best choice. It gives the wing strands their sheen, keeps the chain loops crisp, and holds up to sunlight and washing. The quantities below assume about 125 m per 50 g.
- Color A, Cream: 500 g / 1,250 m (bodies, all frames, cream wings, border, tabs)
- Color B, Lavender: 100 g / 250 m (lavender wings)
These quantities include a margin of about 10% for gauge swatches and differences between dye lots.
Tools:
- 3.5 mm (E-4) crochet hook
- Tapestry needle
- Stitch markers
- Rustproof pins and a blocking surface at least 48″ x 33″ (121.9 x 83.8 cm)
- Measuring tape
Abbreviations (US Terms)
- ch: chain
- sl st: slip stitch
- sc: single crochet
- tr: treble crochet (yarn over twice)
- dtr: double treble crochet (yarn over 3 times)
- BLO: back loop only
- sp(s): space(s)
- st(s): stitch(es)
- sk: skip
- rep: repeat
Special stitch: Picot: ch 3, sl st in 3rd ch from hook.
Corner group: (sc, ch 2, picot, ch 2, sc), all worked in the same corner space.
Gauge and Checkpoints
Gauge: 24 sc and 26 rows = 4″ (10.2 cm) in sc.
Before you commit, make one complete motif, including Round 3, and block it. Then check these measurements:
- Body: 1.75″ x 0.5″ (4.4 x 1.3 cm)
- Wings complete: about 2.75″ (7.0 cm) wide
- After Round 1: 3.25″ (8.3 cm) across
- After Round 2: 4.25″ (10.8 cm) square
- After Round 3: 5″ (12.7 cm) square
If the motif is larger than 5″ (12.7 cm), go down 0.25 mm in hook size. If it is smaller, go up 0.25 mm. A difference of only 0.25″ (0.6 cm) per motif adds up to 2.25″ (5.7 cm) across the width of the curtain.
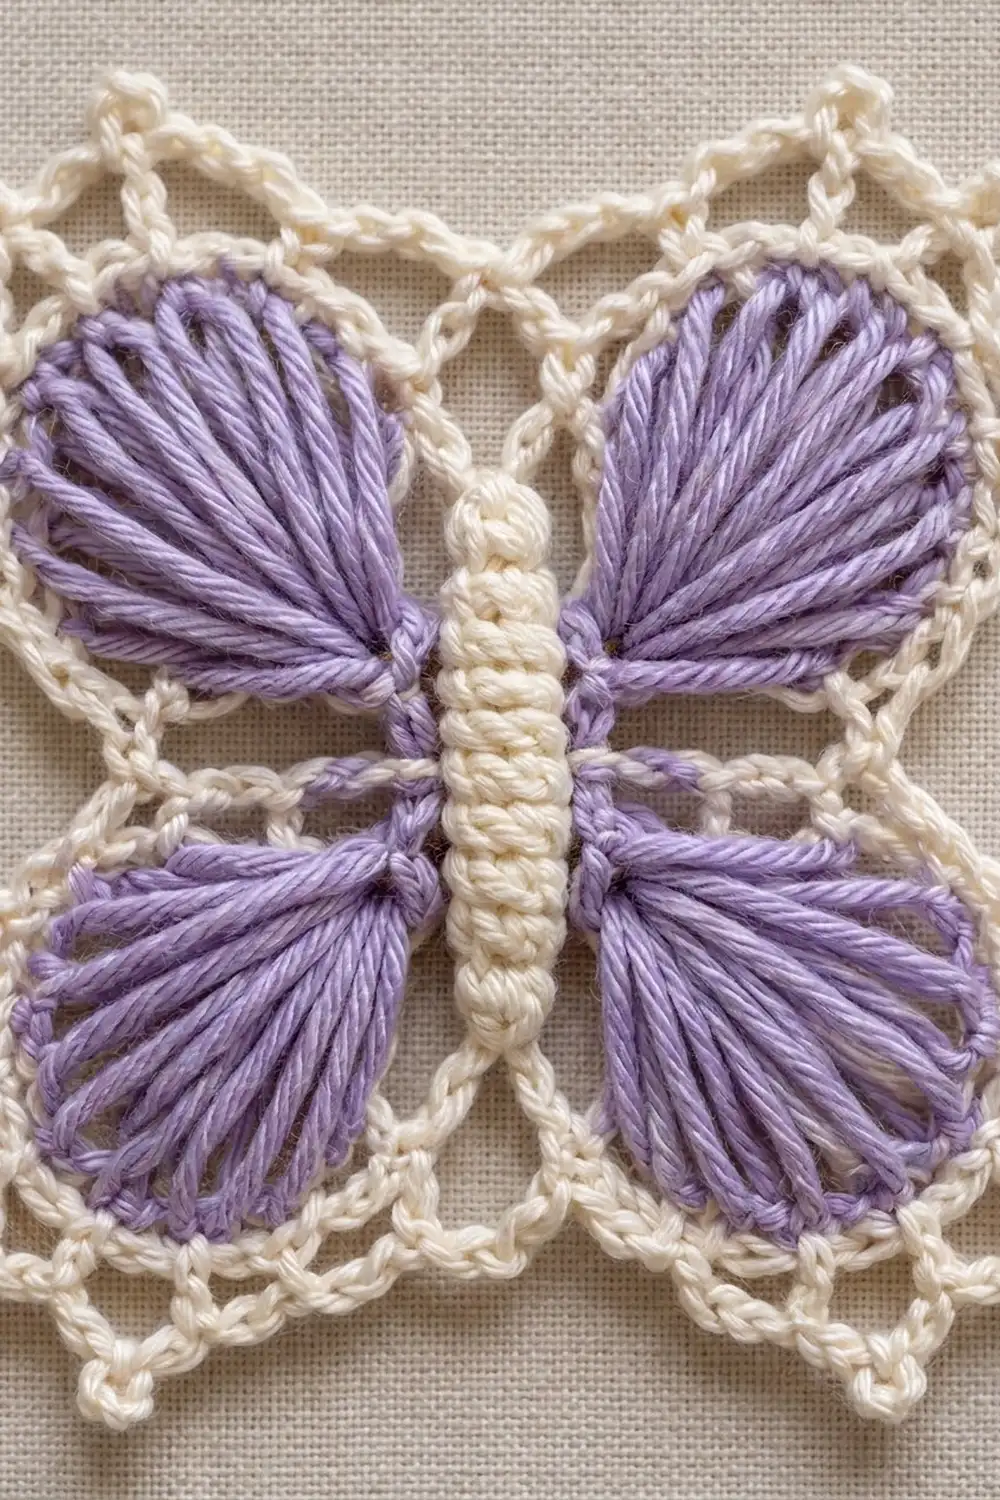
Butterfly Motif
Make 27 motifs with lavender (B) wings and 27 with cream (A) wings. The bodies and all frame rounds are always cream.
Body (Cream)
The body is worked in short rows so the ridges run across it.
With A, ch 4.
Row 1: Sc in 2nd ch from hook and in each ch across, turn. (3 sc)
Rows 2–12: Ch 1, sc in BLO of each st across, turn. (3 sc)
Row 1 is the head end and Row 12 is the tail end. Each long side has 12 row-ends. Fasten off. On both long sides, place a marker in row-end 4 and in row-end 9.
Checkpoint: 1.75″ x 0.5″ (4.4 x 1.3 cm).
Wings (Lavender or Cream)
Every wing is a fan worked into one row-end, so all its strands meet at the body.
Upper wing (make 2): Join the wing color with a sl st in marked row-end 4. Ch 5 (counts as first dtr), then work 14 dtr in the same row-end. (15 dtr) Fasten off. Repeat on the other long side.
Lower wing (make 2): Join the wing color with a sl st in marked row-end 9. Ch 4 (counts as first tr), then work 14 tr in the same row-end. (15 tr) Fasten off. Repeat on the other long side.
Each fan opens into a rounded wing. The upper wings are taller because they use dtr, and the lower wings are shorter because they use tr. Weave in the ends at the body so the base of each fan stays tight.
Round 1: Wing Outline (Cream)
With the right side facing, work around the motif in this order: upper-right wing, lower-right wing, tail, lower-left wing, upper-left wing, head. On each wing, start at the end of the fan nearest the head.
Join A with sc in top of the first st of the upper-right wing. (Ch 1, sc in next st) 14 times. This wing now has 15 sc and 14 ch-1 sps. Ch 3, sc in first st of lower-right wing, then (ch 1, sc in next st) 14 times. Ch 2, sc in center st of Row 12 (tail), ch 2. Sc in first st of lower-left wing, then (ch 1, sc in next st) 14 times. Ch 3, sc in first st of upper-left wing, then (ch 1, sc in next st) 14 times. Ch 2, sc in center st of Row 1 (head), ch 2, sl st to first sc. Fasten off.
Count: 62 sc (15 on each wing, plus the head and tail), 56 ch-1 sps, 2 ch-3 sps, 4 ch-2 sps.
Checkpoint: 3.25″ (8.3 cm) across.
Round 2: Squaring Round (Cream)
Number the ch-1 spaces on each wing 1 to 14, starting from the end where you began that wing in Round 1. The corner of the square sits at the outer tip of each wing, between sps 7 and 8.
Join A with sc in sp 1 of the upper-right wing.
Each wing: (Ch 4, sk next sp, sc in next sp) 3 times, so you have sc in sps 1, 3, 5 and 7. Ch 6 for the corner. Sc in sp 8, then (ch 4, sk next sp, sc in next sp) 3 times, so you have sc in sps 8, 10, 12 and 14.
Between wings: Ch 4. Sc in the transition point, which is the ch-3 sp on the left and right sides and the head or tail sc at the top and bottom. Ch 4, then sc in sp 1 of the next wing.
Work all four wings and all four transitions. After the last transition (at the head), finish with ch 4 and sl st to the first sc. Skip the ch-2 spaces from Round 1. Fasten off.
Count: 36 sc, 32 ch-4 loops, 4 ch-6 corner sps.
Each side has 3 loops from one wing, 2 transition loops and 3 loops from the next wing. That makes 8 ch-4 loops between corners on every side, so the motif is truly square.
Checkpoint: 4.25″ (10.8 cm) square.
Round 3: Lace Frame (First Motif, Unjoined)
Join A with sc in any corner ch-6 sp. Ch 2, picot, ch 2, sc in same sp. (Ch 5, sc in next ch-4 loop) 8 times, ch 5*, then work a corner group in the next corner sp. Rep from * twice more, then work from * to ** once more. Sl st to first sc. Fasten off.
Count: 40 sc, 36 ch-5 loops, 4 corner picot loops.
Per side: 9 ch-5 loops plus 2 corner loops = 11 edge loops per side, counting both corners. Each corner loop is shared by two sides, so 4 sides x 11 minus 4 shared corners = 40 loops in total.
Checkpoint: 5″ (12.7 cm) square.
Make All Pieces
Work every motif through Round 2. You complete Round 3 on each one as you join it.
- Lavender-wing motifs (L): 27
- Cream-wing motifs (C): 27
- Cream frames on all 54 motifs
Layout (9 across x 6 down):
Row 1: L C L C L C L C L
Row 2: C L C L C L C L C
Row 3: L C L C L C L C L
Row 4: C L C L C L C L C
Row 5: L C L C L C L C L
Row 6: C L C L C L C L C
Rows 1, 3 and 5 each have 5 L and 4 C. Rows 2, 4 and 6 each have 4 L and 5 C. That gives 27 of each.
Joining
The motifs are joined as you go during Round 3. Make the top-left motif first, without joining. After that, work across each row from left to right, and work the rows from top to bottom.
Joined corner: Sc in the corner sp, ch 2, sl st in the picot of the motif you are joining to, ch 2, sc in the same corner sp. Where four motifs meet, always sl st into the picot of the first motif made at that point, so all the joins stack in one spot.
Joined side: Each ch 5 becomes ch 2, sl st in the matching ch-5 loop of the neighbor, ch 2. Work (ch 2, sl st in neighbor’s loop, ch 2, sc in next ch-4 loop) 8 times. Then ch 2, sl st in the neighbor’s 9th loop, ch 2, and go on to the next corner.
Stitch-to-stitch logic: Each side has 9 loops, so loop 1 joins to loop 1, and so on through loop 9. Corners join to corners. Ch 2 + sl st + ch 2 is the same length as ch 5, so the joined edges lie flat.
Tension: Keep the joining sl st snug but not tight. If you pull it tight, the neighbor’s loop gathers and the seam ripples.
Size checkpoint: After joining all 54 motifs, the panel measures 45″ x 30″ (114.3 x 76.2 cm).
Border
Border gauge: 31 sc per motif side, which is 6.2 sc per inch (2.5 cm). That is a little more than the 6 sc per inch of the main gauge, and the extra stitches keep the lace edge from cupping.
Starting count: The top and bottom each have 9 motifs x 11 edge loops = 99 loops. The left and right sides each have 6 motifs x 11 edge loops = 66 loops. Each of these counts includes the 2 curtain corner loops, which are shared with the neighboring side. At every seam along the outer edge, count both motifs’ corner loops. Don’t add any extra loops at the seams.
Round 1 (Cream): Join A in the top-right curtain corner loop. Work 3 sc in every ch-5 side loop and 2 sc in every motif corner loop, working around the chains and leaving the picots free. In each of the 4 curtain corner loops, work (2 sc, ch 2, 2 sc). Sl st to first sc.
- Top and bottom: 99 (1 per loop) + 180 extra (2 extra in each of 81 side loops + 1 extra in each of 18 corner loops) = 279 sc
- Left and right: 66 (1 per loop) + 120 extra (2 extra in each of 54 side loops + 1 extra in each of 12 corner loops) = 186 sc
Round 2: Ch 1, sc in each sc around. In each corner ch-2 sp, work (sc, ch 2, sc). Sl st to first sc.
- Top and bottom: 279 (1 per st) + 2 (corner sc) = 281 sc
- Left and right: 186 (1 per st) + 2 (corner sc) = 188 sc
Why the math works: Every motif side has 11 loops, and they always become 31 sc (9 x 3 + 2 x 2). A row of 9 motifs is 45″ (114.3 cm) long, and 279 sc over 45″ is 6.2 sc per inch. A column of 6 motifs is 30″ (76.2 cm), and 186 sc over 30″ is also 6.2 sc per inch. Because the stitch density is the same on every side, the corners lie square.
Tabs (make 10): The top edge has 281 sts, split as 2 + (7 x 10 tabs) + (23 x 9 gaps) + 2 = 281.
With the wrong side facing, skip the first 2 sts of the top edge and join A in the next st.
- Row 1: Sc in this st and the next 6 sts. (7 sc)
- Rows 2–20: Ch 1, turn, sc across. (7 sc)
Fasten off and leave a long tail. Skip 23 sts and make the next tab. Fold each tab to the back and sew its last row to Round 1 of the border. Each tab is 1.25″ (3.2 cm) wide. The 3″ (7.6 cm) strip folds into a loop that fits a rod up to 1″ (2.5 cm) in diameter.
Final Blocking
- Weave in all ends inside the bodies and along the sc of the frames.
- Soak the curtain in cool water for 10 minutes. Roll it in a towel to press the water out, without wringing.
- Pin the curtain to 46″ x 31″ (116.8 x 78.7 cm). Start at the four corners, then pin the midpoint of each edge.
- Pin each seam line straight and check that every motif measures 5″ (12.7 cm).
- Spread each wing fan with your fingers so the strands sit evenly.
- Pin out the corner picots along the border.
- Let it dry completely, which takes about 24 hours.
Final Quality-Control Checklist
- 54 motifs in the checkerboard layout, 27 L and 27 C
- Every motif is 5″ (12.7 cm) square
- Each motif side has 9 ch-5 loops and 2 corner loops
- Corners where four motifs meet share one picot
- Border Round 1 has 279 / 186 sc per side
- Border Round 2 has 281 / 188 sc per side
- Panel measures 46″ x 31″ (116.8 x 78.7 cm)
- 10 tabs, each 7 sts wide, sewn down evenly
- No ends show through the lace
Troubleshooting
- Wings look stringy or gappy: Your tension is too loose. Keep each yarn over snug and pull the loops up evenly.
- Wing fan twists: You probably worked into only one strand of the row-end. Insert the hook under two strands of the row-end.
- Motif isn’t square: Recount Round 2. There should be 8 ch-4 loops between corners on every side.
- Seams ripple: The joining sl sts are too tight. Rework them more loosely.
- Border waves: Check that you worked 2 sc, not 3, in each corner loop.
- Border cups: Work the border rounds with a hook 0.5 mm larger.
Care
Hand wash in cool water with mild soap, then reshape and dry flat. Cotton fades in strong sun, so take the curtain down now and then if it hangs in a bright window.
Final Notes
Here is the measurement chain:
- The body is 1.75″ (4.4 cm) long.
- The wings are 2.75″ (7.0 cm) across.
- After Round 1, the motif is 3.25″ (8.3 cm) across.
- After Round 2, it is 4.25″ (10.8 cm) square.
- After Round 3, it is 5″ (12.7 cm) square, with 11 edge loops per side.
- Joined 9 x 6, the panel is 45″ x 30″ (114.3 x 76.2 cm).
- The border turns each motif side into 31 sc and adds 0.5″ (1.3 cm) on every side.
- The finished curtain is 46″ x 31″ (116.8 x 78.7 cm).
If every motif matches the 5″ (12.7 cm) checkpoint, everything after it will add up.
Happy crocheting!