

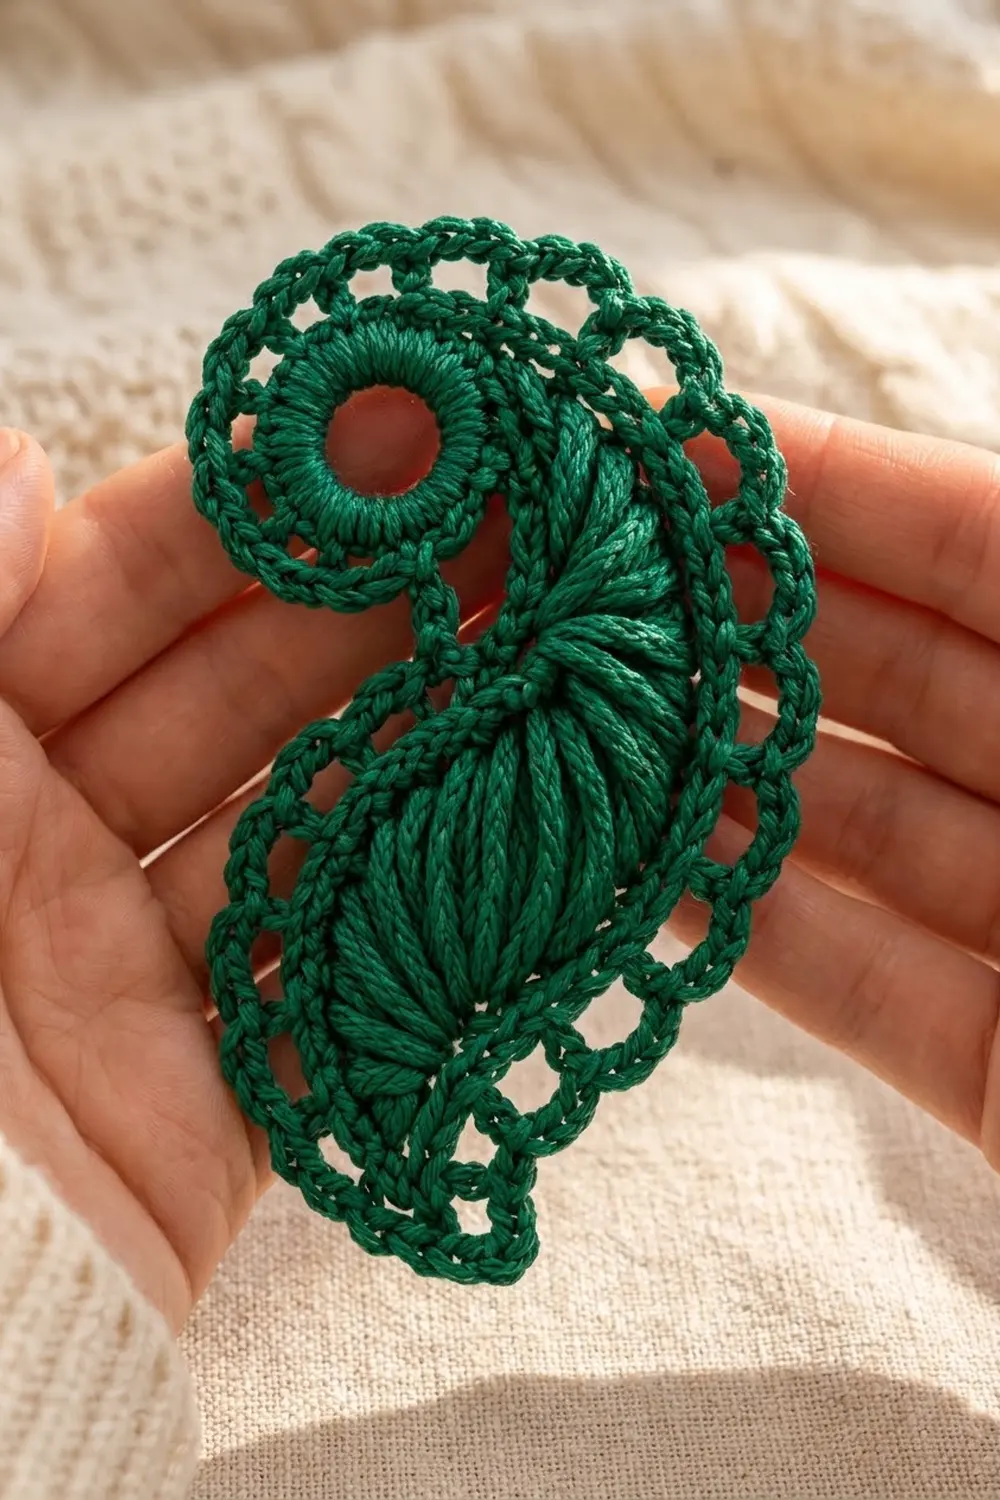
This Emerald Paisley Lace Motif is a classic teardrop shape with a curled tail, worked in rich forest-green cotton. A padded ring makes the “eye” at the wide head. A ridged leaf fills the body, and a lacy edge of chain loops frames the whole outline, a bit like Irish crochet.
The design uses one color only, so all the interest comes from texture. The ring is dense and raised. The leaf has long stitches that fan out from a center spine. The chain-loop edge keeps everything light and open. The look is festive but timeless, and it works nicely as a holiday ornament, a lace appliqué, or a gift-tag decoration.
This pattern uses US crochet terms. The finished motif measures about 5 in (12.7 cm) tall and 3 in (7.6 cm) wide after blocking.
You’ll make the eye ring first. Next comes the leaf, worked around both sides of a foundation chain. In Round 3 of the leaf you join the ring on as you go. A final border round then runs around the whole paisley and pulls the tail into its curl.
Finished Size and Construction
- Finished size: 5 in x 3 in (12.7 cm x 7.6 cm)
- Skill level: Intermediate
- Terminology: US crochet terms
- Yarn weight: Sport (#2) mercerized cotton
- Hook: 3.0 mm (US C/2–D/3)
- Number of pieces: 1 motif (made from 2 parts, joined during Leaf Round 3)
- Layout: Ring at the wide head, leaf body curving into the tail
- Ring size (after Round 3): 1.5 in (3.8 cm) across
- Size before border: 4.5 in x 2.5 in (11.4 cm x 6.4 cm)
- Border depth: about 0.25 in (0.6 cm) on every side
Materials
Yarn: Use a smooth, tightly plied mercerized cotton in sport weight, about 150 m per 50 g. Mercerized cotton shows off the stitch definition and holds a crisp curl after blocking. Avoid fuzzy or very soft yarns, because the ridges and loops will blur.
- Emerald green: 10 g / 30 m (includes about 1 m for padding cord)
The quantity includes a safety margin of about 40% above what one motif actually uses.
Tools:
– 3.0 mm crochet hook
– Tapestry needle
– Scissors
– Rustproof pins
– Blocking mat or folded towel
– Spray bottle with water
– Optional: light spray starch
Abbreviations (US Terms)
- ch – chain
- sl st – slip stitch
- sc – single crochet
- hdc – half double crochet
- dc – double crochet
- tr – treble crochet
- sp – space
- st(s) – stitch(es)
- rnd – round
- RS – right side
Special stitch: Padded sc. Hold a 12 in (30.5 cm) strand of the same yarn, folded in half, along the ring. Work each sc into the ring and over the doubled strand so the strand is buried inside the stitches. This is what gives the eye its raised, cushioned look.
Joining loop: Ch 1, sl st into the indicated ring loop, ch 1. This takes the place of a normal chain loop and fixes the two parts together.
Gauge and Checkpoints
Gauge matters less for a single motif than for a garment. Even so, it controls whether the ring fits the leaf and whether the tail curls neatly. Make one test motif first and measure at each checkpoint:
- Ring after Rnd 1: center hole about 0.5 in (1.3 cm)
- Ring after Rnd 2: 1.1 in (2.8 cm) across
- Ring after Rnd 3: 1.5 in (3.8 cm) across
- Leaf after Rnd 1: 3.25 in x 1.25 in (8.3 cm x 3.2 cm)
- Leaf after Rnd 2: 3.5 in x 1.5 in (8.9 cm x 3.8 cm)
- Leaf after Rnd 3, ring attached: 4.5 in x 2.5 in (11.4 cm x 6.4 cm)
- After border: 5 in x 3 in (12.7 cm x 7.6 cm)
Too big: Go down to a 2.75 mm hook, or tighten your chains. Loose chains are the most common reason a motif runs large.
Too small: Go up to a 3.25 mm hook. If only the ring is small, make the starting chain ch 11 and keep every other count the same.
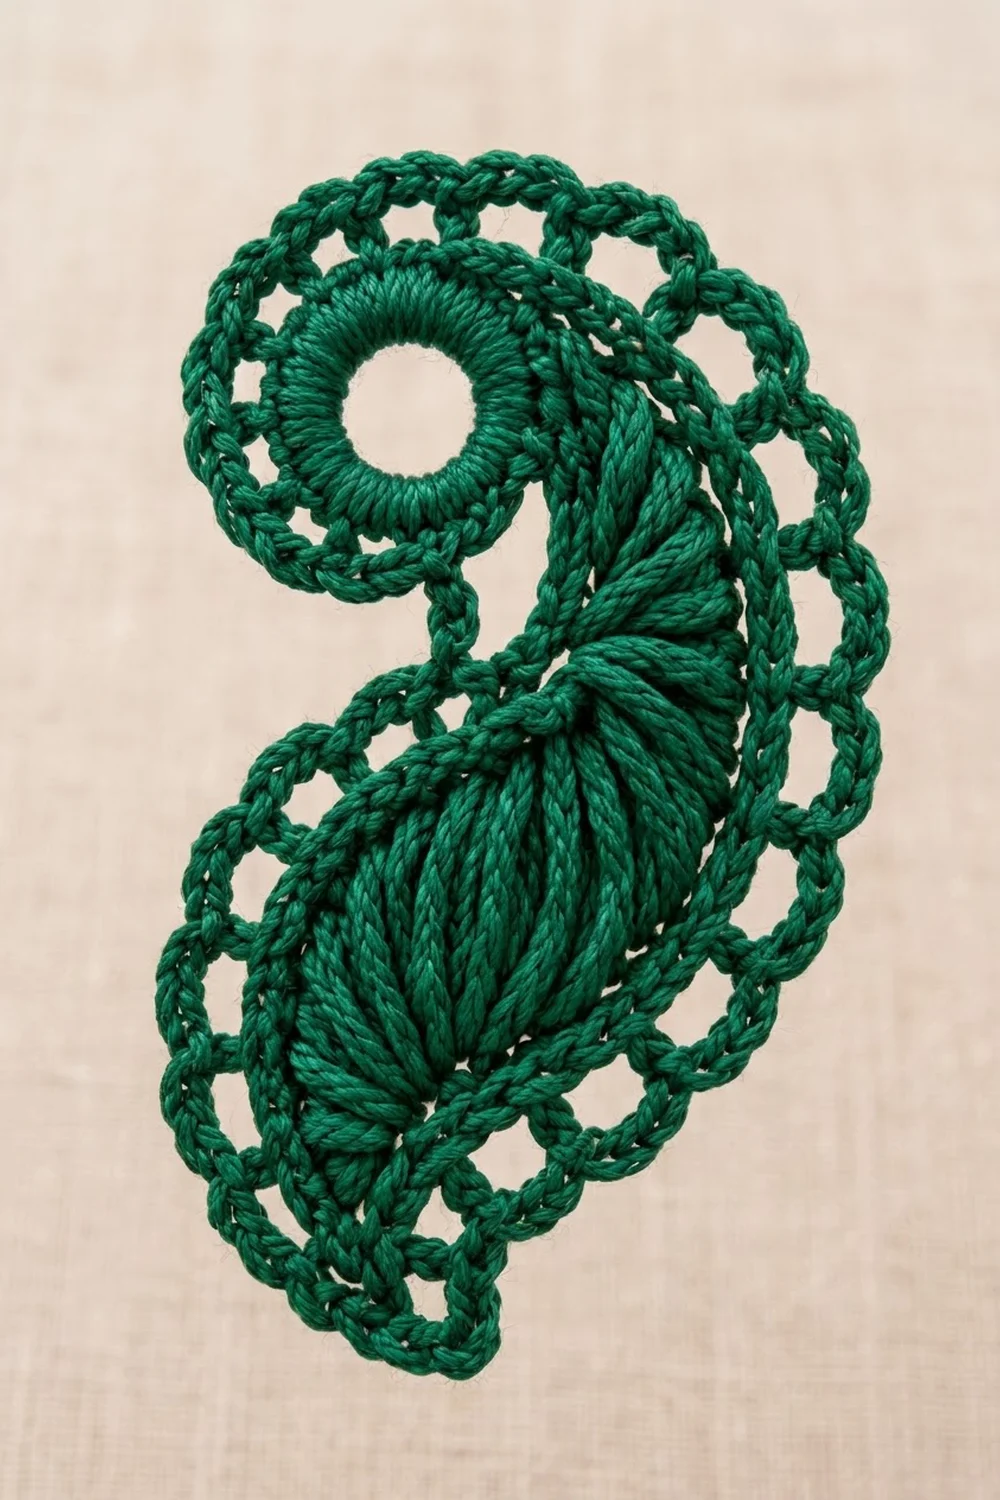
Part 1: Eye Ring
Foundation: Ch 10, sl st to the first ch to form a ring.
Rnd 1: Ch 1. Lay the doubled padding strand along the ring and work 20 padded sc into the ring, covering the strand. Sl st to the first sc. (20 sc)
Gently pull the padding tails so the stitches bunch up and fill the ring evenly. Trim the tails to 0.5 in (1.3 cm) and hide them under Rnd 2.
Rnd 2 (growth): Ch 1, sc in next st, 2 sc in next st; repeat from * 10 times total. Sl st to the first sc. (30 sc)
Rnd 3: Ch 1, sc in next st, ch 3, skip next st; repeat from * 15 times total. Sl st to the first sc. (15 sc, 15 ch-3 loops)
Fasten off and weave in the ends. The ring should lie flat and measure 1.5 in (3.8 cm) across.
Part 2: Leaf Body
The leaf is worked around both sides of one foundation chain. The chain stays in the middle as the spine, and the taller stitches fan out from it into ridges.
Foundation: Ch 18.
Counting from the hook, ch 1 is the chain nearest the hook and ch 18 is the first chain you made.
Rnd 1:
– Side A: Sl st in 2nd ch from hook, sc in next 2 ch, hdc in next 2 ch, dc in next 4 ch, tr in next 6 ch, dc in next ch. (16 sts)
– Base: 5 dc in last ch. (5 sts)
– Side B: Rotate the work and go along the opposite side of the foundation chain. Dc in next ch, tr in next 6 ch, dc in next 4 ch, hdc in next 2 ch, sc in next 2 ch, sl st in next ch. (16 sts)
– Tip: Ch 1, sl st to the first sl st. This makes the tip ch-1 sp.
Total: 37 sts plus 1 tip ch-1 sp. The tr stitches sit across from each other, so the widest part of the leaf is near the base, where the ring will go.
Rnd 2 (conversion round, cord outline):
– Sl st into the tip ch-1 sp. Ch 1, 3 sc in the same sp.
– Sc in each of the next 16 sts (Side A).
– Sc in next 2 dc, 3 sc in next dc (the center of the base fan), sc in next 2 dc.
– Sc in each of the next 16 sts (Side B).
– Sl st to the first sc.
Count: 37 sts worked 1 per st + 2 extra at the base center + 3 in the tip sp = 42 sc.
To help with Rnd 3, number the Rnd 2 stitches like this:
– Tip = sts 1–3 (center = st 2)
– Side A = sts 4–19
– Base = sts 20–26
– Side B = sts 27–42
Part 3: Leaf Loop Round and Ring Join
Rnd 3:
1. Sl st into st 2 (the center tip sc). Ch 1, sc in the same st, ch 3, skip next st. (1 tip loop)
2. Sc in next st, ch 2, skip next st; repeat from * 8 times total. (8 ch-2 loops, Side A, inner curve)
3. Hold the ring next to the base, both RS facing up. Sc in next st, joining loop into the next ring ch-3 loop, skip next st; repeat from * 4 times total, moving to the next ring loop each time. (4 joining loops into 4 neighboring ring loops)
4. Sc in next st, ch 4, skip next st; repeat from * 7 times total. (7 ch-4 loops, Side B, outer curve)
5. Sc in next st (st 42), ch 3, sl st to the first sc. (1 closing loop)
Count: 21 sc and 21 loops in total. That’s 1 tip loop, 8 ch-2 loops, 4 joining loops, 7 ch-4 loops, and 1 ch-3 closing loop. Steps 1 through 5 use 2 + 16 + 8 + 14 + 1 = 41 sts, and the closing loop skips st 1, so all 42 sts are accounted for.
The short ch-2 loops on Side A pull that edge in, and the longer ch-4 loops on Side B let it spread. That difference is what starts the paisley curve. The ring now has 11 free ch-3 loops. Do not fasten off.
Checkpoint: The motif should measure about 4.5 in x 2.5 in (11.4 cm x 6.4 cm), with the tail already bending toward Side A.
Border
Border gauge: One ch-5 loop with its sc spans about 0.4 in (1 cm) along the edge and stands about 0.25 in (0.6 cm) out from it. A ch-3 loop spans about 0.25 in (0.6 cm).
Rnd 4: Sl st over to the center of the tip ch-3 loop.
– Tip: Ch 1, sc in the tip loop, ch 5. (1 sc, 1 ch-5)
– Side A: Sc in next ch-2 loop, ch 3; repeat from * 8 times total. (8 sc, 8 ch-3) The last ch-3 crosses over to the ring.
– Ring: Skip the joined loops. Sc in next free ring loop, ch 5; repeat from * 11 times total. (11 sc, 11 ch-5) The last ch-5 crosses over to Side B.
– Side B: Sc in next loop, ch 5; repeat from * 8 times total (7 ch-4 loops plus the closing ch-3 loop). (8 sc, 8 ch-5)
– Sl st to the first sc. Fasten off.
Border total: 1 + 8 + 11 + 8 = 28 sc and 28 loops. That’s 20 ch-5 loops and 8 ch-3 loops, which use 100 + 24 = 124 chains.
Why the math works: Every free loop from Rnd 3 gets exactly one sc, and the 4 joined loops are left out. On the leaf, 21 loops minus 4 joined leaves 17 free (1 tip + 8 Side A + 8 Side B). On the ring, 15 loops minus 4 joined leaves 11 free. Together that’s 17 + 11 = 28 border loops.
The inner curve keeps short ch-3 loops, so it stays snug. The outer curve and the ring get ch-5 loops, so they flare. The result is a deeper curl without any increases. The border adds about 0.25 in (0.6 cm) on each side, taking the motif from 4.5 in x 2.5 in (11.4 cm x 6.4 cm) to 5 in x 3 in (12.7 cm x 7.6 cm).
Final Blocking
- Weave in all remaining ends through the dense sc cord, not through the open loops.
- Soak the motif in cool water for 10 minutes, then press out the water in a towel. Don’t wring it.
- Lay it RS up on the blocking mat.
- Pin the ring into a true circle 1.5 in (3.8 cm) across, measured at the Rnd 3 loops.
- Pin the leaf spine into a gentle curve so the tail bends toward Side A.
- Pin each ch-5 border loop outward into a rounded arch. Pin the ch-3 loops closer in.
- Check that the overall size is 5 in x 3 in (12.7 cm x 7.6 cm).
- If you’re using starch, mist it on lightly. Let the motif dry completely before unpinning.
Final Quality-Control Checklist
- Ring Rnd 1 has 20 padded sc, with no padding strand showing.
- Ring Rnd 2 has 30 sc. Ring Rnd 3 has 15 loops.
- Leaf Rnd 1 has 16 + 5 + 16 = 37 sts.
- Leaf Rnd 2 has 42 sc, with 3-sc corners at the tip and base.
- Leaf Rnd 3 has 21 loops, and exactly 4 of them are joined to the ring.
- The border has 28 loops: 1 tip, 8 Side A, 11 ring, 8 Side B.
- The tail curls smoothly, with no ripples.
- The motif measures 5 in x 3 in (12.7 cm x 7.6 cm).
- All ends are secured inside sc cords.
Troubleshooting
The ring cups or ruffles. Rnd 2 has the wrong count. Recount for exactly 30 sc. If it still ruffles, use a smaller hook for Rnd 3.
The padding strand shows through. Work the sc more snugly, and tug the strand gently before trimming.
The leaf twists along the spine. Your foundation chain is probably twisted. When you work Side B, make sure you’re going into the bottom loops of the same chain, not the back bumps.
The tail won’t curl. Check that Side A has ch-2 loops in Rnd 3 and ch-3 loops in the border. Then re-block with a stronger pinned curve.
The ring pulls away from the leaf. Make sure each joining loop goes into a separate, neighboring ring loop. Don’t stack two joins in one loop.
The border waves. Tighten your chains, or cut the ch-5 loops down to ch 4 on the ring side only.
Care
Hand wash in cool water with a mild detergent, press dry in a towel, and lay flat or pin to dry. Re-starch after washing if you want crisp loops.
Final Notes
Here’s the measurement chain one more time. The ring grows from a 0.5 in (1.3 cm) hole to 1.5 in (3.8 cm) across. The leaf goes from 3.25 in x 1.25 in (8.3 cm x 3.2 cm) to 3.5 in x 1.5 in (8.9 cm x 3.8 cm). Joined at Rnd 3, the motif reaches 4.5 in x 2.5 in (11.4 cm x 6.4 cm), and the 28-loop border brings it to 5 in x 3 in (12.7 cm x 7.6 cm). Check each stage as you go and your paisley will come out balanced, curled, and crisp.
Happy crocheting!