

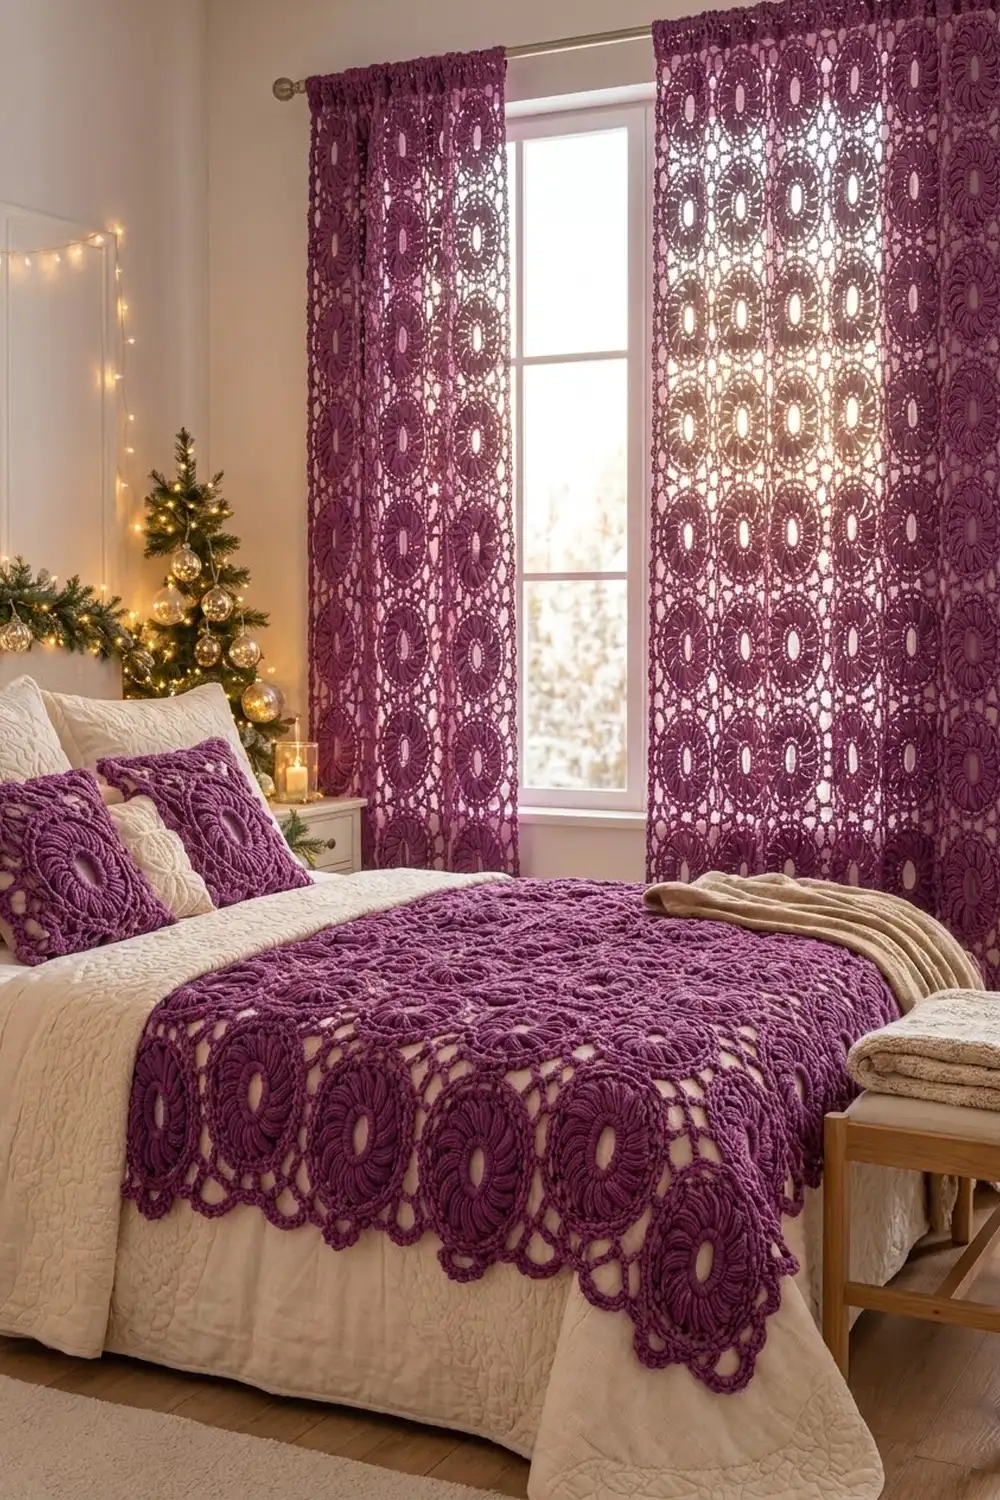
The Plum Halo Curtain Panel is a lace window panel made of joined oval motifs in one deep plum-purple yarn. Each motif has an open oval center inside a thick, rope-like ring. A crown of long puff stitches radiates from the ring, and then a ladder round and a ring of chain loops finish the edge. Where the motifs meet, small diamond-shaped gaps open up, so the panel lets light through like a stained-glass window.
The style is cozy and slightly vintage. Using one solid color keeps the eye on the texture, and the puffs catch light and shadow when the panel hangs at a window.
This pattern uses US crochet terms. The finished panel measures 26 x 62 in (66.0 x 157.5 cm) after the border and blocking.
You crochet one oval motif in five rounds and join each new motif to its neighbors on the last round (join-as-you-go). The panel is 4 motifs wide and 8 motifs tall. A three-round border then fills in the scalloped edges and turns them into a straight rectangle.
Finished Size and Construction
- Finished size: 26 x 62 in (66.0 x 157.5 cm)
- Skill level: Intermediate
- Terminology: US crochet terms
- Yarn weight: Worsted (#4)
- Hook: 5 mm (H-8)
- Number of pieces: 32 oval motifs
- Layout: 4 motifs wide x 8 motifs tall
- Motif size (blocked): 6 x 7.5 in (15.2 x 19.1 cm)
- Size before border: 24 x 60 in (61.0 x 152.4 cm)
- Border depth: about 1 in (2.5 cm) on each side
Materials
Yarn: Use a smooth, tightly plied worsted cotton or cotton blend, about 200 m (219 yd) per 100 g. A firm cotton gives crisp puffs and holds its shape when hanging. Very fuzzy or splitty yarn hides the stitch definition and makes the puffs hard to pull through.
- Plum (one color only): 700 g, about 1,400 m (1,531 yd)
- Each motif uses about 17 g / 34 m (37 yd)
- 32 motifs use about 544 g; the border uses about 50 g
These amounts include about 15% extra for gauge differences and a test motif.
Tools:
- 5 mm (H-8) crochet hook
- Tapestry needle
- 8 locking stitch markers
- Rust-proof pins and a blocking mat or folded towels
- Spray bottle
- Measuring tape
Abbreviations (US Terms)
- ch – chain
- sl st – slip stitch
- sc – single crochet
- hdc – half double crochet
- dc – double crochet
- tr – treble crochet (yo twice)
- dtr – double treble crochet (yo 3 times)
- sk – skip
- sp(s) – space(s)
- st(s) – stitch(es)
- rnd – round
- yo – yarn over
Special stitch – Puff: (Yo, insert hook in st, yo, pull up a loop to about ¾ in / 1.9 cm tall) 5 times, yo, pull through all 11 loops on hook, ch 1 to close. The closing ch does not count as a stitch.
Gauge and Checkpoints
Make one complete motif and block it before you start the panel. Every other measurement depends on this one piece.
- After Rnd 1: ring is about 2.5 in (6.4 cm) across, with a center hole of about 1.25 in (3.2 cm).
- After Rnd 2: about 4.25 x 4.75 in (10.8 x 12.1 cm).
- After Rnd 3: about 4.5 x 5.25 in (11.4 x 13.3 cm).
- After Rnd 4: about 5.5 x 6.75 in (14.0 x 17.1 cm).
- After Rnd 5, blocked: 6 x 7.5 in (15.2 x 19.1 cm).
Border gauge: 16 sc = 4 in (10.2 cm), worked into the joined edge.
If your blocked motif is larger than 6 x 7.5 in, go down to a 4.5 mm hook. If it is smaller, go up to a 5.5 mm hook. Small differences add up fast: an error of just ¼ in (0.6 cm) per motif changes the panel length by 2 in (5.1 cm).
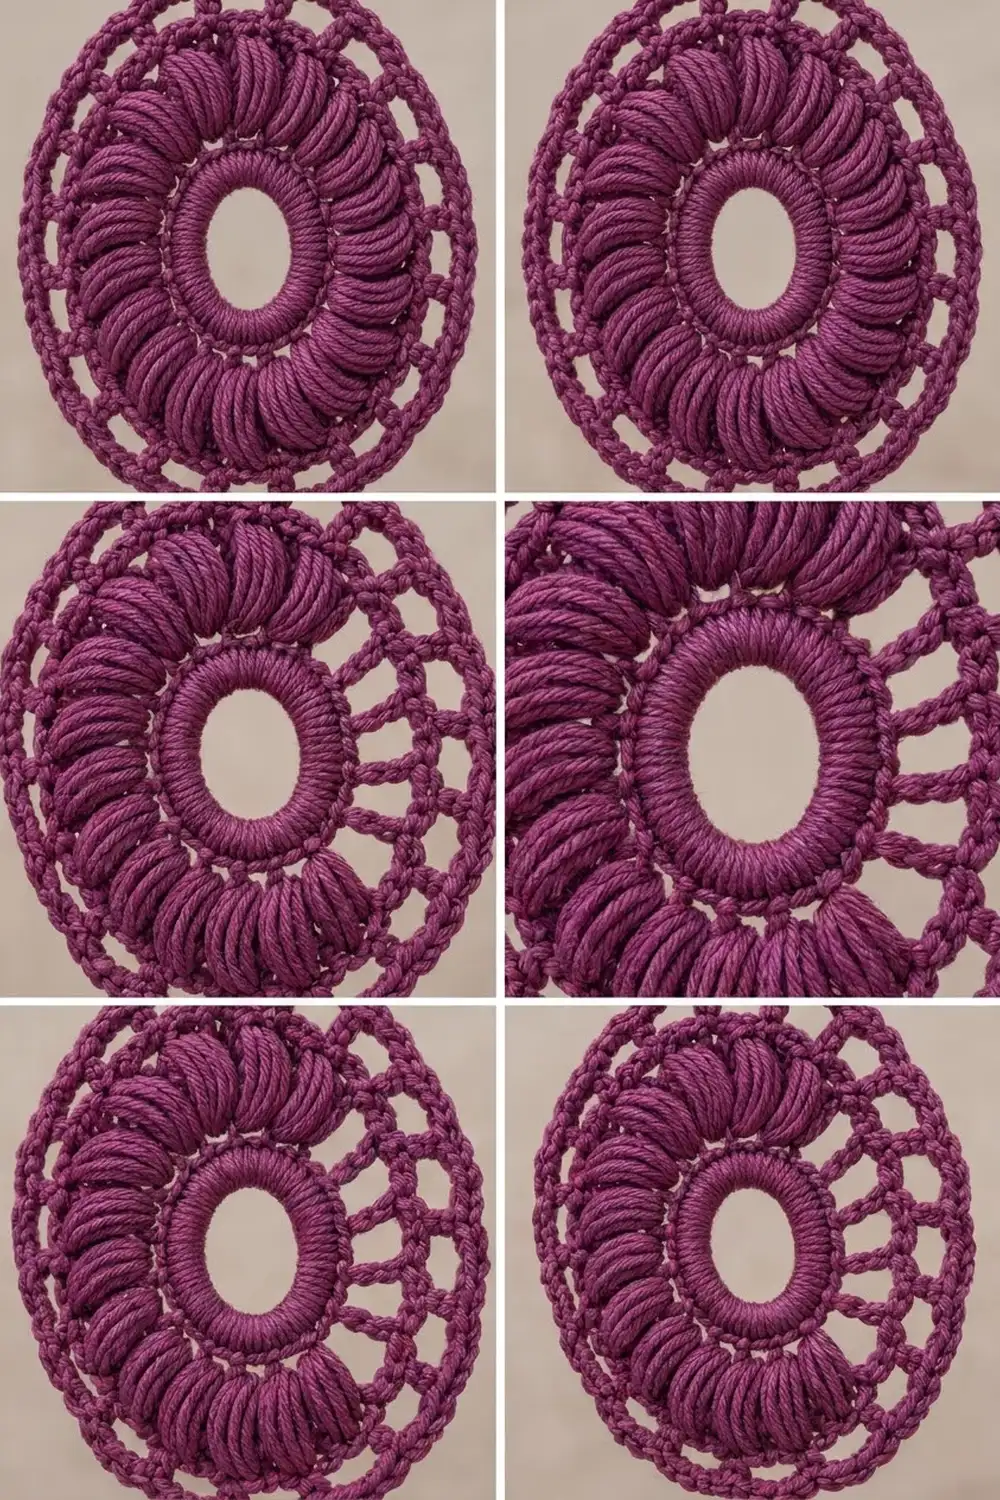
Oval Motif
The oval shape comes from stitch height. The two narrow ends (top and bottom) get taller stitches and longer loops than the two long sides.
Rnd 1 (ring): Ch 24, sl st in first ch to form a ring. Ch 1, work 54 sc into the ring (over the chain, not into it), pushing the stitches together so they cover the chain completely. Sl st in first sc. (54 sc)
The tightly packed sc give the ring its thick, rope-like look.
Rnd 2 (puffs): Sl st in next sc. Ch 1, puff in next sc, ch 1, sk next 2 sc; rep from * around. Sl st in top of first puff. (18 puffs, 18 ch-1 sps)*
Lay the motif flat and mark the four arcs with locking markers:
- Puffs 1–4: top arc
- Puffs 5–9: right arc
- Puffs 10–13: bottom arc
- Puffs 14–18: left arc
Rnd 3 (conversion round): Ch 1. Then work each arc as follows, and sl st in first st to close:
- Top arc (puffs 1–4): hdc in puff, 3 hdc in next ch-1 sp.
- Right arc (puffs 5–9): sc in puff, 3 sc in next ch-1 sp.
- Bottom arc (puffs 10–13): work as for the top arc, in hdc.
- Left arc (puffs 14–18): work as for the right arc, in sc.
Count: 18 sts worked 1 per puff + 54 sts worked into the ch-1 sps = 72 sts (16 per end arc, 20 per side arc).
Rnd 4 (ladder round): Sl st in next st. Over each end arc, tr in next st, ch 2, sk next st. Over each side arc, dc in next st, ch 2, sk next st. Use ch 4 as the first tr. Sl st in top of beginning ch.
Count: 36 posts (8 tr per end arc, 10 dc per side arc), 36 ch-2 sps. These posts make the ladder-like ring around the puffs.
Rnd 5 (loop round): Sl st in next ch-2 sp. Ch 1, *sc in ch-2 sp, ch 5 over end arcs or ch 4 over side arcs; rep from * around. Sl st in first sc. Fasten off (first motif only).
Count: 36 loops = top arc 8 + right arc 10 + bottom arc 8 + left arc 10.
Number the loops 1–36 clockwise, starting at the top arc:
- Loops 1–8: top
- Loops 9–18: right
- Loops 19–26: bottom
- Loops 27–36: left
Pin the first motif to 6 x 7.5 in (15.2 x 19.1 cm), mist it, and let it dry.
Make All Pieces
Make 32 motifs in Plum. Make motif 1 complete. For every motif after that, work Rnds 1–4, then join it on Rnd 5.
Row 1:  [ 1][ 2][ 3][ 4]
Row 2:  [ 5][ 6][ 7][ 8]
Row 3:  [ 9][10][11][12]
Row 4:  [13][14][15][16]
Row 5:  [17][18][19][20]
Row 6:  [21][22][23][24]
Row 7:  [25][26][27][28]
Row 8:  [29][30][31][32]
All motifs stand upright, with the long axis vertical. 4 columns x 6 in = 24 in (61.0 cm); 8 rows x 7.5 in = 60 in (152.4 cm).
Joining
Method: Join-as-you-go on Rnd 5. To join a loop, you work half a loop, a sl st into the neighbor, and the other half, instead of one full loop.
- Side joins: Side loops are ch 4. Work ch 2, sl st into the matching loop of the neighbor, ch 2.
- End joins: End loops are ch 5. Work ch 3, sl st into the matching loop of the neighbor, ch 2.
Which loops join: Only the two center loops of the arcs that face each other.
- New motif to its left neighbor: new motif’s loops 31 and 32 join the neighbor’s loops 14 and 13.
- New motif to the motif above: new motif’s loops 4 and 5 join the upper motif’s loops 23 and 22.
All other loops stay free. The free loops around each point where four motifs meet form the open diamond gaps of the lattice.
Join order:
- Motif 2 joins motif 1 at 2 loops.
- Motif 5 joins motif 1 at 2 loops.
- Motif 6 joins motif 2 (above) and motif 5 (left), 4 loops total.
- Continue the same way across each row.
Tension: Keep the joining sl st snug but not tight. A joined loop should be the same height as a free loop. Lay each motif flat after joining; it should not cup or pull on its neighbor.
Size checkpoint: Measure after Row 2. The panel should be 24 in (61.0 cm) wide and 15 in (38.1 cm) tall. Check again after Row 4 for a height of 30 in (76.2 cm).
The joins add no extra width. Motifs meet loop tip to loop tip, so the panel is exactly 4 x 6 in wide and 8 x 7.5 in tall.
Border
Border gauge: 4 sc per inch (16 sc = 4 in / 10.2 cm).
Each edge motif has one free arc on the outside of the panel:
- Top-row motifs: their top arc (8 loops)
- Bottom-row motifs: their bottom arc (8 loops)
- Edge-column motifs: their outer side arc (10 loops)
Rnd 1 uses stitches of different heights to fill the dips between motifs.
Rnd 1 (leveling round): Join yarn in loop 1 of motif 1. Work one st in each free outer loop, with ch 2 after every st:
- End arcs (8 loops): dtr, tr, dc, hdc, hdc, dc, tr, dtr.
- Side arcs (10 loops): tr, dc, hdc, sc, sc, sc, sc, hdc, dc, tr.
The ch 2 after the last st of one motif bridges the gap to the first st of the next motif. The ch 2 after the last st of each side is the corner ch-2 sp. Sl st in first st.
Count per side: top and bottom 4 x 8 = 32 sts; each long side 8 x 10 = 80 sts. Total 224 sts and 224 ch-2 sps.
Rnd 2 (sc round): Ch 1. Sc in each st and 2 sc in each ch-2 sp. In each corner ch-2 sp, work 3 sc; the center sc of the three is the corner st. Sl st in first sc.
Count per side (between corner sts): each st gives 1 sc and each ch-2 sp gives 2 sc, so every free loop gives 3 sc.
- Top and bottom: 4 motifs x 24 sc = 96 sc
- Long sides: 8 motifs x 30 sc = 240 sc
- Total: 96 + 96 + 240 + 240 + 4 corners = 676 sc
Rnd 3 (loop edge): Ch 1. *(Sc, ch 3, sc) in corner st, (ch 3, sk 1, sc in next sc) across to the last sc before the next corner (48 times on top and bottom, 120 times on long sides), ch 3; rep from * around. Sl st in first sc. Fasten off.
Count: 49 loops on top and bottom, 121 loops on each long side, plus 4 corner loops = 344 loops. These ch-3 loops echo the loop edge of the motifs.
Why the math works: 96 sc across 24 in and 240 sc across 60 in both equal 4 sc per inch, which matches the border gauge. Because 96 and 240 are even numbers, the “sk 1, sc in next” repeat lands exactly on the last sc before each corner. The border adds about 1 in (2.5 cm) per side, so the panel becomes 24 + 2 = 26 in (66.0 cm) wide and 60 + 2 = 62 in (157.5 cm) long.
Final Blocking
- Weave in all ends along the ring or puff rounds, where they hide well.
- Soak the panel in cool water for 15 minutes. Press out the water; do not wring.
- Roll it in a towel to remove more moisture.
- Lay it flat on mats or towels and pin the four corners to 26 x 62 in (66.0 x 157.5 cm).
- Pin along each edge every 3 in (7.6 cm), keeping the border straight.
- Pin the center hole of each motif into an even oval.
- Fluff each puff with your fingers so they all lie the same direction.
- Let it dry completely before unpinning.
Final Quality-Control Checklist
- Panel measures 26 x 62 in (66.0 x 157.5 cm).
- All 32 motifs are upright and the same size.
- Each motif has 18 puffs, 36 posts, and 36 loops.
- Every interior join uses exactly 2 loops.
- The diamond gaps are even and open.
- Border Rnd 2 has 96 sc per short side and 240 sc per long side.
- Corners are square and edges are straight.
- No ends show on either side.
Troubleshooting
Ring stitches don’t cover the chain: Push them closer together so all 54 sc fit. If the ring is too crowded, start with ch 26.
Puffs lean or look uneven: Pull every loop up to the same ¾ in (1.9 cm) height before closing the puff.
Motif is round, not oval: Check that you used hdc and tr on the end arcs, sc and dc on the side arcs, and ch 5 vs. ch 4 on Rnd 5.
Motif cups: Rnd 3 or Rnd 4 is too tight. Go up a hook size for those rounds.
Motif ruffles: The puffs are too tall. Make the pulled-up loops slightly shorter.
Panel is wider than 24 in (61.0 cm): The joining loops are too long. Keep them the same height as the free loops.
Border waves: You have too many stitches. Recount Rnd 2 against 96 and 240.
Border pulls in: The Rnd 1 stitches at the dips are too short. Use a full dtr at each end-arc end.
Care
Hand wash in cool water with mild soap and dry flat, reshaping while damp. Don’t hang the panel while it’s wet, because the weight of the water will stretch it.
Final Notes
The measurement chain is simple. One blocked motif is 6 x 7.5 in (15.2 x 19.1 cm). Four across and eight down give 24 x 60 in (61.0 x 152.4 cm). The border adds 1 in (2.5 cm) per side, for a finished panel of 26 x 62 in (66.0 x 157.5 cm). If your first motif measures right, the rest will follow. To hang the panel, slip curtain clip rings through the ch-3 loops along the top edge.
Happy crocheting!