

The Midnight Plume Bedspread is made from lacy peacock-feather motifs. Each feather has a solid oval eye with a tiny open center. Long barbs fan out from the eye, and a knotted picot outline finishes the edge. Joined together, the feathers make an elegant, airy spread with a pointed hem at the foot of the bed.
The sample is worked in a single deep denim-blue cotton, which shows off the stitch texture. Any rich solid color works well, such as teal, ink, emerald, or charcoal. The pattern uses US crochet terms throughout.
The finished bedspread measures 73.5 x 86.5 in (186.7 x 219.7 cm) after the border. That is 16 motifs across and 10 motifs down, 160 motifs in all.
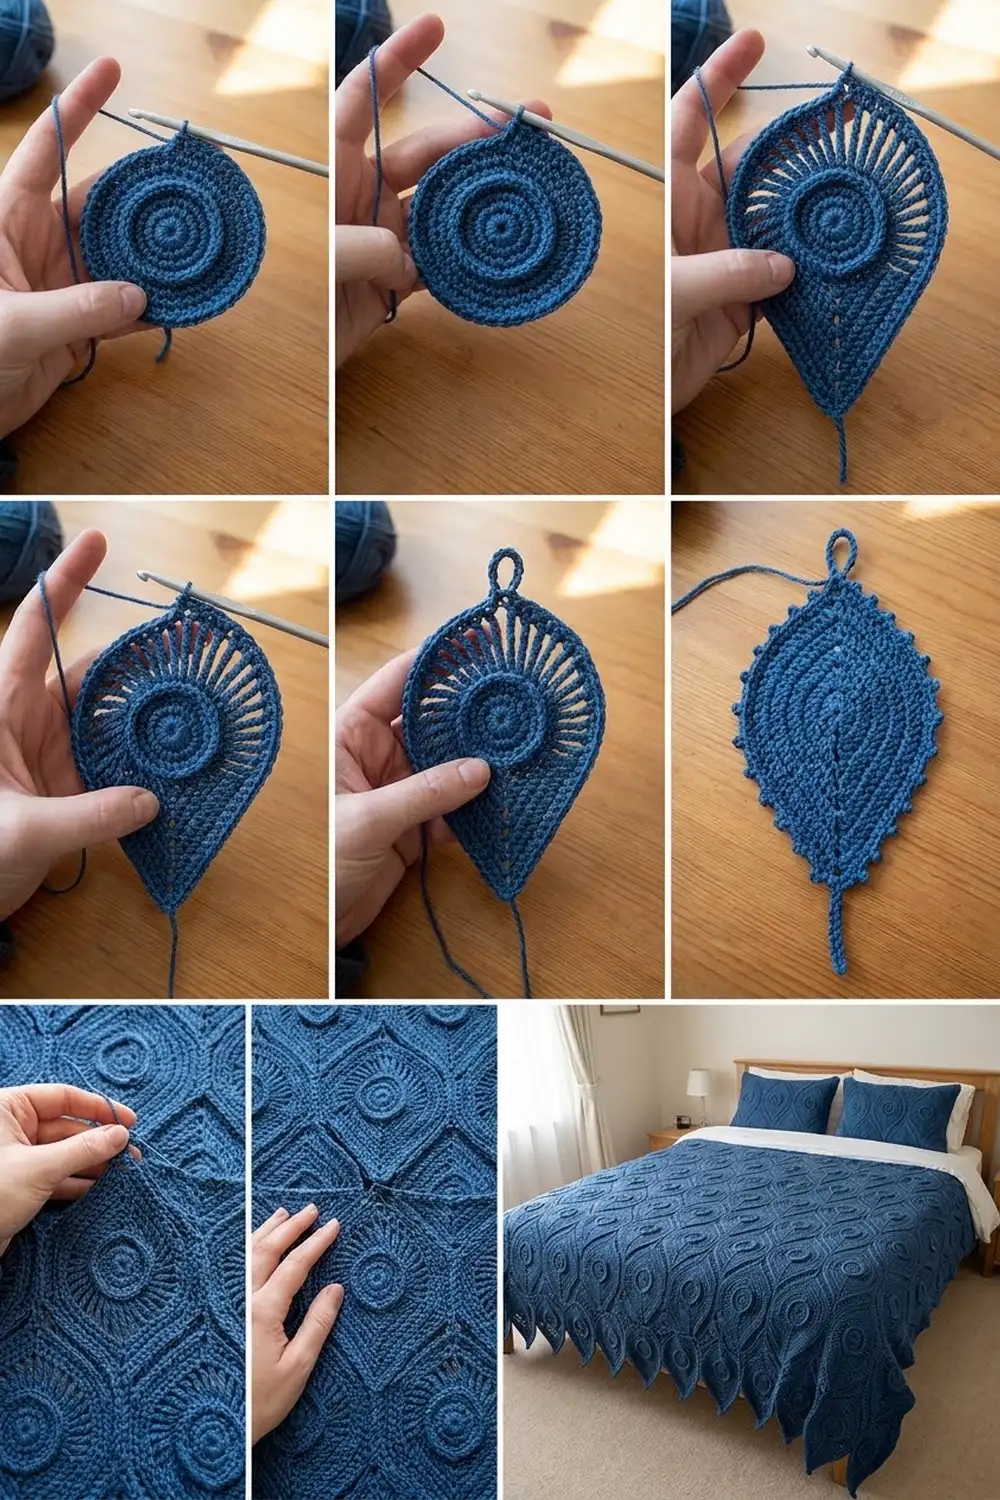
Each motif is worked in the round. You make the eye first, then one round of tall spokes, then an outline round with picots, a tip loop, and a stem. From the second motif on, you join each new motif to its neighbors as you work its outline round. A three-round picot border follows the scalloped outer edge.
Finished Size and Construction
- Finished size: 73.5 x 86.5 in (186.7 x 219.7 cm)
- Skill level: Intermediate
- Terminology: US crochet terms
- Yarn weight: Worsted (#4) cotton
- Hook: 4.0 mm (G-6)
- Number of pieces: 160 feather motifs
- Layout: 16 motifs across x 10 motifs down, all pointing the same way
- Piece size: 4.5 x 8.5 in (11.4 x 21.6 cm), measured tip loop to stem end
- Size before border: 72 x 85 in (182.9 x 215.9 cm)
- Border depth: 0.75 in (1.9 cm)
Materials
Yarn: Use a smooth worsted-weight cotton or cotton blend at about 175 m per 100 g. Cotton gives crisp spokes and picots, and it blocks to sharp points. Avoid fuzzy yarns because they hide the barb lines.
- Denim blue: 1,800 g (about 3,150 m), which is eighteen 100 g skeins
Each motif uses about 16 m (9 g). The border uses about 250 m (143 g). These quantities include a margin of about 12% for gauge differences and the gauge swatch. If you can, buy all the yarn from one dye lot.
Tools:
– 4.0 mm (G-6) crochet hook
– Tapestry needle
– 4 locking stitch markers
– Rust-proof pins and blocking mats
– Spray bottle
– Tape measure
Abbreviations (US Terms)
- ch – chain
- sl st – slip stitch
- sc – single crochet
- hdc – half double crochet
- dc – double crochet
- tr – treble crochet (yo twice)
- dtr – double treble crochet (yo 3 times)
- trtr – triple treble crochet (yo 4 times)
- BLO – back loop only
- sp – space
- st(s) – stitch(es)
- RS – right side
Special stitches
- Picot: Ch 3, then sl st in the sc just made.
- Joining picot: Ch 1. Remove the hook and insert it from front to back through the matching picot of the neighboring motif. Pick up your dropped loop and pull it through. Ch 1, then sl st in the sc just made.
- Spoke: One tall stitch (tr, dtr, or trtr, as stated), followed by ch 1.
Gauge and Checkpoints
Gauge:
– Rounds 1–3 of the eye measure 1.75 in (4.4 cm) across.
– One finished motif measures 4.5 x 8.5 in (11.4 x 21.6 cm) after blocking.
– Border gauge: 16 sc = 4 in (10.2 cm).
Make and block one complete motif before you start production. Check it at each stage:
- After Round 1: 0.75 in (1.9 cm) across
- After Round 2: 1.25 in (3.2 cm) across
- After Round 3: 1.75 in (4.4 cm) across
- After Round 4: oval, 2 x 2.75 in (5.1 x 7.0 cm)
- After Round 5: about 4 x 6 in (10.2 x 15.2 cm)
- After Round 6 and blocking: 4.5 x 8.5 in (11.4 x 21.6 cm). This includes the 0.75 in (1.9 cm) tip loop and the 1.25 in (3.2 cm) stem, so the body is 6.5 in (16.5 cm).
If your motif is too big by more than 1/4 in (0.6 cm), switch to a 3.75 mm hook. If it is too small, switch to a 4.5 mm hook. If the eye cups or ruffles but the overall size is right, adjust only your Round 1–3 tension.
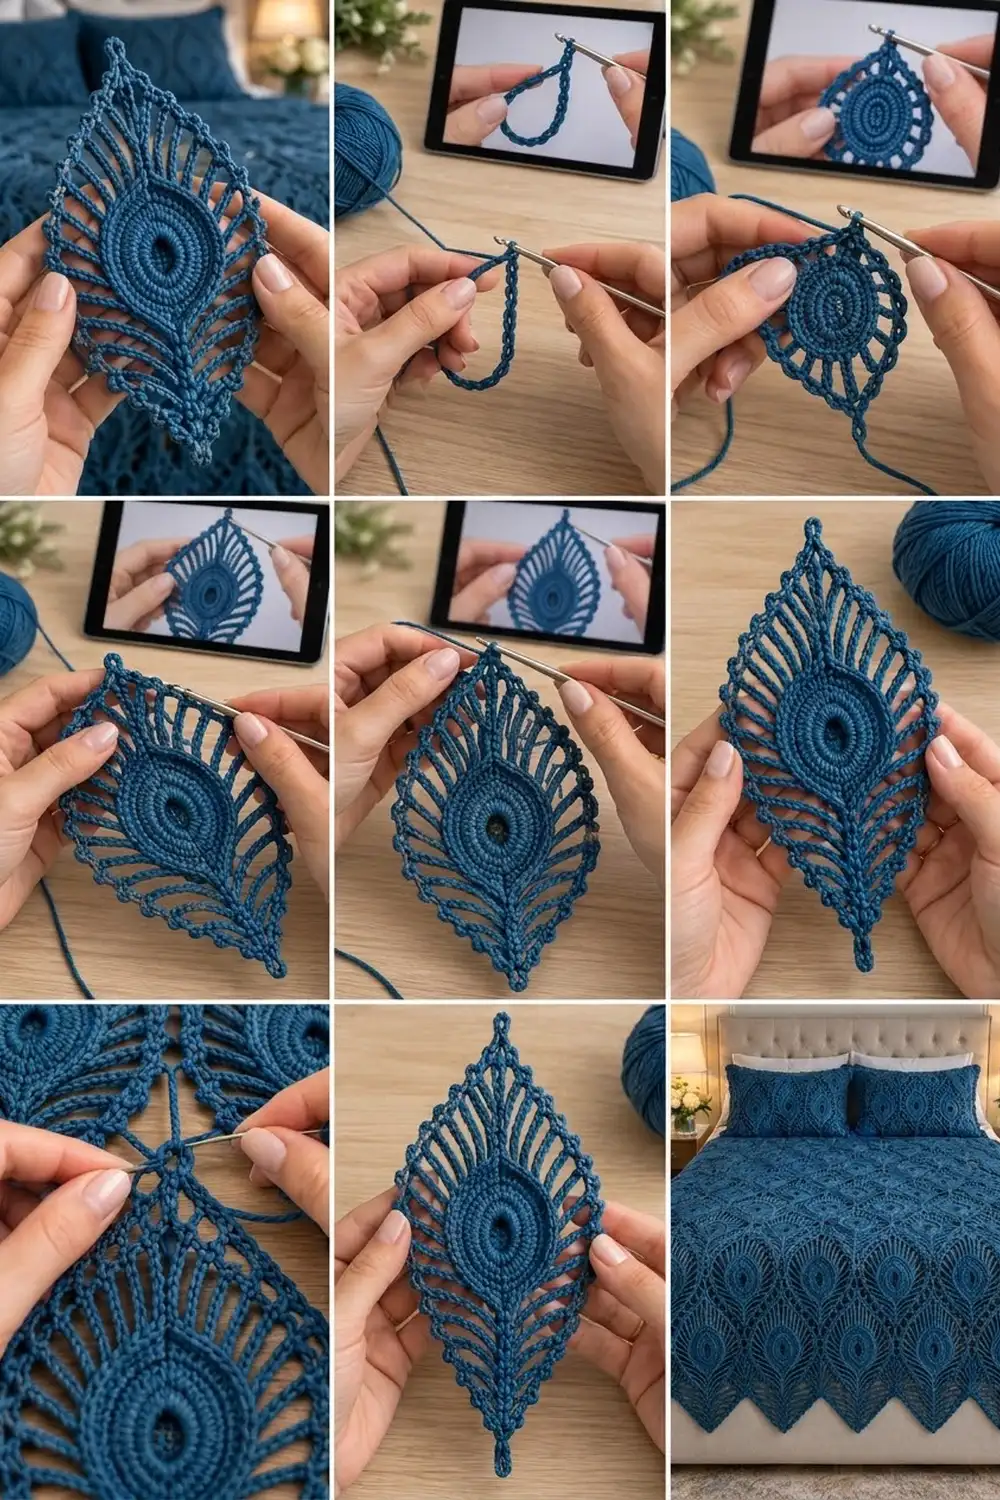
Feather Motif
Round 1: Ch 5 and sl st to the first ch to form a ring. Ch 2 (does not count as a st). Work 12 hdc in the ring, then sl st to the first hdc. (12 sts) The ring stays open and forms the hole in the eye.
Round 2: Ch 2 (does not count). Work 2 hdc in each st around, then sl st to the first hdc. (24 sts)
Round 3 (ridge round): Ch 1. Working in BLO, sc in next 3 sts, 2 sc in next st, and repeat from * 6 times. Sl st to the first sc. (30 sts) The unused front loops form the raised ring around the eye.
Round 4 (oval round): Work this round through both loops. Ch 1, then work these four sections:
- Sc in next 4 sts, 2 sc in next st, sc in next 4 sts. (10 sc, side)
- [Dc in next 2 sts, 2 dc in next st] twice. (8 dc, end)
- Sc in next 4 sts, 2 sc in next st, sc in next 4 sts. (10 sc, side)
- [Dc in next 2 sts, 2 dc in next st] twice. (8 dc, end)
Sl st to the first sc. (36 sts)
The taller dc sections stretch the eye into an oval. Choose the first dc section (sts 11–18) as the top. The top center falls between st 14 and st 15. The bottom center falls between st 32 and st 33.
Round 5 (spoke round): Sl st in each of the next 14 sts so you reach st 15. Ch 6 (counts as the first trtr) and ch 1.
Side A (sts 15–32, working from top to bottom):
– Trtr in next st, ch 1.
– [Dtr, ch 1] in each of next 2 sts.
– [Tr, ch 1] in each of next 8 sts.
– [Dtr, ch 1] in each of next 3 sts.
– [Trtr, ch 1] in each of next 3 sts.
Side B (sts 33–36 and 1–14, working from bottom to top):
– [Trtr, ch 1] in each of next 3 sts.
– [Dtr, ch 1] in each of next 3 sts.
– [Tr, ch 1] in each of next 8 sts.
– [Dtr, ch 1] in each of next 2 sts.
– [Trtr, ch 1] in each of next 2 sts.
Sl st to the top of the beginning ch-6.
(36 spokes: 10 trtr, 10 dtr, 16 tr; 36 ch-1 sps)
Number the spokes s1–s18 on each side, counting from the top. The last ch-1 sp you made is the top center sp. The sp between the two s18 spokes is the bottom center sp. The longest spokes sit at the top and bottom, which pulls the motif into a pointed leaf.
Round 6 (outline round): Sl st into the top center sp.
Tip: Ch 1. In the top center sp, work (sc, ch 6, sc). The ch-6 makes the tip loop.
Side A: [Sc in next spoke (odd), sc in next sp, sc in next spoke (even), picot, sc in next sp] 8 times. Then sc in s17, sc in next sp, sc in s18, picot.
Stem: In the bottom center sp, work sc. Ch 10, then sl st in the 2nd ch from the hook and in each of the next 8 ch (9 sl sts). Work sc in the same sp.
Side B: Sc in s18, picot. [Sc in next sp, sc in next spoke (odd), sc in next sp, sc in next spoke (even), picot] 8 times. Sc in next sp, sc in s1. Sl st to the first sc and fasten off.
(74 sc: 35 per side + 2 at the tip + 2 at the stem; 18 picots; 1 tip loop; 1 stem)
Label the picots on each side A1–A9 and B1–B9, counting from the tip. Each side has 9 picots, one on every even spoke.
Make All Pieces
Make 160 motifs in denim blue: 16 per row x 10 rows. You need about 16 m (9 g) per motif.
- Make 1 complete motif first, and block it as your reference.
- From the second motif on, use the joining method below as you work Round 6. Work Rounds 1–5 as written.
Layout (V = one motif, tip pointing toward the foot):
Head
V V V V V V V V V V V V V V V V   Row 1
V V V V V V V V V V V V V V V V   Row 2
V V V V V V V V V V V V V V V V   Row 3
V V V V V V V V V V V V V V V V   Row 4
V V V V V V V V V V V V V V V V   Row 5
V V V V V V V V V V V V V V V V   Row 6
V V V V V V V V V V V V V V V V   Row 7
V V V V V V V V V V V V V V V V   Row 8
V V V V V V V V V V V V V V V V   Row 9
V V V V V V V V V V V V V V V V   Row 10
Foot
Joining
Method: Join as you go during Round 6. Start with Row 1 at the head edge and work each row in the same direction. Turn every motif so its tip loop points toward the foot and its stem points toward the head.
Side joins:
– Join the new motif’s A-side to the B-side of the previous motif in the same row.
– When you reach A4, A5, and A6 (on spokes s8, s10, and s12), work joining picots into the neighbor’s B4, B5, and B6 in that order.
– All other picots are worked as regular picots.
– The first motif in each row has no side join.
Vertical joins (Rows 2–10):
– Make the stem as follows: ch 9, sl st through the tip loop of the motif directly above, then sl st in each of the 9 ch back toward the motif.
– The stem count stays at 9 sl sts, so the stem end and the tip loop meet exactly. The vertical repeat is 8.5 in (21.6 cm).
Stitch-to-stitch logic:
– Side joins are always picot to picot at the matching numbers, so the widest points line up.
– No stitches are added at any seam.
– The open diamond-shaped gaps above and below each side join are part of the design.
Tension: Keep the joining chains the same tension as your regular picot chains. If they are tight, the motifs pucker. If they are loose, the motifs drift apart. Lay the work flat every few joins to check.
Size checkpoints:
– After Row 1: 72 in (182.9 cm) wide.
– After Row 4: 34 in (86.4 cm) long.
– After Row 10: 72 x 85 in (182.9 x 215.9 cm).
Border
Border gauge: 16 sc = 4 in (10.2 cm), or 4 sts per inch along the edge.
Edge points: The border is worked into the free “points” around the scalloped edge. Each one gets 1 sc in Round 1. Each edge has the following points:
- Head edge: 16 motifs x 7 points (A7, A8, A9, stem end, B9, B8, B7) = 112 points
- Foot edge: 16 motifs x 7 points (A3, A2, A1, tip loop, B1, B2, B3) = 112 points
- Each long side: (8 middle motifs x 9 outer picots) + (2 corner motifs x 6 picots) + 9 junctions where a tip loop meets a stem = 72 + 12 + 9 = 93 points
The corner motifs give their 3 picots nearest the stem or tip to the head or foot edge. Those picots are counted only once, never twice.
Total: 112 + 112 + 93 + 93 = 410 points
Round 1: With the RS facing, join the yarn at any head-edge stem end. Ch 1. Sc in the point, ch 3, and repeat from * at each point around. Sl st to the first sc. (410 sc + 410 ch-3 sps = 1,640 sts)
Per edge: head 448, foot 448, each side 372.
Round 2 (conversion round): Ch 1. Sc in each sc and 3 sc in each ch-3 sp. Sl st to the first sc. (410 + 1,230 worked 1 per existing st, + 0 extra = 1,640 sc)
Per edge: head 448, foot 448, each side 372.
Round 3: Ch 1. [Sc in next 4 sts, picot] 410 times. Sl st to the first sc and fasten off. (1,640 sc + 410 picots)
Per edge: head 448 sc + 112 picots, foot 448 sc + 112 picots, each side 372 sc + 93 picots.
Why the math works: The points along the motif edges are about 1 in (2.5 cm) apart. Each Round 1 unit is 1 sc + 3 ch = 4 sts, which is exactly 1 in at border gauge. The border therefore follows the scallops without pulling or rippling. Each later round keeps that 4 sts per point ratio, so every picot in Round 3 sits above one motif point. The border adds 0.75 in (1.9 cm) to every edge: 72 + 1.5 = 73.5 in (186.7 cm) wide and 85 + 1.5 = 86.5 in (219.7 cm) long.
Final Blocking
- Weave in all ends along the outline sc, never across the spokes.
- Soak the bedspread in cool water with a little wool wash for 15 minutes. Gently press out the water. Do not wring it.
- Roll it in towels to remove more water.
- Lay it flat on mats on the floor. Pin the outer edge to 73.5 x 86.5 in (186.7 x 219.7 cm).
- Pin each foot-edge tip loop to a sharp point and each head-edge stem straight.
- Use a few pins to open each spoke fan evenly so the barbs radiate cleanly.
- Let it dry completely, usually 24–48 hours, before you unpin it.
Final Quality-Control Checklist
- Each eye is oval and has an open center hole and a visible ridge ring.
- Every motif has 36 spokes, 18 picots, 1 tip loop, and a 9-sl-st stem.
- All side joins are at A4–A6 to B4–B6.
- Every tip loop is joined to the stem below it.
- The grid is 16 x 10 motifs and measures 72 x 85 in (182.9 x 215.9 cm) before the border.
- The border counts are 448 / 448 / 372 / 372 sts per edge in Rounds 1–2 and 410 picots in Round 3.
- The finished spread measures 73.5 x 86.5 in (186.7 x 219.7 cm).
Troubleshooting
- The eye cups: Hdc too tight in Rounds 1–2. Loosen your tension or go up a hook size just for those rounds.
- The eye ruffles: Round 3 is too loose. Work the BLO stitches more firmly.
- The motif is round instead of pointed: Check the spoke heights in Round 5. The trtr spokes must sit at the top and bottom.
- The outline waves: Round 6 is too loose. Tighten the sc on top of the spokes.
- The joins twist: You inserted the hook from back to front. Always insert it from front to back.
- The spread is too long: The stems are too loose. Keep the chains firm so the stem stays 1.25 in (3.2 cm).
- The border flares: Do Round 2 again with fewer sc in each ch-3 sp, keeping the per-edge counts in multiples of 4.
Care
Hand wash cool or machine wash on a gentle cycle in a laundry bag, then dry flat and reshape the points. Do not hang it wet, because the long spokes will stretch.
Final Notes
Everything depends on your first motif. If the eye reaches 1.75 in (4.4 cm) after Round 3 and the blocked motif is 4.5 x 8.5 in (11.4 x 21.6 cm), then 16 x 10 joined motifs will measure 72 x 85 in (182.9 x 215.9 cm). Add a 0.75 in (1.9 cm) border on every edge and you finish at 73.5 x 86.5 in (186.7 x 219.7 cm). Check at each stage, and the feathers will line up.
Happy crocheting!