

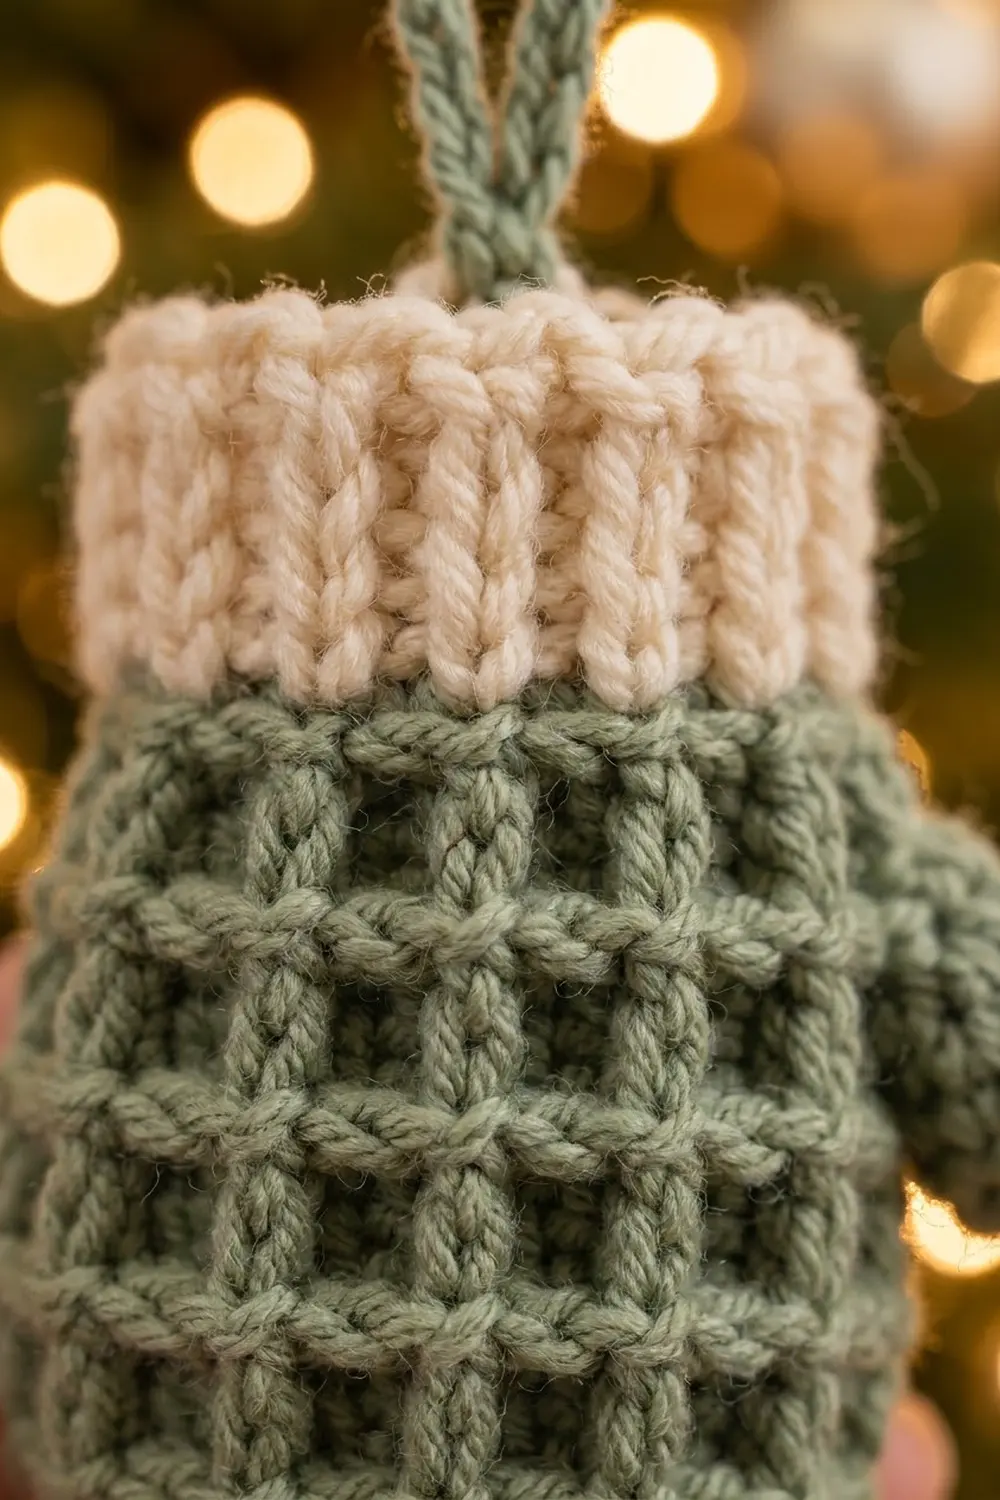
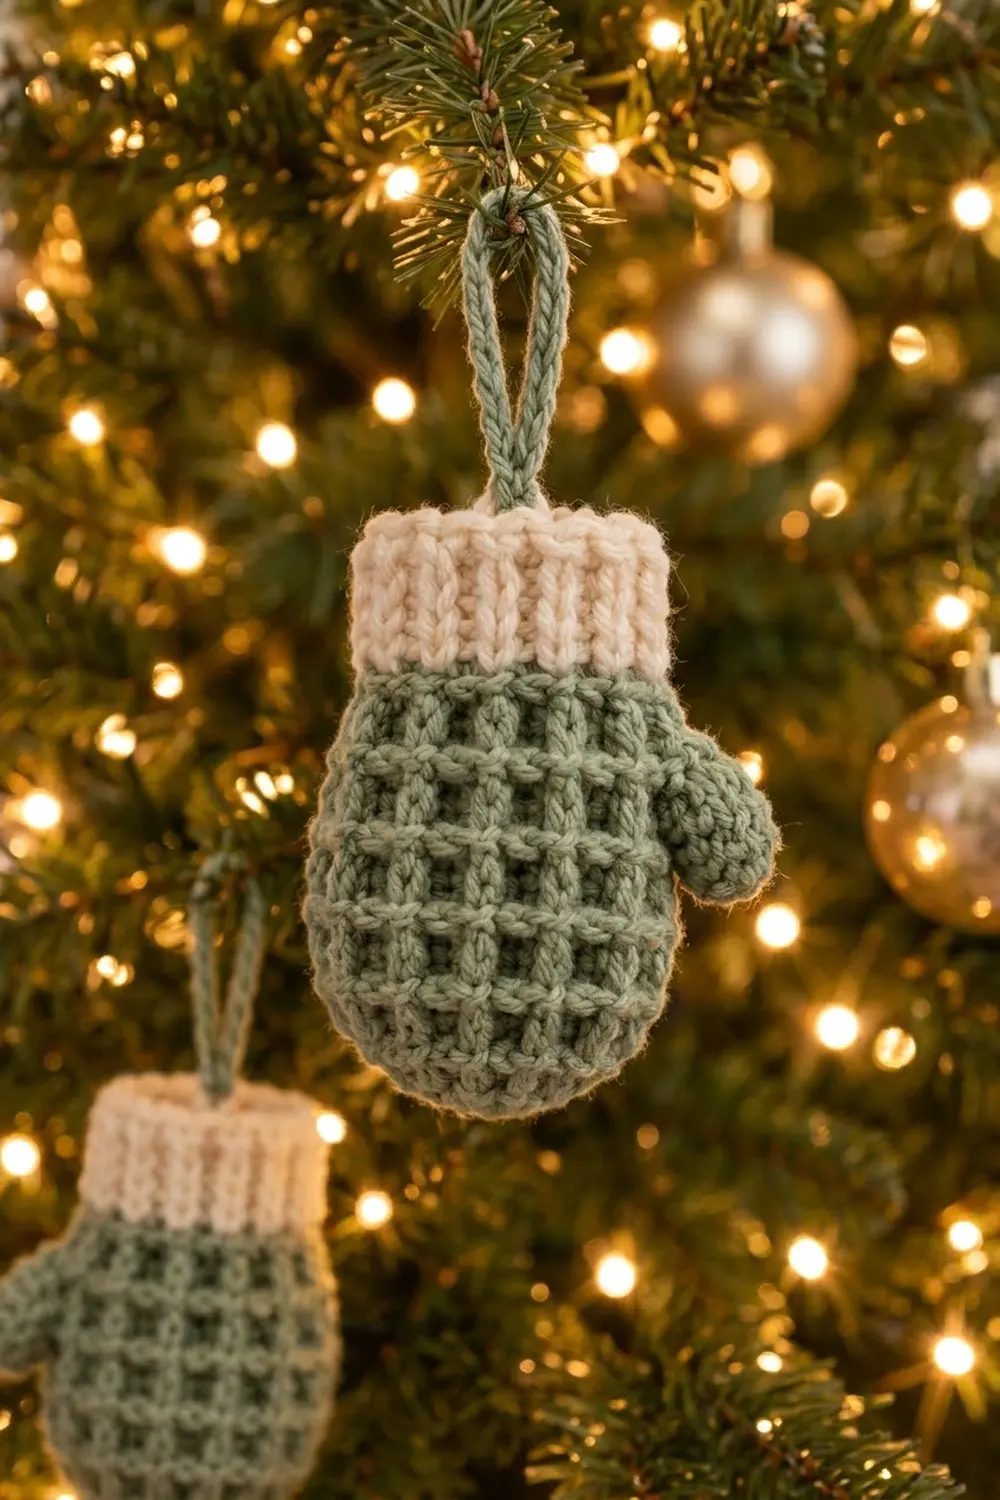
This little mitten ornament has a cozy, knit-style texture and fits in the palm of your hand. The hand is worked in a deep waffle stitch that makes a neat grid of raised squares. A soft cream cuff with vertical ribs sits on top, and a short chain loop lets it hang from a branch.
The colors are muted sage green and warm cream. The look is calm and farmhouse-style, so it suits natural decor, gift tags and wreaths. All instructions use US crochet terms.
The finished mitten is 2.4 in (6.1 cm) wide across the body and 3.9 in (9.9 cm) tall from the tip to the cuff edge. The loop adds 1.5 in (3.8 cm), so the mitten hangs 5.4 in (13.7 cm) long.
The construction is simple. You start at the rounded tip with a magic ring and work joined rounds up through the waffle body. Then you switch to cream for the ribbed cuff. You crochet a tiny thumb separately and sew it to one side. The loop is chained on last.
Finished Size and Construction
- Finished size: 2.4 in (6.1 cm) wide x 3.9 in (9.9 cm) tall, plus a 1.5 in (3.8 cm) loop
- Skill level: Easy-intermediate (post stitches in the round)
- Terminology: US
- Yarn weight: Worsted (#4)
- Hook: 4.0 mm (G-6)
- Number of pieces: 1 ornament (the body is worked in one piece, plus a small sewn-on thumb)
- Layout: Single mitten; it is not joined into a larger project
- Piece size (body before cuff): 2.4 in (6.1 cm) wide x 3 in (7.6 cm) tall, flattened
- Size before border: 2.4 in (6.1 cm) x 3 in (7.6 cm)
- Border (cuff) depth: 0.9 in (2.3 cm)
Materials
Use a smooth worsted weight yarn with good stitch definition. Cotton blends and soft acrylics both work well. Avoid fuzzy or very splitty yarn, because the waffle grid needs clean posts to show.
- Sage green: 12 g, about 24 m (26.2 yd), for the body, thumb and loop
- Cream: 4 g, about 8 m (8.7 yd), for the cuff
These amounts include a margin of about 20% for checking gauge and for tails. Other quiet color pairs also work well, such as dusty blue with white or rust with oatmeal. Keep the cuff color lighter than the body so the ribs stand out.
Tools:
- 4.0 mm (G-6) crochet hook
- Locking stitch marker
- Tapestry needle
- Scissors
- A small pinch of polyester fiberfill for the thumb (optional)
- Ruler or tape measure
Abbreviations (US Terms)
- ch: chain
- MR: magic ring
- sl st: slip stitch
- sc: single crochet
- hdc: half double crochet
- dc: double crochet
- sc2tog: single crochet 2 together
- st(s): stitch(es)
- FPdc: front post double crochet
- BPdc: back post double crochet
- rnd(s): round(s)
FPdc: Yarn over and insert the hook from front to back to front around the post of the stitch below. Yarn over and pull up a loop, then (yarn over, pull through 2 loops) twice.
BPdc: Work it like an FPdc, but insert the hook from back to front to back around the post.
Round joins: Join each round with a sl st to the first st. The ch 1 or ch 2 at the start of a round does not count as a stitch. Work the first stitch of the next round into (or around) the same stitch you joined to.
Gauge and Checkpoints
Make the body first and check it before you go further. The mitten is small, so it works as its own swatch.
- Stitch gauge: 24 sts in the round = 4.8 in (12.2 cm) around, or 2.4 in (6.1 cm) flattened.
- Row gauge: 6 waffle rnds = 2 in (5.1 cm) tall.
Checkpoint 1 (after Rnd 5): Flatten the cup. It should measure 2.4 in (6.1 cm) wide and 1 in (2.5 cm) deep.
Checkpoint 2 (after Rnd 11): The flattened body should be 2.4 in (6.1 cm) wide and 3 in (7.6 cm) tall.
Checkpoint 3 (after Rnd 15): The cuff should be 0.9 in (2.3 cm) deep and 2.1 in (5.3 cm) wide flattened. The total height is 3.9 in (9.9 cm).
If your piece is too big, go down to a 3.75 mm (F-5) hook. If it’s too small, go up to a 4.5 mm (7) hook. Being off by 0.1 in (0.3 cm) is fine for an ornament. If you’re off by 0.25 in (0.6 cm) or more at Checkpoint 1, pull out your stitches and change hooks.
Checkpoint 1 matters most. Every later round keeps the same 24 stitches, so the width you have at Rnd 5 is the width you’ll have at the wrist. Post stitches can’t fix a base that’s too wide or too narrow.
If you plan to make a whole set for a tree, finish one complete mitten first. Measure it and write down your hook size so every mitten in the set matches.
Body (Sage Green)
You start at the rounded tip and work up toward the wrist. Keep the right side facing you the whole time; don’t turn.
Rnd 1: With sage, make an MR, ch 1, work 6 sc in the ring. Join. (6 sts)
Rnd 2: Ch 1, 2 sc in each st around. Join. (12 sts)
Rnd 3: Ch 1, sc in next st, 2 sc in next st 6 times. Join. (18 sts)
Rnd 4: Ch 1, sc in next 2 sts, 2 sc in next st 6 times. Join. (24 sts)
Rnd 5: Ch 2, hdc in each st around. Join. (24 sts)
This hdc round is the base for the waffle posts. Check Checkpoint 1 now.
Waffle Section
The waffle uses two rounds that alternate. Each repeat is 3 stitches, and 24 divides evenly into 8 repeats.
Rnd 6 (Waffle A): Ch 2, FPdc around next st, dc in next 2 sts 8 times. Join. (24 sts: 8 FPdc + 16 dc)
Rnd 7 (Waffle B): Ch 2, dc in next st, FPdc around next 2 sts 8 times. Join. (24 sts: 8 dc + 16 FPdc)
The single dc in Rnd 7 sits on top of each FPdc from Rnd 6. Each pair of FPdc wraps around the 2 dc from Rnd 6 and pulls them forward. These pairs form the horizontal bars of the grid.
Rnds 8 and 10: Repeat Rnd 6. (24 sts each)
Rnds 9 and 11: Repeat Rnd 7. (24 sts each)
In each A round, the FPdc always wraps the single dc that sits on the vertical line. If you lose your place, look for the narrow column of single stitches. That’s where the FPdc of an A round goes.
Keep your tension even and slightly snug. Pull up each post loop to the height of a regular dc. Short loops make the cells shallow, and loose loops make the body flare.
You now have 6 waffle rounds. Don’t fasten off yet; you’ll cut the sage yarn after you join the cream.
Check Checkpoint 2 now. Flatten the body so the round join sits on one side fold. Sts 1–12 form the front and sts 13–24 form the back. Each flat side has 12 sts, or 4 waffle squares.
Mark the side fold between st 12 and st 13 with a locking marker. The thumb goes on this side.
Thumb (Sage Green)
Rnd 1: Make an MR, ch 1, work 6 sc in the ring. Join. (6 sts)
Rnd 2: Ch 1, sc in next st, 2 sc in next st 3 times. Join. (9 sts)
Rnds 3–5: Ch 1, sc in each st around. Join. (9 sts each)
Fasten off and leave an 8 in (20.3 cm) tail. The thumb is 0.9 in (2.3 cm) long and 0.75 in (1.9 cm) wide when flattened.
If you’d like the thumb to stay rounded, push in a small pinch of fiberfill. Don’t overstuff it.
Attach the thumb: Flatten the open end and place it on the marked side fold, between Rnd 8 and Rnd 10. Angle the tip slightly up and out. Whipstitch all around the open end, going through the thumb’s outer loops and the posts of the body. The thumb should stick out about 0.6 in (1.5 cm) past the edge of the body, so the mitten is 3 in (7.6 cm) wide including the thumb.
Pin the thumb before you sew and look at it from the front. It should sit just below the cuff line, the way a real thumb sits near the wrist.
Border: Ribbed Cuff (Cream)
The cuff is the mitten’s border. It pulls in slightly at the wrist so the shape reads as a mitten, not a tube.
Border gauge: 20 ribbed sts = 4.2 in (10.7 cm) around, or 2.1 in (5.3 cm) flattened. Each flat side has 10 sts.
Rnd 12 (decrease round): Join cream with a sl st to the first st of Rnd 11. Cut the sage, leaving a 6 in (15.2 cm) tail. Ch 1, sc in next 4 sts, sc2tog 4 times. Join. (20 sts = 16 sc worked 1 per stitch + 4 sc2tog)
Per side: 10 sts on the front and 10 sts on the back. Each side has 8 sc and 2 sc2tog.
To get a clean color change, finish the last yarn over of Rnd 11’s join with cream. Tug both tails snug before you start Rnd 12.
Rnd 13: Ch 2, FPdc around next st, BPdc around next st 10 times. Join. (20 sts: 10 FPdc + 10 BPdc; 10 per side)
Rnd 14: Ch 2, FPdc around the FPdc, BPdc around the BPdc 10 times. Join. (20 sts; 10 per side)
Rnd 15: Sl st loosely in each st around. Finish with an invisible join. (20 sts; 10 per side)
Fasten off and weave in the ends.
Why the math works: The body has 24 sts, or 12 per side. Rnd 12 removes exactly 4 sts with 4 sc2tog, which is 2 per side. That leaves 20 sts, or 10 per side. Ribbing needs an even count, and 20 splits into 10 pairs of FPdc and BPdc. That gives 5 raised ribs on each face. At 5 sts per inch flattened, 10 sts would measure 2 in. Ribbing relaxes a little once blocked, so the cuff measures 2.1 in (5.3 cm), still just under the 2.4 in (6.1 cm) body.
Hanging Loop
Flatten the mitten and find the center of the back cuff, which falls between st 15 and st 16 of Rnd 15.
Join sage with a sl st in st 15. Ch 20, then sl st in st 16. Fasten off. Weave the tails down into the inside of the cuff.
The loop folds to 1.5 in (3.8 cm) tall and stands up from the middle of the cuff.
Final Blocking
- Weave in all remaining ends on the inside of the mitten.
- Lightly mist the mitten with water, or hold it over steam without letting the iron touch the yarn.
- Flatten the mitten so the round join is on one fold and the thumb is on the opposite fold.
- Pin it to a foam board at 2.4 in (6.1 cm) wide across the body and 3.9 in (9.9 cm) tall.
- Pin the cuff to 2.1 in (5.3 cm) wide. Don’t stretch the ribs, or they’ll lose their spring.
- Gently press the waffle cells with your fingertips so they line up in straight columns.
- Angle the thumb and pin it in place.
- Let the mitten dry completely, at least 4 hours.
- Unpin it and shape the loop so it stands straight.
Final Quality-Control Checklist
- Rnds 4–11: 24 sts in each round
- Waffle: 6 rounds, with 4 squares across each face of the body
- Cuff: 20 sts, 10 per side, with 5 raised ribs on each face
- Body width: 2.4 in (6.1 cm)
- Total height: 3.9 in (9.9 cm), not counting the loop
- Thumb: sewn securely between Rnds 8 and 10, sticking out about 0.6 in (1.5 cm)
- Loop: centered on the back of the cuff and firmly anchored at both ends
- Tails: all woven in, with none showing through the waffle cells
Troubleshooting
The waffle looks like plain ribs instead of squares. You may be working the FPdc into the top of the stitch instead of around the post. Recheck Rnd 7: the 2 FPdc must wrap the 2 dc below.
The stitch count drifts. Always start each round in the same stitch as the join, and don’t count the starting chain. Place a marker in the first stitch.
The tip is pointed or puckered. The MR wasn’t pulled tight, or the Rnd 3 increases stacked unevenly. Close the ring firmly and space the increases as written.
The body flares wider than 2.4 in (6.1 cm). FPdc stitches stretch when they’re worked loosely. Snug each post stitch, or go down a hook size.
The cuff is as wide as the body. Check that Rnd 12 has all 4 sc2tog.
The cuff ribs lean to one side. Make sure each FPdc in Rnd 14 wraps the FPdc directly below it, not the stitch next to it.
The thumb flops downward. Add a few more whipstitches along the top edge of the thumb opening, or add a little more fiberfill.
The loop twists. Untwist the chain before you work the final sl st into st 16.
The join seam slants. That’s normal in joined rounds. Keep the seam on the side fold opposite the thumb.
Care
Spot clean the mitten with cool water and mild soap, then lay it flat to dry. Store it flat in tissue paper so the cuff and loop keep their shape.
Final Notes
The measurements build up in a short, easy chain:
- The tip cup is 2.4 in (6.1 cm) wide and 1 in (2.5 cm) deep.
- 6 waffle rounds add 2 in (5.1 cm), so the body is 3 in (7.6 cm) tall.
- The ribbed cuff adds 0.9 in (2.3 cm) and narrows to 2.1 in (5.3 cm).
- The loop adds 1.5 in (3.8 cm).
The finished mitten is 3.9 in (9.9 cm) tall and hangs 5.4 in (13.7 cm) long. If each checkpoint matches, the finished mitten will too.
Happy crocheting!