

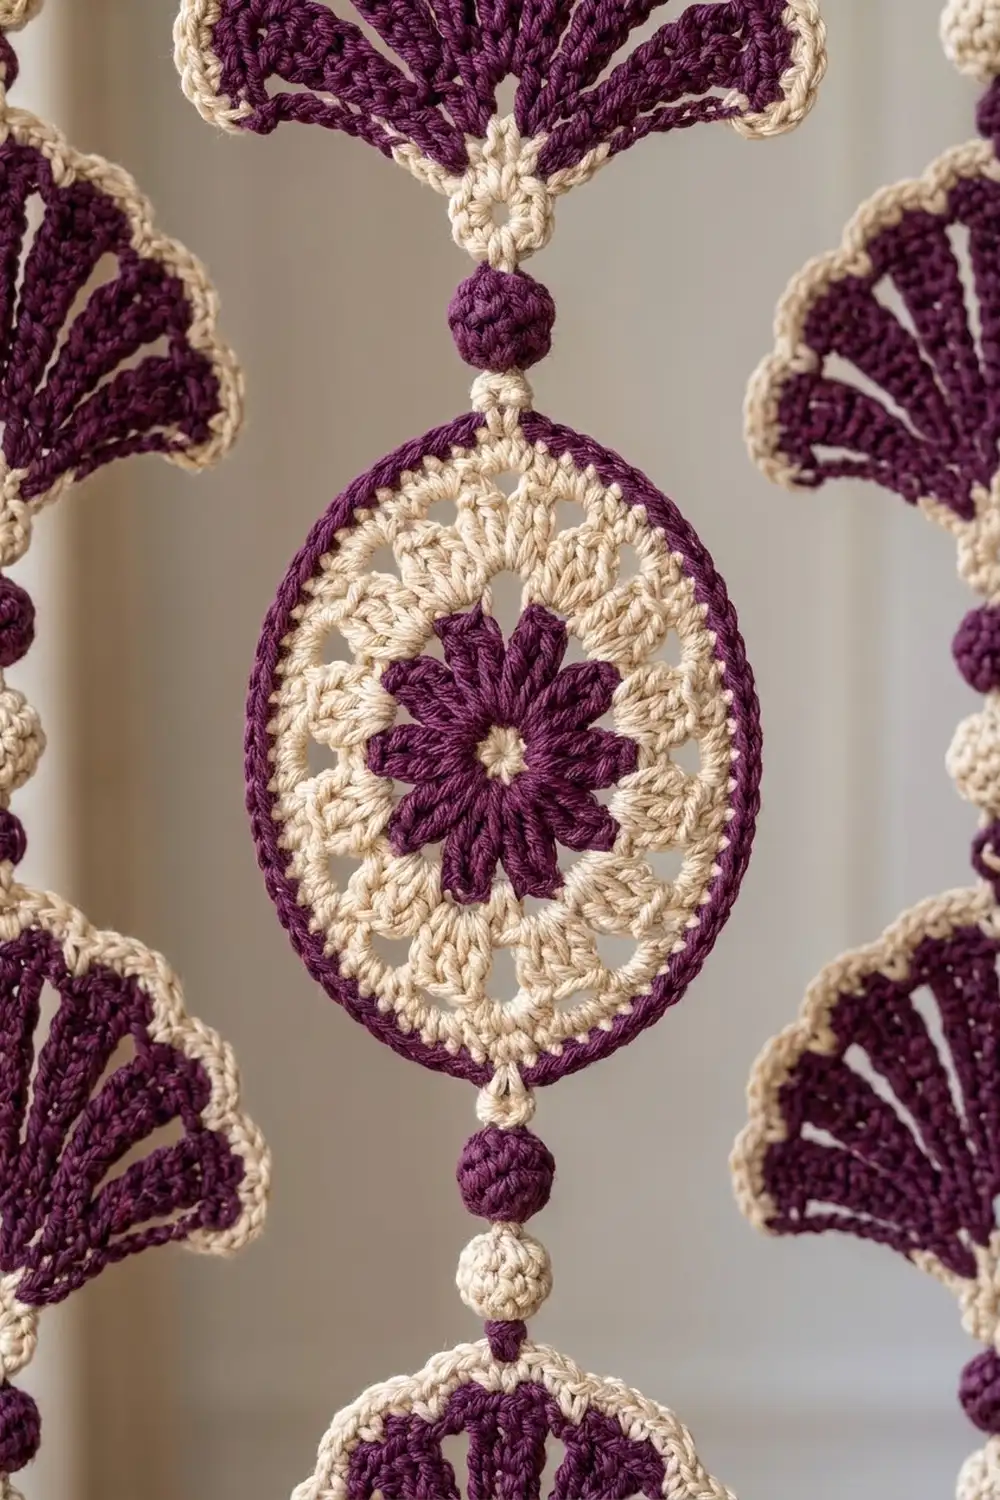
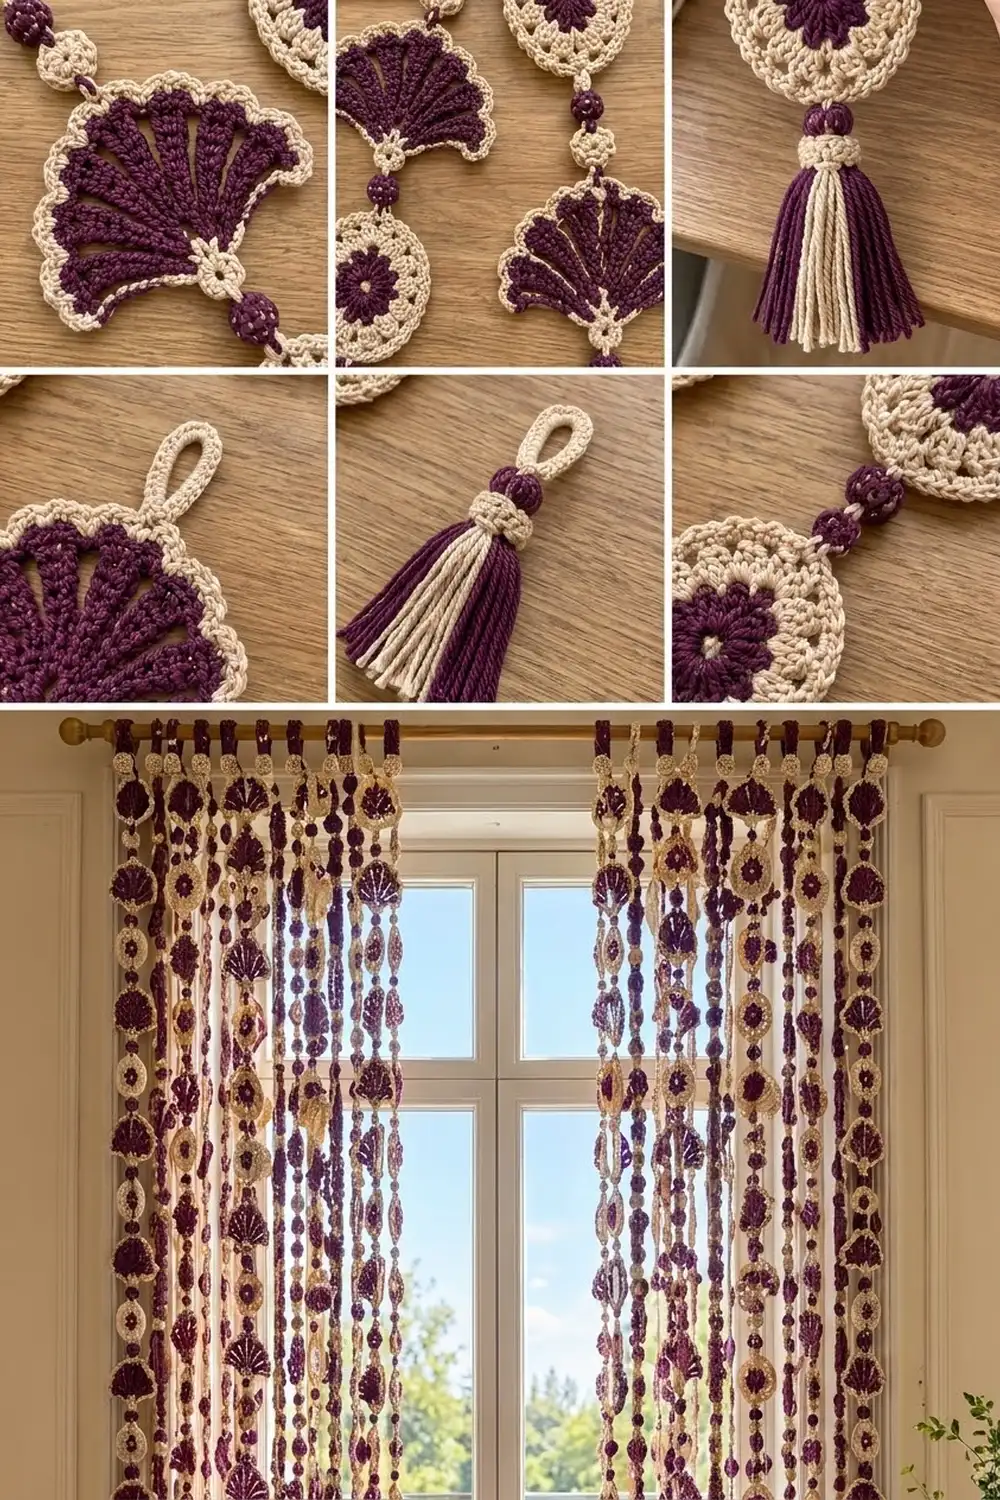
This curtain has a relaxed boho look. Each vertical strand alternates a scalloped plum fan with a cream oval medallion, and small plum and cream beads sit between them. A plum tassel with a cream neck finishes the bottom of every strand, and a cream tab loop at the top slides onto a curtain rod.
The pattern uses just two colors, deep plum and natural cream, so the contrast stays crisp. The fans are worked in plum and edged in cream. The ovals reverse that, with a plum flower framed by cream lace.
All instructions use US crochet terms. Each strand measures 85.25 in (216.5 cm) from the top fold of the tab to the tip of the tassel. One panel of 8 strands is about 41.5 in (105.4 cm) wide.
Every part is made separately: fans, ovals, beads, tassels and tabs. You then string them onto a doubled plum spine. Make two panels if you want a pair for one window.
Finished Size and Construction
- Strand length: 85.25 in (216.5 cm)
- Panel width: 41.5 in (105.4 cm) with 8 strands spaced 5 in (12.7 cm) apart, center to center
- Skill level: Intermediate
- Terminology: US
- Yarn weight: Worsted (4) cotton
- Hooks: 4.0 mm (G-6) for motifs, 3.5 mm (E-4) for beads
- Pieces per strand: 6 fans, 6 ovals, 39 beads, 1 tassel, 1 tab (53 pieces)
- Layout: 8 strands per panel, alternating Strand A and Strand B
- Fan: 6.5 × 3.5 in (16.5 × 8.9 cm); 6 × 3.25 in (15.2 × 8.3 cm) before edging
- Oval: 3.5 × 4.5 in (8.9 × 11.4 cm); 3 × 4 in (7.6 × 10.2 cm) before border
- Border depth: 0.25 in (0.6 cm) on both motifs
Materials
Use a smooth mercerized or combed worsted-weight cotton, about 80 m per 50 g. Cotton keeps its shape when it hangs and shows the stitch texture clearly.
For one panel (8 strands):
- Plum: 750 g (about 1,200 m), or 15 balls of 50 g
- Cream: 700 g (about 1,120 m), or 14 balls of 50 g
These amounts include a margin of about 10% for swatching and spines. Double them for a pair of panels.
Tools:
- 4.0 mm (G-6) and 3.5 mm (E-4) hooks
- Large-eye tapestry needle, plus a long doll needle for threading the spine
- Stitch markers
- Cardboard cut 5.5 in (14.0 cm) tall, for tassels
- Small yarn scraps or fiberfill for stuffing beads
- Blocking mat, rustproof pins and a spray bottle
Abbreviations (US Terms)
- ch: chain
- sl st: slip stitch
- sc: single crochet
- hdc: half double crochet
- dc: double crochet
- tr: treble crochet
- sk: skip
- sp: space
- inc: 2 sc in the same stitch
- dec: sc2tog
- MR: magic ring
- rev sc: reverse single crochet (crab stitch)
- dc2tog: double crochet 2 together
Special stitch: dc2tog cluster. Yarn over and insert hook in the next stitch. Pull up a loop, then yarn over and pull through 2 loops. Repeat in the following stitch. Yarn over and pull through all 3 loops on the hook.
Special stitch: rev sc. Work single crochet from left to right (right to left if you are left-handed). This creates the corded edge.
Gauge and Checkpoints
With the 4.0 mm hook: 16 dc and 8 rows = 4 in (10.2 cm). Also, 16 sc and 18 rows = 4 in (10.2 cm).
Before you start the full set, make one fan, one oval and one bead and check them against these measurements:
- Fan after Row 1: 1.5 in (3.8 cm) wide
- Fan after Row 3: 4 in (10.2 cm) wide
- Fan after Row 5: 6 × 3.25 in (15.2 × 8.3 cm)
- Fan after edging: 6.5 × 3.5 in (16.5 × 8.9 cm)
- Oval flower after Rnd 3: 2 in (5.1 cm) across
- Oval after Rnd 5: 2.75 × 3.5 in (7.0 × 8.9 cm)
- Oval after Rnd 7: 3.25 × 4.25 in (8.3 × 10.8 cm)
- Oval after Rnd 8: 3.5 × 4.5 in (8.9 × 11.4 cm)
- Bead: 0.75 in (1.9 cm) across
If your pieces are too big, go down half a hook size. If they are too small, go up half a size. Keep the fan and oval on the same hook, because the strand spacing depends on both widths.
Fan Motif (Plum with Cream Edging)
The fan is worked in rows from a small ring at the base and opens out into nine ribs.
With plum and the 4.0 mm hook, ch 5. Sl st in the first ch to form a ring.
Row 1: Ch 3 (counts as dc). Work 8 dc in the ring. Turn. (9 dc, in a half circle)
Row 2: Ch 4 (counts as dc + ch 1). Dc in next dc, ch 1. Repeat from * across, ending with dc in the top of the turning ch. Turn. (9 dc, 8 ch-1 sps)
Row 3: Ch 3 (counts as dc). Dc in the same st. Ch 1, sk ch-1 sp, 2 dc in next dc. Repeat from * 8 times, working the last 2 dc into the 3rd ch of the turning ch. Turn. (18 dc in 9 ribs of 2, 8 ch-1 sps)
Row 4: Ch 3 (counts as dc). Dc in the same st, then dc in the next dc. Ch 2, sk ch-1 sp, 2 dc in next dc, dc in next dc. Repeat from * 8 times. Turn. (27 dc in 9 ribs of 3, 8 ch-2 sps)
Row 5: Ch 4 (counts as tr). Tr in the same st, tr in the next dc, and 2 tr in the next dc. Ch 2, sk ch-2 sp, 2 tr in next dc, tr in next dc, 2 tr in next dc. Repeat from * 8 times. Fasten off. (45 tr in 9 ribs of 5, 8 ch-2 sps)
Each rib grows from 1 to 2, 3 and then 5 stitches while the gaps stay open. This is what makes the ribs flare into the scallops in the photo.
Oval Medallion (Plum Flower, Cream Lace)
Rnd 1 (plum): With the 4.0 mm hook, make a MR. Ch 3 (counts as dc), then work 15 dc in the ring. Join to the top of ch-3. (16 dc)
Rnd 2 (plum): Ch 2, then dc in the next st (counts as the first dc2tog). Ch 4. Dc2tog over the next 2 sts, ch 4. Repeat from * 7 times. Join to the first cluster. (8 clusters, 8 ch-4 sps)
Rnd 3 (plum): In each ch-4 sp, work (sc, hdc, 2 dc, hdc, sc). Join and fasten off. (8 petals, 48 sts)
Rnd 4 (cream): Working behind the petals, join cream with an sc around the post of any Rnd 2 cluster. Ch 5, sc around the post of the next cluster. Repeat from * 6 times, then ch 5 and join to the first sc. (8 sc, 8 ch-5 sps)
Number the loops 1 to 8. Loop 1 is the top, loop 3 and loop 7 are the sides, and loop 5 is the bottom.
Rnd 5 (cream): Sl st into loop 1. Work into the ch-5 sps only, skipping the Rnd 4 sc:
- Loops 1 and 5: (2 dc, 3 tr, 2 dc) in each
- Loops 2, 4, 6 and 8: (hdc, 4 dc, hdc) in each
- Loops 3 and 7: (sc, 3 hdc, sc) in each
Join to the first st. (14 + 24 + 10 = 48 sts)
The taller stitches at the top and bottom turn the circle into an oval.
Rnd 6: Ch 1. Sc in the first st. Ch 3, sk 1 st, sc in next st. Repeat around, ending with ch 3 and sk the last st. Join. (24 sc, 24 ch-3 sps)
Beads, Tassels and Tabs
Bead (make in plum and cream): Use the 3.5 mm hook.
- Rnd 1: MR, 6 sc. (6)
- Rnd 2: (sc, inc) 3 times. (9)
- Rnd 3: Sc in each st. (9)
- Rnd 4: (sc, dec) 3 times. (6)
Stuff firmly with matching yarn scraps. Close the hole and leave a short tail.
Tassel: Wrap plum 30 times around the 5.5 in (14.0 cm) card. Tie the top loop with a 12 in (30.5 cm) plum tie and cut the bottom loops. Wrap cream tightly 8 times, 0.5 in (1.3 cm) below the top, and knot it. Trim the tassel to 5 in (12.7 cm).
Tab (cream): Use the 4.0 mm hook. Ch 6. Row 1: sc in the 2nd ch from the hook and in each ch across (5 sc). Rows 2–27: ch 1, turn, sc across (5 sc). The strip measures 6 × 1.25 in (15.2 × 3.2 cm). Fold it in half and sew the short ends together to make a 3 in (7.6 cm) loop. It fits rods up to 1.5 in (3.8 cm) across.
Make All Pieces
For one panel (4 Strand A + 4 Strand B):
- Fans: 48
- Ovals: 48
- Plum beads: 160 (20 per strand)
- Cream beads: 152 (19 per strand)
- Tassels: 8
- Tabs: 8
Strand A, top to bottom:
Tab
P bead, C bead, P bead
[Fan, C, P, C, Oval, P, C, P] x 6
Tassel
Strand B, top to bottom:
Tab
P bead, C bead, P bead
[Oval, P, C, P, Fan, C, P, C] x 6
Tassel
Panel layout across the rod:
A  B  A  B  A  B  A  B
F  O  F  O  F  O  F  O
O  F  O  F  O  F  O  F
Each repeat is 3.5 + 2.25 + 4.5 + 2.25 = 12.5 in (31.8 cm). Six repeats come to 75 in (190.5 cm). Add the top section, which is 3 in (7.6 cm) of tab plus three beads, for 5.25 in (13.3 cm). Add the 5 in (12.7 cm) tassel. The total is 85.25 in (216.5 cm).
Joining (Stringing Each Strand)
Method: Cut two strands of plum, each 100 in (254.0 cm) long. Thread both through the doll needle together to make a doubled spine.
Stitch-to-stitch logic:
- Pass the spine through the bottom of the tab and knot it securely.
- Thread each bead through its center, entering at the closing hole and leaving through the magic ring.
- Fan: Enter the fan at the top center sc of the edging (st 27 of the 53 top sts). Run down the back of the center rib, passing under the stitch posts. Exit through the base sc (st 3 of the 5 base sc).
- Oval: Enter at the top center sc of Rnd 7 (st 4). Run down the back through the Rnd 4 ring. Exit at the bottom center sc (st 28).
- At the bottom, pass the spine through the tassel’s top loop. Knot it three times and bury the ends inside the tassel.
Tension: Beads and motifs should just touch. Leave no visible spine between them, but don’t pull so tight that the motifs cup.
Checkpoint: Hang the strand and measure it. It should be 85.25 in (216.5 cm). If it is more than 1 in (2.5 cm) too long, tighten the spine slightly. If it is too short, ease the spine before knotting.
Border
Border gauge: 4 sc = 1 in (2.5 cm) along the edge.
Fan edging, Rnd 1 (cream): With the RS facing, join cream in the first tr of Row 5.
- Top arc: Sc in each of the 5 tr, 1 sc in the ch-2 sp. Repeat across, ending with 5 sc in the last rib. (45 + 8 = 53 sc)
- Side: 2 sc in each dc row end (Rows 4 to 1) and 3 sc in the Row 5 row end. (11 sc)
- Base: 5 sc around the exposed ring. (5 sc)
- Second side: Same as the first side. (11 sc)
Join. (53 + 11 + 5 + 11 = 80 sc)
Fan edging, Rnd 2: Ch 1, then rev sc in each sc around. Join and fasten off. (80 rev sc)
Oval border, Rnd 7 (cream): Ch 1. Sc in the sc, sc in the ch-3 sp. Repeat around and join. (24 + 24 = 48 sc, 12 per quarter) Top center is st 4 and bottom center is st 28, with 24 stitches between them on each side.
Oval border, Rnd 8: Ch 1, then rev sc in each sc around. Join and fasten off. (48 rev sc)
Why the math works:
- Fan: The edging places exactly one sc on each tr, so it follows the scallops without ruffling. The single sc in each gap pulls the dips in slightly, which sharpens the scallops. Each side is about 2.75 in (7.0 cm) long, and 11 sc at 4 per inch fits that length.
- Oval: After Rnd 7 the oval is 3.25 × 4.25 in (8.3 × 10.8 cm), with an edge of about 11.8 in (30.0 cm). At 4 sc per inch, 48 sc lie flat.
Final Blocking
- Weave in all ends before blocking.
- Spray the fans and ovals until damp. Don’t soak them.
- Pin each fan to 6.5 × 3.5 in (16.5 × 8.9 cm), with a pin at each rib tip so the scallops spread evenly.
- Pin each oval to 3.5 × 4.5 in (8.9 × 11.4 cm), and open up the ch-3 lace.
- Let them dry completely.
- Hang the strung strands for 24 hours. Then recheck the length and adjust the spine if needed.
Final Quality-Control Checklist
- Every fan has 9 ribs, 80 edging sts and a matching size
- Every oval has 8 petals and 48 border sts, and the flower is centered
- The bead order matches the strand charts
- Each strand measures 85.25 in (216.5 cm)
- On the rod, fans sit beside ovals and never beside other fans
- All spine knots are buried and secure
Troubleshooting
- Fan cups: Your tension on Row 5 is tight. Go up a hook size for that row only.
- Fan ruffles too much: Use ch 1 instead of ch 2 in Row 5, and work the edging with the 3.5 mm hook.
- Oval looks round: Make sure Rnd 5 has tr in loops 1 and 5.
- Beads look flat: Add more stuffing, or work Rnd 3 twice.
- Strand twists: Thread every piece from the front, and let the strand hang overnight before trimming.
Care
Hand wash in cool water. Roll the strands in a towel to remove water and dry them flat, then rehang while slightly damp so they settle straight.
Final Notes
The measurement chain holds the whole curtain together. Check the gauge first, then the fan at 6.5 × 3.5 in (16.5 × 8.9 cm), the oval at 3.5 × 4.5 in (8.9 × 11.4 cm) and the bead at 0.75 in (1.9 cm). From there, each repeat is 12.5 in (31.8 cm), each strand is 85.25 in (216.5 cm) and the panel is 41.5 in (105.4 cm) wide. If each stage matches, the finished curtain will hang evenly.
Happy crocheting!