

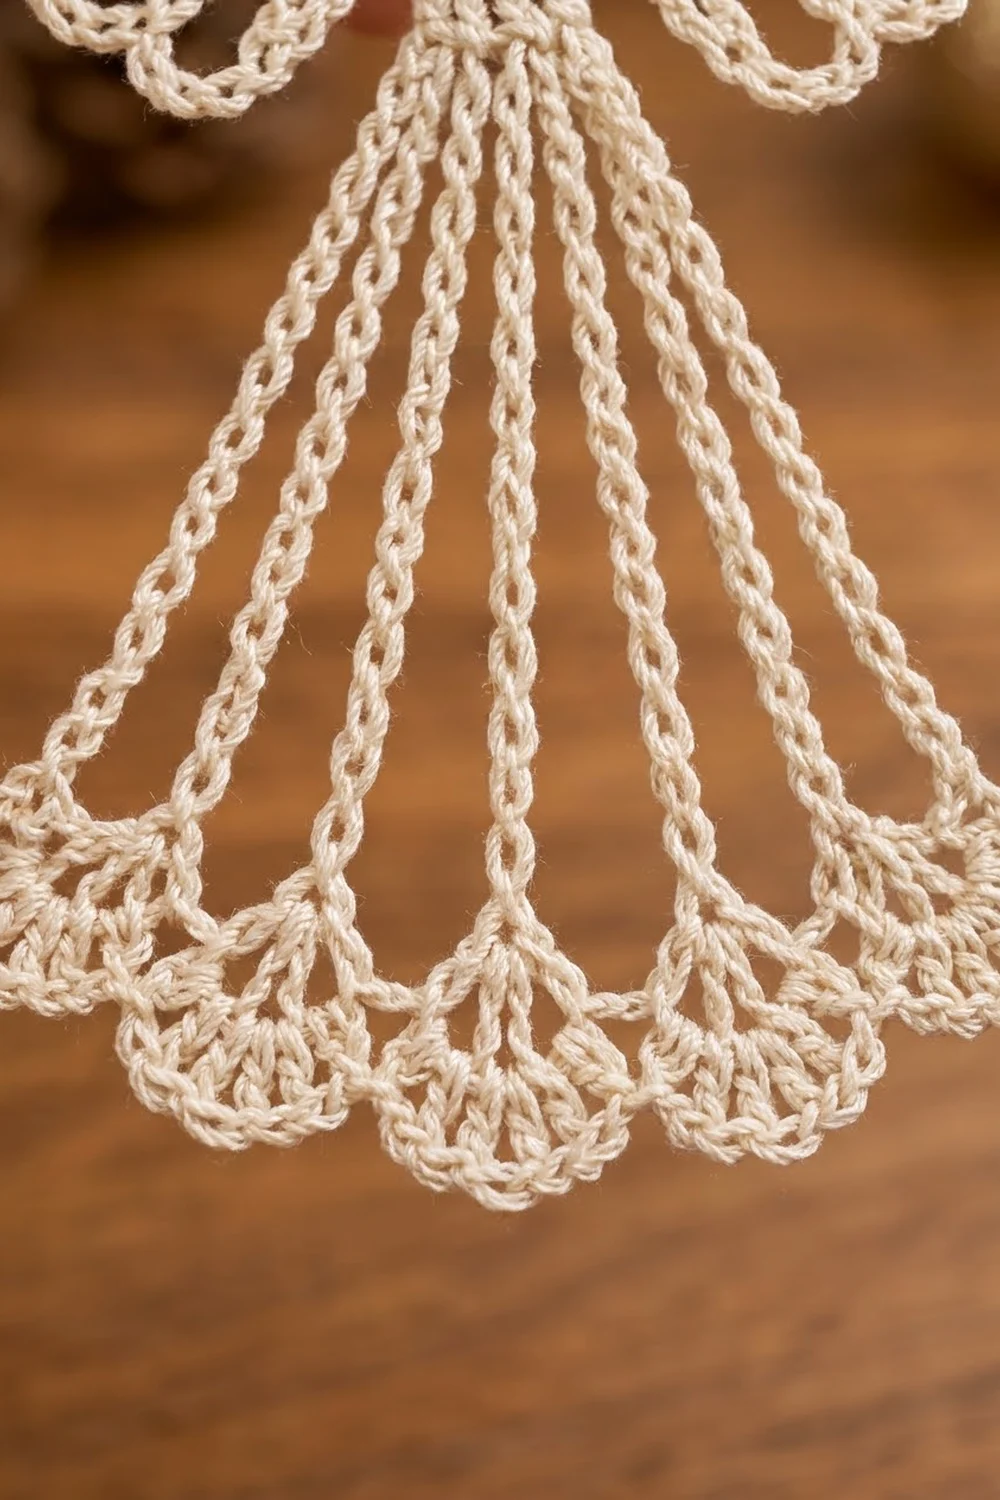
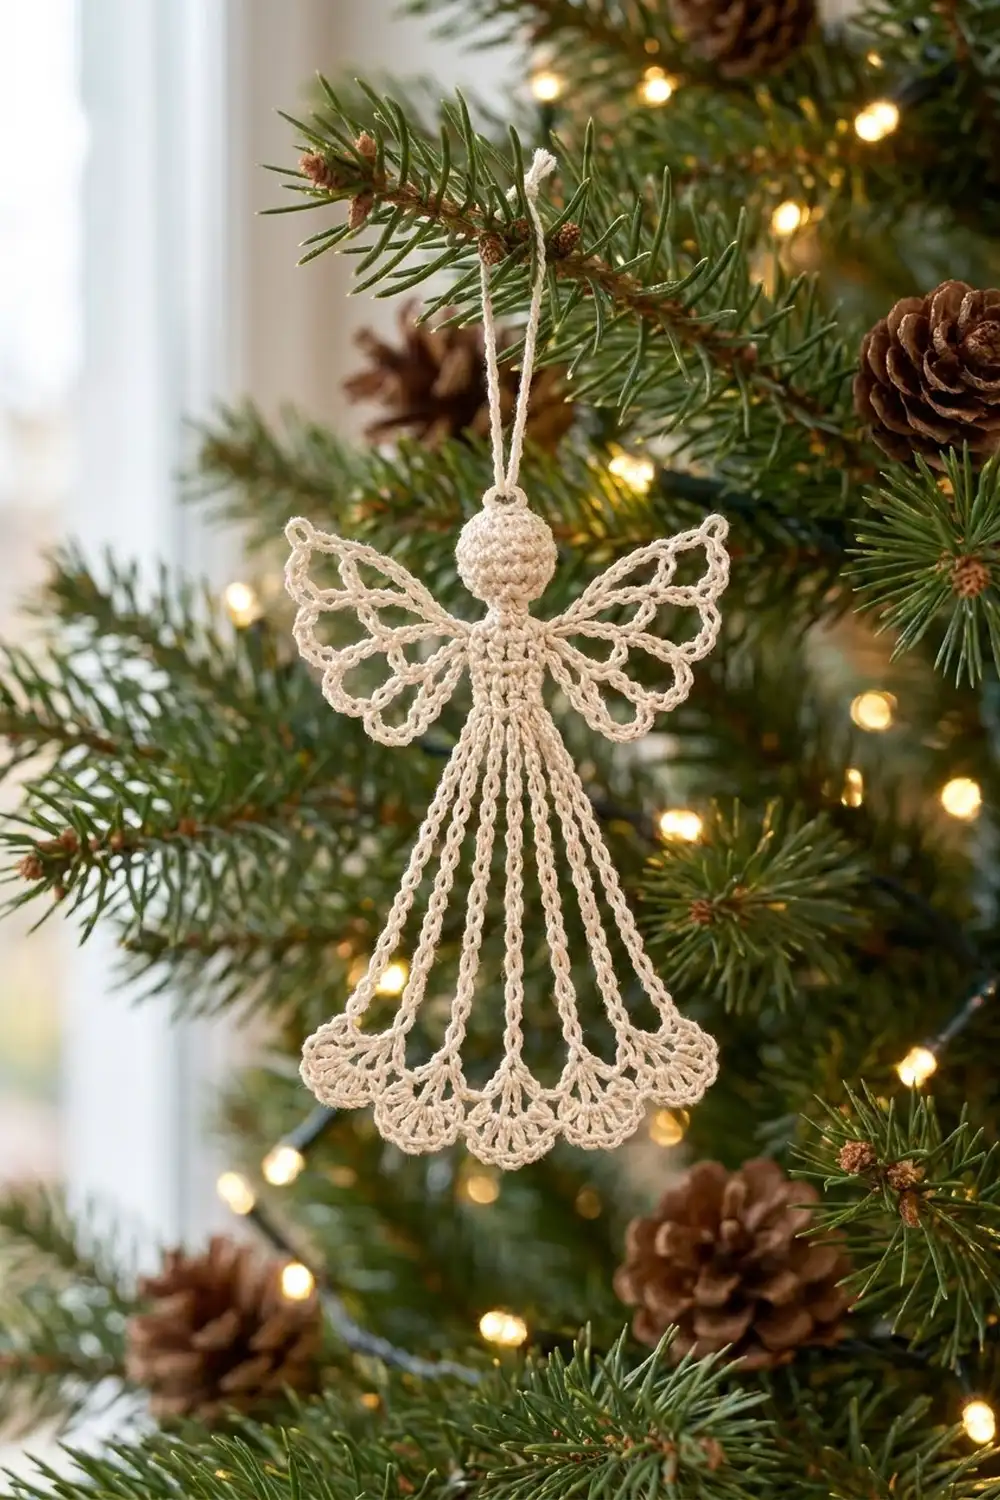
This little angel is made from fine cream cotton thread. She has a round, solid head, a narrow fitted bodice, a fanned skirt of corded spokes, and a scalloped lace hem. Two open wings made of chain loops sit at her shoulders, and a thin chain loop at the top of the head lets her hang from a tree branch.
The whole ornament is worked in one color, a soft cream or ivory. Thread this fine makes the stitches crisp and lacy, so she looks light and heirloom-style rather than chunky. Hang a few together and they look like a matching set.
This pattern uses US crochet terms. The finished angel measures about 4.25 in (10.8 cm) tall from the top of the head to the hem, or 5.75 in (14.6 cm) with the hanging loop. The wingspan is 3.5 in (8.9 cm) and the hem is 3.25 in (8.3 cm) wide.
Construction is continuous and seamless. You work the head in the round, decrease to a neck, and keep going down into a tubular bodice. Then you flatten the bodice, add eight corded spokes for the skirt, and connect the spoke tips with a three-row scalloped hem. Last, you work the wings straight onto the sides of the bodice and add the hanging loop.
Finished Size and Construction
- Finished size: 4.25 in (10.8 cm) tall without the loop, 5.75 in (14.6 cm) with the loop
- Wingspan: 3.5 in (8.9 cm)
- Skill level: Intermediate
- Terminology: US crochet terms
- Yarn weight: Size 3 cotton crochet thread (Lace, category 0)
- Hook: 2.0 mm
- Number of pieces: 1, worked as a single piece with no sewing
- Layout: One flat-backed angel figure, made to hang
- Head: 0.6 in (1.5 cm) diameter ball
- Bodice: 0.5 in (1.3 cm) wide × 0.9 in (2.3 cm) tall
- Size before border: 3.7 in (9.4 cm) tall, from head to spoke tips
- Border (scalloped hem) depth: 0.55 in (1.4 cm)
Materials
Pick a mercerized cotton crochet thread in size 3. The sheen and firm twist give clear stitch definition and hold their shape well once starched. Acrylic or very soft thread won’t keep the wings crisp.
- Cream / ivory, size 3 cotton thread: 15 g, about 25 m (27 yd)
The quantity includes a margin of roughly 20% for your gauge swatch and tails. One standard ball will make many angels.
Tools:
– 2.0 mm crochet hook
– 1 stitch marker
– Tapestry needle with an eye small enough for thread
– A pinch of polyester fiberfill for the head
– Blocking board or foam mat, plus rust-proof pins
– Fabric stiffener, or a strong starch solution
– Small scissors
Abbreviations (US Terms)
- ch – chain
- sl st – slip stitch
- sc – single crochet
- dc – double crochet
- inc – 2 sc in the same stitch
- dec – sc2tog (single crochet 2 together)
- MR – magic ring
- sp – space
- st(s) – stitch(es)
- rep – repeat
Special stitch – Corded Spoke: Ch 27. Sl st in the 2nd ch from the hook and in each ch back to the start (26 sl st). Sl st into the stitch the spoke began from. The slip stitches wrap the chain and give it a firm, twisted cord look. The skipped chain at the far end is the spoke tip.
Gauge and Checkpoints
- Main gauge: 10 sc and 11 sc rounds = 1 in (2.5 cm)
- Chain gauge: 12 ch = 1 in (2.5 cm)
Test the head first instead of making a separate swatch. After Round 3, the flat disc should measure 0.55 in (1.4 cm) across. Then chain 24 with your working thread: the chain should be 2 in (5.1 cm) long.
Checkpoints:
– After Round 8 the stuffed head is 0.6 in (1.5 cm) across.
– After Row 18 the flattened bodice is 0.5 in (1.3 cm) wide.
– Each corded spoke measures 2.2 in (5.6 cm).
– After Hem Row 1 the hem is 3.1 in (7.9 cm) wide.
– The finished hem is 3.25 in (8.3 cm) wide.
If your angel is too big: go down to a 1.75 mm hook, or tighten the way you pull up loops. If it’s too small: go up to a 2.25 mm hook. Chains matter more here than sc, because the spokes, hem and wings are mostly chain. If only the chain gauge is off, change hooks just for the skirt and wings.
Head
Stuff the head before closing it. Use a stitch marker to mark the first stitch of each round.
Round 1: Make a MR, ch 1, 6 sc in the ring. Pull it closed. (6 sts)
Round 2: Inc in each st around. (12 sts)
Round 3: (Sc in next st, inc) 6 times. (18 sts)
Rounds 4–6: Sc in each st around. (18 sts per round)
Round 7: (Sc in next st, dec) 6 times. (12 sts)
Firmly stuff the head with a small pinch of fiberfill so it’s round and smooth, with no gaps between stitches.
Round 8: Dec 6 times. (6 sts)
This tight 6-stitch round forms the neck and keeps the stuffing in place.
Bodice
Carry straight on from the neck. Don’t fasten off.
Round 9: (Sc in next st, inc) 2 times, sc in next 2 sts. (8 sts)
Round 10: (Sc in next 3 sts, inc) 2 times. (10 sts)
Rounds 11–17: Sc in each st around. (10 sts per round)
Don’t stuff the bodice. Flatten the tube so the first stitch of the round sits on one side fold and stitch 6 sits on the other. The front layer is now sts 1–5 and the back layer is sts 6–10. The two side folds are where the wings attach later.
Row 18 (closing row): Ch 1. Working through both layers together, pair st 1 with st 10, st 2 with st 9, and so on, and sc across. (5 sc)
The bodice is now a flat rectangle 0.5 in (1.3 cm) wide.
Skirt
Row 19 (waist, conversion row): Ch 1, turn. 2 sc in first st, sc in next st, 2 sc in next st, sc in next st, 2 sc in last st. That’s 5 stitches worked 1 per existing stitch + 3 extra stitches = 8 sc.
Row 20 (spokes): Don’t turn. Work a Corded Spoke from the last sc you made. Sl st into the next waist sc and work a Corded Spoke from it. Repeat from * 6 more times. (8 spokes, one from each of the 8 waist sts)
Fasten off and weave in the tail at the waist. Let the spokes hang straight down, each 2.2 in (5.6 cm) long. Lay the angel flat and number the spokes 1–8 from left to right.
Border: Scalloped Hem
The hem is the border for this piece. It ties the eight spoke tips into a curved, scalloped edge.
Border gauge: One hem section (1 ch-4 arch plus 1 sc) is about 0.45 in (1.1 cm) wide, and the scalloped edge is 0.55 in (1.4 cm) deep.
Hem Row 1 (arches): Join the thread with a sc in the tip of spoke 1. Ch 4, sc in the tip of the next spoke. Repeat from * 6 more times.
Count: 8 sc + 7 ch-4 sps (28 ch). The hem is 3.1 in (7.9 cm) wide, and the spokes fan out evenly.
Hem Row 2 (shells): Ch 1, turn. Sc in first sc. In next ch-4 sp work (dc, [ch 1, dc] 4 times), sc in next sc. Repeat from * 6 more times.
Count: 7 shells, each with 5 dc and 4 ch-1 sps (35 dc and 28 ch-1 sps in total), plus 8 sc.
Hem Row 3 (picot edge): Ch 1, turn. Sc in first sc. [Ch 3, sc in next ch-1 sp] 4 times, ch 3, sc in next sc. Repeat from * 6 more times.
Count: each scallop has 5 ch-3 loops and 5 sc (4 in the ch-1 sps and 1 in the sc between shells). Total: 35 ch-3 loops and 36 sc (1 + 7 × 5). Fasten off.
Why the math works: The waist has 8 sts, which gives 8 spokes, which gives 8 tips. 8 tips have 7 gaps between them, so there are exactly 7 arches and 7 shells, with an anchoring sc at both ends. Each shell sits inside a single 4-chain arch. Its 4 ch-1 sps plus the sc after it give 5 anchor points for the 5 picot loops, and that’s why every scallop comes out the same. The fan grows from 0.8 in (2.0 cm) at the waist to 3.25 in (8.3 cm) at the hem, which gives the bell-shaped skirt.
Wings
The wings are worked straight onto the side folds of the bodice. Each wing is a cluster of chain-loop petals all anchored at one point. Three larger petals make the upper wing and two smaller petals make the lower wing. Make both wings the same way.
Upper wing: Join the thread with a sl st in the side-fold st of Round 12.
– Ch 28, sl st in the same st (petal A, upper inner).
– Ch 36, sl st in the same st (petal B, wing tip).
– Ch 30, sl st in the same st (petal C, lower edge).
Cover the petals: Work 30 sc over the chain of petal C, then sl st in the anchor st. Work 36 sc over petal B, then sl st in the anchor. Work 28 sc over petal A, then sl st in the anchor. (94 sc)
Lower wing: Sl st down the same side fold into the edge st of Round 13, then Round 14.
– Ch 24, sl st in the same st (petal D).
– Ch 18, sl st in the same st (petal E).
Work 18 sc over petal E and sl st in the anchor. Work 24 sc over petal D and sl st in the anchor. (42 sc)
Wing total: 136 ch covered by 136 sc. Leave a 6 in (15.2 cm) tail.
Using the tail, tack petal A to petal B and petal B to petal C with a single small stitch where they touch, about two-thirds of the way out from the anchor. Tack D to E the same way. This gives the butterfly-wing outline. Weave in the tail.
Repeat on the other side fold, using the matching stitches of Rounds 12 and 14. Each wing reaches 1.5 in (3.8 cm) from the bodice. 1.5 + 0.5 + 1.5 = 3.5 in (8.9 cm) wingspan.
Hanging Loop
Join the thread with a sl st in a Round 1 stitch at the top of the head. Ch 36 and sl st in the same st. Fasten off and weave the tails into the head. The 36 chains measure 3 in (7.6 cm) and fold into a loop 1.5 in (3.8 cm) tall.
Final Blocking
- Weave in all remaining ends, hiding them inside the covered petals or the head.
- Dip the angel in fabric stiffener, or in a strong starch solution. Gently squeeze out the extra so no film is left in the open spaces.
- Lay her face up on the blocking board.
- Pin the top of the head and the center of the hem so the body is 4.25 in (10.8 cm) tall.
- Fan the spokes out evenly. Pin spokes 1 and 8 so the hem measures 3.25 in (8.3 cm).
- Pin each of the 35 picot loops into a small rounded point.
- Open out each wing petal into a smooth teardrop. Pin the tips of petal B 3.5 in (8.9 cm) apart.
- Pin the hanging loop straight up.
- Leave it to dry completely, usually 12–24 hours, and only then remove the pins.
Final Quality-Control Checklist
- Head is round and firm, 0.6 in (1.5 cm), with no stuffing showing
- Bodice is flat, 0.5 in (1.3 cm) wide, with the wings sitting on the side folds
- 8 spokes, all 2.2 in (5.6 cm) long and evenly spaced
- 7 arches, 7 shells and 35 picot loops in the hem
- Hem 3.25 in (8.3 cm) wide, wingspan 3.5 in (8.9 cm)
- Both wings match: 3 upper petals and 2 lower petals each
- The angel hangs straight from the loop without tilting
- No visible tails
Troubleshooting
Spokes twist or curl: Your slip stitches are too tight. Work them more loosely, and let blocking straighten them.
Hem ruffles: The ch-4 arches are too long for your gauge. Redo Hem Row 1 with ch 3 arches.
Hem pulls the spokes inward: Your arches are too tight. Use ch 5, or go up a hook size for the hem only.
Wing petals are lumpy: You’re working too many sc over the chain. Keep to one sc per chain and push the stitches together as you go.
Angel tilts when hung: Check that the hanging loop sits in the exact center of Round 1 and that both wings use the same rounds.
Stuffing shows through the head: Use less fiberfill, or go down a hook size for the head only.
Care
Hand wash in cool water only if needed, then reshape and re-starch. Store flat in tissue paper so the wings and picots keep their shape.
Final Notes
Everything follows one measurement chain. The 0.6 in (1.5 cm) head sits on a 0.9 in (2.3 cm) bodice, then come 2.2 in (5.6 cm) spokes and a 0.55 in (1.4 cm) hem, which adds up to a 4.25 in (10.8 cm) angel. Across the body, the 8-stitch waist leads to 8 spokes, 7 shells and a 3.25 in (8.3 cm) hem, and two 1.5 in (3.8 cm) wings on a 0.5 in (1.3 cm) bodice give the 3.5 in (8.9 cm) wingspan. Check the head first and the rest of the angel will come out the right size.
Happy crocheting!