

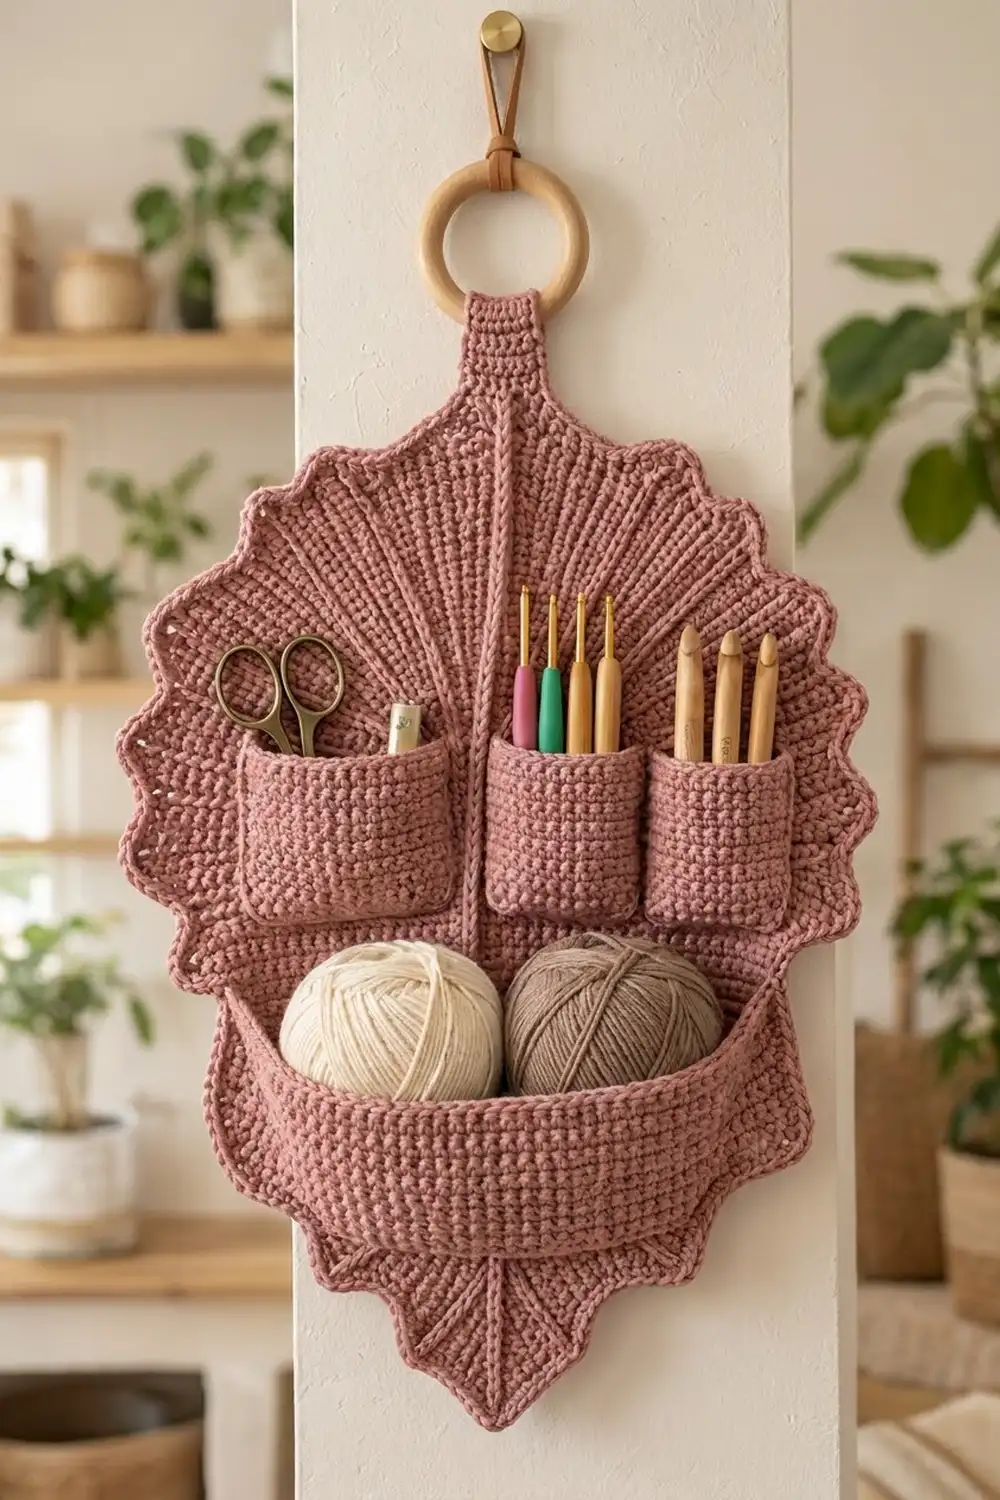
The Ginkgo Rose Wall Organizer is a leaf-shaped hanging caddy for your crochet desk. Raised veins fan up from the point of a dense single-crochet leaf. A row of small scallops frames the edge, and four box pockets hold scissors, hooks and a couple of yarn balls.
The whole organizer is worked in one dusty rose color, so the texture does the work: firm stitches, sculpted veins and a soft wavy edge. A natural wooden ring at the top gives it a calm, modern look.
This pattern uses US crochet terms. The finished organizer measures about 11.75 in (29.8 cm) wide and 14.75 in (37.5 cm) tall from the bottom point to the base of the tab. Measured to the top of the folded tab, it is about 15.75 in (40.0 cm) tall, not counting the ring.
You will crochet the leaf panel in rows from the bottom point upward, ending with a narrow hanging tab. Next you add the veins with surface slip stitches and work a two-row scallop border. Then you make one large and three small pockets, each with a flat base, sew them on and attach the ring.
Finished Size and Construction
- Finished size: 11.75 in × 14.75 in (29.8 cm × 37.5 cm), excluding the tab
- Skill level: Intermediate
- Terminology: US
- Yarn weight: Worsted (#4)
- Hook: 5 mm (H-8)
- Number of pieces: 5 (1 panel, 1 large pocket, 3 small pockets)
- Layout: 3 small pockets in a row, with 1 large pocket below them, on a leaf panel
- Panel size before border: 10.25 in × 14.0 in (26.0 cm × 35.6 cm)
- Border depth: 0.75 in (1.9 cm)
- Small pocket: 2.75 in wide × 0.7 in deep × 2.7 in tall (7.0 × 1.8 × 6.9 cm)
- Large pocket: 8.25 in wide × 1.3 in deep × 3.3 in tall (21.0 × 3.3 × 8.4 cm)
Materials
Choose a smooth worsted-weight cotton or cotton blend. Cotton holds its shape, shows the veins clearly and keeps the pockets from sagging. Avoid fuzzy or very stretchy yarns.
- Dusty rose: 200 g, about 340 m (372 yd)
The quantity includes a margin of roughly 25% for your gauge swatch and any small differences in tension.
Tools:
– 5 mm (H-8) crochet hook
– Tapestry needle
– 6 locking stitch markers
– Wooden ring, 2.5 in (6.4 cm) across
– Optional leather or cord loop for hanging
– Ruler or tape measure
– Blocking mat and pins
Abbreviations (US Terms)
- ch – chain
- sc – single crochet
- dc – double crochet
- sl st – slip stitch
- sc2tog – single crochet 2 together
- BLO – back loop only
- st(s) – stitch(es)
- Rnd – round
Surface slip stitch: Hold the yarn behind the work. Insert the hook from the front between stitches, pull up a loop, then pull it through the loop on the hook. Repeat along a line to make a raised chain on the front.
Scallop shell: 5 dc in the same stitch.
Gauge and Checkpoints
Gauge: 16 sc and 18 rows = 4 in (10.2 cm) in single crochet worked in rows.
Make a swatch before you start. Ch 21, then work 20 sc for 20 rows, and measure 4 in (10.2 cm) across the center. Gauge matters here because the pockets are positioned by row number and stitch number on the panel.
Checkpoints:
– After Row 20, the panel is 41 sts, 10.25 in (26.0 cm) wide and 4.4 in (11.2 cm) tall.
– After Row 46, the panel is 10.2 in (25.9 cm) tall.
– After Row 63, the panel is 14.0 in (35.6 cm) tall.
– The small pocket base should be 2.75 in × 0.7 in (7.0 × 1.8 cm).
– The large pocket base should be 8.25 in × 1.3 in (21.0 × 3.3 cm).
If your work is too big, go down a hook size, to 4.5 mm. If it is too small, go up to 5.5 mm. Don’t change any stitch counts. All the placements depend on them.
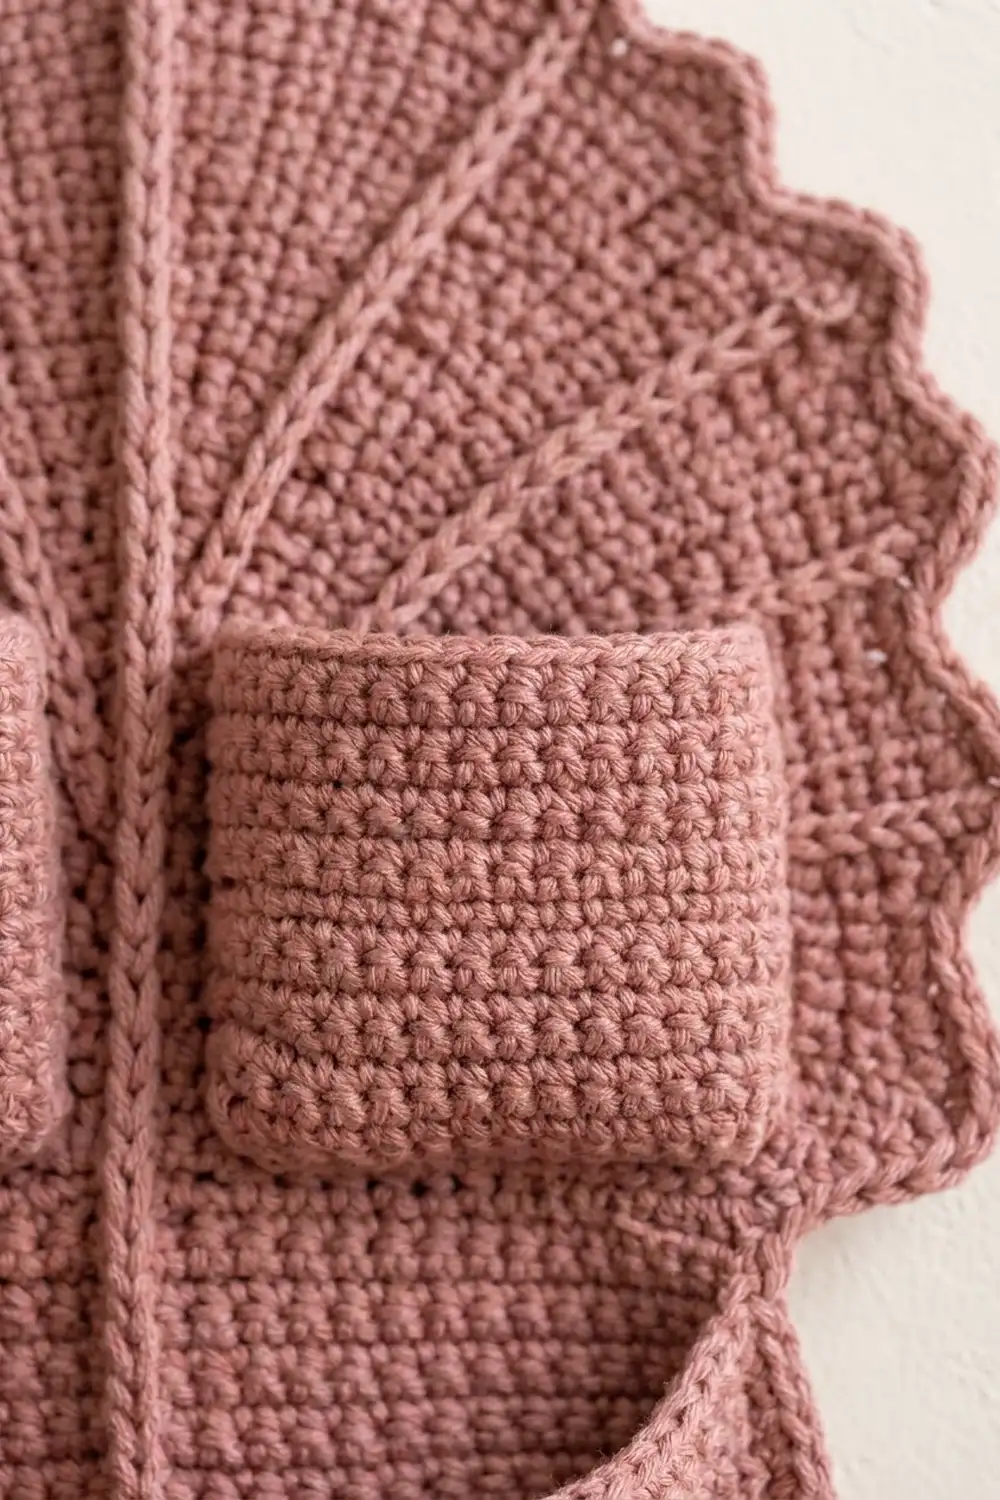
Back Panel
You work the panel in rows, starting at the bottom point. Each row begins with ch 1, which does not count as a stitch. Turn at the end of every row.
Lower Point (Increase Rows)
Row 1: Ch 2, then work 3 sc in the 2nd ch from the hook. (3 sts)
Rows 2–20: Ch 1, turn. Work 2 sc in the first st, sc in each st to the last st, then 2 sc in the last st.
Each row has 2 more stitches than the row before. The total for any row is (row number × 2) + 1.
- Row 2: 5 sts
- Row 5: 11 sts
- Row 10: 21 sts
- Row 15: 31 sts
- Row 18: 37 sts
- Row 20: 41 sts
Check the panel now: 10.25 in (26.0 cm) wide and 4.4 in (11.2 cm) tall. Each slanted edge measures about 6.5 in (16.5 cm).
Straight Middle
Rows 21–46: Ch 1, turn, and sc in each st across. (41 sts each row)
These 26 rows add 5.8 in (14.7 cm). The panel is now 10.2 in (25.9 cm) tall.
Upper Taper
Rows 47–63: Ch 1, turn. Sc2tog, sc across to the last 2 sts, then sc2tog.
Each row has 2 fewer stitches than the row before.
- Row 47: 39 sts
- Row 50: 33 sts
- Row 55: 23 sts
- Row 60: 13 sts
- Row 63: 7 sts
These 17 rows add 3.8 in (9.7 cm). The total panel height is 4.4 + 5.8 + 3.8 = 14.0 in (35.6 cm). Each upper slant measures about 5.7 in (14.5 cm).
Hanging Tab
Rows 64–73: Ch 1, turn, and sc in each st across. (7 sts each row)
The tab is 1.75 in (4.4 cm) wide and 2.2 in (5.6 cm) long. Fasten off, leaving a 12 in (30.5 cm) tail for sewing.
Surface Veins
Lay the panel right side up with the point toward you. Every vein starts at the bottom point and ends at the spot marked below. Place markers on both sides of the panel to mark the end points:
- Center vein: the 4th (middle) st of Row 63
- Vein 1: the edge of Row 58
- Vein 2: the edge of Row 52
- Vein 3: the edge of Row 44
- Vein 4: the edge of Row 34
That gives 9 veins in total: 1 center vein plus 4 on each side.
For each vein, work surface slip stitches from the point to its marker, 1 sl st per row. Follow a straight line, using a ruler or a strand of contrasting yarn as a guide. Keep each stitch loose and the same length as the row height. Fasten off and weave the ends in on the back.
Pockets
Small Pocket (Make 3)
Base: Ch 12, then sc in the 2nd ch from the hook and in each ch across. (11 sts)
Base Rows 2–3: Ch 1, turn, sc across. (11 sts)
Rnd 1: Without turning, ch 1. Work 11 sc across the last row, 3 sc down the row-ends, 11 sc along the foundation chain and 3 sc up the other row-ends. Join with a sl st. (28 sts)
Rnd 2: Ch 1, then sc BLO in each st around and join. (28 sts) The free front loops make a crisp fold where the base meets the walls.
Rnds 3–12: Ch 1, then sc in each st around and join. (28 sts)
Rnd 13: Sl st in each st around. (28 sl sts)
The pocket walls are 2.7 in (6.9 cm) tall. Fasten off, leaving an 18 in (45.7 cm) tail.
Large Pocket (Make 1)
Base: Ch 34, then sc in the 2nd ch from the hook and in each ch across. (33 sts)
Base Rows 2–6: Ch 1, turn, sc across. (33 sts)
Rnd 1: Ch 1. Work 33 sc across the last row, 6 sc down the row-ends, 33 sc along the foundation chain and 6 sc up the other row-ends. Join. (78 sts)
Rnd 2: Ch 1, then sc BLO in each st around and join. (78 sts)
Rnds 3–15: Ch 1, then sc in each st around and join. (78 sts)
Rnd 16: Sl st in each st around. (78 sl sts)
The walls are 3.3 in (8.4 cm) tall. Fasten off, leaving a 30 in (76.2 cm) tail.
Make All Pieces
All pieces are dusty rose:
- Back panel with tab: 1
- Small pockets: 3
- Large pocket: 1
Layout on the panel, front view:
          [ tab + ring ]
        /  veins fan out  \
  [ S1 ]   [ S2 ]   [ S3 ]    <- bases on Row 32
 [        LARGE POCKET     ]  <- base on Row 18
        \               /
           \  point  /
Joining
Sew every piece on with whipstitch and its own tail. Go through both loops of the pocket stitch and one full stitch of the panel, sewing one pocket stitch to one panel stitch.
Large pocket: The 33 base stitches along the foundation-chain side make up the back bottom edge. Sew them 1-to-1 to sts 3–35 of Row 18. Row 18 has 37 sts, so this leaves 2 sts free on each side.
Next, sew the two back corner columns up the panel, 1 pocket round to 1 panel row. Follow the same vertical stitch column on the panel. Because of the edge increases, that column is st 3 in Row 18 and becomes st 5 from Row 21 onward. Then tack the top edge of the back wall to the panel every 3 sts.
Small pockets: Row 32 has 41 sts. Sew the back base edges (11 sts each) 1-to-1 like this:
- Pocket 1: sts 3–13
- Pocket 2: sts 16–26
- Pocket 3: sts 29–39
This leaves 2 sts free at each outer edge and 2 sts between pockets: 2 + 11 + 2 + 11 + 2 + 11 + 2 = 41. Sew the back corner columns up and tack the tops as you did for the large pocket.
The small pockets reach up to about Row 44. The large pocket’s rim sits around Row 33, just in front of the lower edges of the small pockets.
Tension: Pull each whipstitch snug enough to close the gap, but not so tight that it puckers. After each pocket, check that the panel still lies flat and is 10.25 in (26.0 cm) wide across the middle.
Border
Border gauge: about 4.5 sc per 1 in (2.5 cm) of edge. This matches the row gauge on the straight sides and spreads stitches evenly on the slants.
The border is worked as two rows around the leaf. It starts at the left base of the tab, goes around the point and ends at the right base of the tab. The tab itself has no border.
Row 1: With the right side facing, join the yarn at the row-end of Row 63 on the left. Ch 1, then work these counts on each part of the edge.
Left side (80 sts):
– Upper slant, Rows 63 down to 47: sc in each of the 17 row-ends, with 2 sc in the row-ends of Rows 48, 50, 52 … 62. That is 17 + 8 = 25 sts.
– Straight edge, Rows 46 down to 21: 1 sc in each row-end. (26 sts)
– Lower slant, Rows 20 down to 1: sc in each of the 20 row-ends, with 2 sc in the row-ends of Rows 3, 5, 7 … 19. That is 20 + 9 = 29 sts.
Point: 3 sc in the tip chain. (3 sts)
Right side (80 sts): Mirror the left side, working the same rows in reverse order: 29 + 26 + 25 = 80 sts.
Row 1 total: 80 + 3 + 80 = 163 sts.
Row 2: Ch 1 and turn. Sc in the first st. Then skip 2 sts, 5 dc in the next st, skip 2 sts, sc in the next st. Repeat from * to * 27 times, ending in the last st.
That gives 27 shells: 135 dc + 28 sc = 163 sts. Fasten off.
Why the math works: The scallop pattern needs a multiple of 6 + 1 stitches, and 163 = 6 × 27 + 1. The center stitch is stitch 82, the middle of the 3 tip stitches. Shells fall on stitches 4, 10, 16 and so on (4 + 6k), and 82 = 4 + 6 × 13, so a shell sits right on the point.
The extra stitches on the slants match their longer lengths. The lower slant is about 6.5 in (16.5 cm) × 4.5 ≈ 29 sts, and the upper slant is about 5.7 in (14.5 cm) × 4.5 ≈ 25 sts. That way the edge doesn’t cup or ruffle.
The border adds 0.75 in (1.9 cm) on each side: 10.25 + 1.5 = 11.75 in (29.8 cm) wide, and 14.0 + 0.75 = 14.75 in (37.5 cm) tall.
Attaching the Ring
Wrap the tab from front to back around the wooden ring. Whipstitch the last row of the tab across the back of the panel at about Row 59. About 1 in (2.5 cm) of the folded tab shows above the panel.
Final Blocking
- Weave in all ends on the back of the panel.
- Lightly spray the organizer with water or steam it gently. Don’t press the veins flat.
- Pin the panel to 11.75 in × 14.75 in (29.8 × 37.5 cm), keeping the point centered.
- Pin each scallop into a rounded curve.
- Stuff the pockets with folded cloth so they dry square.
- Let the organizer dry completely before you hang it.
Final Quality-Control Checklist
- The panel stitch counts are 41 at Row 20, 41 at Row 46 and 7 at Row 63.
- All 9 veins start at the point and run straight.
- Border Row 1 has 163 sts, and Row 2 has 27 shells.
- A shell sits exactly on the bottom point.
- The small pockets sit on sts 3–13, 16–26 and 29–39 of Row 32.
- The large pocket sits on sts 3–35 of Row 18.
- The tab is sewn securely and the ring hangs straight.
- The finished size is 11.75 in × 14.75 in (29.8 × 37.5 cm).
Troubleshooting
- The panel edges slant unevenly: Check that you increase or decrease at both ends of every shaping row.
- The veins pucker: Loosen your slip stitches, or switch to a hook one size larger for the veins only.
- The border ruffles: Recount Row 1. You may have extra 2-sc row-ends.
- The border cups: Your tension may be too tight. Work Row 1 with a larger hook.
- The pockets sag forward: Tack the top of the back wall more often, every 2 sts.
- The pocket walls lean: Make sure Rnd 2 was worked in the back loop only.
Care
Hand wash in cool water and lay flat to dry, reshaping the pockets and scallops. Don’t tumble dry.
Final Notes
The measurement chain is simple: a gauge of 16 sc × 18 rows = 4 in (10.2 cm) gives a 41-stitch panel 10.25 in (26.0 cm) wide. The panel’s three sections, 4.4 + 5.8 + 3.8 in, add up to 14.0 in (35.6 cm) tall. A 163-stitch border with 27 scallops then brings the organizer to 11.75 in × 14.75 in (29.8 × 37.5 cm). If you check each stage as you go, the pockets will land exactly where they belong.
Happy crocheting!