

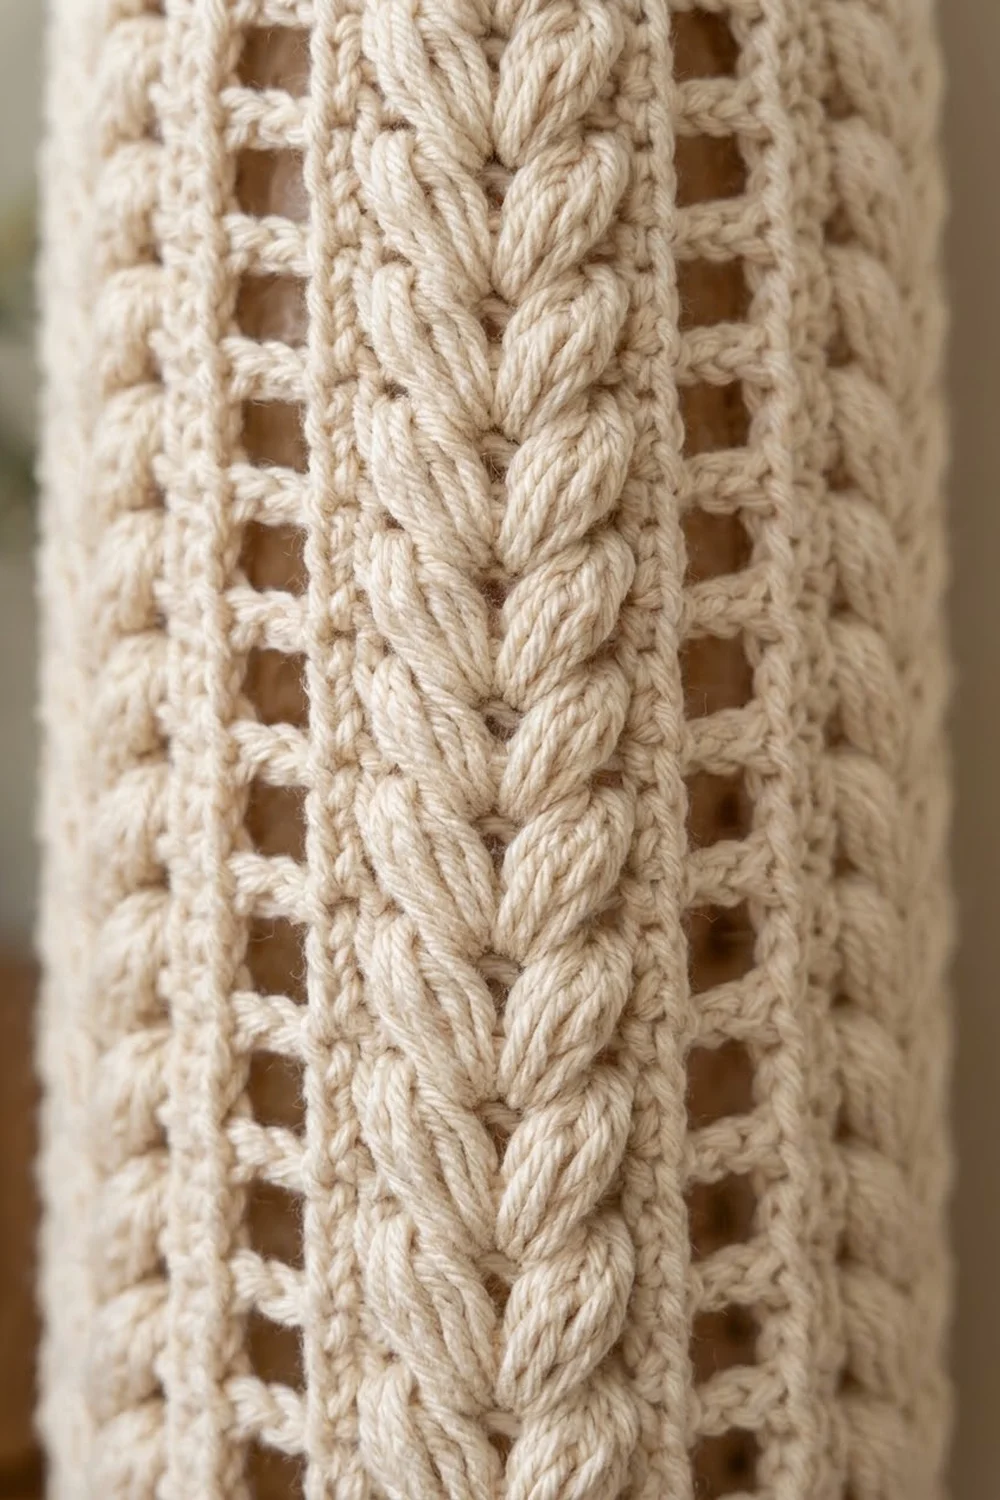
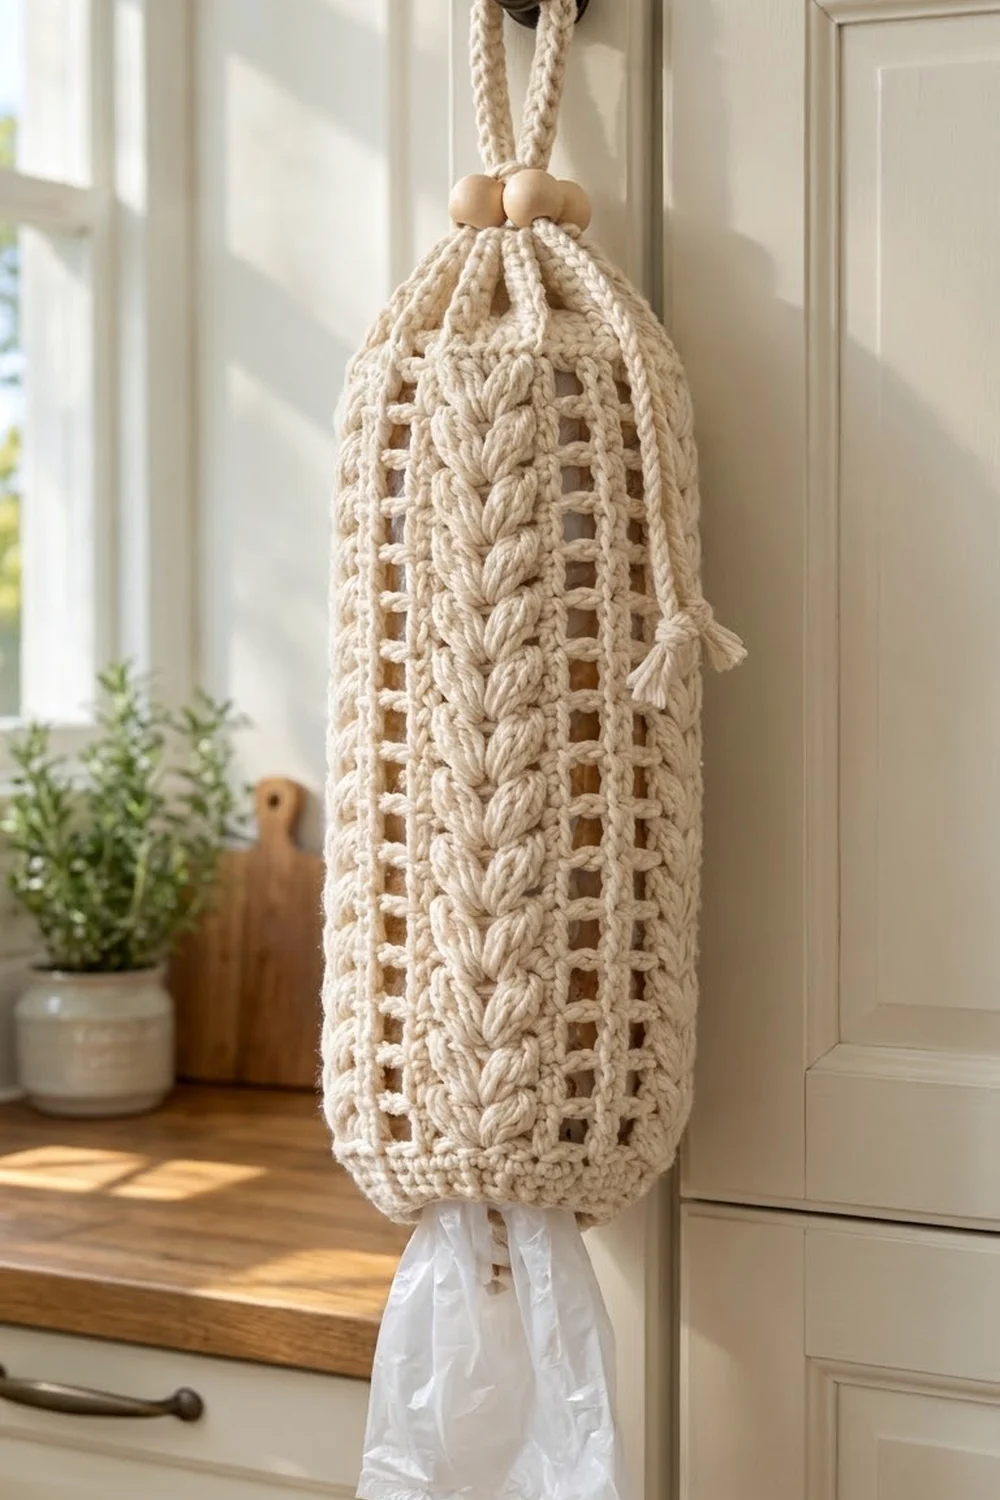
This holder stores plastic grocery bags in a tidy cream tube that hangs on a cabinet knob or pantry hook. Columns of stacked puff “wheat leaves” run from top to bottom, and an open filet ladder sits between each pair of leaf columns. You push bags in at the top and pull them out of the bottom.
The sample is made in a single cream colour of bulky cotton, with two natural wooden beads on the drawstring. It suits a farmhouse or Scandinavian kitchen. Warm taupe or oatmeal works just as well if you want a second holder for another door. The pattern uses US crochet terms throughout.
The finished holder is about 20.5 in (52.1 cm) tall from the bottom rim to the gathered top. The hanging loop adds another 6 in (15.2 cm). The tube lies flat at about 9 in (22.9 cm) wide, and when it hangs it is about 5.7 in (14.5 cm) across.
You work one flat panel in rows and then seam it into a tube. After that you add a narrowed single crochet rim at the bottom, an eyelet band at the top, a drawstring with beads, and a hanging loop. There is nothing to assemble except one seam.
Finished Size and Construction
- Finished size: 20.5 in (52.1 cm) tall × 9 in (22.9 cm) flat width, plus a 6 in (15.2 cm) loop
- Skill level: Easy-intermediate
- Terminology: US crochet terms
- Yarn weight: Bulky (#5) cotton or cotton blend
- Hook: 6 mm (US J-10)
- Number of pieces: 1 main panel (seamed into a tube), plus 2 cords (drawstring and loop)
- Layout: Single tube with 6 leaf columns and 6 mesh strips around it
- Panel size before seaming: 18.4 in (46.7 cm) wide × 18 in (45.7 cm) tall
- Size before border: Tube 18 in (45.7 cm) tall, 18 in (45.7 cm) around
- Border depth: Bottom rim 1 in (2.5 cm); top eyelet band 1.5 in (3.8 cm)
Materials
Yarn: Choose a smooth, firm bulky cotton or cotton-blend yarn. Cotton holds its shape when the tube is stuffed with bags, and it shows the puff leaves clearly. Avoid fuzzy or very stretchy acrylic, because the mesh windows will sag.
- Cream: 180 g, about 234 m (based on 130 m per 100 g)
This quantity includes a margin of roughly 20% for your gauge swatch, the cords, and any differences in tension.
Tools and notions:
- 6 mm (US J-10) crochet hook
- 2 wooden beads, 20 mm (0.8 in) across, with holes at least 6 mm (0.25 in) wide
- Tapestry needle
- 4 locking stitch markers
- Scissors and tape measure
- Rust-proof pins and a spray bottle for blocking
Abbreviations (US Terms)
- ch – chain
- sl st – slip stitch
- sc – single crochet
- sc2tog – single crochet 2 together
- dc – double crochet
- sk – skip
- sp – space
- st(s) – stitch(es)
- RS / WS – right side / wrong side
- rep – repeat
Special stitches
- Puff: (Yarn over, insert hook in the stitch, pull up a loop to dc height) 3 times, then yarn over and pull through all 7 loops on the hook.
- V-puff: Work (puff, ch 1, puff) in the same stitch. Each V-puff counts as 3 sts: puff, ch-1 sp, puff.
Counting rules: In this pattern, every ch-1 sp, every dc and every puff counts as 1 stitch. The beginning ch-3 counts as 1 dc.
Gauge and Checkpoints
Pattern gauge: 16 sts (2 repeats) = 6 in (15.2 cm) wide, and 8 rows = 6 in (15.2 cm) tall, measured in pattern.
Test piece first: Ch 19. Work Row 1 as written below to get 17 sts. Then work Rows 2–3 four times so that the swatch has 9 rows. Measure across the 16 sts between the two outer leaf-edge dc. It should be 6 in (15.2 cm). The 8 rows above Row 1 should also measure 6 in (15.2 cm).
Checkpoints on the real panel:
- After Row 1: 49 sts, 18.4 in (46.7 cm) wide
- After Row 9: 6.75 in (17.1 cm) tall
- After Row 24: 18 in (45.7 cm) tall
If your swatch is too big, go down 0.5 mm in hook size. If it is too small, go up 0.5 mm. If only the height is off, you can add or remove one pair of pattern rows (Rows 2–3). Width cannot be adjusted by changing rows, because 49 sts is fixed by the six repeats, so correct width with your hook.
Main Panel
The panel is worked flat. The foundation chain becomes the bottom edge.
Foundation: Ch 51.
Row 1 (WS): Dc in 4th ch from hook. The skipped 3 chains count as the first dc. Dc in each ch across, then turn. (49 sts)
Row 2 (RS, leaf row): Ch 3 (counts as dc). Then work the following 6 times:
- ch 1, sk next st, dc in next st
- ch 1, sk next st, dc in next st
- sk next st, V-puff in next st, sk next st, dc in next st
Turn. (49 sts: 1 starting dc + 6 repeats × 8 sts)
Each repeat uses exactly 8 sts of the row below and makes 8 new sts: ch 1, dc, ch 1, dc, puff, ch 1, puff, dc. The two ch-1 sps form the two mesh windows, and the V-puff sits centered between two leaf-edge dc.
Row 3 (WS): Ch 3 (counts as dc). Then work the following 6 times:
- dc in next puff, dc in next ch-1 sp, dc in next puff
- dc in next dc, ch 1, sk next ch-1 sp
- dc in next dc, ch 1, sk next ch-1 sp
- dc in next dc
The last dc of the final repeat goes in the top of the turning ch-3. Turn. (49 sts: 1 starting dc + 6 repeats × 8 sts)
Row 3 smooths the leaf section into 5 solid dc. The center dc of that group, worked into the ch-1 sp, is where the next V-puff goes.
Row 4 (RS): Ch 3. Then work the following 6 times:
- ch 1, sk ch-1 sp, dc in next dc
- ch 1, sk ch-1 sp, dc in next dc
- sk next dc, V-puff in next (center) dc, sk next dc, dc in next dc
The last dc goes in the top of the turning ch-3. Turn. (49 sts)
Rows 5–23: Repeat Row 3 and Row 4 alternately, ending with a Row 3. (Each row has 49 sts.) You now have 11 leaf rows. Each new V-puff opens upward over the one below, which stacks them into a wheat-ear column.
Row 24 (RS, top band): Ch 3. Dc in each dc and in each ch-1 sp across, with the last dc in the top of the turning ch. (49 sts)
Do not fasten off. Leave a 24 in (61.0 cm) tail for seaming, then cut the yarn.
Checkpoint: The panel should measure 18.4 in (46.7 cm) wide × 18 in (45.7 cm) tall, with six leaf columns. A leaf-edge dc runs along each side edge.
Seaming the Tube
Fold the panel with the RS facing out so that the two side edges meet. Thread the tail onto a tapestry needle.
Join the edges with mattress stitch, working row by row from Row 24 down to Row 1. For each row, pick up the post of the edge dc on one side and then the post of the edge dc on the other side. That is 24 rows, or 2 posts per row.
Pull each stitch just snug enough to close the gap. The seam should lie flat and form one solid vertical bar at the edge of a mesh strip. It should not pucker. Do not pull tight, or the seam will be shorter than 18 in (45.7 cm).
Checkpoint: The tube is 18 in (45.7 cm) tall and about 18 in (45.7 cm) around. The seam takes up about 0.4 in (1.0 cm) of the 18.4 in (46.7 cm) panel width. Laid flat, the tube measures 9 in (22.9 cm) wide.
Border: Bottom Rim and Top Eyelet Band
Border gauge: 11 sc = 4 in (10.2 cm); 3 sc rounds = 1 in (2.5 cm).
Since the holder is a tube, the border is worked in rounds, not in sides. All counts below are the complete total for each round.
Bottom Rim
Join the yarn with sc at the seam on the foundation-chain edge, and work in the remaining loops of the chain.
Rnd 1: Sc2tog over the last foundation st of one side and the first foundation st of the other side, so the two seam stitches merge into one. Sc in each of the remaining 47 foundation sts. Sl st to the first st. (48 sc: 47 worked 1-per-stitch + 1 sc2tog)
Rnd 2: Ch 1. Work [sc in each of next 4 sts, sc2tog] 8 times. Sl st to the first sc. (40 sc)
Rnd 3: Ch 1. Work [sc in each of next 3 sts, sc2tog] 8 times. Sl st to the first sc, then fasten off. (32 sc)
The opening is about 11.6 in (29.5 cm) around. That is loose enough to pull a bag through and firm enough to hold the rest in.
Top Eyelet Band
Join the yarn at the seam on Row 24.
Rnd 1: Sc2tog over the two seam stitches. Sc in each of the remaining 47 sts. Sl st to the first st. (48 sc: 47 worked 1-per-stitch + 1 sc2tog)
Rnd 2 (eyelets): Ch 4 (counts as dc + ch 1), sk next st. Work [dc in next st, ch 1, sk next st] 23 times. Sl st to the 3rd ch of the starting ch-4. (48 sts: 24 dc + 24 ch-1 sps)
Rnd 3: Ch 1. Sc in each dc and in each ch-1 sp around. Sl st to the first sc, then fasten off. (48 sc)
Why the Math Works
The panel has 49 sts. Merging the two seam edge stitches with one sc2tog gives an even 48. That number divides cleanly by 8 for the decreases at the bottom (48 → 40 → 32), and by 2 for the 24 eyelets at the top. It also means 8 stitches sit over each 3 in (7.6 cm) leaf-and-mesh repeat, so the border lies flat without ruffling or cupping.
Drawstring, Beads, and Hanging Loop
Drawstring: Ch 90, or until the chain measures 32 in (81.3 cm) without stretching. Sl st into the back bump of the 2nd ch from the hook and of each ch back along. This gives a firm, round cord. Fasten off and weave in the ends.
Hanging loop: Ch 40, or until the chain measures 14 in (35.6 cm). Sl st back along it the same way, then fasten off. Leave an 8 in (20.3 cm) tail at each end.
Assembly:
- Weave the drawstring in and out of the 24 eyelets of the top band’s Rnd 2. Start and finish at the center front, opposite the seam.
- Thread each drawstring end through one wooden bead.
- Tie an overhand knot about 2 in (5.1 cm) from each end, so the beads cannot slide off.
- Fold the hanging loop in half. From the inside, sew both of its ends securely to Rnd 1 of the top band at the back, directly above the seam.
- Gather the drawstring firmly so the loop emerges from the center of the gathered top. Slide the beads down to lock the gather.
Final Blocking
- Lay the tube flat with the seam centered at the back, and pin it to 9 in (22.9 cm) wide × 18 in (45.7 cm) tall, measuring the body only.
- Ease each leaf column so it runs straight, and square up each mesh window with your fingertips.
- Mist the tube until it is evenly damp. Do not soak it.
- Let it dry completely, then flip it over and mist the back if it curls.
- Unpin it, gather the drawstring, and hang it. The bottom rim will settle into a neat ring once bags are inside.
Final Quality-Control Checklist
- 49 sts in every panel row, with 6 V-puff leaves in each leaf row
- 11 leaves stacked straight in each column
- Seam flat and 18 in (45.7 cm) long, with no puckers
- Bottom rim counts are 48, 40 and 32 sc
- Top band has 24 evenly spaced eyelets
- Drawstring is 32 in (81.3 cm) long, with both beads knotted on
- Hanging loop is securely sewn, and the loop above the gathered top is 6 in (15.2 cm) tall
- All ends woven in at least 2 in (5.1 cm) inside the solid sections
Troubleshooting
Leaves lean or drift sideways. The V-puff must go into the center dc of the 5-dc leaf group. Count to it from the leaf-edge dc on each row.
Puffs look flat. Pull each loop up to full dc height before closing the puff, and keep the closing yarn-over firm.
Mesh windows are uneven. Make every ch-1 the same size. If the windows look tall and narrow, your chains are too tight.
Panel is narrower than 18.4 in (46.7 cm). Go up a hook size and work a new swatch. Do not add stitches, because the pattern needs exactly 6 repeats.
Bottom opening is too tight. Skip Rnd 3 and finish after Rnd 2, which leaves 40 sc, about 14.5 in (36.8 cm) around.
Bags fall out on their own. Work one extra round of [sc 2, sc2tog] 8 times on the bottom rim, for 24 sc.
Care
Hand wash in cool water with mild soap, gently press out the water, and dry flat. Re-shape the leaf columns while the holder is damp.
Final Notes
Each measurement leads to the next. The gauge swatch gives 16 sts = 6 in (15.2 cm), so 49 sts make an 18.4 in (46.7 cm) panel, and 24 rows make an 18 in (45.7 cm) height. Seaming turns the panel into an 18 in (45.7 cm) tube that lies 9 in (22.9 cm) flat. The 1 in (2.5 cm) bottom rim and the 1.5 in (3.8 cm) top band bring the holder to 20.5 in (52.1 cm), and the hanging loop adds 6 in (15.2 cm), for a total hanging length of 26.5 in (67.3 cm). Check each stage before moving on and the holder will finish to size.
Happy crocheting!