

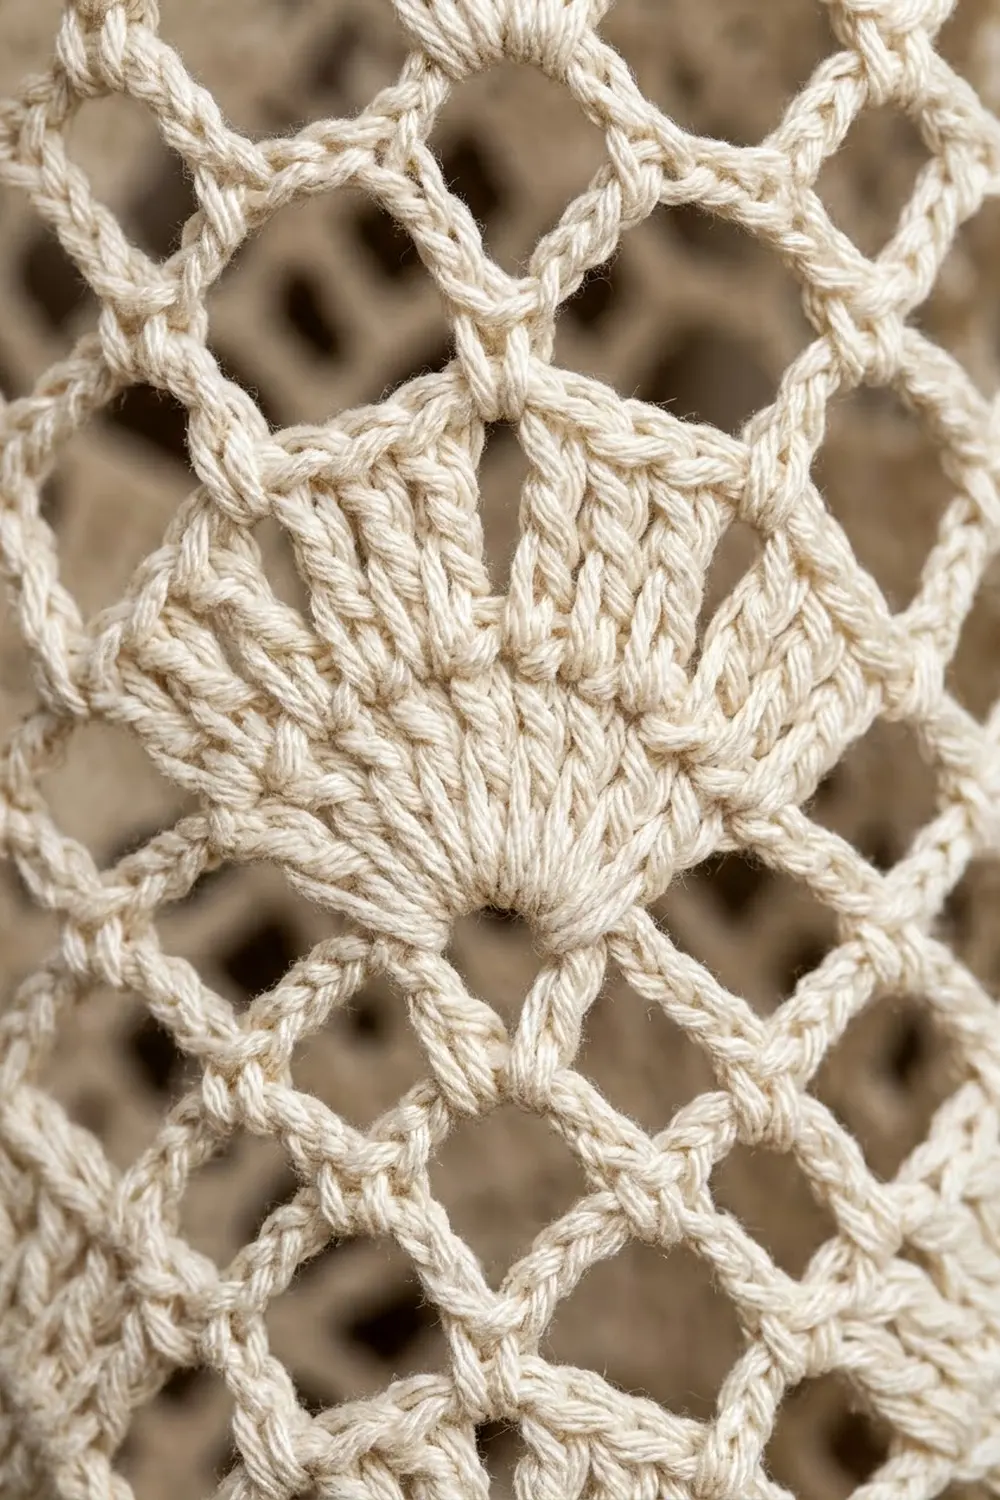
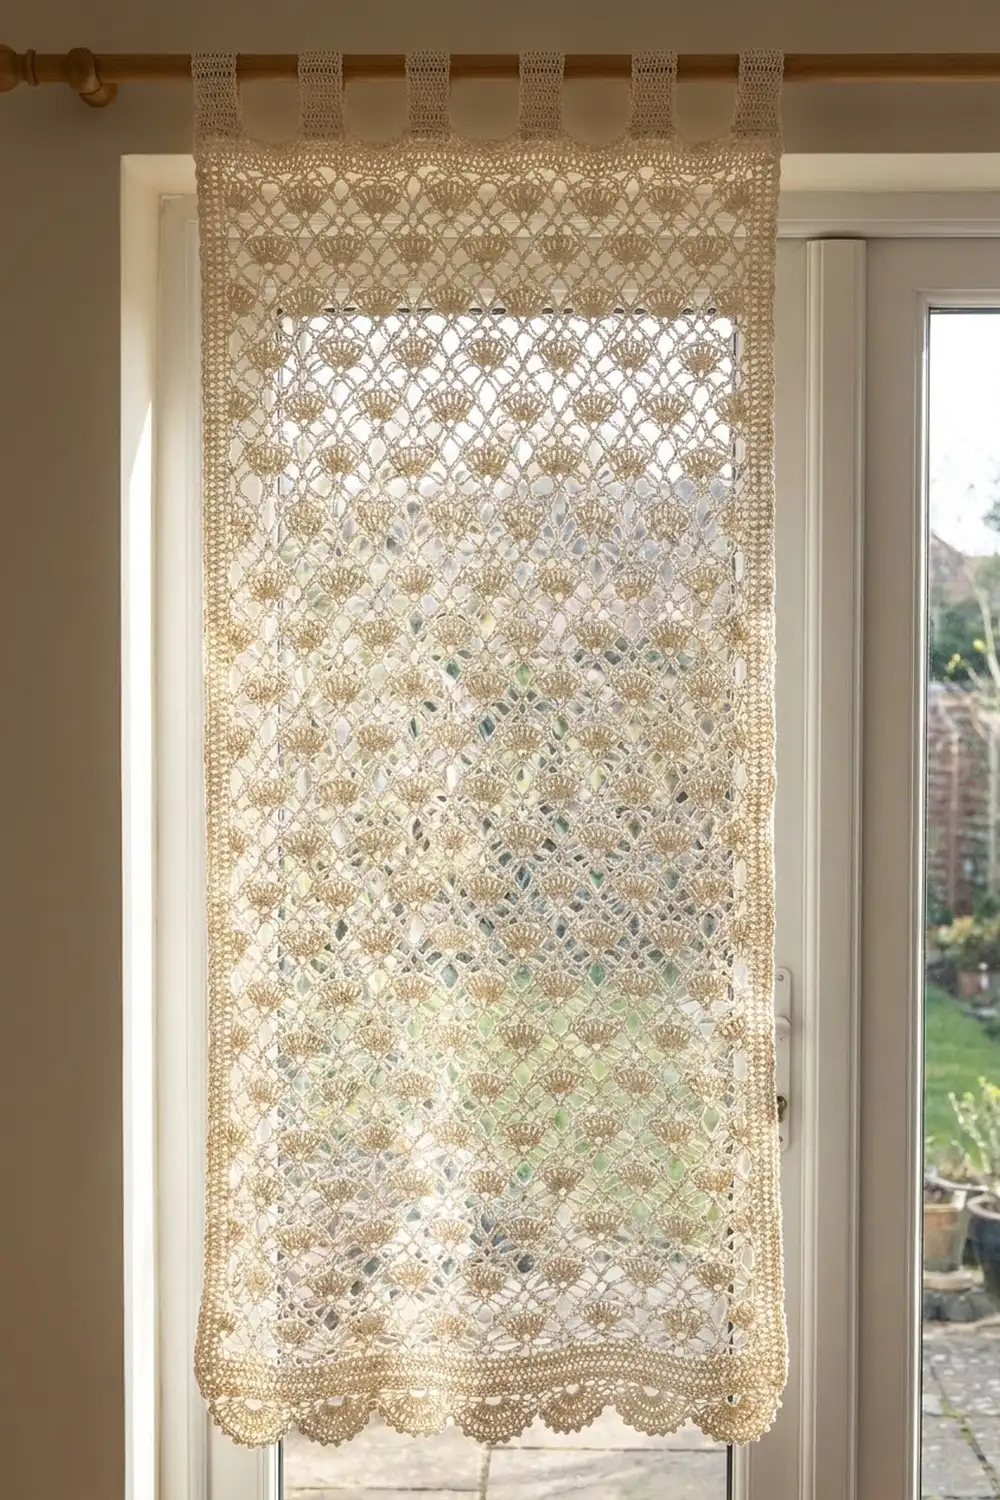
This curtain panel is a tall rectangle of cream cotton lace. Rows of nine-stitch fans sit inside a diamond-shaped chain lattice. The bottom edge ends in rounded scallops trimmed with tiny picots, and a row of fabric tabs along the top slides onto a curtain rod.
The design uses one color only, a soft cream or ivory. That keeps the fan-and-diamond texture easy to read and lets daylight show through every open space. The style is relaxed and cottage-inspired, and it suits a bright living room or bedroom window.
The pattern uses US crochet terms. One finished panel measures 42.5 in (108.0 cm) wide and 79.5 in (201.9 cm) long from the top edge to the scallop points. The tab loops add about 2 in (5.1 cm) above that. For a pair like the one in the photos, make the panel twice.
Each panel is crocheted in one piece. You start with a foundation chain at the top edge and work downward in rows of alternating fans and chain nets. The last fan row becomes the scalloped hem. After that you add a picot trim to the hem, single crochet down both sides, and work the hanging tabs along the top.
Finished Size and Construction
- Finished size: 42.5 in (108.0 cm) wide x 79.5 in (201.9 cm) long, not counting the tabs
- Skill level: Easy-intermediate
- Terminology: US crochet terms
- Yarn weight: DK (#3), cotton
- Hook: 4.0 mm (G-6)
- Number of pieces: 1 panel, made in one piece
- Layout: 14 fan repeats across and 31 four-row repeats down, below a 2-row header
- Piece size before border: 42 in (106.7 cm) wide x 78.5 in (199.4 cm) long
- Border depth: scalloped hem trim 0.75 in (1.9 cm); side edging 0.25 in (0.6 cm) per side; top row 0.25 in (0.6 cm)
- Tabs: 10 tabs, each 2.25 in (5.7 cm) wide, folded into 2 in (5.1 cm) loops
Materials
Yarn: Use a smooth, mercerized or combed DK cotton. Cotton holds the fans crisply, keeps its shape after blocking, and stands up to sunlight and washing better than acrylic. Stay away from very splitty or fuzzy yarns, because they hide the lattice. A 50 g ball of DK cotton usually has about 120 m, so plan on roughly 20 balls per panel.
- Cream / ivory: about 1,000 g (approx. 2,400 m) per panel, or 2,000 g (approx. 4,800 m) for a pair
These quantities include a margin of about 10% for the swatch, blocking differences, and any rows you might pull out. Buy all of your yarn from the same dye lot.
Tools:
- 4.0 mm (G-6) crochet hook
- Tapestry needle
- Stitch markers (at least 15)
- Measuring tape
- Rust-proof pins and blocking mats, or a clean carpet covered with a sheet
- Spray bottle
Abbreviations (US Terms)
- ch – chain
- sl st – slip stitch
- sc – single crochet
- dc – double crochet
- sk – skip
- sp – space
- st(s) – stitch(es)
- RS / WS – right side / wrong side
Special stitches:
- Fan: 9 dc worked into the same st or sp.
- Half fan: at the edge of a row, ch 3 (this counts as the first dc), then 4 dc in the same st. That makes 5 dc. At the end of a row, the half fan is simply 5 dc worked into the same st.
- Picot: ch 3, then sl st into the first of those 3 ch.
Gauge and Checkpoints
Make a swatch before you start the panel. It takes about an hour and can save you from a curtain that ends up 6 in (15.2 cm) too wide.
Pattern gauge: 1 fan repeat (12 sts) = 3 in (7.6 cm) wide. 4 pattern rows (Rows 3–6) = 2.5 in (6.4 cm) tall.
Single crochet gauge: about 4 sc = 1 in (2.5 cm) along the edges.
Swatch: Ch 38. Work Rows 1–6, then work Rows 3–6 once more (10 rows total). The swatch has 3 fans across.
- Width: 9 in (22.9 cm)
- Height after Row 6: 3.5 in (8.9 cm)
- Height after Row 10: 6 in (15.2 cm)
Before measuring, pin the swatch out lightly and mist it with water. Lace always measures larger once it is opened up.
If the swatch is too big, go down one hook size, to 3.75 mm (F-5). If it is too small, go up one size, to 4.5 mm (7). Width matters more than height, because you can always add or remove a 4-row repeat to adjust the length.
Panel checkpoints (measured lightly stretched):
- After Row 2: 42 in (106.7 cm) wide, 1 in (2.5 cm) tall
- After Row 18 (4 repeats): 11 in (27.9 cm) tall
- After Row 66 (16 repeats): 41 in (104.1 cm) tall
- After Row 126: 78.5 in (199.4 cm) tall
Panel
Foundation: Ch 170. This is a multiple of 12 plus 2: 14 repeats of 12, plus 1 st to finish the repeat and 1 turning ch.
Row 1 (WS): Sc in 2nd ch from hook and in each ch across, turn. (169 sc)
Row 2 (RS): Ch 1, sc in first sc. Sk 5 sc, fan in next sc, sk 5 sc, sc in next sc. Repeat from * across, turn. (14 fans, 15 sc)
Row 3 (WS, net row): Ch 5 (counts as dc + ch 2), sc in the center (5th) dc of the first fan. Ch 5, sc in the center dc of the next fan. Repeat from * across until all 14 fans have an sc. Ch 2, dc in the last sc, turn. (14 sc, 13 ch-5 loops, 2 ch-2 sps, 2 dc counting the turning ch)
Keep the ch-5 loops relaxed. They should arch slightly above the fan tops instead of pulling them flat.
Row 4 (RS, offset fan row): Work a half fan in the first dc. Sc in the next sc. Fan in the next ch-5 loop, sc in the next sc. Repeat from * 12 more times. Work 5 dc in the 3rd ch of the turning ch-5, turn. (2 half fans, 13 fans, 14 sc)
The full fans in this row sit directly above the sc of Row 2, and the sc sit above the fan centers. This half-repeat shift is what creates the diamond lattice.
Row 5 (WS, net row): Ch 1, sc in the first dc. Ch 5, sc in the center dc of the next full fan. Repeat from * 12 more times. Ch 5, sc in the top of the turning ch-3, turn. (15 sc, 14 ch-5 loops)
Row 6 (RS, fan row): Ch 1, sc in the first sc. Fan in the next ch-5 loop, sc in the next sc. Repeat from * across, turn. (14 fans, 15 sc)
Row 6 lines up with Row 2. Place a marker in the center dc of every fan if you find it hard to spot the centers in Rows 3 and 5.
Rows 7–126: Work Rows 3–6 another 30 times, which makes 31 repeats including the first one. End on a Row 6 fan row. Don’t fasten off.
The panel now measures 42 in (106.7 cm) x 78.5 in (199.4 cm). If your curtain needs to be longer or shorter, add or remove full 4-row repeats here. Each repeat is 2.5 in (6.4 cm).
Border
The border has three parts: the scalloped hem, the side edging, and the top row with tabs. All edge stitches follow the sc gauge of 4 sc per 1 in (2.5 cm). That gauge matches the panel, because the body is 169 sts across 42 in (106.7 cm) and 314 edge sc down 78.5 in (199.4 cm).
Scalloped hem
Hem Row 1 (WS): Turn. Ch 1, sc in the first sc. 2 sc in each of the 9 dc of the next fan (18 sc), sc in the next sc. Repeat from * across, turn. (14 x 18 = 252 sc over the fans + 15 valley sc = 267 sc)
Why 2 sc per dc: Each fan spreads into a half circle about 3 in (7.6 cm) across, so its outer curve is roughly 4.7 in (11.9 cm) long. At 4 sc per inch, that curve needs about 18–19 sc. Working 18 sc keeps the scallop flat, so it neither ruffles nor cups.
Hem Row 2 (RS): Ch 1, sc in the first sc. Sk the next sc. [Sc in each of the next 2 sc, picot] 8 times. Sk the next sc, sc in the next valley sc. Repeat from * across. Fasten off. (14 x 16 = 224 sc over the scallops + 15 valley sc = 239 sc; 112 picots)
Skipping the first and last sc of each scallop draws the valleys inward and gives each scallop a clear outline. The hem now adds 0.75 in (1.9 cm).
Side edging
With RS facing, join the yarn at the bottom corner of one long side. Ch 1, then sc evenly up the side as follows:
- 3 sc across the ends of the 2 hem rows (1 in Hem Row 1, 2 in Hem Row 2)
- 10 sc along each 4-row repeat, 31 times (3 sc in each dc-height row end of Rows 3 and 4, and 2 sc in each sc-height row end of Rows 5 and 6)
- 4 sc along Rows 1–2 (3 in the Row 2 end, 1 in the Row 1 end)
Fasten off. (3 + 310 + 4 = 317 sc)
Repeat on the other long side, starting at the top corner and working down, so you again have RS facing. (317 sc)
Why the math works: 317 sc divided by 4 sc per inch is 79.25 in (201.3 cm). That equals the body length of 78.5 in (199.4 cm) plus the 0.75 in (1.9 cm) hem. The edge lies flat without pulling the lace in or waving.
Top row
Top Row (RS): With RS facing, join at the top corner. Ch 1, sc in the end of the side edging row. Sc in each of the 169 foundation ch loops, then sc in the end of the other side edging row. Fasten off. (1 + 169 + 1 = 171 sc)
The finished width is now 42.5 in (108.0 cm), and the full length is 79.5 in (201.9 cm).
Tabs (make 10)
The 171 top sts divide into 10 tabs of 9 sts with 9 gaps of 9 sts: 90 + 81 = 171. The outer tabs sit flush with the corners.
Tab Rows 1–16: With RS facing, join the yarn in the first st of the tab position. Ch 1, sc in the same st and the next 8 sts, turn. (9 sc) For each of the next 15 rows, ch 1, sc in each sc, turn. (9 sc)
Fasten off, leaving a 12 in (30.5 cm) tail. Each tab is 2.25 in (5.7 cm) wide and 4 in (10.2 cm) long.
Fold the tab to the WS. Whipstitch the last row to the back of the same 9 sts of the Top Row. Skip 9 sts and start the next tab. The folded loops are 2 in (5.1 cm) tall and fit rods up to 1 in (2.5 cm) in diameter.
Final Blocking
- Weave in all ends, running each one for at least 2 in (5.1 cm) along solid sc or dc rather than through chain loops.
- Soak the panel in cool water with a little wool wash for 15 minutes. Press the water out gently and don’t wring it.
- Roll the panel in towels to remove most of the water.
- Lay it flat on mats or on a sheet over carpet. Pin the top edge straight at 42.5 in (108.0 cm).
- Pin both sides straight down to 79.5 in (201.9 cm), placing a pin every 4 in (10.2 cm).
- Pin each scallop point, then pin the valleys in line between them.
- Open the diamond loops with your fingers so the fans sit evenly.
- Let the panel dry completely. Leave the pins in for a few more hours after it feels dry.
Final Quality-Control Checklist
- There are 14 fans across every fan row, and each one has exactly 9 dc.
- Every net-row sc sits in a center (5th) dc.
- The full fans alternate position from one fan row to the next, forming clean diamonds.
- Each scallop has 8 picots and two skipped sc.
- Each side has 317 sc, and both sides measure 79.25 in (201.3 cm).
- The top row has 171 sc and 10 evenly spaced tabs.
- The panel blocks to 42.5 in (108.0 cm) x 79.5 in (201.9 cm), give or take 0.5 in (1.3 cm).
Troubleshooting
The diamonds look slanted. You may have worked an sc into the 4th or 6th dc of a fan. Mark the center dc of each fan.
The panel narrows as you go. Your ch-5 loops are getting tight. Loosen your chains or work them with a hook one size larger.
The scallops ruffle. Work Hem Row 1 with a firmer tension, or put 2 sc in only 8 of the 9 dc of each fan (17 sc per fan).
The scallops cup. Add 1 extra sc at the center dc of each fan (19 sc per fan) and adjust the picot repeat to fit.
The sides wave. You have too many edge sc. Work 9 sc per repeat instead of 10.
The sides pull in. You have too few edge sc. Add an extra sc every 2 repeats.
The tabs stretch. Use a smaller hook for the tabs, or work them in sc through the back loops only.
Care
Hand wash or machine wash on a gentle cool cycle inside a mesh bag, then lay flat to dry. To refresh the panel, lightly re-block it every few washes.
Final Notes
Everything in this panel follows one measurement chain. A swatch that measures 3 in (7.6 cm) per fan and 2.5 in (6.4 cm) per four rows gives a body of 42 in (106.7 cm) x 78.5 in (199.4 cm). The 0.75 in (1.9 cm) hem and 0.25 in (0.6 cm) edging bring the panel to 42.5 in (108.0 cm) x 79.5 in (201.9 cm). As long as you match the swatch and check the counts after each section, the panel will block square and hang straight. Make a second panel the same way for a matching pair.
Happy crocheting!