

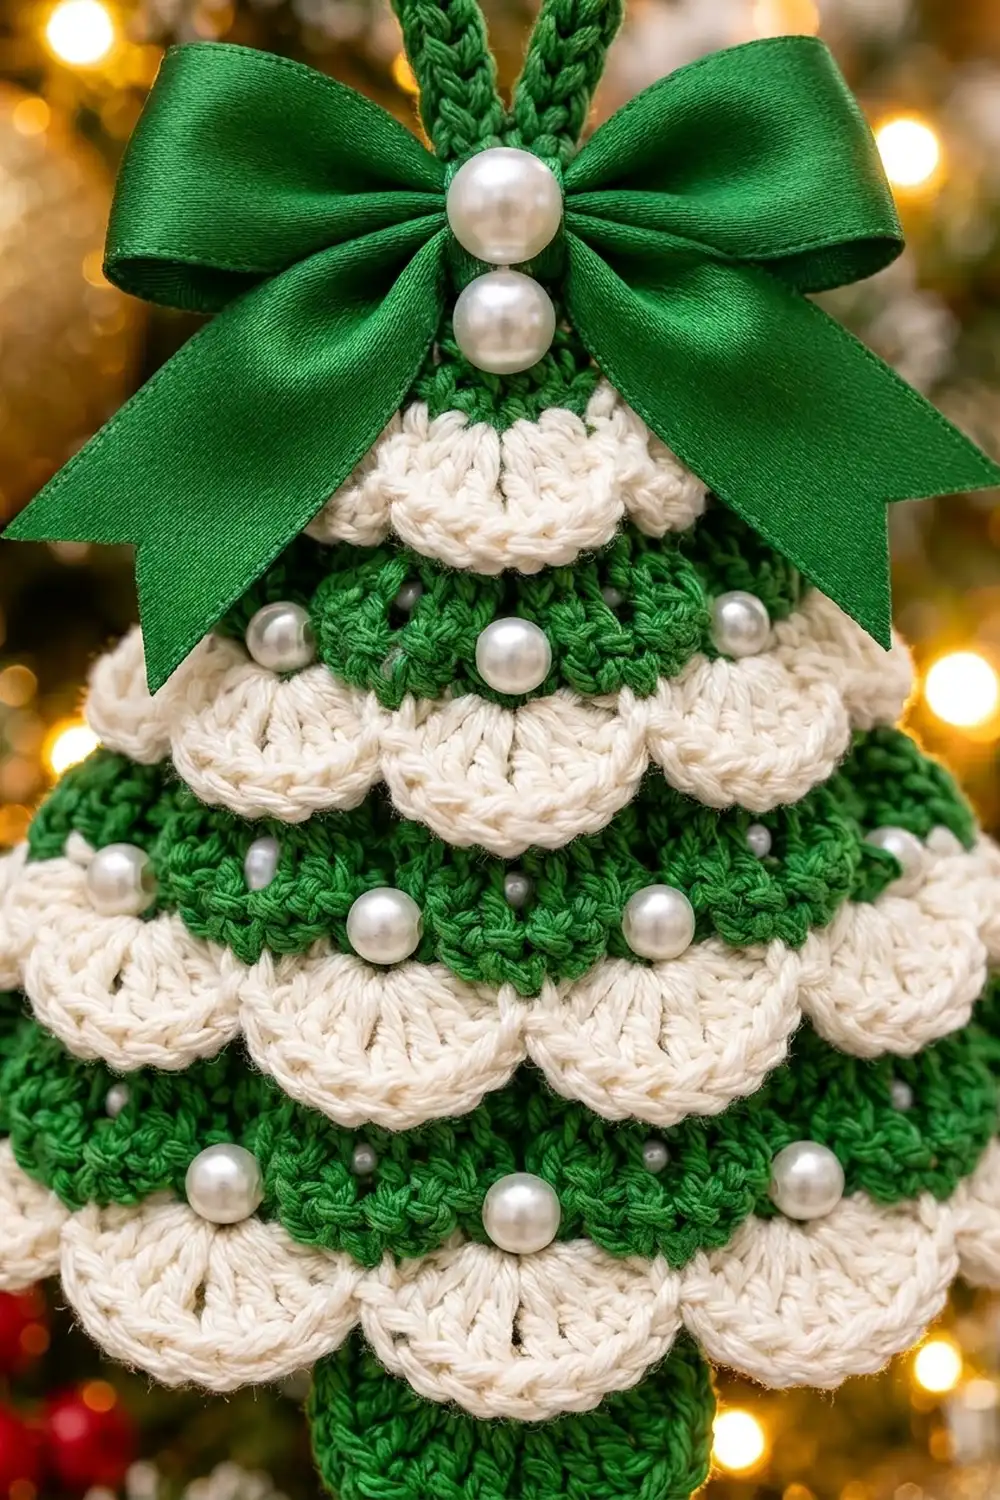
This Pearl Frost Christmas Tree Ornament is a small, flat tree with a lot of texture. A green triangle forms the body, and six cream scallop tiers sit on it like layers of fresh snow. Little pearl beads fill the green bands between the tiers. A round green trunk shows below the lowest tier, and a crocheted hanging loop and a green satin bow finish the top.
The palette is classic and calm: forest green and soft cream, with white pearls and a glossy green ribbon. It looks great on a tree, on a gift, or hanging in a window.
The pattern uses US crochet terms. The finished ornament is about 4.75 in (12.1 cm) wide at the base and 5 in (12.7 cm) tall from tip to trunk. The hanging loop adds 1.25 in (3.2 cm), for a total of 6.25 in (15.9 cm).
The body is worked top down in single crochet rows. Every fourth row is worked through one loop only, so a strip of free loops (a “ledge”) is left on the right side. You then work the cream scallop tiers into those ledges. After that comes a green edge with the loop, then a small trunk circle sewn on the back, then pearls and the bow.
Finished Size and Construction
- Finished size: 4.75 in (12.1 cm) wide x 5 in (12.7 cm) tall, plus a 1.25 in (3.2 cm) loop
- Skill level: Easy+ (simple stitches, careful loop tracking)
- Terminology: US crochet terms
- Yarn weight: Light / DK (#3) cotton
- Hook: 3.25 mm (US D/3)
- Number of pieces: 1 ornament (tree body plus a small trunk circle sewn behind it)
- Layout: single standalone ornament, no joining
- Body size before border: 4.5 in (11.4 cm) wide at the base x 3.67 in (9.3 cm) tall
- Trunk circle: 1.8 in (4.6 cm) across
- Border depth: about 0.15 in (0.4 cm), side edges only
Materials
Cotton or a cotton blend is the best choice. It keeps the shells crisp and holds its shape after blocking. Acrylic will work, but the scallops will be softer and may curl.
- Green (body, edge, loop, trunk): 8 g, about 20 m
- Cream (scallop tiers): 4 g, about 10 m
These quantities include a margin for your gauge check and sewing tails.
Tools and notions:
- 3.25 mm (US D/3) crochet hook
- Tapestry needle
- Sewing needle and white or clear thread
- 22 pearl beads, 4 mm (buy a few spares)
- 12 in (30.5 cm) of 5/8 in (1.6 cm) green satin ribbon
- Scissors, stitch markers, rust-proof pins, spray bottle
- Optional: fabric glue or fray check for the ribbon ends
Abbreviations (US Terms)
- ch – chain
- sc – single crochet
- dc – double crochet
- sl st – slip stitch
- sk – skip
- inc – 2 sc in the same stitch
- FLO – front loop only
- MR – magic ring
- RS / WS – right side / wrong side
Special stitch – Shell: work 5 dc in the same stitch.
Ledge row: a WS row worked in FLO. On a WS row, the front loop is the loop nearest you, so working in it leaves the RS loop of the row below free. Those free RS loops form a ledge for a scallop tier.
Gauge and Checkpoints
Gauge: 22 sc and 24 rows = 4 in (10.2 cm), worked flat in sc with the 3.25 mm hook. That is 5.5 stitches and 6 rows per 1 in (2.5 cm).
Make the body first and measure it before you add any tiers. The body works as your gauge swatch.
Checkpoints (body, before border):
- After Row 6 (9 sts): 1.6 in (4.1 cm) wide at the base, 1 in (2.5 cm) tall
- After Row 12 (15 sts): 2.75 in (7.0 cm) wide, 2 in (5.1 cm) tall
- After Row 22 (25 sts): 4.5 in (11.4 cm) wide, 3.67 in (9.3 cm) tall
Being within 1/8 in (0.3 cm) is fine. If the piece is more than 1/4 in (0.6 cm) too big, go down a hook size. If it is more than 1/4 in (0.6 cm) too small, go up one size.
Height matters most here. Ledges sit 4 rows apart, which is about 0.67 in (1.7 cm). The shells are about 0.5 in (1.3 cm) tall, so this leaves a green band about 0.17 in (0.4 cm) deep between tiers for the pearls.
Tree Body
Use green and work in rows. The ch 1 at the start of each row does not count as a stitch. Turn at the end of every row.
Row 1 (RS): Ch 2, 3 sc in 2nd ch from hook. (3 sts)
Row 2 (WS): Ch 1, inc in first st, sc in next st, inc in last st. (5 sts)
Row 3: Ch 1, sc in each st across. (5 sts)
Row 4 (WS, Ledge 1): Ch 1, working in FLO: inc in first st, sc in next 3 sts, inc in last st. (7 sts) This leaves 5 free loops on the RS of Row 3.
Row 5: Ch 1, sc across through both loops. (7 sts)
Row 6: Ch 1, inc, sc in next 5 sts, inc. (9 sts)
Row 7: Ch 1, sc across. (9 sts)
Row 8 (Ledge 2): Ch 1, in FLO: inc, sc in next 7 sts, inc. (11 sts) Ledge 2 = 9 free loops.
Row 9: Sc across. (11 sts)
Row 10: Inc, sc in next 9 sts, inc. (13 sts)
Row 11: Sc across. (13 sts)
Row 12 (Ledge 3): In FLO: inc, sc in next 11 sts, inc. (15 sts) Ledge 3 = 13 free loops.
Row 13: Sc across. (15 sts)
Row 14: Inc, sc in next 13 sts, inc. (17 sts)
Row 15: Sc across. (17 sts)
Row 16 (Ledge 4): In FLO: inc, sc in next 15 sts, inc. (19 sts) Ledge 4 = 17 free loops.
Row 17: Sc across. (19 sts)
Row 18: Inc, sc in next 17 sts, inc. (21 sts)
Row 19: Sc across. (21 sts)
Row 20 (Ledge 5): In FLO: inc, sc in next 19 sts, inc. (23 sts) Ledge 5 = 21 free loops.
Row 21: Sc across. (23 sts)
Row 22: Inc, sc in next 21 sts, inc. (25 sts) Do not fasten off.
Every even row adds 2 stitches, and every odd row keeps the same count. The ledges have 5, 9, 13, 17 and 21 free loops, and the last row has 25 stitches. Each of these numbers is (4 x shells) + 1, which is exactly what the scallop repeat needs.
Green Edge and Hanging Loop
Work this before the tiers so the sides are neat where the scallops reach them.
Border gauge: 1 sc per row end, plus 1 extra sc at each corner.
Continue with the green from Row 22, RS facing. Turn the work so you can go up the side edge.
Right edge: 2 sc in the end of Row 22, 1 sc in each row end from Row 21 to Row 2 (20 sc), 2 sc in the end of Row 1. (24 sc)
Tip and loop: Sc in the foundation ch at the tip, ch 16, sl st in the same foundation ch to close the loop. Work 24 sc into the ch-16 loop, then sl st in the tip sc. (Loop: 24 sc)
Left edge: 2 sc in the end of Row 1, 1 sc in each row end from Row 2 to Row 21 (20 sc), 2 sc in the end of Row 22. (24 sc) Fasten off and weave in.
Edge total: 24 + 1 tip sc + 24 loop sc + 24 = 73 sc.
Why the math works: Each slanted side runs 2.27 in (5.8 cm) across and 3.67 in (9.3 cm) up, so the slant is about 4.3 in (10.9 cm) long. At 5.5 sts per inch, that length needs 23.7 sc, so 24 sc keeps the edge flat. With fewer stitches the edge cups, and with more it ruffles.
The ch-16 loop is about 2.9 in (7.4 cm) around. Packing 24 sc into it makes it firm, so it stands about 1.25 in (3.2 cm) tall. The bottom edge (Row 22) gets no green trim because Tier 6 goes there.
Scallop Tiers
Use cream. Hold the tree RS facing and upside down, with the base at the top. That way each shell grows toward the base and hangs down over the green once the tree is turned upright.
For each tier, join cream with a sl st in the first free loop of the ledge. Then repeat: sk 1, shell in next, sk 1, sl st in next. Fasten off after each tier and leave the tails on the WS.
Tier 1 (Ledge 1, 5 loops): Sl st, repeat 1 time. (1 shell: 5 dc + 2 sl st)
Tier 2 (Ledge 2, 9 loops): Sl st, repeat 2 times. (2 shells: 10 dc + 3 sl st)
Tier 3 (Ledge 3, 13 loops): Sl st, repeat 3 times. (3 shells: 15 dc + 4 sl st)
Tier 4 (Ledge 4, 17 loops): Sl st, repeat 4 times. (4 shells: 20 dc + 5 sl st)
Tier 5 (Ledge 5, 21 loops): Sl st, repeat 5 times. (5 shells: 25 dc + 6 sl st)
Tier 6 (Row 22, both loops, 25 sts): Sl st, repeat 6 times. (6 shells: 30 dc + 7 sl st)
Check: loops used = 1 + (4 x shells). For example, 1 + 24 = 25 for Tier 6. The last sl st of every tier lands in the last stitch, so each tier reaches both edges.
Trunk
Use green and work in continuous rounds without joining. Mark the first stitch of each round.
Rnd 1: 6 sc in MR. (6 sts)
Rnd 2: Inc in each st around. (12 sts)
Rnd 3: (Sc, inc) 6 times. (18 sts)
Rnd 4: (2 sc, inc) 6 times. (24 sts)
Rnd 5: (3 sc, inc) 6 times. (30 sts)
Sl st in the next st and fasten off, leaving a 10 in (25.4 cm) tail. The circle should measure 1.8 in (4.6 cm) across.
Final Blocking
- Weave in all ends except the trunk tail.
- Spray the tree and trunk until damp but not soaked.
- Pin the tree flat, WS down, at 4.75 in (12.1 cm) across the base edge and 3.67 in (9.3 cm) from the tip to Row 22.
- Pin the center dc of each shell down so the scallops fan out evenly over the green below.
- Pin the loop upright in an oval about 1.25 in (3.2 cm) tall.
- Pin the trunk flat as a 1.8 in (4.6 cm) circle. Let everything dry completely.
- Trunk: Center the trunk behind the base. Let 1.25 in (3.2 cm) of it hang below Row 22, so about 0.75 in (1.9 cm) shows below the shells. Whipstitch the top half to the WS of the body and fasten off.
- Pearls: With sewing thread, sew pearls in the green band below each of Tiers 1–5. Place one at each end of the band and one in each valley between shells. That is 2, 3, 4, 5 and 6 pearls, for 20 in total.
- Bow: Tie the ribbon into a bow about 2.5 in (6.4 cm) wide. Trim the ends on the diagonal and seal them. Sew the bow just below the loop, over the tip and the top of Tier 1. Sew 2 pearls down the center of the knot.
Final Quality-Control Checklist
- The body has 22 rows, with 25 sts in Row 22
- There are five ledges, all on the RS, 4 rows apart
- The tiers have 1, 2, 3, 4, 5 and 6 shells, from top to bottom
- Every tier starts and ends at the edge stitches
- Each side edge has 24 sc and lies flat
- The loop is firm and stands about 1.25 in (3.2 cm) tall
- The trunk shows about 0.75 in (1.9 cm) below Tier 6
- There are 20 pearls in the bands and 2 on the bow, all sewn on securely
- The finished size is about 4.75 in (12.1 cm) x 5 in (12.7 cm), plus the loop
Troubleshooting
Free loops show on the WS instead of the RS. You worked the back loop on the ledge rows. Rip back and use the loop nearest you on those WS rows.
Shells stand up instead of hanging down. You worked the tier with the tree right side up. Rework it with the base at the top, then spray it and pin the shells down.
Shells completely cover the green bands. Your dc are tall compared with your rows. Pull up the first loop of each dc less, or use 5 hdc per shell instead.
Side edges ripple. There are too many edge stitches. Skip the extra corner sc.
Side edges cup. There are too few edge stitches. Add 1 sc in the middle of each side.
Loop is floppy. Work the 24 sc more tightly, or add a round of sl st around the outer edge of the loop.
Ornament curls. Block it again and let it dry fully while pinned.
Care
Spot clean with cool water and mild soap, press it flat with your fingers, and dry it flat. Do not machine wash it, because the ribbon and pearls are sewn on.

Final Notes
Each measurement builds on the one before it. A gauge of 22 sc and 24 rows to 4 in (10.2 cm) gives a 25-stitch body that is 4.5 in (11.4 cm) wide and 3.67 in (9.3 cm) tall. With a ledge every 4 rows, the tiers are spaced 0.67 in (1.7 cm) apart. The 24-stitch side edges bring the width to 4.75 in (12.1 cm). The trunk and loop bring the total height to 6.25 in (15.9 cm). Check the body against the checkpoints first, and everything after it will fall into place.
Happy crocheting!