

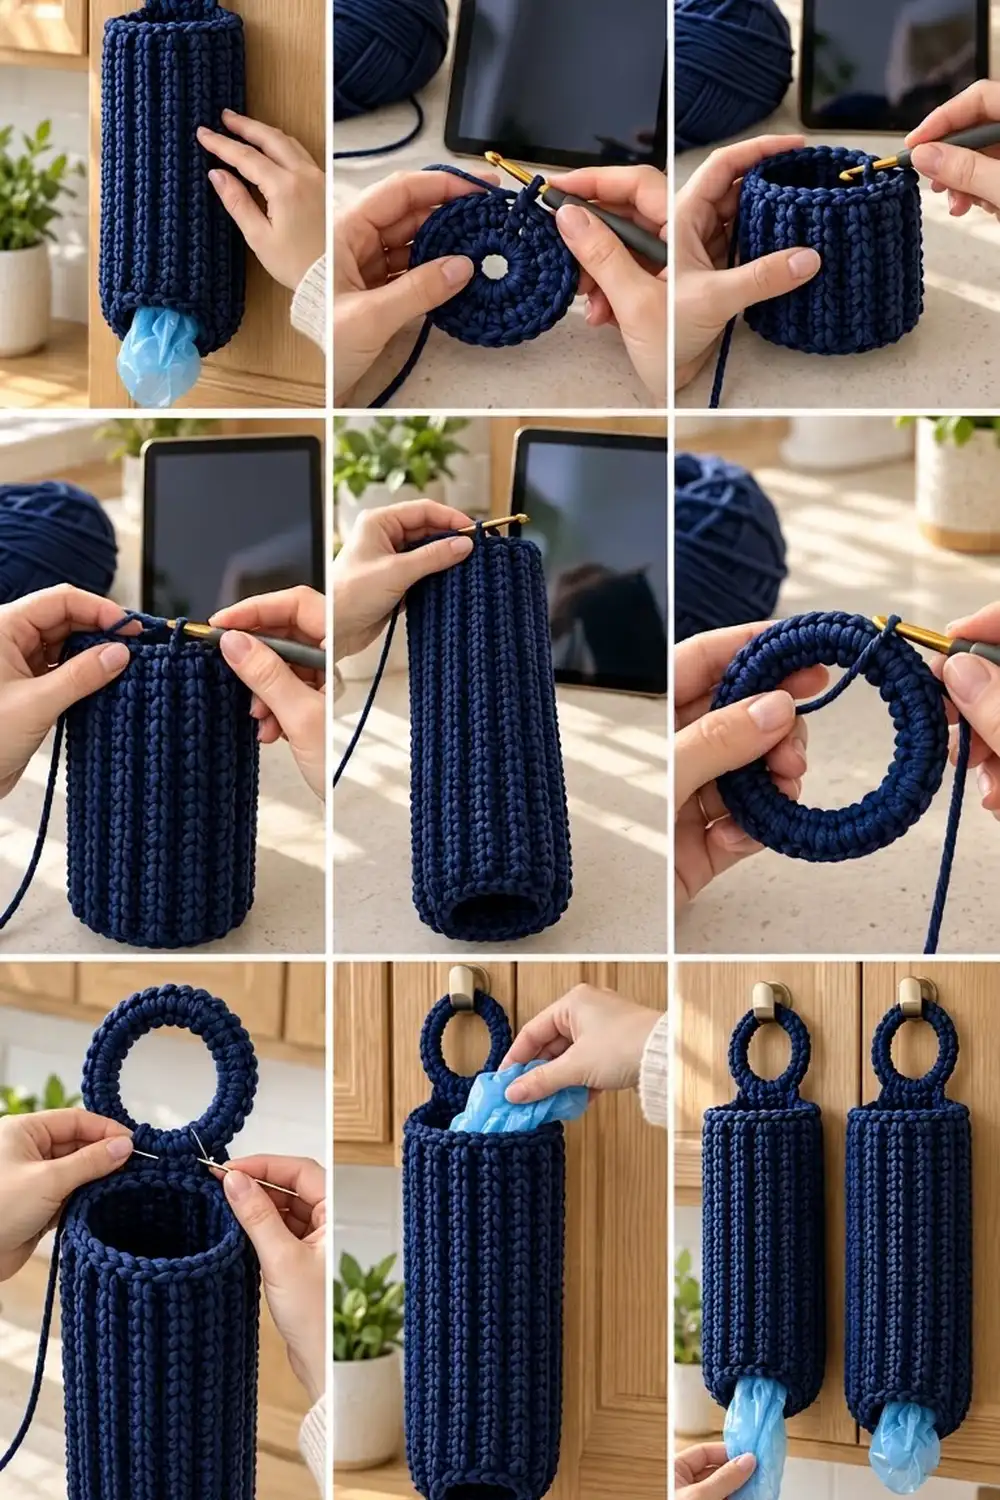
This hanging bag holder puts loose grocery bags in one tidy column on a cabinet door or pantry hook. You stuff bags in through the wide top opening and pull them out one at a time through the smaller opening at the bottom. Deep vertical ribs make the tube look tailored, and they also give it enough body to hold its shape when it’s empty.
The sample uses one color, a deep navy that looks good next to warm wood cabinets. A bulky cotton or cotton-blend yarn shows off the rib texture and is sturdy enough for daily use. The hanging ring is thick and firm, so it won’t stretch out on a hook.
This pattern uses US crochet terms. The finished holder measures about 5 in (12.7 cm) wide when laid flat and 13 in (33.0 cm) tall from the bottom fold to the top edge. With the hanging ring, the total length is about 17 1/4 in (43.8 cm).
Construction is simple. You start with a small flat ring of single crochet at the bottom opening. Next you work one turning round of double crochet, then post-stitch ribbing in joined rounds straight up to the top, and finish with a rolled top band. You crochet the hanging ring separately as a flat donut with a short tab and sew it to the center back.
Finished Size and Construction
- Finished size: 5 in (12.7 cm) wide flat × 13 in (33.0 cm) tall body; about 17 1/4 in (43.8 cm) including the ring
- Skill level: Easy-intermediate (front and back post stitches, reverse single crochet)
- Terminology: US crochet terms
- Yarn weight: Bulky (#5)
- Hook: US J-10 (6 mm)
- Number of pieces: 2 components (body and hanging ring) joined into one holder
- Layout: Vertical tube with the ring centered at the top back edge
- Body circumference: 10 in (25.4 cm), 30 stitches
- Bottom opening: 6 in (15.2 cm) circumference, stretches to release bags
- Size before top band: 12 in (30.5 cm) tall
- Top band depth: about 0.9 in (2.3 cm)
- Hanging ring: about 3 3/4 in (9.5 cm) outer diameter
Materials
Yarn: Use a bulky (#5) cotton, cotton blend, or soft cotton cord with good stitch definition. Cotton holds the ribs crisply and doesn’t stretch much under the weight of a full load of bags. Avoid very fuzzy yarns, because they blur the post-stitch texture.
- Navy: 150 g, about 225 m (246 yd)
These quantities include a margin of roughly 20% for your gauge swatch and tension differences. The holder itself uses about 120 g.
Tools:
- US J-10 (6 mm) crochet hook
- Locking stitch marker
- Tapestry needle with a large eye
- Scissors
- Measuring tape
- Pins and a rolled towel or a tall bottle for blocking
Abbreviations (US Terms)
- ch – chain
- sl st – slip stitch
- sc – single crochet
- dc – double crochet
- BLO – back loop only
- FPdc – front post double crochet
- BPdc – back post double crochet
- rev sc – reverse single crochet (crab stitch)
- st(s) – stitch(es)
- rnd(s) – round(s)
- 2 sc in next – increase
Special stitches:
- FPdc: Yarn over, insert the hook from front to back to front around the post of the stitch below, yarn over and pull up a loop, then (yarn over, pull through 2) twice.
- BPdc: Yarn over, insert the hook from back to front to back around the post of the stitch below, then finish as a dc.
- Rev sc: Working from left to right (or right to left if you crochet left-handed), insert the hook into the next stitch to the side, pull up a loop, yarn over, and pull through both loops.
Note: Starting chains don’t count as stitches in this pattern. Join every round with a sl st to the first stitch.
Gauge and Checkpoints
Gauge:
- Single crochet: 12 sts and 13 rnds = 4 in (10.2 cm)
- Post-stitch rib, measured unstretched: 12 sts and 7 rnds = 4 in (10.2 cm)
Test one piece first. Make the hanging ring before the body, because it doubles as your single crochet gauge check. After Rnd 3 of the ring, the outer edge should measure about 12 in (30.5 cm) around, which is 3 3/4 in (9.5 cm) across.
For the rib gauge, start the body and work through Rnd 6. Then lay the tube flat. It should measure 5 in (12.7 cm) wide, which is a circumference of 10 in (25.4 cm).
Checkpoints:
- Bottom ring after Rnd 3: 30 sts, slightly cupped, about 0.9 in (2.3 cm) from inner edge to outer edge
- Body after Rnd 10: 4 in (10.2 cm) tall from the bottom fold
- Body after Rnd 17: 8 in (20.3 cm) tall
- Body after Rnd 24: 12 in (30.5 cm) tall
- After the top band: about 13 in (33.0 cm) tall
If your piece is too big: Go down to a US I-9 (5.5 mm) hook and start again.
If your piece is too small: Go up to a US K-10.5 (6.5 mm) hook.
Don’t add or remove stitches to fix gauge. The rib needs an even stitch count, and the trims are calculated for exactly 30.
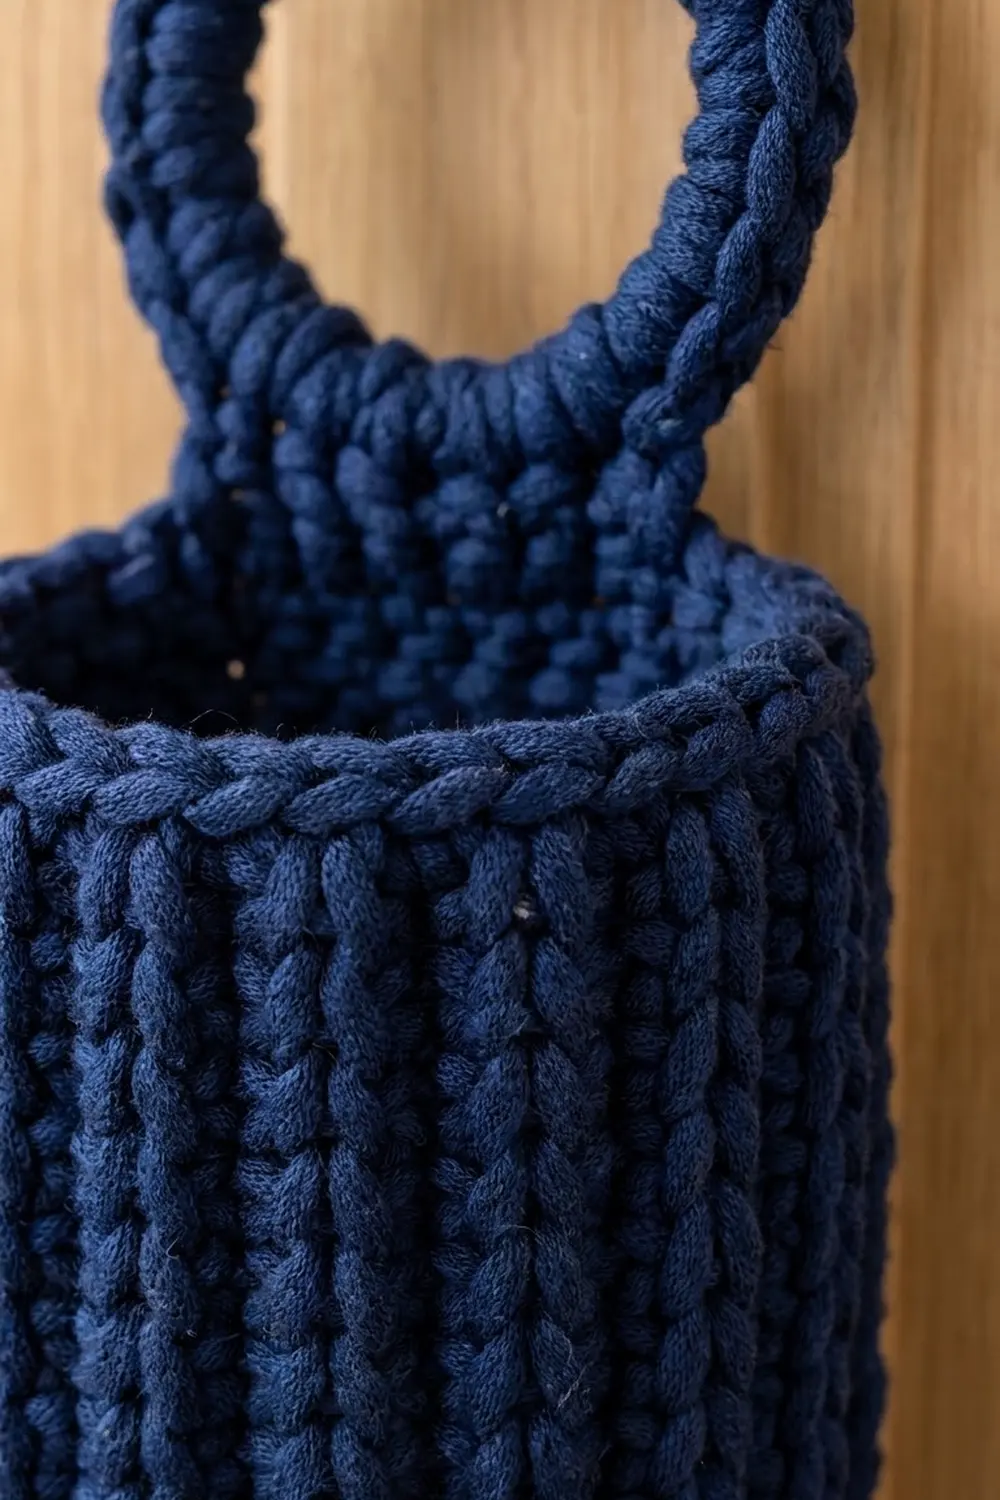
Hanging Ring
Work in joined rounds without turning.
Foundation: Ch 18 and join with a sl st to the first ch to form a ring. Make sure the chain isn’t twisted. This gives an inner circumference of 6 in (15.2 cm).
Rnd 1: Ch 1, sc in each ch around, join. (18 sc)
Rnd 2: Ch 1, *sc in next st, 2 sc in next st; repeat from * 8 more times, join. (27 sc)
Rnd 3: Ch 1, *sc in next 2 sts, 2 sc in next st; repeat from * 8 more times, join. (36 sc)
The ring should lie flat or very slightly ruffled and measure about 3 3/4 in (9.5 cm) across. The band from the inner edge to the outer edge is about 1 in (2.5 cm) wide. Don’t fasten off.
Tab (worked in rows):
Row 1: Ch 1, sc in the same st as the join and in the next 5 sts, turn. (6 sc)
Rows 2–4: Ch 1, sc in each st across, turn. (6 sc)
The tab is 2 in (5.1 cm) wide and about 1 1/4 in (3.2 cm) long. Fasten off, leaving a 16 in (40.6 cm) tail for sewing.
Body
Bottom Ring
The bottom ring forms the small dispensing opening and the inward-curving base you see in the photo.
Foundation: Ch 18 and join with a sl st to form a ring without twisting. This gives a 6 in (15.2 cm) circumference.
Rnd 1: Ch 1, sc in each ch around, join. (18 sc)
Rnd 2: Ch 1, *sc in next 2 sts, 2 sc in next st; repeat from * 5 more times, join. (24 sc)
Rnd 3: Ch 1, *sc in next 3 sts, 2 sc in next st; repeat from * 5 more times, join. (30 sc)
A truly flat ring would need about 37 stitches at this point. Stopping at 30 makes the ring cup upward, so the base curves inward the way it does in the sample.
Turning Round
Rnd 4: Ch 2, dc in the BLO of each st around, join. (30 dc)
Working in the back loop leaves the front loops showing as a neat ridge along the bottom fold. Working the round 1-per-stitch, with no increases, turns the work so the tube rises straight up.
Ribbed Tube
Rnd 5: Ch 2, *FPdc around next st, BPdc around next st; repeat from * 14 more times, join. (30 sts: 15 FPdc, 15 BPdc)
Rnds 6–24: Ch 2, *FPdc around the FPdc below, BPdc around the BPdc below; repeat from * 14 more times, join. (30 sts in every round)
Each FPdc stacks on top of the FPdc below it, so the raised columns run unbroken from the base to the top. The BPdc stitches sink back and form the grooves between them. That’s the 1×1 vertical rib in the photo.
Place a marker in the first stitch of each round so the joins stay in a straight line. Turn the holder so the joins sit at the center back, where the ring will cover the top of them.
There are 21 double crochet rounds from Rnd 4 through Rnd 24, and 21 ÷ 7 × 4 in = 12 in (30.5 cm). Check your height against the checkpoints above.
Border
The border has two parts: a rolled band at the top opening and a firm edge at the bottom opening.
Border gauge: Single crochet, 12 sts = 4 in (10.2 cm), the same gauge as the hanging ring.
Top Band
Rnd 25: Ch 1, sc in the top of each st around, join. (30 sc: 30 worked 1-per-existing-stitch + 0 added)
Rnd 26: Ch 1, sc in each st around, join. (30 sc)
Rnd 27: Ch 1, rev sc in each st around, join. (30 rev sc)
Fasten off and weave in the end.
Why the math works: 30 sc at 12 sts per 4 in gives 10 in (25.4 cm), which exactly matches the rib’s circumference. The band doesn’t ruffle or pull in. Single crochet is a little firmer than the post rib, which keeps the top opening rounded. The rev sc creates the twisted, rolled edge. These 3 rounds add about 0.9 in (2.3 cm), bringing the body to about 13 in (33.0 cm).
Bottom Opening Edge
Bottom Rnd: Join yarn to any remaining loop on the underside of the foundation chain. Ch 1, sc in each ch loop around, join. (18 sc: 18 worked 1-per-existing-chain + 0 added)
Fasten off and weave in the end.
Why the math works: 18 sc at 12 sts per 4 in gives 6 in (15.2 cm), the same as the foundation chain. This edge covers the bare chain and makes the opening a little stronger without making it smaller. The opening stretches enough to pull one bag through at a time, but it’s snug enough to hold the rest inside.
Attach the Hanging Ring
- Lay the body flat with the column of joins centered at the back.
- Place the tab on the inside of the back wall. Row 4 of the tab should sit at the base of Rnd 25, so the ring stands up above the rev sc edge. About 1/2 in (1.3 cm) of the tab shows above the band.
- Pin the tab so its 6 sts line up with 6 sts of the top band.
- Using the tail, whipstitch the side edges and the last row of the tab to the inside of Rnds 25–26. Then work a line of small stitches across the tab just below the rev sc edge.
- Keep your stitches on the inside so they don’t show between the ribs on the outside.
Final Blocking
- Wet the holder in cool water, then press out the excess. Don’t wring it.
- Roll it in a towel to take out more moisture.
- Slide the tube over a tall bottle or a rolled towel about 3 in (7.6 cm) across so it dries round.
- Smooth the ribs so they run straight up. Gently straighten any spiral caused by the joins.
- Lay the hanging ring flat, pat it into a circle 3 3/4 in (9.5 cm) across, and pin it if it ruffles.
- Let it dry completely before you hang it.
Final Quality-Control Checklist
- Every rib round has 30 sts, with 15 FPdc columns
- The ribs are vertical and unbroken from the bottom fold to the top band
- The body is 5 in (12.7 cm) wide flat and about 13 in (33.0 cm) tall
- The bottom opening is 6 in (15.2 cm) around and has a clean sc edge
- The top band lies smooth and doesn’t flare
- The ring is about 3 3/4 in (9.5 cm) across and sits centered at the back
- The tab is sewn securely and the stitches don’t show from the front
- All ends are woven in on the inside
Troubleshooting
The ribs are slanting or zigzagging. You’re probably working a FPdc around a BPdc. Check the alignment right after each join.
The tube is twisting into a spiral. Joined rounds sometimes drift. Join into the exact first stitch, and use the marker to check every round.
The bottom ring is too flat or too cupped. Check that Rnd 3 ends with 30 sts. Tight sc makes it cup more, and a looser tension softens the curve.
The top band flares. Your sc tension is looser than the rib’s. Rework Rnds 25–27 with a hook one size smaller.
Bags are falling out of the bottom. Work a second bottom sc round with a smaller hook. This firms up the opening without changing the stitch count.
The ring stretches on the hook. Use a firmer cotton yarn, or work the ring with a hook one size smaller.
Care
Hand wash in cool water and lay flat or over a bottle to dry. Don’t tumble dry cotton yarn, because it can shrink and make the ribs uneven.
Final Notes
The measurements all start from one number: 30 stitches at 12 per 4 in gives a 10 in (25.4 cm) circumference and a 5 in (12.7 cm) flat width. The bottom ring increases from 18 to 30 stitches, the turning round keeps 30, and every rib round stays at 30. Twenty-one double crochet rounds reach 12 in (30.5 cm), and the 30-stitch top band finishes the body at about 13 in (33.0 cm). The 36-stitch hanging ring brings the total length to about 17 1/4 in (43.8 cm). If you check your gauge on the ring first and measure at each checkpoint, your holder will come out the size of the sample.
Happy crocheting!