

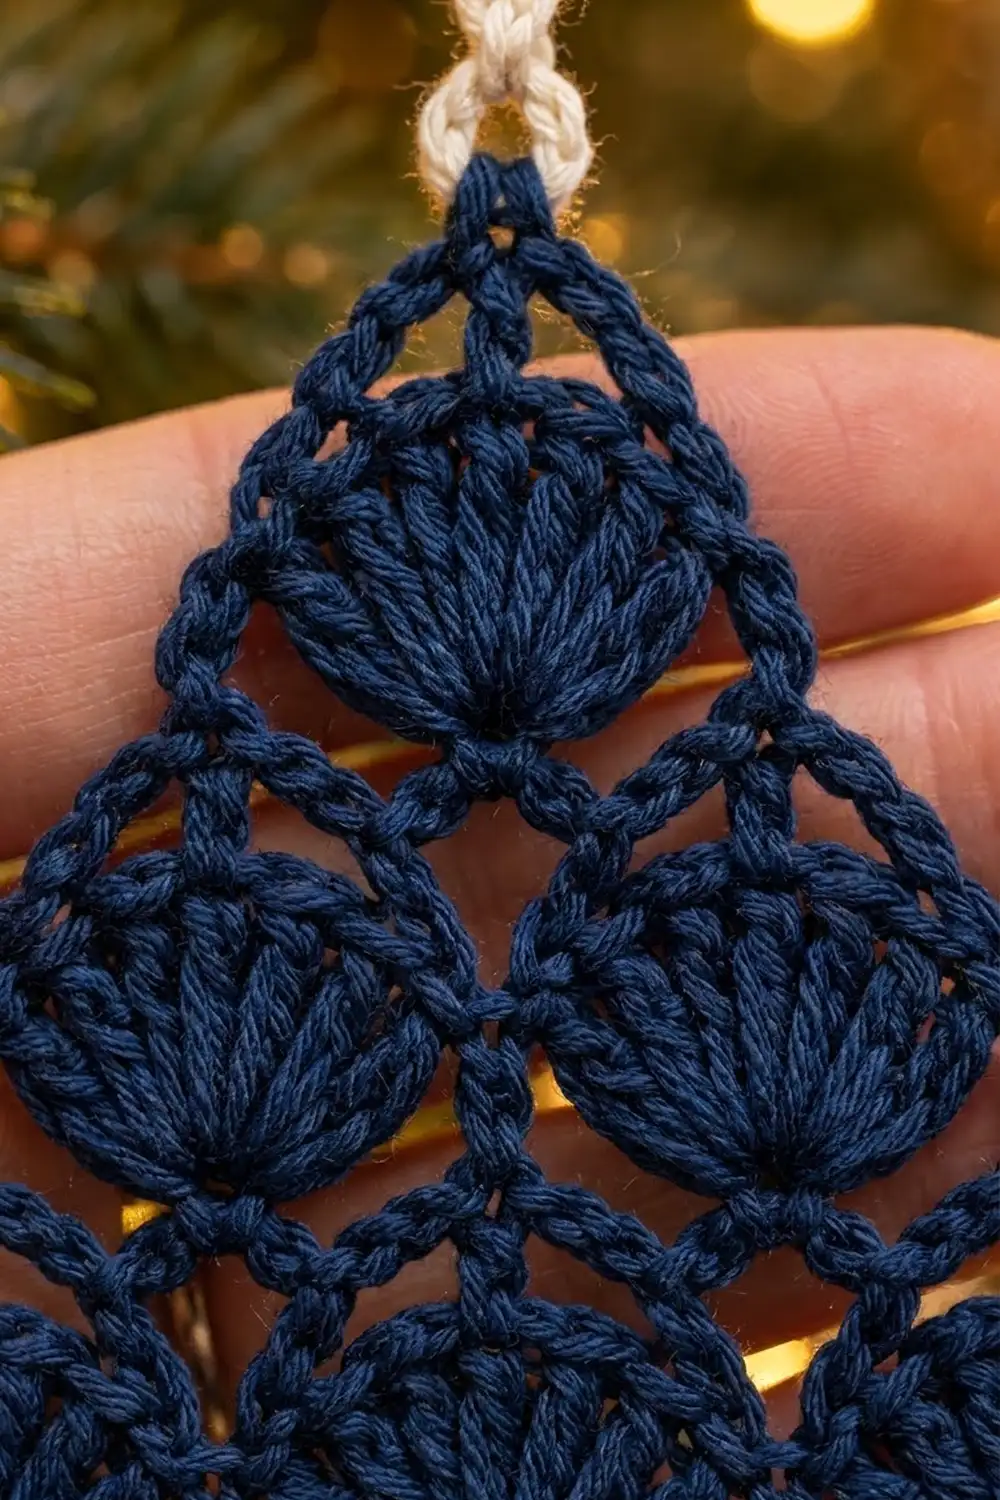
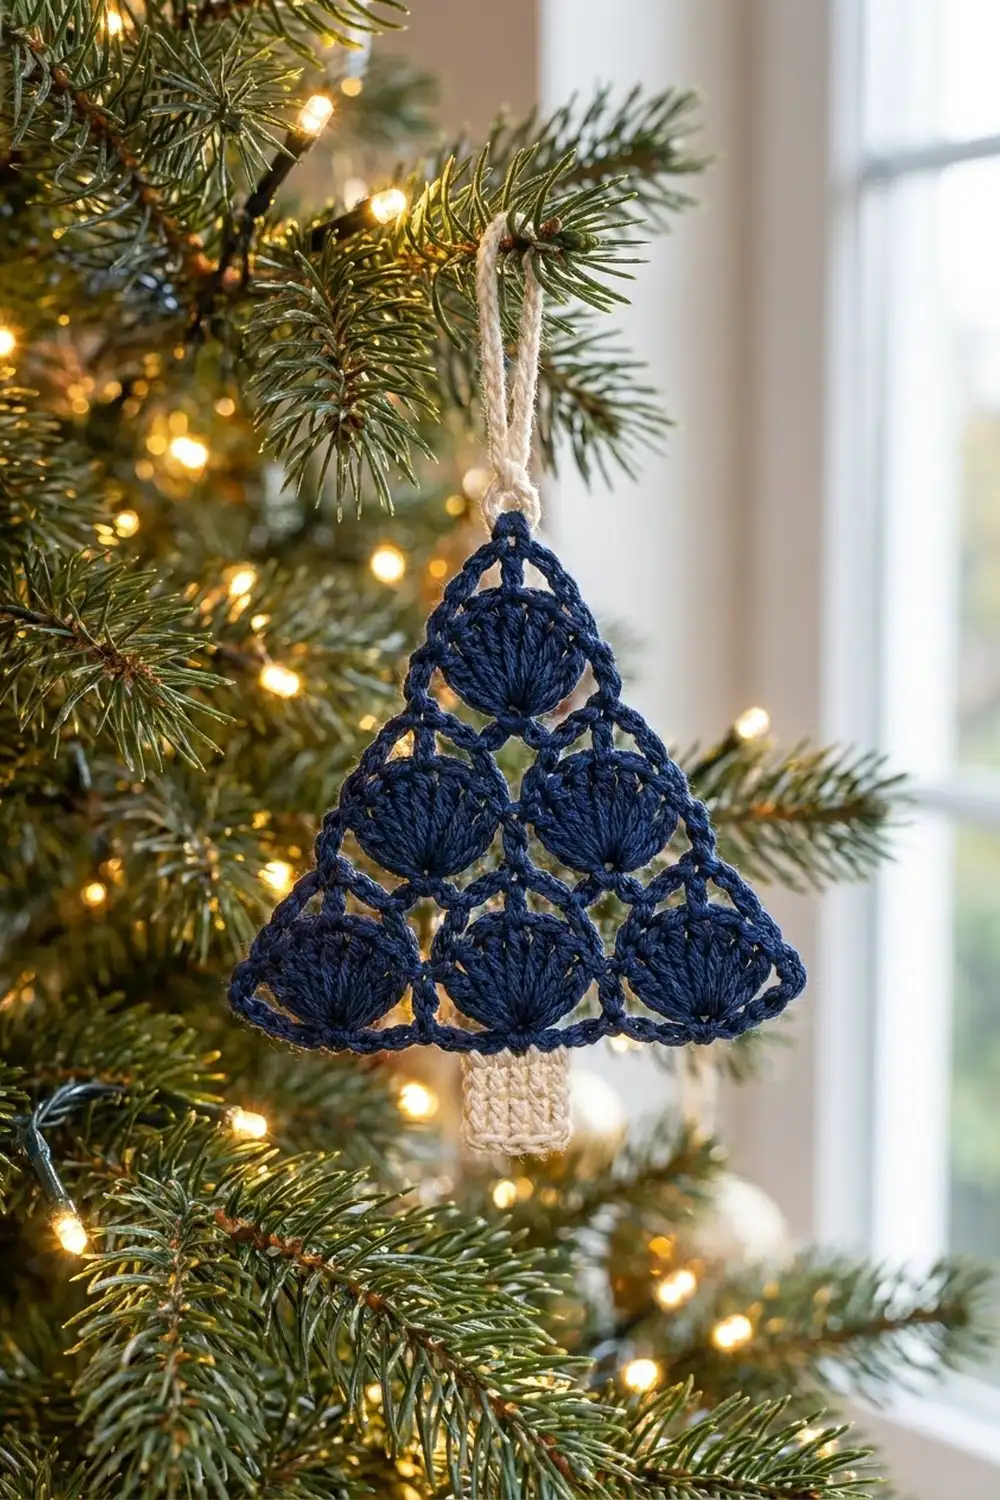
This little tree ornament is made of six rounded shell fans stacked in a pyramid: three on the bottom, two in the middle and one at the top. Chain arches run between the fans to form a lacy lattice. A firm single crochet edge pulls everything into a crisp triangle.
The tree is worked in deep navy cotton. The trunk and hanging loop are a soft cream, a classic two-tone look that stands out against green branches and warm lights.
The pattern uses US crochet terms. The finished triangle measures 4.5 in (11.4 cm) per side and about 3.9 in (9.9 cm) tall. With the trunk added, the ornament is about 4.9 in (12.4 cm) tall, not counting the hanging loop.
Construction is simple. You work the tree from the bottom up in turned rows, switching between shell rows and chain-arch rows. Each new tier steps in by one fan. Two border rounds then straighten the sides. Last, you add the cream trunk in rows off the bottom edge and a slip-stitch cord hanging loop at the tip.
Finished Size and Construction
- Finished size: 4.5 in (11.4 cm) per side, 3.9 in (9.9 cm) tall triangle; 4.9 in (12.4 cm) tall with trunk
- Skill level: Easy-intermediate
- Terminology: US crochet terms
- Yarn weight: Sport / fine (#2) cotton
- Hook: 3.0 mm (US C/2 or D/3)
- Number of pieces: 1 (worked in one piece; trunk and loop are added directly)
- Layout: 6 shell fans arranged 3-2-1 in a triangle
- Piece size before border: about 4.2 in (10.7 cm) across the base, 3.4 in (8.6 cm) tall
- Border depth: about 0.2 in (0.5 cm), 2 rounds
- Trunk: 1.2 in (3.0 cm) wide x 1 in (2.5 cm) tall
- Hanging loop: hangs about 2 in (5.1 cm) above the tip
Materials
Choose a smooth, mercerized sport-weight cotton or cotton blend. Cotton keeps the shells crisp and holds its shape after blocking. Fuzzy or very soft acrylic will blur the lattice and make the fans look puffy.
- Navy: 10 g / 30 m (33 yd) for the tree body and border
- Cream: 3 g / 9 m (10 yd) for the trunk and hanging loop
Tools:
- 3.0 mm crochet hook
- Tapestry needle
- Scissors
- Stitch markers (2–3)
- Blocking mat and rustproof pins
- Spray bottle with water
- Ruler or tape measure
These quantities include a margin for a gauge test and weaving in ends. One ornament uses less than this.
Abbreviations (US Terms)
- ch: chain
- sl st: slip stitch
- sc: single crochet
- dc: double crochet
- sk: skip
- sp(s): space(s)
- st(s): stitch(es)
- RS: right side
- rep: repeat
- BLO: back loop only
Special stitch – Shell: 9 dc worked into the same stitch. The 5th dc is the center of the shell.
Gauge and Checkpoints
Gauge: 6 sc = 1 in (2.5 cm) and 6 sc rows = 1 in (2.5 cm) with a 3.0 mm hook.
Make one ornament first and measure it at each checkpoint below. On a piece this small, the ornament itself is your best gauge swatch.
- After Row 1: 25 sc measure 4.2 in (10.7 cm).
- After Row 3: the bottom tier is about 1.3 in (3.3 cm) tall.
- After Row 7: the stacked fans are about 3.4 in (8.6 cm) tall.
- After Border Round 2: each side is 4.5 in (11.4 cm).
If your piece is too big: go down to a 2.75 mm hook, or check that your dc are not too tall. Pull each yarn-over snug.
If your piece is too small: go up to a 3.25 mm or 3.5 mm hook. Small differences matter on a piece this size, so change hooks rather than changing stitch counts.
Tree Body
Use navy throughout. Turn at the end of every row. Turning chains do not count as stitches.
Row 1 (RS): Ch 26. Sc in 2nd ch from hook and in each ch across. Turn. (25 sc)
Leave the free loops of the foundation chain unworked for now. You will use them in the border.
Row 2 (bottom shells): Ch 1, sc in first sc. Sk 3 sc, shell in next sc, sk 3 sc, sc in next sc. Rep from * to * 2 more times. Turn. (3 shells, 4 sc = 31 sts)
The shells go into sc numbers 5, 13 and 21. The sc go into numbers 1, 9, 17 and 25.
Row 3 (arch row): Ch 1, sc in first sc. Ch 4, sk 4 dc, sc in 5th dc of shell, ch 4, sk 4 dc, sc in next sc. Rep from * to * 2 more times. Turn. (7 sc, 6 ch-4 sps)
Number these 7 sc from 1 to 7. The 2nd, 4th and 6th sit on top of the shells. The 3rd and 5th sit between shells. The ch-4 arches form the outline around each fan.
Row 4 (middle shells): Sl st in first sc, sl st in each of next 4 ch, sl st in next sc (2nd sc, top of a shell). Ch 1, sc in same sc. Shell in next sc (between shells), sc in next sc (top of a shell). Rep from * to * once more. Leave the last ch-4 sp and last sc unworked. Turn. (2 shells, 3 sc = 21 sts)
In this row, work only into the sc of Row 3 and skip the ch-4 arches. The arches stay visible below the new shells and form the open diamonds of the lattice.
Row 5 (arch row): Ch 1, sc in first sc. Ch 4, sk 4 dc, sc in 5th dc of shell, ch 4, sk 4 dc, sc in next sc. Rep from * to * once more. Turn. (5 sc, 4 ch-4 sps)
Row 6 (top shell): Sl st in first sc, sl st in each of next 4 ch, sl st in next sc (2nd sc). Ch 1, sc in same sc, shell in next sc (3rd sc), sc in next sc (4th sc). Leave remaining sts unworked. Turn. (1 shell, 2 sc = 11 sts)
Row 7 (top arch): Ch 1, sc in first sc, ch 4, sk 4 dc, sc in 5th dc of shell, ch 4, sk 4 dc, sc in last sc. (3 sc, 2 ch-4 sps) Fasten off.
Checkpoint: You should have six fans in a 3-2-1 pyramid, each topped by two ch-4 arches. The piece should measure about 4.2 in (10.7 cm) across the base and 3.4 in (8.6 cm) tall. The sides look like steps at this stage; the border straightens them.
Border
The border has two jobs. Round 1 bridges the stepped sides with chain spaces. Round 2 covers everything in sc so that every side ends up with the same count.
Border gauge: 6 sc = 1 in (2.5 cm), the same as the body. Each finished side has 27 sc: 27 ÷ 6 = 4.5 in (11.4 cm).
Rows 1, 3, 5 and 7 are all RS rows, so their last sc all sit on the same side of the tree. Round 1 goes down that side first.
Round 1: With RS facing, join navy in the center sc of Row 7 (the sc on top of the top shell). Ch 1, (sc, ch 3, sc) in same st for the tip.
First slanted side: Ch 5, sc in last sc of Row 7. Ch 5, sc in last sc of Row 5. Ch 5, sc in last sc of Row 3. Ch 5.
First bottom corner: (Sc, ch 3, sc) in the free loop of the foundation ch at the base of the last sc of Row 1.
Bottom edge: Sc in each of the next 23 free loops of the foundation chain.
Second bottom corner: (Sc, ch 3, sc) in the last free loop.
Second slanted side: Ch 5, sc in first sc of Row 3. Ch 5, sc in first sc of Row 5. Ch 5, sc in first sc of Row 7. Ch 5. Join with sl st to first sc.
Round 1 count: 35 sc, 8 ch-5 sps, 3 ch-3 corner sps.
That breaks down as 2 sc at each of the 3 corners (6), 3 sc on each slanted side (6) and 23 sc on the bottom: 6 + 6 + 23 = 35.
Round 2: Sl st into tip ch-3 sp. Ch 1, (sc, ch 2, sc) in same sp. Sc in each sc and 5 sc in each ch-5 sp to next corner ch-3 sp, (sc, ch 2, sc) in corner sp. Rep from * to * once more. Then sc in each sc and 5 sc in each sp back to the tip. Join with sl st to first sc. Fasten off.
Round 2 count: 81 sc and 3 ch-2 corner sps. (27 sc per side)
Why the math works:
- Each slanted side: 1 corner sc + 1 sc (Round 1 tip sc) + 4 ch-5 sps x 5 sc (20) + 3 sc (Round 1 side sc) + 1 sc (Round 1 corner sc) + 1 corner sc = 27 sc.
- Bottom side: 1 corner sc + 1 sc (Round 1 corner sc) + 23 sc + 1 sc (Round 1 corner sc) + 1 corner sc = 27 sc.
- Total: Every Round 1 sc gets 1 sc (35), every ch-5 sp gets 5 sc (40) and each corner sp gets 2 sc (6). 35 + 40 + 6 = 81 = 3 x 27.
The 27 per side already includes the corner sc at each end of that side. Nothing is counted twice.
Checkpoint: Each side measures 4.5 in (11.4 cm). The triangle is about 3.9 in (9.9 cm) tall from the bottom edge to the tip.
Trunk
Use cream. Lay the tree with RS facing and the bottom edge at the top.
Row 1: Count the 27 sc along the bottom side of Round 2, starting at either corner sc. Join cream in the 11th sc. Ch 1, sc in same st and in each of next 6 sc. Turn. (7 sc)
This uses sts 11 through 17 and leaves 10 sc free on each side, so the trunk is exactly centered.
Rows 2–6: Ch 1, sc in each sc across. Turn. (7 sc)
Fasten off after Row 6.
Checkpoint: The trunk measures 1.2 in (3.0 cm) wide and 1 in (2.5 cm) tall. For more defined vertical ridges, work Rows 2–6 in BLO. The count stays at 7 sc.
Hanging Loop
With cream, join with sl st in the tip ch-2 sp. Ch 24. Sl st in the same tip sp. Turn and work 1 sl st in each of the 24 ch back to the tip. Sl st in the tip sp once more and fasten off.
The sl st pass makes a firm cord that won’t stretch on the branch. The loop hangs about 2 in (5.1 cm) above the tip.
Weave in all ends along the border or inside the shells, where the stitches are dense.
Final Blocking
- Mist the ornament lightly with water until it is damp, not soaked.
- Place it RS up on a blocking mat.
- Pin the three corners first so that each side measures 4.5 in (11.4 cm).
- Pin the middle of each side to keep the edges straight, not bowed.
- Use a fingertip to gently push each shell into a smooth semicircle and to open each lattice space.
- Pin the trunk square at 1.2 in (3.0 cm) x 1 in (2.5 cm).
- Lay the hanging loop flat above the tip.
- Let it dry completely, at least 6 hours, before removing the pins.
Final Quality-Control Checklist
- Six shells in a 3-2-1 arrangement, each with 9 dc
- All ch-4 arches visible and evenly open
- 81 sc in Border Round 2, 27 per side
- Three sharp corners with a ch-2 sp at each
- Sides are straight and measure 4.5 in (11.4 cm)
- Trunk is 7 sc wide, 6 rows tall and centered
- Hanging loop is secure and lies flat
- All ends woven in and trimmed
Troubleshooting
Shells cup or ruffle: Your dc are too loose. Go down a hook size for the shell rows only.
Shells look squashed: Your dc are too tight, or you worked into a ch sp instead of the sc. Check that each shell goes into a single sc.
Sides bow inward: The ch-5 bridges in Round 1 are too short for your tension. Try ch 6 instead, and still work 5 sc in each sp in Round 2 so the count stays the same.
Sides wave or ruffle: The ch-5 bridges are too loose. Chain more firmly, or use a smaller hook for Round 1 only.
Wrong count in Round 2: Recount Round 1. Most errors come from missing a Round 1 side sc or working something other than 23 sc along the bottom.
Trunk is off-center: Make sure you counted from the corner sc, not from the ch-2 sp.
Care
Hand wash in cool water with mild soap, press the water out in a towel and reshape flat to dry. Store flat in tissue paper so the shells keep their shape.
Final Notes
The measurements build step by step. The 25 sc of Row 1 give a 4.2 in (10.7 cm) base. Three shell tiers bring the body to 3.4 in (8.6 cm) tall. Two border rounds turn it into a triangle with 27 sc and 4.5 in (11.4 cm) per side. A 7-sc trunk adds 1 in (2.5 cm), for a total height of 4.9 in (12.4 cm).
Once your first tree matches these checkpoints, the rest will go quickly. Make one for every branch, tuck one into a gift, or try the body in deep green or burgundy.
Happy crocheting!