

These lace curtain panels are made from openwork butterflies in one shade of cornflower denim blue. When light comes through the window, the butterflies show up as solid shapes against open lace.
Each butterfly has four open-center wings outlined in tall stitches, a raised segmented body, and two chain antennae with small round knots at the ends. The butterflies join wingtip to wingtip in two columns. A lace header across the top holds the curtain rings. The pattern uses US crochet terms throughout.
One finished panel measures 16 in wide x 66 in long (40.6 x 167.6 cm) after blocking. The pattern makes a pair of panels.
You work each motif in the round from a small center ring. Four chain loops become the wings, and a picot round at the end joins the motifs as you go. The bodies are made separately and sewn on. After all 18 motifs in a panel are joined, you work the header across the top.
Finished Size and Construction
- Finished panel size: 16 x 66 in (40.6 x 167.6 cm)
- Skill level: Intermediate
- Terminology: US
- Yarn weight: DK / light worsted (#3), mercerized cotton
- Hook: 4.0 mm (G-6)
- Number of pieces: 18 butterfly motifs plus 18 bodies per panel; 36 of each for the pair
- Layout: 2 columns x 9 rows per panel
- Motif size: 8 in wide x 7 in tall (20.3 x 17.8 cm), picot to picot
- Size before header: 16 x 63 in (40.6 x 160.0 cm)
- Header depth: 3 in (7.6 cm), top edge only
Materials
Use mercerized cotton or a cotton blend. It keeps the wing outlines crisp and holds its shape when it hangs. Acrylic will stretch lengthwise over time.
- Cornflower / denim blue: 400 g, about 880 m (eight 50 g balls of about 110 m each)
Tools:
- 4.0 mm (G-6) crochet hook
- Tapestry needle
- Stitch markers
- 16 curtain clip rings (8 per panel)
- Blocking boards or foam mats, plus rustproof pins
- Spray starch (optional)
The yarn amount includes a margin of about 20%. That covers your gauge swatch, weaving in ends, and small differences in tension.
Abbreviations (US Terms)
- ch – chain
- sl st – slip stitch
- sc – single crochet
- hdc – half double crochet
- dc – double crochet
- tr – treble crochet
- sk – skip
- sp – space
- st(s) – stitch(es)
- rep – repeat
Special stitches
- Picot: ch 3, sl st in 3rd ch from hook. Picots are not included in stitch counts.
- Join picot: ch 1, sl st in the matching picot of the neighboring motif, ch 1, sl st in the 1st ch. Where two neighbors meet at the same point, sl st into both picots before the second ch 1.
- Puff knot: (yo, insert hook in indicated ch, yo, pull up a loop) 3 times, yo, pull through all 7 loops on hook, ch 1 to lock.
- Crossed dc: sk next st, dc in next st, then working in front of the dc just made, dc in skipped st.
Gauge and Checkpoints
Header gauge: 16 dc and 8 dc rows = 4 in (10.2 cm).
Motif gauge: One finished motif measures 8 in wide x 7 in tall (20.3 x 17.8 cm), picot to picot, after a light steam.
Make one complete motif before starting the rest. Check it at each of these points:
- After Rnd 2: Lay one ch-20 loop flat. It should be about 2.75 in (7.0 cm) long.
- After Rnd 3: About 7 in wide x 6 in tall (17.8 x 15.2 cm).
- After Rnd 4: 8 in wide x 7 in tall (20.3 x 17.8 cm).
- Body: 3.5 in (8.9 cm) long x 0.75 in (1.9 cm) wide.
If your motif is more than 1/4 in (0.6 cm) too big, go down a hook size. If it is too small, go up a hook size. Every 1/4 in per motif adds up over the panel: across 9 rows it becomes 2.25 in (5.7 cm) of length.
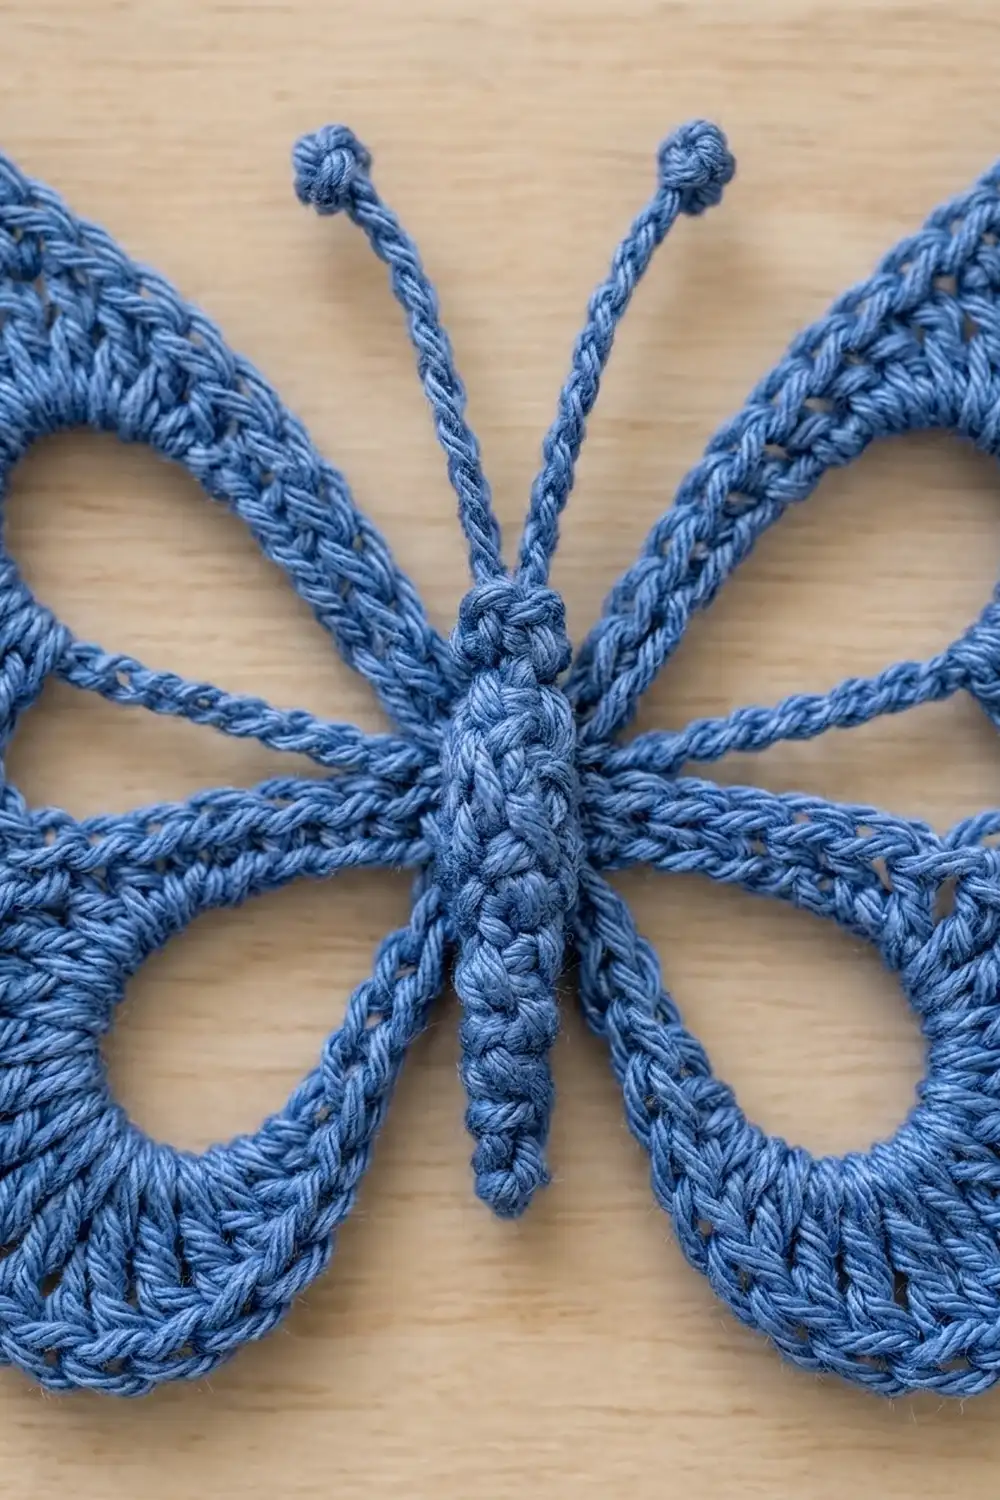
Butterfly Motif
Make 18 per panel.
Ch 4, sl st in first ch to form a ring.
Rnd 1: Ch 1, 8 sc in ring, sl st in first sc. (8 sc)
Rnd 2 (wing frames): Ch 1. Upper-left wing: sc in first sc, ch 20, sc in next sc. Lower-left wing: sc in next sc, ch 16, sc in next sc. Lower-right wing: sc in next sc, ch 16, sc in next sc. Upper-right wing: sc in next sc, ch 20, sc in next sc. Sl st in first sc. (8 sc, two ch-20 loops, two ch-16 loops)
Rnd 3 (wing fill): Sl st in first ch-20 sp.
– Upper-left wing: (2 sc, 2 hdc, 4 dc, 14 tr, 4 dc, 2 hdc, 2 sc) in ch-20 sp. (30 sts)
– Sk next 2 sc. Lower-left wing: (2 sc, 3 hdc, 14 dc, 3 hdc, 2 sc) in ch-16 sp. (24 sts)
– Sk next 2 sc. Lower-right wing: work as for the lower-left wing. (24 sts)
– Sk next 2 sc. Upper-right wing: work as for the upper-left wing. (30 sts)
– Sl st in first sc.
The stitches cover the chain loops. Each loop stays open in the middle, which gives the teardrop-shaped hole in each wing. (108 sts)
Rnd 4 (outline and picots): Ch 1. Work each wing as listed, then go straight to the next wing across the skipped sc. Do not add any stitches at the gaps.
- Upper-left: sc in first 8 sts, [2 sc in next st] 6 times, picot (TL), [2 sc in next st] 4 times, sc in next 12 sts. (40 sc)
- Lower-left: sc in next 5 sts, [2 sc in next st] 2 times, picot (SL), [2 sc in next st] 3 times, picot (BL), [2 sc in next st] 2 times, sc in next 12 sts. (31 sc)
- Lower-right: sc in next 12 sts, [2 sc in next st] 2 times, picot (BR), [2 sc in next st] 3 times, picot (SR), [2 sc in next st] 2 times, sc in next 5 sts. (31 sc)
- Upper-right: sc in next 12 sts, [2 sc in next st] 4 times, picot (TR), [2 sc in next st] 6 times, sc in last 8 sts. (40 sc)
Sl st in first sc and fasten off. (142 sc and 6 picots)
Here is where the picots sit:
- TL and TR: the upper outer corners of the top wings
- SL and SR: the outer sides of the lower wings
- BL and BR: the bottom points of the lower wings
Each wing count matches its stitches: 8 + 6 + 4 + 12 = 30 for each upper wing, and 5 + 2 + 3 + 2 + 12 = 24 for each lower wing.
Body and Antennae
Make 18 per panel.
Ch 14.
Rnd 1: 3 sc in 2nd ch from hook (head), sc in next 4 ch, hdc in next 7 ch, 3 hdc in last ch. Working along the other side of the foundation chain: hdc in next 7 ch, sc in next 4 ch. Sl st in first sc. (28 sts)
Rnd 2: Ch 1, sc in each st around, working 2 sc in the center st of each 3-st end. Sl st in first sc. (30 sc)
Fasten off and leave a 16 in (40.6 cm) tail. Wrap the tail tightly twice around the body at 3 points to make 4 segments, then pull the tail through to the back.
Antennae (make 2 per body): Join yarn at the top of the head. Ch 12, work a puff knot in 3rd ch from hook, sl st in each of the remaining 9 ch, sl st in head. Each antenna is about 2.25 in (5.7 cm) long. Angle the two antennae into a V.
Sew the body over the center ring with the head between the upper wings. The antenna knots should sit level with the TL and TR picots.
Make All Pieces
For the pair of panels you need:
- Cornflower blue: 36 motifs, 36 bodies, 72 antennae
Sew each body on before you join that motif, so the body seams stay hidden. Join the motifs on Rnd 4 in this order:
Panel layout (one panel)
         Col 1   Col 2
Row 1    M1      M2     <- header here
Row 2    M3      M4
Row 3    M5      M6
Row 4    M7      M8
Row 5    M9      M10
Row 6    M11     M12
Row 7    M13     M14
Row 8    M15     M16
Row 9    M17     M18
Joining
Method: Join as you go. Work Rnd 4 of each new motif as written. When you reach a picot that touches a finished neighbor, replace it with a join picot.
Which picots join:
- Horizontal (Col 2 to Col 1): TL joins to the left neighbor’s TR, and SL joins to the left neighbor’s SR.
- Vertical (to the motif above): TL joins to the BL of the motif above, and TR joins to the BR of the motif above.
- Col 2 from Row 2 down: TL has two partners, the left neighbor’s TR and the BL of the motif above. Sl st into both before the second ch 1.
Stitch-to-stitch logic: A join picot replaces a plain picot one for one. The sc count stays at 142 per motif, and the motif keeps its 8 x 7 in (20.3 x 17.8 cm) size. Since only the picots touch, the spaces between motifs stay open. Those diamond-shaped gaps are part of the lace look.
Tension: Keep the join ch 1s the same size as your regular chains. Tight joins pucker the wingtips. Loose joins make the panel sag between rows.
Size checkpoint: After 4 motifs (2 rows), the piece should measure 16 x 14 in (40.6 x 35.6 cm). A finished panel of 18 motifs measures 16 x 63 in (40.6 x 160.0 cm).
Border: Lace Header
The border is a header across the top edge only. The sides and the bottom are left as the open wing outlines, which gives the curtain its scalloped edges.
Border gauge: 16 dc = 4 in (10.2 cm), so 4 sts per inch.
With the right side facing, join yarn with a sl st in the TR picot of M2 (the top right corner). This sl st is not counted.
Row 1 (base): For M2 and then M1: ch 12, sc in right antenna knot, ch 5, sc in left antenna knot, ch 12, sc in TL picot.
Each motif takes 12 + 1 + 5 + 1 + 12 + 1 = 32 sts. For M2, work the sc in TL into the joined picot cluster with M1’s TR. M1’s ch 12 then starts from that sc, so the seam adds no stitches. Row 1 has 2 x 32 = 64 sts. Turn.
Row 2: Ch 3 (counts as dc throughout), dc in each st across. Turn. (64 dc)
Row 3: Ch 3, [crossed dc] 31 times, dc in last st. Turn. (1 + 62 + 1 = 64 sts)
Row 4: Ch 3, dc in each st across. Turn. (64 dc)
Row 5: Rep Row 3. (64 sts)
Row 6: Rep Row 4. (64 dc)
Row 7: Ch 1, sc in first 2 sts, [picot, sc in next 4 sts] 15 times, picot, sc in last 2 sts. (64 sc and 16 picots) Fasten off.
Counts per side:
- Top edge: 64 sts
- Each side edge: 7 row ends, about 3 in (7.6 cm) deep
- Bottom: the free wing outlines
Why the math works: Each motif gives 32 sts across its 8 in (20.3 cm) top. At 4 sts per inch, 32 sts is exactly 8 in. Two motifs give 64 sts, which is 16 in (40.6 cm) and matches the joined width.
The header depth is Row 1 at 0.25 in (0.6 cm), plus five dc rows at 0.5 in (1.3 cm) each, plus Row 7 at 0.25 in (0.6 cm). That adds up to 3 in (7.6 cm). Panel length is 63 + 3 = 66 in (167.6 cm).
Rings: Clip 8 rings to Row 7 at sts 1, 10, 19, 28, 37, 46, 55, and 64. That spaces them 9 sts, or 2.25 in (5.7 cm), apart.
Final Blocking
- Soak the panel in cool water for 15 minutes. Press out the water without wringing.
- Roll the panel in a towel to remove extra water.
- Lay it flat on blocking mats and pin the header to 16 in (40.6 cm) wide.
- Pin every TL, TR, BL, and BR picot so each motif sits at 8 x 7 in (20.3 x 17.8 cm).
- Pin each open wing center into a smooth teardrop or oval.
- Push the antennae into a V and pin the knots level with the wingtips.
- Spray with starch if you like, and let it dry completely before unpinning.
Final Quality-Control Checklist
- Every motif has 142 sc and 6 picots.
- All 4 wing centers on every motif are open and evenly shaped.
- Each body shows 4 segments and is sewn over the center ring.
- Each antenna has a firm, round knot.
- Every join picot is joined to the correct partner. Check the double joins in Col 2.
- The header has 64 sts on each row and 16 picots on Row 7.
- The panel measures 16 x 66 in (40.6 x 167.6 cm).
- All ends are woven in along sc outlines, not across open spaces.
Troubleshooting
- Wings cup or ruffle: Your tr fill is too loose or too tight. Change hook size for Rnd 3 only.
- Wing centers close up: You didn’t cover the loop evenly. Spread the Rnd 3 stitches along the entire chain loop.
- Panel is longer than 63 in (160.0 cm) before the header: Tighten your join picots. Steam and re-block.
- Header is wider than the motifs: Go down a hook size for Rows 2–7.
- Antennae droop: Starch them, or run a short length of yarn back through each antenna.
- Body twists: Sew it down at the head, middle, and tail before sewing the edges.
Care
Hand wash cool and lay flat to dry, re-pinning the picots if needed. Cotton may relax a little when it hangs, so re-block after the first wash.
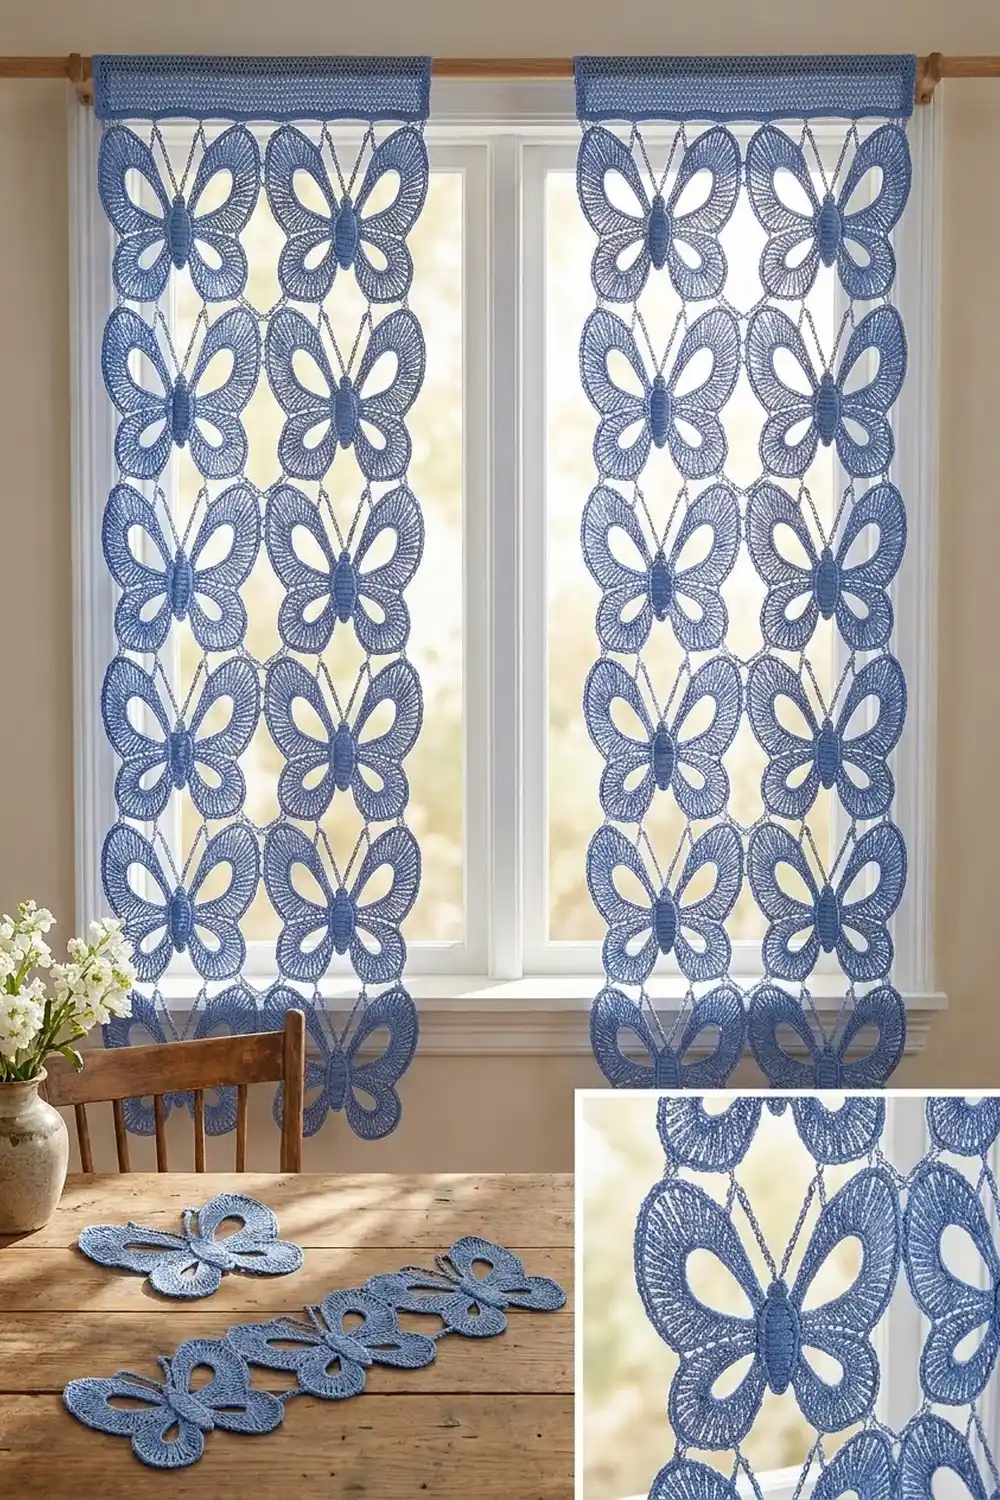
Final Notes
Here is the full measurement chain:
- One motif is 8 x 7 in (20.3 x 17.8 cm) with 142 sc.
- Two columns make 16 in (40.6 cm) of width, and nine rows make 63 in (160.0 cm) of length.
- The header adds 64 sts and 3 in (7.6 cm) of depth.
- One finished panel is 16 x 66 in (40.6 x 167.6 cm).
As long as your first motif matches its checkpoints, every later step comes out to size.
Happy crocheting!