

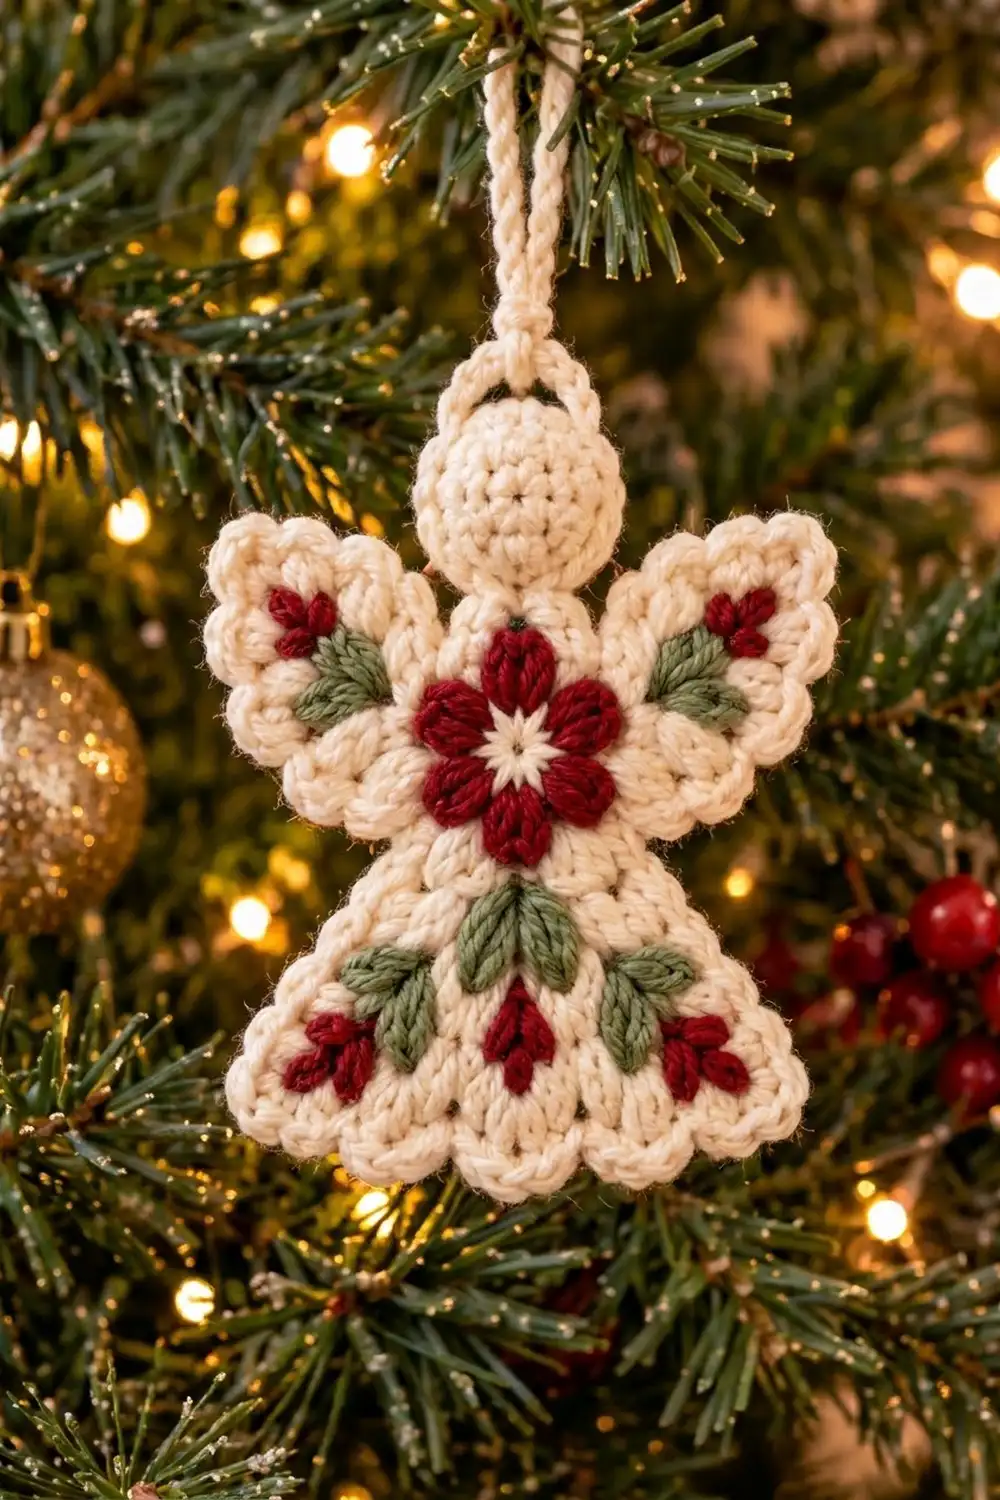
This little angel is a flat Christmas ornament in soft cream with a deep red puff-stitch poinsettia on her chest. Sage green leaves and red tulip buds decorate her wings and skirt. A scalloped shell edge runs around the wings, shoulders and hem, and a small domed head with a crocheted hanging loop sits on top.
The palette is three colors: cream for the body, head, border and loop, burgundy red for the flower petals and buds, and sage green for the leaves. The look is classic Scandinavian-style holiday folk art, so she suits a natural tree, a wrapped gift, a wreath or a window hook. She also makes a quick handmade gift.
This pattern uses US crochet terms. The finished angel is about 5 in (12.7 cm) wide and 6 in (15.2 cm) tall, not counting the hanging loop.
Construction is simple and nothing is sewn. You work a round chest medallion, then work the skirt and both wings straight off its edge in rows. Next comes a two-round scalloped border, then a small head that is joined-as-you-go to the top. The leaves and buds are added last with lazy-daisy embroidery in doubled yarn, so they sit raised like little puffs.
Finished Size and Construction
- Finished size: about 5 in (12.7 cm) wide x 6 in (15.2 cm) tall, not counting the loop
- Skill level: Easy-intermediate
- Terminology: US crochet terms
- Yarn weight: DK / light (3), cotton or cotton blend
- Hook: 3.5 mm (E-4)
- Number of pieces: 1 finished ornament (head joined-as-you-go, no sewing)
- Layout: single angel, worked flat
- Chest medallion: 2 in (5.1 cm) across
- Body size before border: 4 in (10.2 cm) wide x 4 in (10.2 cm) tall
- Border depth: 1/2 in (1.3 cm) at the scallops, 0.4 in (1.0 cm) at the plain top center
- Head: 1.25 in (3.2 cm) across
Materials
Choose a smooth, firm cotton or cotton blend in DK weight. Cotton shows the puff petals and shells clearly and holds its shape well after blocking. Fuzzy or brushed yarns blur the flower and the embroidered details, so save them for another project.
For the colors, pick a warm cream or ivory rather than bright white, a deep burgundy or cranberry red, and a soft muted sage. Strong contrast between the cream and the red makes the poinsettia stand out from across the room.
- Cream: 15 g, about 35 m (body, border, head, loop)
- Burgundy red: 4 g, about 9 m (flower petals, buds)
- Sage green: 3 g, about 7 m (leaves)
These quantities include a margin for a gauge test and generous embroidery tails. A standard ball of each color makes many angels.
Tools:
- 3.5 mm (E-4) crochet hook
- Tapestry needle with a large eye
- 4 locking stitch markers
- Scissors
- Blocking mat, rust-proof pins and a spray bottle
- Ruler or tape measure
Abbreviations (US Terms)
- ch – chain
- sl st – slip stitch
- sc – single crochet
- hdc – half double crochet
- dc – double crochet
- st(s) – stitch(es)
- sp – space
- MR – magic ring
Puff stitch (puff): (Yarn over, insert hook in st, yarn over, pull up a loop to about 1/2 in [1.3 cm]) 4 times, so you have 9 loops on the hook. Yarn over and pull through all 9 loops. Ch 1 to lock it closed.
Scallop repeat: Sc in next st, skip 1 st, 5 dc in next st, skip 1 st. Each repeat uses 4 sts and makes 6 sts.
Lazy-daisy stitch: Bring the needle up at the base of the petal, go back down in the same hole leaving a loop, come up at the tip inside the loop, and go down just outside it to tack the loop in place.
Gauge and Checkpoints
Gauge: 10 hdc and 6 rows = 2 in (5.1 cm) square; 5 sc = 1 in (2.5 cm).
Make the medallion first and measure it before going further. Every other measurement builds on it, so it’s your real gauge test. If you plan a batch of angels, finish one completely first and confirm the final size before making the rest.
Checkpoints:
- Medallion after Round 4: 2 in (5.1 cm) across
- Skirt after Row 6: 4 in (10.2 cm) wide at the hem, 2 in (5.1 cm) tall
- Each wing after Row 3: extends 1 in (2.5 cm) from the medallion
- Body before border: 4 in (10.2 cm) wide x 4 in (10.2 cm) tall
- After border: 5 in (12.7 cm) wide
If your medallion is larger than 2 in (5.1 cm), switch to a 3.25 mm hook. If it’s smaller, switch to a 3.75 mm hook. Small differences are fine for an ornament, but a big one will make the wings and skirt look out of proportion to the head.
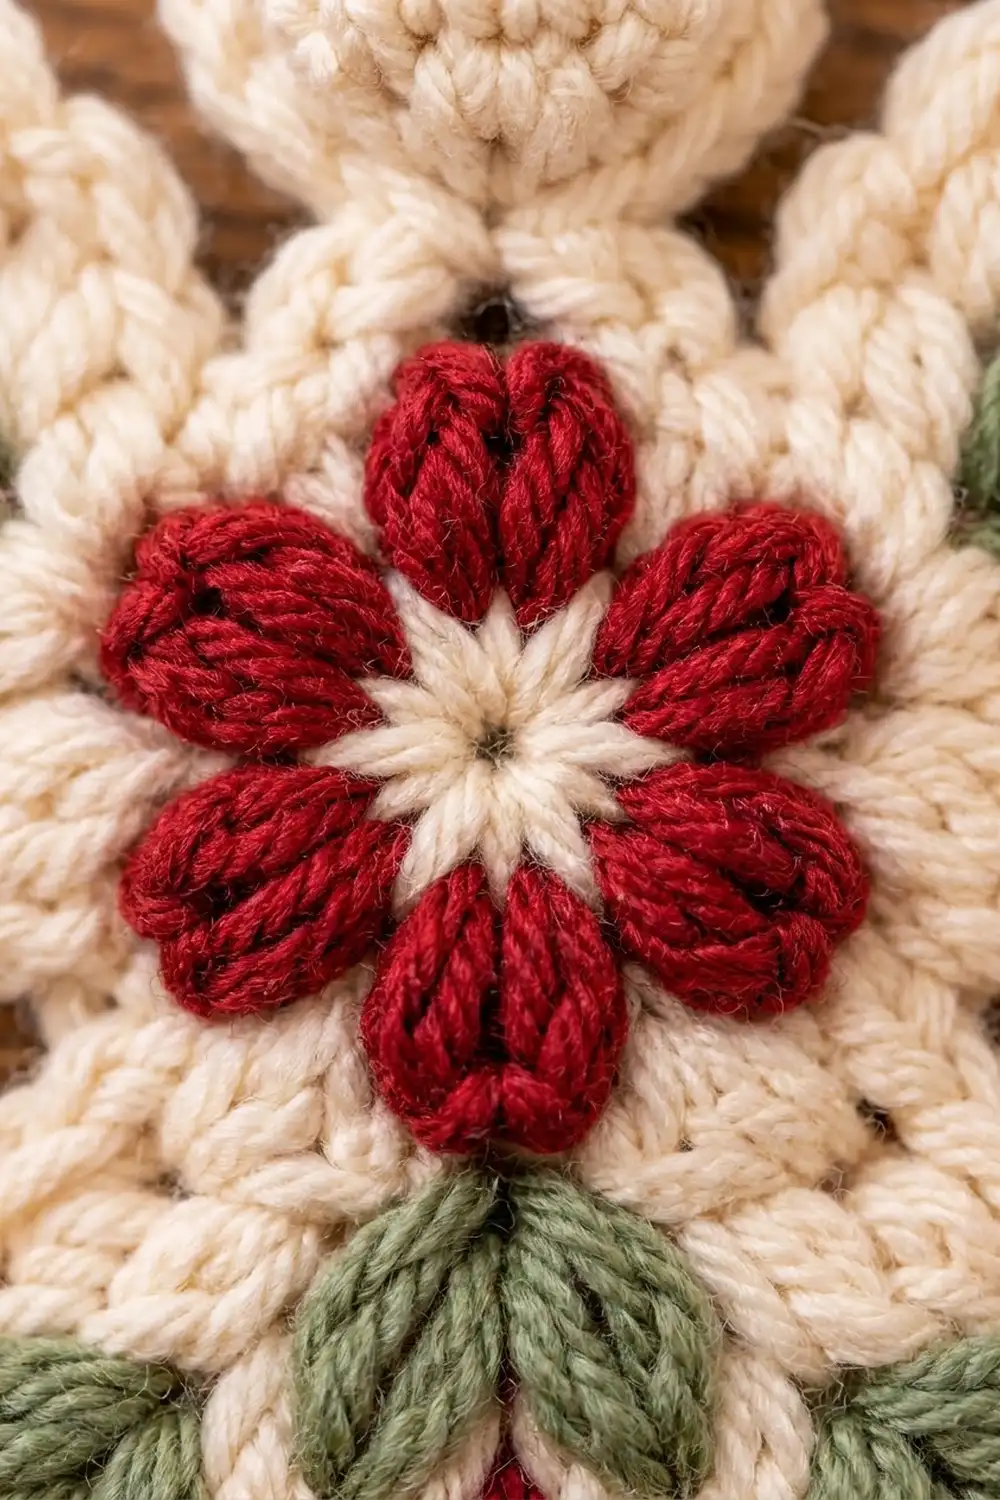
Chest Medallion
Round 1 (cream): MR, ch 1, 8 sc in ring, join with sl st to first sc. (8 sts) Measure: about 1/2 in (1.3 cm) across. Pull the ring tight and fasten off.
Round 2 (red): Join red in any sc. Ch 1 (does not count). Puff in st, ch 2, repeat in each st around. Join with sl st to the top of the first puff. (8 puffs, 8 ch-2 sps) Fasten off red.
The 8 puffs are the poinsettia petals around the cream center. The medallion now measures about 1.25 in (3.2 cm) across.
Round 3 (cream): Join cream in any ch-2 sp. Ch 1, 3 sc in each ch-2 sp around. Join. (24 sc: 8 sps x 3 sc)
You only work into the spaces, so the puffs stay raised above the cream ring. The medallion measures about 1.6 in (4.1 cm) across.
Round 4 (cream): Ch 1, sc in next 2 sts, 2 sc in next st, repeat around. Join. (32 sts: 24 worked 1 per existing stitch + 8 increases) Fasten off.
Checkpoint: 2 in (5.1 cm) across, lying flat.
Mark the sections. Lay the medallion with one petal pointing straight down. Divide the 32 sts of Round 4 like this:
- Bottom 10 sts: skirt base (centered under the low petal)
- Next 5 sts up each side: wing bases
- Top 12 sts: shoulders and neck
Place a marker in the first and last st of each wing base (4 markers). Check your count: 10 + 5 + 5 + 12 = 32.
Skirt
Work the skirt in rows, back and forth, on the bottom 10 sts. The turning ch 2 does not count as a st.
Row 1: With the right side facing, join cream in the first skirt-base st. Ch 2, hdc in each of the 10 skirt sts. Turn. (10 hdc) Width: 2 in (5.1 cm).
Row 2: Ch 2, 2 hdc in first st, hdc in next 8 sts, 2 hdc in last st. Turn. (12 hdc)
Row 3: Ch 2, 2 hdc in first st, hdc in next 10 sts, 2 hdc in last st. Turn. (14 hdc) Width: 2.8 in (7.1 cm).
Row 4: Ch 2, 2 hdc in first st, hdc in next 12 sts, 2 hdc in last st. Turn. (16 hdc)
Row 5: Ch 2, 2 hdc in first st, hdc in next 14 sts, 2 hdc in last st. Turn. (18 hdc)
Row 6: Ch 2, 2 hdc in first st, hdc in next 16 sts, 2 hdc in last st. (20 hdc) Fasten off.
Checkpoint: The hem is 4 in (10.2 cm) wide and the skirt is 2 in (5.1 cm) tall. Both sides should slope outward evenly into a neat trapezoid.
Wings (Make 2, Worked Onto the Medallion)
Each wing is a small fan worked onto the 5 marked wing-base sts.
Row 1: Join cream in the first marked wing st. Ch 2, 2 hdc in each of the 5 wing sts. Turn. (10 hdc)
Row 2: Ch 2, hdc in next st, 2 hdc in next st, repeat 5 times. Turn. (15 hdc)
Row 3: Ch 2, hdc in next 7 sts, 2 hdc in next st, hdc in next 7 sts. (16 hdc) Fasten off.
Repeat on the other side, then remove the markers.
Checkpoint: Each wing reaches 1 in (2.5 cm) out from the medallion. The body now measures 4 in (10.2 cm) from wing tip to wing tip and 4 in (10.2 cm) from the top of the medallion to the hem.
Border
Border gauge: same as the body, 5 sc = 1 in (2.5 cm). Each scallop repeat covers 4 sc, which is 0.8 in (2.0 cm).
Round 1 (cream, conversion round): With the right side facing, join cream in the first (leftmost) of the 12 top sts. Ch 1. Working clockwise, sc around as follows:
- Top: 1 sc in each of the 12 top medallion sts = 12
- Right wing: 6 sc down the upper row-ends (2 per row); along the 16 outer sts, 3 sc in the first st, 1 sc in the next 14, 3 sc in the last st (16 worked 1 per stitch + 4 extra = 20); 6 sc along the lower row-ends = 32
- Right skirt side: 2 sc per row-end = 12
- Hem: along the 20 sts, 3 sc in the first st, 1 sc in the next 18, 3 sc in the last st (20 + 4 extra) = 24
- Left skirt side: 12
- Left wing: 6 + 20 + 6 = 32
Join with sl st to first sc. (124 sc: 12 + 32 + 12 + 24 + 12 + 32)
The 3-sc corner groups add 2 extra sc at each wing tip and hem corner so they lie flat. The underarm inside corners need no extra sts.
Round 2 (scallops): Ch 1. Work 1 scallop repeat over the first 4 sts. Sc in each of the next 4 sts (the plain neck section). Work the scallop repeat 29 more times around. Join with sl st to first sc. (30 scallops, 184 sts: 30 x 6 + 4 plain sc) Fasten off, leaving a 6 in (15.2 cm) tail.
Why the math works: Every scalloped section is a multiple of 4. The top is 4 + 4 plain + 4 = 12 sts. Each wing is 32 sts (8 scallops), and the skirt sides and hem together are 12 + 24 + 12 = 48 sts (12 scallops). So 30 repeats x 4 + 4 plain sc = 124, exactly matching Round 1. No scallop gets squeezed or stretched, and the 4 plain sc sit centered for the head.
Checkpoint: 5 in (12.7 cm) wide, with the border 1/2 in (1.3 cm) deep at the shells.
Head and Hanging Loop
Round 1: With cream, MR, 6 sc in ring. Join. (6 sts) About 0.4 in (1.0 cm) across.
Round 2: Ch 1, 2 sc in each st around. Join. (12 sts) About 0.8 in (2.0 cm) across.
Round 3: Ch 1, sc in next st, 2 sc in next st, repeat around. Join. (18 sts) About 1.25 in (3.2 cm) across.
Round 4 (joining round): Ch 1, sc in each st around with no increases. (18 sts)
With no increases, the head cups gently into the dome shown. While you work this round, join the bottom 4 sts of the head to the 4 plain neck sc on the body. For each of those 4 sts, drop the loop from your hook, insert the hook from front to back through the matching neck st, pick up the dropped loop and pull it through, then finish the sc into the head. Join the round.
Hanging loop: Sl st to the top center st of the head. Ch 24, then sl st in the same st. Sl st into the next st to lock it, and fasten off. The loop stands about 2 in (5.1 cm) tall.
Embroidery
Use doubled yarn and a tapestry needle. Leave each petal loop fairly loose so it sits raised like a puff. Before you stitch, mark the positions with pins and check that the left and right sides mirror each other.
- Wings: Near each wing tip, make one red bud of 3 lazy-daisy petals fanned upward and outward. Just inside it, closer to the body, make a green leaf pair of 2 lazy-daisy petals in a V.
- Skirt, upper band (Rows 2-3): Make 3 green leaf pairs evenly spaced, with the center pair directly under the medallion.
- Skirt, lower band (Rows 4-5): Make 3 red buds of 3 petals each. Put one under the center leaf pair and one near each hem corner, pointing down and outward.
Weave in all tails on the back, keeping the front clean.
Final Blocking
- Spray the angel lightly until it’s damp but not dripping.
- Pin the hem straight at 4 in (10.2 cm) between the corner 3-sc groups.
- Pin out the wing tips so the angel measures 5 in (12.7 cm) across, border included.
- Pin each shell at its center dc so the scallops fan open evenly.
- Gently press the head dome with a fingertip so it stays rounded. Don’t pin it flat.
- Let it dry completely, at least 4 hours, before you unpin it.
Final Quality-Control Checklist
- Medallion is 2 in (5.1 cm) across with 8 even puff petals
- Skirt hem is 20 hdc and 4 in (10.2 cm) wide
- Each wing ends with 16 hdc
- Border Round 1 has 124 sc and Round 2 has 30 scallops
- The 4 plain sc are centered under the head
- Head is 18 sts, domed, and joined straight and centered
- Embroidery motifs mirror left to right
- Finished size is about 5 x 6 in (12.7 x 15.2 cm)
- All tails are woven in securely
Troubleshooting
Medallion ruffles at Round 4: Your tension is loose. Go down half a hook size, or space the increases exactly as written.
Puffs look flat: Pull the loops up taller before closing each puff, and always ch 1 to lock it.
Skirt curls at the hem: Your increases may be too tight. Work them more loosely, then block well.
Wings cup forward: Row 3 should have only 1 increase. Make sure you have 16 sts, not more, and block the wings flat.
Scallops don’t line up at the neck: Recount Round 1 section by section. Every section has to match exactly before you start Round 2.
Head tilts: Make sure the 4 joined sts are at the bottom center of Round 4 and land on the 4 plain neck sc.
Embroidery puckers: Your stitches are pulling too tight. Leave the loops slightly slack and tack them lightly.
Care
Hand wash in cool water with mild soap, roll in a towel to press out the water, and dry flat, reshaping the scallops. Store the angel flat or hanging, out of direct sunlight, so the red doesn’t fade.
Final Notes
Each measurement in this angel builds on the one before it. The 2 in (5.1 cm) medallion sets the 10-st skirt base, which grows to a 4 in (10.2 cm) hem. The 5-st wing bases fan out into 1 in (2.5 cm) wings, for a 4 in (10.2 cm) wingspan. Border Round 1 has 124 sc, and Round 2 turns them into 30 scallops plus 4 plain neck sts. With her head on top, the angel finishes at about 5 x 6 in (12.7 x 15.2 cm). Check each stage before you move on and your angel will come out right.
Happy crocheting!