

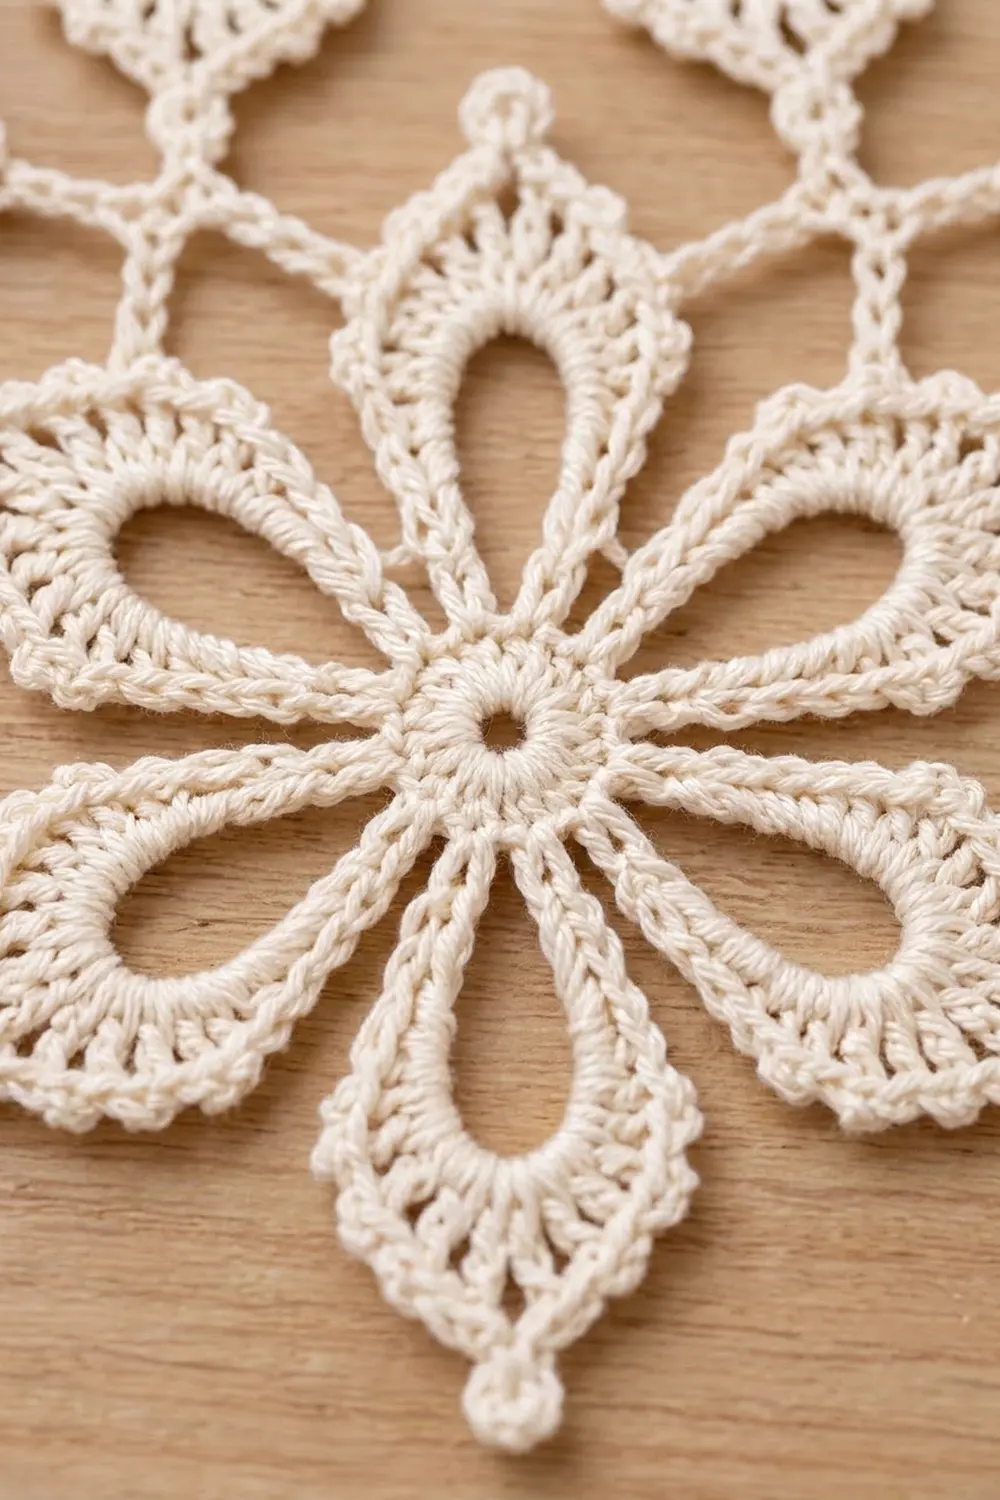
The Frost Lily Snowflake is a six-petal lace motif with an airy, heirloom look. Each petal has an open teardrop window in the middle, a lacy lattice around it and a neat little ball at its tip. The result looks like a cross between a snowflake and a lily seen from above.
This sample uses a single ivory/cream cotton, which shows off the stitch texture and works with any holiday palette. The finished motif measures about 6 in (15.2 cm) from point to point. All instructions use US crochet terms.
The construction is simple. You start with a ring of double crochet, then chain six long loops that become the teardrop windows. Next you outline each loop with graduated stitches, add a lattice round and finish with a picot edging round that acts as the border. It is one piece in five rounds, with no sewing.
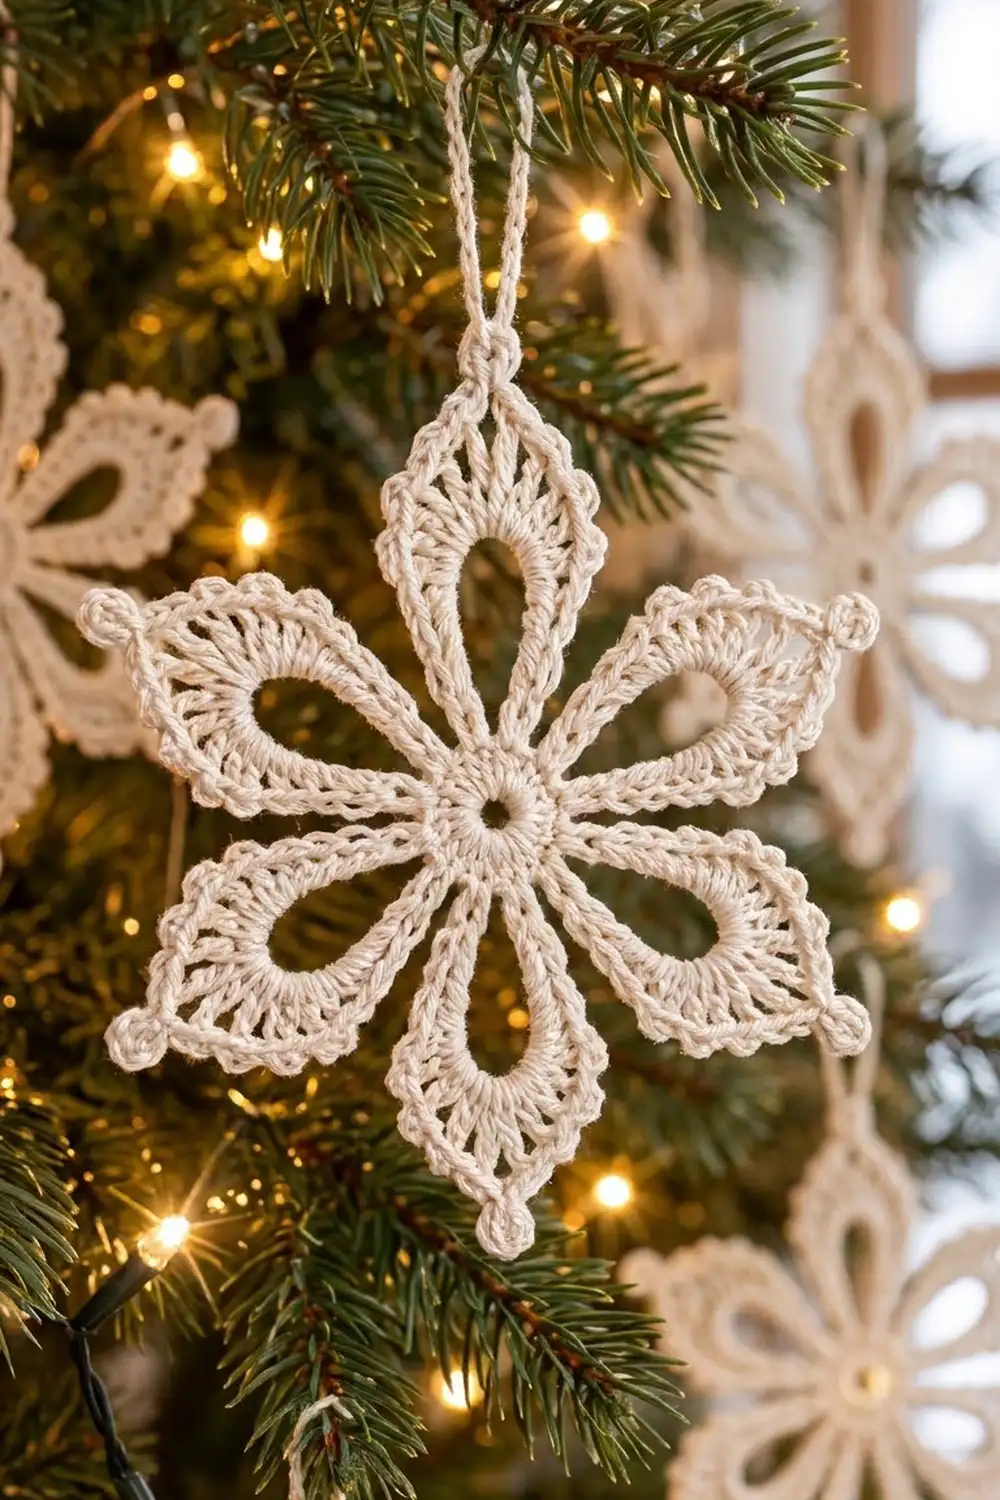
You can use it as a tree ornament, gift tag, package topper or window decoration. If you want to hang it, add a chain hanging loop at the end.
Finished Size and Construction
- Finished size: 6 in (15.2 cm) from tip to opposite tip
- Skill level: Easy-intermediate
- Terminology: US crochet terms
- Yarn weight: Size 3 crochet cotton thread (super fine, close to fingering weight)
- Hook: 2.75 mm (US C-2)
- Number of pieces: 1 motif
- Layout: One six-petal motif, worked in the round
- Piece size: 6 in (15.2 cm) tip to tip; each petal is about 3 in (7.6 cm) long from the center
- Size before border (after Rnd 4): 5.25 in (13.3 cm) tip to tip
- Border depth (Rnd 5): about 0.375 in (1.0 cm) added on each side
Materials
Yarn: Choose a mercerized cotton crochet thread in size 3. Mercerized cotton gives crisp stitch definition, holds a starch block well and won’t fuzz. Matte cotton also works, but the picots will be softer and less spiky.
- Ivory/cream: 10 g, about 27 m (approx. 30 yd)
These quantities include a margin of roughly 30% for your gauge check, weaving in ends and the hanging loop. One small ball makes several snowflakes.
Tools:
- 2.75 mm (US C-2) crochet hook
- Tapestry needle with a small eye
- Scissors
- Rust-proof pins
- Foam blocking mat or folded towel
- Fabric stiffener or spray starch (optional, recommended for ornaments)
- Ruler or tape measure
Abbreviations (US Terms)
- ch – chain
- sl st – slip stitch
- sc – single crochet
- hdc – half double crochet
- dc – double crochet
- tr – treble crochet
- sk – skip
- sp – space
- st(s) – stitch(es)
- rep – repeat
- Rnd – round
Special stitches:
- Picot: Ch 3, sl st in the 3rd ch from the hook.
- Ball picot: Ch 3. Yarn over, insert the hook in the 3rd ch from the hook, yarn over and pull up a loop, yarn over and pull through 2 loops. Rep from * to * 2 more times (4 loops on hook). Yarn over and pull through all 4 loops. This makes a small 3-dc cluster that sits as a round knob.
Gauge and Checkpoints
Exact gauge isn’t critical for an ornament, but size matters if you want a matching set. Make one motif first and measure it at each checkpoint below before you make more.
Base gauge: Rnd 1 should measure 0.75 in (1.9 cm) across, with a small open hole in the center.
Checkpoints:
- After Rnd 1: 0.75 in (1.9 cm) diameter.
- After Rnd 3: 4 in (10.2 cm) from tip to opposite tip.
- After Rnd 4: 5.25 in (13.3 cm) from tip to opposite tip.
- After Rnd 5: 6 in (15.2 cm) from tip to opposite tip once blocked. Before blocking it may measure about 5.75 in (14.6 cm).
If your motif is too big: Switch to a 2.5 mm hook, or chain the long ch-16 loops in Rnd 2 more snugly so they aren’t loose and floppy.
If your motif is too small: Switch to a 3 mm hook. Thread crocheters who work tightly often need this.
Don’t change stitch counts to fix the size, because the petal shape depends on them.
Before you start: Leave a 6 in (15.2 cm) beginning tail and keep it out of the way. It is easier to weave in once the center is closed. Work with even tension throughout, especially on long chains. A chain that is tighter than your stitches will pull the petals into a cup.
Pattern
Rnd 1: Center Ring
Make a magic ring.
Ch 3 (counts as the first dc), then work 17 dc into the ring. Pull the ring closed, leaving a small hole about 0.25 in (0.6 cm) wide. Join with a sl st to the top of the beginning ch-3.
Stitch count: 18 dc.
Checkpoint: 0.75 in (1.9 cm) across.
Rnd 2: Teardrop Loops
This round makes the six open windows. Each loop is anchored at a single stitch, so it closes into a teardrop at the base.
Ch 1, sc in the same st as the join, ch 16, sc in the same st (first loop made), sc in each of the next 2 dc.
Sc in the next dc, ch 16, sc in the same dc, sc in each of the next 2 dc. Rep from * to * 4 more times. Join with a sl st to the first sc.
Stitch count: 24 sc and 6 ch-16 loops.
Each repeat uses 3 dc from Rnd 1 (1 anchor dc and 2 between loops). Six repeats of 3 dc use all 18 dc, so the loops sit evenly around the ring.
Keep the ch-16 loops flat and untwisted. Lay the piece on the table and check that all six loops point outward like flower petals.
Rnd 3: Petal Outline
This round fills each loop with a thick, graduated outline. Short stitches at the base and tall stitches at the widest part give the teardrop window its shape.
Sl st into the first ch-16 loop.
In the ch-16 loop work: 2 sc, 2 hdc, 6 dc, (2 dc, ch 2, 2 dc), 6 dc, 2 hdc, 2 sc. Sk the next anchor sc, sl st in each of the next 2 sc, sk the next anchor sc. Rep from * to * 5 more times. Join with a sl st to the first sc of this round.
Stitch count per petal: 24 sts (12 per side) and 1 ch-2 tip sp.
Round total: 144 petal sts, 12 sl sts and 6 ch-2 tip sps.
The next rounds refer to the stitches on each side of a petal as sts 1–12:
- Side 1: st 1 is the first sc at the base and st 12 is the last dc before the tip.
- Side 2: st 1 is the first dc after the tip and st 12 is the last sc at the base.
Checkpoint: 4 in (10.2 cm) tip to tip.
Rnd 4: Lattice
This round builds the lacy diamond outline around each teardrop and adds the pointed tip.
Ch 1, sc in the same st as the join (st 1 of side 1).
Side 1: Ch 2, sk st 2, dc in st 3, (ch 1, sk next st, dc in next st) 4 times, ch 1, sk st 12.
Tip: (2 tr, ch 3, 2 tr) in the ch-2 tip sp.
Side 2: Ch 1, sk st 1, dc in st 2, (ch 1, sk next st, dc in next st) 4 times, ch 2, sk st 11, sc in st 12.
Skip the 2 sl sts between petals and sc in st 1 of the next petal. Rep Side 1, Tip and Side 2 for the remaining 5 petals. After the final sc of the last petal, join with a sl st to the first sc.
On side 1 the dc land in sts 3, 5, 7, 9 and 11. On side 2 they land in sts 2, 4, 6, 8 and 10. Counted from the base, those are the same positions, so the lattice is mirror-symmetrical.
Stitch count per petal: 2 sc, 10 dc and 4 tr; 10 ch-1 sps, 2 ch-2 sps and 1 ch-3 tip sp.
Per side: 1 sc, 5 dc and 2 tr; 5 ch-1 sps and 1 ch-2 sp.
Round total: 12 sc, 60 dc and 24 tr; 60 ch-1 sps, 12 ch-2 sps and 6 ch-3 sps.
Checkpoint: 5.25 in (13.3 cm) tip to tip.
Border (Rnd 5: Picot Edging)
On this single motif, the border is the final edging round. It adds a solid sc rim, tiny picot spikes along both sides of each petal and a ball picot knob at every point.
Border gauge: About 7.5 sc per 1 in (2.5 cm) along the petal edge. Each petal side is about 2.25 in (5.7 cm) long and holds 17 sc.
Ch 1, sc in the same st as the join.
Side 1: 2 sc in the ch-2 sp, (sc in next dc, picot, sc in next ch-1 sp) 5 times, sc in each of the next 2 tr.
Tip: (2 sc, ball picot, 2 sc) in the ch-3 tip sp.
Side 2: Sc in each of the next 2 tr, (sc in next ch-1 sp, sc in next dc, picot) 5 times, 2 sc in the ch-2 sp, sc in the last sc of the petal.
Sc in the first sc of the next petal. Rep Side 1, Tip and Side 2 for the remaining 5 petals. Join with a sl st to the first sc. Fasten off, leaving a 6 in (15.2 cm) tail.
Per side count: 1 sc (base), 2 sc (ch-2 sp), 10 sc (5 dc and 5 ch-1 sps), 2 sc (tr) and 2 sc (half of the tip) make 17 sc and 5 picots.
Per petal: 34 sc, 10 picots and 1 ball picot.
Round total: 204 sc, 60 picots and 6 ball picots.
Why the math works: Every stitch and every ch-1 space of Rnd 4 gets exactly one sc. Each ch-2 sp gets two and each tip sp gets four. That keeps the edging flat, with no ruffling or cupping. Side 1 has 1 + 2 + 10 + 2 = 15 sc before the tip, and side 2 has 2 + 10 + 2 + 1 = 15 sc after it. The tip splits its 4 sc evenly between the two sides, giving 17 sc per side. The picots sit on top of the dc on both sides, so they line up as mirrored pairs across every petal.
Checkpoint: 6 in (15.2 cm) tip to tip after blocking.
Optional Hanging Loop
Join the thread with a sl st at the top of any ball picot. Ch 20, then sl st in the same place. Fasten off and weave in the ends. The loop measures about 2 in (5.1 cm) long.
Final Blocking
- Weave in all ends along the back of the sc rim, then trim them.
- Soak the motif in cool water for 5 minutes. Press the water out in a towel; don’t wring it.
- If you are stiffening it, dip the motif in fabric stiffener or a strong starch solution and blot off the excess.
- Lay the motif face up on the mat. Pin the center first so the hole stays round.
- Pin each of the six ball picots out to 3 in (7.6 cm) from the center, so opposite tips sit 6 in (15.2 cm) apart and the tips are 60 degrees apart.
- Pin each teardrop window open with one pin at its widest point.
- Gently pull each picot outward so it stands out as a spike.
- Let the motif dry completely, for at least 12 hours, before unpinning it.
Final Quality-Control Checklist
- The center hole is open and round, about 0.25 in (0.6 cm) across.
- There are six petals, evenly spaced and all the same length.
- Each teardrop window is open and untwisted.
- Each petal has 5 picots per side, 10 in total.
- Each petal tip ends in one ball picot.
- The motif measures 6 in (15.2 cm) tip to tip.
- The piece lies flat with no cupping or ruffling.
- All ends are woven in and invisible from the front.
Troubleshooting
The motif cups like a bowl: The Rnd 2 loops are too short or tight. Chain more loosely, or go up a hook size.
The edges ruffle: You added extra stitches in Rnd 5. Recount: there should be 17 sc per side and 34 per petal.
A teardrop looks twisted: A ch-16 loop flipped before you anchored it. Undo it and re-chain, keeping the front of the chain facing you.
The petals are uneven lengths: Recount Rnd 3. Each loop must hold exactly 24 sts plus the ch-2 tip.
A ball picot looks flat: Pull the last yarn over firmly to close the cluster, and push it forward with a fingertip while the motif is damp.
The picots lean sideways: Pin each one straight out during blocking.
The center hole is too big: Pull the magic ring tighter before joining Rnd 1, then secure the beginning tail with a few stitches on the back.
The petals touch at the base: This is expected. Rnd 4 works sc directly from one petal to the next.
Care
Hand wash in cool water with mild soap, press dry in a towel and re-block flat. Re-starch stiffened ornaments after washing.
Final Notes
The measurement chain is short and easy to check:
- Rnd 1 is 0.75 in (1.9 cm) across.
- After Rnd 3 the motif is 4 in (10.2 cm) tip to tip.
- After Rnd 4 it is 5.25 in (13.3 cm).
- The picot border adds about 0.375 in (1.0 cm) on each side, for a blocked size of 6 in (15.2 cm).
Keep the counts steady: 18 dc in the center, 6 loops, 24 sts per petal outline, 16 sts per petal lattice and 17 sc per petal side in the edging. If you hit those numbers, every Frost Lily Snowflake you make will match.
Happy crocheting!